Bissell TURBOCLEAN POWERBRUSH Manual
Hide thumbs Also See for TURBOCLEAN POWERBRUSH:

Advertisement

TURBOCLEAN
POWERBRUSH
MODEL 2889F
What's in the Box? .........................................................3
Assembly ..............................................................................3
Cleaning Formulas .........................................................4
Filling the Clean Water Tank....................................5
Cleaning Your Carpet ...................................................6
Emptying the Dirty Water Tank ............................ 7
After-Cleaning Care ......................................................8
Replacing the Belt & Brush Roll ............................9
Storing Your Machine ...................................................9
Troubleshooting .............................................................10
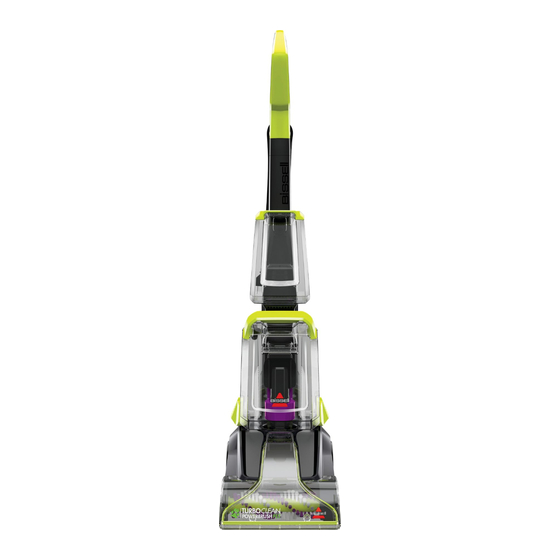
Product Overview
1. Upper Handle
2. Spray Trigger
3. Middle Handle
4. Clean Water Tank
5. Dirty Water Tank Handle
6. Dirty Water Tank
7. Lower Body
8. Nozzle
This guide has everything you need to get ready for first use,
including setting up, using and maintaining your machine,
but online you'll find additional resources like tips and
troubleshooting, parts, and more. Go to BISSELL.com.
1
2
3
4
5
6
7
8

Advertisement

Table of Contents
loading

Summary of Contents for Bissell TURBOCLEAN POWERBRUSH

  • Page 1: Table Of Contents

    5. Dirty Water Tank Handle This guide has everything you need to get ready for first use, including setting up, using and maintaining your machine, but online you’ll find additional resources like tips and troubleshooting, parts, and more. Go to BISSELL.com.
  • Page 2 » If your appliance has a motorised Brush Roll, do not leave machine running in the same spot without the handle fully upright. » To reduce the risk of a leaking condition, do not store machine where freezing may occur. Damage to internal components may result. » Plastic tanks are not dishwasher safe. Do not put tanks in dishwasher. 2 BISSELL.com...
  • Page 3: What's In The Box

    Slide Middle Handle onto Slide Upper Handle into Place Clean Water Tank on Lower Body until it “clicks” into Middle Handle until it “clicks” handle and push down until it place. into place. “clicks” into place. Wrap up power cable. BISSELL.com 3...
  • Page 4: Cleaning Formulas

    WARNING To reduce the risk of fi re and electric shock due to internal component damage, use only BISSELL formula intended for use with this machine. Use of cleaning formulas that contain eucalyptus, lemon or pine oil may damage this appliance and void the guarantee.
  • Page 5: Filling The Clean Water Tank

    MAX) tap water to the WATER away from the machine. line. Do not use boiling water. Do not heat water and/or tank in the microwave. Add BISSELL formula to the Replace and tighten the Replace the tank on the FORMULA line. cap.
  • Page 6: Cleaning Your Carpet

    • If cleaning an entire room, consider moving your furniture to another area. • Vacuum to remove loose dirt and impediments before cleaning. • Pretreat stains with BISSELL® Pretreat to improve carpet cleaning. Plug into a proper outlet. Turn the machine ON by Step on the recline pedal pressing the power switch.
  • Page 7: Emptying The Dirty Water Tank

    To empty, pour out dirty To continue cleaning, align tank. water using opening at back of the bottom of the tank to the tank. Rinse the tank thoroughly. base and secure into place Reinsert tab into tank. with latches. BISSELL.com 7...
  • Page 8: After-Cleaning Care

    Return Dirty Water Tank to the machine and try cleaning again. WARNING To reduce the risk of fi re, electric shock or injury, turn power OFF and disconnect plug from electrical outlet before performing maintenance or troubleshooting. 8 BISSELL.com...
  • Page 9: Replacing The Belt & Brush Roll

    NOTICE: To reduce the risk of a leaking condition, do not store machine where freezing may occur. Damage to internal components may result. WARNING To reduce the risk of fire, electric shock or injury, turn power OFF and disconnect plug from electrical outlet before performing maintenance or troubleshooting. BISSELL.com 9...
  • Page 10: Troubleshooting

    Nothing in this guarantee global.BISSELL.com/privacy-policy. excludes, limits or modifies any liability of BISSELL which is imposed by law, or limits or BISSELL® Two Year Guarantee modifies any remedy available to the consumer which is granted by law. To make a claim under...
  • Page 12 ©2020 BISSELL Inc. All rights reserved. Part Number 1621790 05/20 RevA...

This manual is also suitable for:

2889f

Table of Contents