Advertisement
Available languages
Available languages
INSTRUCTION
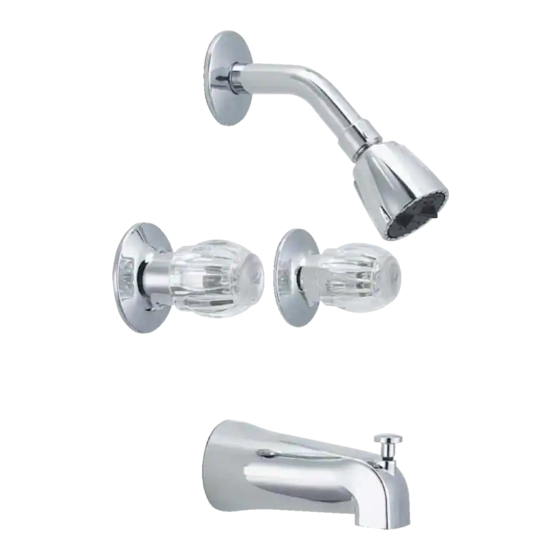
TWO HANDLE TUB & SHOWER FAUCET
01# index H
12# washer
02# screw
13# diverter
14# o-ring
03# handle
15# adaptor
04# flange
16# coupling nut
05# shank
17# index C
06# nut
18# shower flange
07# washer
19# shower arm
08# bonnet
20# shower
09# stem
10# disc
21# spout
22# washer
11# screw
Preparation / Assembly
Fig .1
Fig .2
Tools:
Require:
Adjustable wrench
Groove joint plier
Pipe wrench
Pipe tape
Phillips screwdriver
Helpful:
Supply lines
Basin wrench
Hacksaw
Pipe wrench
Tube cutter
Utility knife
18
19
22
20
12
11
10
9
8
7
6
5
4
3
2
1
17
21
Shut off main water supply. Install rigid casting to 1/2" water lines.
1
Tailpieces on casting are threaded for 1/2" threaded pipe and will
accept 1/2" sweat copper.
For tub installation only, plug top outlet. For shower installation
2
only,plug bottom outlet.(see Fig. 2)
Fig .3
1-3/8" ~ 2"
Fig .4
UP
(Shower)
13
14
15
16
Fig .5
Fig .6
Fig .7
1A
Recommended component locations: (see Fig. 3)
3
The dimension for valve centerline to finished wall is 1-7/8" MIN
to 2-7/8" MAX.Recommended 2-3/8"
1A. Shower and / or spout outlet hole: 1-1/4" diameter.
1B
1B. Cut or leave a 1-3/8" to 2" diameter hole(Recommended 1-3/4")
for the cold water inlet side(the right side) and for the hot water
inlet side (the left side).
The center to center distance between the cold water inlet and
hot is 8". (see Fig. 4)
1A
CAUTION: Allow at least 2" between tub outlet and tub rim.
1-3/8" ~ 2"
4
A . Position valve body correctly in wall (see Fig. 5). UP marking is
on up side and DOWN marking on down side.
8"
B . Connect water supply through coupling nut to valve assemblies.
C . Turn on hot and cold water supply lines.
D . Rotate connect2(13#) to allow water to flow from tub spout until
there is no foreign matter in discharge.
Note: H - hot water supply C - cold water supply
Up - shower outlet
C
Pressure testing
5
DOWN
(Spout)
A . Install a 1/2" iron pipe plug (not included) on both shower and
H
tub outlets. Turn connect2(13#) to full " ON " and check all
connections for leaks.
B. Turn connect2(13#) to " OFF " .
CAUTION: Do not turn water off and on repeatedly during initial
period.
A . Caution: Slowly remove pipe plugs from shower and tub outlets.
6
B . After wall treatment. Slide flanges (16#) onto valves and back
against finished wall .
C . Install the handle assembly(17#) (see Fig. 6 ).
A . For tub and shower combined installation,connect bottom outlet
7
to spout,connect top outlet to shower arm with proper fittings.
(see Fig. 7).
Down - tub outlet
Advertisement
Table of Contents

Related Manuals for PEERLESS PlumbShop 063-3806-6


Summary of Contents for PEERLESS PlumbShop 063-3806-6
- Page 1 INSTRUCTION TWO HANDLE TUB & SHOWER FAUCET Tools: Recommended component locations: (see Fig. 3) Require: The dimension for valve centerline to finished wall is 1-7/8" MIN Adjustable wrench to 2-7/8" MAX.Recommended 2-3/8" Groove joint plier Pipe wrench 1A. Shower and / or spout outlet hole: 1-1/4" diameter. Pipe tape Phillips screwdriver 1B.
- Page 2 INSTRUCTIONS ROBINET DE BAIGNOIRE ET DE DOUCHE À DEUX POIGNÉES Outils : Emplacement recommandé des composants (voir la Fig. 3) Requis : La distance de la ligne centrale de la soupape jusqu'au mur fini est de Clé à molette 47 mm (1-7/8 po) MIN à 73 (2-7/8 po) MAX. La distance recommandée est Pinces multiprises de 60 mm (2-3/8 po).
Need help?
Do you have a question about the PlumbShop 063-3806-6 and is the answer not in the manual?
Questions and answers