Table of Contents
Advertisement
Advertisement
Table of Contents

Subscribe to Our Youtube Channel
Related Manuals for XSONIC XTONE Pro


Summary of Contents for XSONIC XTONE Pro
- Page 1 XTONE Pro User Manual XSONIC RELOAD YOUR TONE...
- Page 2 Visit www.xsonicaudio.com to view the online manual...
- Page 3 Contents Quick Start ..................1 Function Description ................2 Connection Example ................. 6 Install Driver ..........Erreur ! Signet non défini. Hardware Monitor ................11 Phantom Power ................11 Compatible Device................11 Commonly Used Software .............. 12 Software Settings ................12 MIDI Control ..................
- Page 4 XTONE Pro is a professional and multi-purpose smart audio interface for guitar, bass and vocals. Like XTONE, XTONE Pro is designed for the software effects, and has an ultra-high sampling rate of 192KHz. For a better experience with software effects, Pro is optimized for latency and dynamic range compared to traditional audio interfaces.
- Page 5 Function Description...
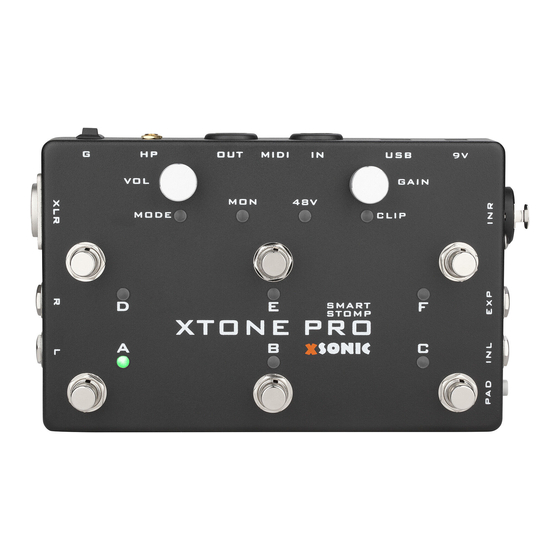
- Page 6 ① Smart foot switches: 6 MIDI foot switches with LED indicator A, B, C, D, E, F; When the foot switch is pressed, the corresponding LED lights up and Pro sends MIDI commands outward. You can specify any features that you want to control via MIDI in software effects. For more details, please refer to the MIDI chapter below.
- Page 8 ① Guitar and line input: Specialized input interface for guitar, bass, it is left channel. The interface does not pass any preamp, ensuring pure clear sound. This also means that the interface can be used for line input. ② Expression pedal input: This interface can be connected to the expression pedal using the TRS cable. You can specify any desired expression control in software effects.
- Page 9 Connection Example...
- Page 10 Windows PC need to install the driver for XTONE&XTONE Duo, please visit www.xsonicaudio/pages/support to download the driver. Step 1. Install the” XSONIC XTONE Original driver”, after the installation, connect your XTONE Series product to your computer, and if you see this, just ignore all the remain part of this document and ENJOY :...
- Page 11 Step 2. Install the XTONE-Driver(old).exe (XMOS Driver) in the pack. Step 3. Make sure you have plugged your XTONE Series product to you computer. Then open this in the DFU folder of the pack.
- Page 12 The current firmware should be 1.08 or 1.09,and the upgrade windows should show “Device opened.” .Click “Browse”, and load “xtone-update-1.1.0.bin” from the pack, then click Start. The upgrade process should be finished in a few seconds.If it Step 4 shows “upgrade finished successfully, click “exit”. If the process is stuck, re-plug XTONE and repeat this step.
- Page 13 Step 5. If the new driver panel shows as the picture below, ENJOY! You can set the sample rate as high as you want ,and the buffer size (lower means lower latency) even can be set to 8 samples if your computer can handle. Now enjoy the low latency on Windows! If you prefer a more steady audio behavior than the extreme low latency, please drag the safe mode.
- Page 14 Phantom Power On the INR input of XTONE Pro, it has +48V phantom power. Long press the F foot switch to turn on/off, and use the 48V indicator to observe the current switch status. When using a condenser microphone, please turn on the phantom power. When using a dynamic microphone or other input, turn off the phantom power to reduce unwanted noise.
- Page 15 KPA, AXE etc. With XSPEED ultra-low latency technology, in fact, You already have a hi-end hardware effect. In addition, XTONE Pro can give you almost unlimited possibilities. With different software effects, you can create more ways to use it. You can use effects apps such as VocaLive to turn Pro into a vocal effects pedal.
- Page 16 ① Open BIAS FX, and enter the settings. ② Select the input channel. If Pro's INL input is connected, select channel 1; if Pro's INR input is connected, select channel 2. Then enable the ultra low latency and background audio mode. ③...
- Page 17 ④ The basic settings are complete. Read the MIDI chapters below for more MIDI setting details. Settings of BIAS FX on PC: ① Open BIAS FX, and enter the settings. ② Select active input channels. If Pro's INL input is connected, select XTONE1; if Pro's INR input is connected, select XTONE2. Then adjust the Audio Buffer...
- Page 18 Size to 64 samples and activate XTONE as MIDI Inputs. ③ Enable MIDI control. ④ The basic settings are complete. Read the MIDI chapters below for more MIDI setting details.
- Page 19 Settings of BIAS FX on Mac: ① Enter Preferences-Audio, choose XTONE as the input and output device, and adjust the I/O buffer size to the minimum. ② Tick XTONE in the Preferences-MIDI-Input. (If there is no input option in the MIDI field, please enter the advanced settings to enable the additional MIDI options) ③...
- Page 20 - red. Different MIDI command groups, 6 foot switches + 1 expression pedal can send 7 different MIDI commands, which means XTONE Pro can send 3 x 7 = 21 different MIDI commands, control 21 different parameters in the software.
- Page 21 MIDI Command Mode XTONE Pro has 3 MIDI command modes, press A+B switch to mode 1, press A+C to mode 2, press B+C to mode 3. When the switch is successful, mode 1 blinking green, mode 2 blinking blue, mode 3 blinking red.
- Page 22 XTONE / XTONE Pro. Mismatched polarity may result in damage to the XTONE / XTONE Pro. We recommend ZOOM FP02M as the expression pedal of XTONE/XTONE Pro. Also,the expression pedal with polarity switch such as Nektar NX-P works, too.
- Page 23 MIDI PC Control Commands XTONE can switch to the MIDI PC (Program Change) control commands. If you don’t need MIDI PC to control your effects, please ignore this part. When your product is not powered on (not connected to any device or external power), press and hold the Footswitch A and then power on (connect to the device) to turn on the XTONE MIDI PC command mode.
- Page 24 ② Click Preset, then click Preset +. ③ Click MIDI Learn, the“Waiting for MIDI CC” appears on the screen. Press the foot switch on XTONE Pro that you want to use to switch presets. Then MIDI function is successfully specified. Go back to the main page and you can press the foot switch to switch presets.
- Page 25 Example 2 - Toggle Pedal ① Use Pro’s foot switch to toggle a stomp box. Enter main page of BIAS FX, select the pedal that you want to control. ② Long press the indicator position of the pedal to open the MIDI specification.
- Page 26 ③ Click to start MIDI Learn. “Waiting for MIDI CC” appears on the screen. Press the foot switch on Pro that you want to use to toggle this pedal. Then MIDI function is successfully specified. Example 3 - Control Wah Pedal ①...
- Page 27 ② Long press the position of the pedal to open the MIDI specification. ③ Click to start MIDI Learn, the“Waiting for MIDI CC” appears on the screen. Press the expression pedal, then MIDI function is successfully specified.
- Page 28 MIDI Specification of BIAS FX on PC: Example 1 - Switch Presets The MIDI specification settings of switching presets for PC is the same as iOS. Please refer to the previous explanation. Example 2 - Toggle Pedal ① Use Pro’s foot switch to toggle a stomp box. Enter the main page of BIAS FX, Right click on the pedal that you want to control.
- Page 29 ② Then click MIDI/Automation to open MIDI specification. ③ Click “MIDI Learn” at TOGGLE to start MIDI specification. the“Waiting for MIDI CC” appears on the screen. Press the foot switch on XTONE Pro that you want to use to toggle this pedal. Then MIDI function is successfully specified.
- Page 30 ① Use the expression pedal to control the wah. Connect the expression pedal to Pro, enter the BIAS FX main page, open the wah pedal, and right click on it. ② Then click MIDI/Automation to open MIDI specification. ③ Click “MIDI LEARN” at WAH to start MIDI specification, Waiting for MIDI CC appears on the screen. Press the expression pedal, then MIDI function is successfully specified.
- Page 31 MIDI Specification of BIAS FX on Mac: ① Create a new software instrument track and chose BIAS FX2 in AU MIDI-controlled effects. Set as shown below, then click “Create”. ② Open BIAS FX2 plugin.
- Page 32 Click on the “Side Chain” column in the upper right corner and tick the input you want to set. ③ At this time, audio signal output is enabled, and BIAS FX2 now can be controlled through MIDI. Use MIDI Learn to set the pedals. The method is not repeated here.
- Page 33 ⑤ Turn on the record enable button and the input monitoring button. All the settings are completed.
- Page 34 Parameters Input impedance: 1M ohms (INL); 100K ohms (INR) Preamp gain range: 4 ~ 50dB Unbalanced output impedance: 100 ohms Balanced output impedance: 200 ohms Frequency response: 10Hz ~ 21kHz Sampling rate: 44.1k,48k,88.2k,96k,176.4k,192kHz Sampling depth: 24bit Dynamic Range: 114dB THD+N: 0.001% USB power input: 5V Auxiliary power input: 9V DC...
- Page 36 XSONIC RELOAD YOUR TONE...
Need help?
Do you have a question about the XTONE Pro and is the answer not in the manual?
Questions and answers