Advertisement
Advertisement
Table of Contents

Subscribe to Our Youtube Channel
Related Manuals for XSONIC XTONE


Summary of Contents for XSONIC XTONE
- Page 1 XTONE User Manual XSONIC RELOAD YOUR TONE...
- Page 2 Visit www.xsonic.cc to view the online manual...
-
Page 3: Table Of Contents
Function Description ..............2 Connection Example ..............7 Install Driver ................. 8 Compatible Device..............11 Commonly Used Software ............12 Software Settings ............... 13 MIDI Control ................16 MIDI Specification ............... 18 XTONE Duo Instructions ............. 25 Parameters ................. 27... -
Page 4: Quick Start
XTONE is a high-performance audio interface, but we prefer to call it smart stomp. XTONE offers 192KHZ sampling rate for ultra HD audio. It also has foot switch and expression pedal. You can switch the presets, control the wah-wah and so You can use XTONE to replace the traditional digital effects, The APP of running on the smart device has more top tones and more powerful additional features. -
Page 5: Function Description
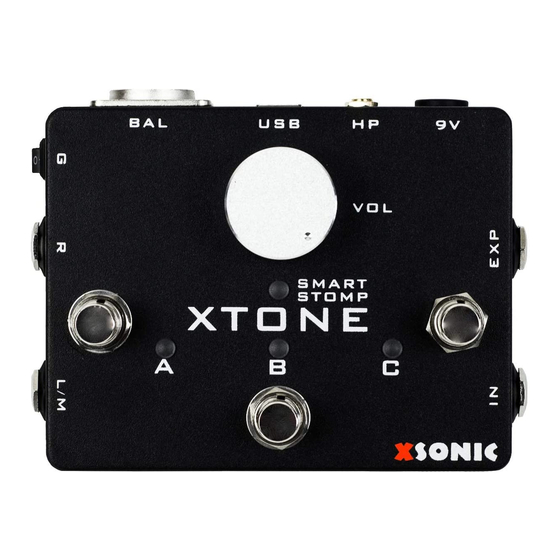
Function Description... - Page 6 ④ Headphone output: Used to connect headphones, support low and high impedance headphones. ⑤ USB interface: Used to connect iPhone, iPad, PC, Mac. XTONE can be powered directly by these devices. Use the USB cable to connect to your PC or Mac;...
- Page 8 ⑤ Headphone output: Used to connect headphones, support low and high impedance headphones. ⑥ USB interface: Used to connect iPhone, iPad, PC, Mac. XTONE Duo can be powered directly by these devices. Use the USB cable to connect to your PC or Mac;...
- Page 9 Footswitch: When the foot switch is pressed, the corresponding LED lights up and XTONE sends MIDI commands outward. You can specify any features ⑬ that you want to control via MIDI in software effects. For more details, please refer to the MIDI chapter below.
-
Page 10: Connection Example
Connection Example... -
Page 11: Install Driver
There are two installation files in the driver package. "XTONE-Driver.exe" and "ASIO4ALL.exe", all must be installed. Must use ASIO4ALL as the main driver, and activate the XMOS USB Audio device in its control panel. - Page 12 ③ Set the contents of both Input and Output to ASIO4ALL and remember the current sample rate. ④ Click the triangle icon that appears in the lower right corner of the screen to open the ASIO4ALL control panel and activate the device named "XMOS USB Audio".
- Page 13 ⑥ After the above settings are successful, XTONE(Duo) can be used normally under Windows.
-
Page 14: Compatible Device
Compatible Device iOS device All iPhone/iPad/iPod that has Lightning and USB-TypeC interface Windows device Windows 7, 8, 8.1, 10 Mac device OS X 10.6 and above Android device Not supported... -
Page 15: Commonly Used Software
Commonly Used Software XTONE(Duo) can connect all kinds of effect APP on the smart device. They have more top tones and richer features, give you more creative inspiration and the desire to play. Software Used For BIAS FX Guitar/Bass JamUp... -
Page 16: Software Settings
① Open BIAS FX, and enter the settings. ② Select the input channel. If XTONE(Duo)'s INL input is connected, select channel 1; if XTONE(Duo)'s INR input is connected, select channel 2. Then enable the ultra low latency and background audio mode. - Page 17 ③ Enter MIDI settings, and enable MIDI control. ④ The basic settings are complete. Read the MIDI chapters below for more MIDI setting details. Settings of BIAS FX on PC: ① Open BIAS FX, and enter the settings.
- Page 18 ② Select active input channels. If XTONE(Duo)'s INL input is connected, select XTONE1; if XTONE(Duo)'s INR input is connected, select XTONE2. Then adjust the Audio Buffer Size to 64 samples and activate XTONE as MIDI Inputs. ③ Enable MIDI control.
-
Page 19: Midi Control
- red. Different MIDI command groups, 3 foot switches + 1 expression pedal can send 4 different MIDI commands, which means XTONE Pro can send 3 x 4 = 12 different MIDI commands, control 12 different parameters in the software. - Page 20 MIDI Command Mode XTONE(Duo) has 3 MIDI command modes, press A+B switch to mode 1, press A+C to mode 2, press B+C to mode 3. When the switch is successful, mode 1 blinking green, mode 2 blinking blue, mode 3 blinking red.
-
Page 21: Midi Specification
MIDI Specification Most of the APP has a MIDI control function. To make the foot switch and expression pedal control the APP, you need to specify their functions in the APP’s MIDI control function list. Take BIAS FX as an example to explain how to specify MIDI function, and other software effects refer to this please. MIDI Specification of BIAS FX on iOS: Example 1 - Switch Presets ①... - Page 22 ③ Click MIDI Learn, the“Waiting for MIDI CC” appears on the screen. Press the foot switch on XTONE(Duo) that you want to use to switch presets. Then MIDI function is successfully specified. Go back to the main page and you can press the foot switch to switch presets.
- Page 23 ② Long press the indicator position of the pedal to open the MIDI specification. ③ Click to start MIDI Learn. “Waiting for MIDI CC” appears on the screen. Press the foot switch on XTONE(Duo) that you want to use to toggle this pedal. Then...
- Page 24 Example 3 - Control Wah Pedal ① Use the expression pedal to control the wah. Connect the expression pedal to XTONE, enter the BIAS FX main page, open and select the wah pedal. ② Long press the position of the pedal to open the MIDI specification.
- Page 25 ③ Click to start MIDI Learn, the“Waiting for MIDI CC” appears on the screen. Press the expression pedal, then MIDI function is successfully specified. MIDI Specification of BIAS FX on PC: Example 1 - Switch Presets...
- Page 26 The MIDI specification settings of switching presets for PC is the same as iOS. Please refer to the previous explanation. Example 2 - Toggle Pedal ① Use XTONE(Duo)’s foot switch to toggle a stomp box. Enter the main page of BIAS FX, Right click on the pedal that you want to control. Then click MIDI/Automation to open MIDI specification.
- Page 27 Example 3 - Control Wah Pedal ① Use the expression pedal to control the wah. Connect the expression pedal to XTONE, enter the BIAS FX main page, open the wah pedal, and right click on ② Then click MIDI/Automation to open MIDI specification.
-
Page 28: Xtone Duo Instructions
XTONE Duo Instructions The function and performance of XTONE Duo are the same as XTONE, so most of the methods of use can refer to XTONE. The only difference between it and XTONE is that it replaces the original expression pedal interface with the microphone input interface. - Page 29 Phantom Power: The microphone input channel has phantom power output, that means you can use the condenser mic. Long press button A for 5 seconds will toggle the power. Four LED lights green means turn on the power; Four LED lights red means turn off the power; Default is turn off.
-
Page 30: Parameters
Parameters XTONE XTONE Duo Input impedance:1M ohms Input impedance:1M ohms(INL) ; 100K ohms(INR) Unbalanced output impedance:100 ohms Unbalanced output impedance:100 ohms Balanced output impedance:200 ohms Balanced output impedance:200 ohms Frequency response:10Hz ~ 21kHz Frequency response:10Hz ~ 21kHz Sampling Rate:44.1k, 48k, 88.2k, 96k, 176.4k, 192kHz Sampling Rate:44.1k, 48k, 88.2k, 96k, 176.4k, 192kHz... - Page 31 XSONIC RELOAD YOUR TONE...
Need help?
Do you have a question about the XTONE and is the answer not in the manual?
Questions and answers