Table of Contents
Advertisement
Quick Links
Advertisement
Table of Contents

Subscribe to Our Youtube Channel
Related Manuals for Analytic Jena InnuPure C16


Summary of Contents for Analytic Jena InnuPure C16
- Page 1 InnuPure C16 Extraction system Operating manual...
- Page 2 Manufacturer CyBio AG Goeschwitzer Strasse 07745 Jena Germany Phone: Hotline: + 49 (0) 3641 / 351-0 351-409 Fax: + 49 (0) 3641 / Email: info@analytik-jena.de Service: Analytik Jena AG Life Science Konrad-Zuse-Str. 1 07745 Jena Germany Phone: Hotline: + 49 (0) 3641 / 77-94 11 77-76 77 76 Fax: + 49 (0) 3641 /...
-
Page 3: Table Of Contents
Operation ........................25 Preparation of the buffers and solutions............25 Preparing the sample trays and inserting them into the InnuPure C16 .... 25 Operating InnuPure C16 with HID-Pro 320 ............29 6.3.1 Overview of the InnuPure C16 program ............29... - Page 4 Fault removal ......................48 Error messages ....................48 General information and tips for preventing problems ........49 Maintenance and care ....................51 Cleaning the InnuPure C16 ................51 Changing fuses ....................52 Software update....................53 Transport and storage ....................54 Transport ......................
- Page 5 Figures Figures Figure 1 Safety symbols at the front and rear of the InnuPure C16 ........10 Figure 2 Front view of the InnuPure C16 ................16 Figure 3 Rear connections and switches at the InnuPure C16 .......... 16 Figure 4 Device view with open front door .................
- Page 6 Figures Edition 06/2015 InnuPure C16...
-
Page 7: Basic Information
The InnuPure C16 is intended for operation by qualified specialist personnel observing this user manual. The user manual informs about the design and operation of the InnuPure C16 and provides the personnel familiar with the isolation and purification of nucleic acid with the necessary know-how for the safe handling of the equipment and its components. -
Page 8: Warranty And Liability
Basic information to operate this device in an explosive environment. to use consumables that are not recommended for the InnuPure C16 and the cor- responding kits. to use overfilled consumables. The operator is responsible for the use of the equipment as intended. -
Page 9: Technical Data
4 reagent strips strips (optional) Barcode scanner reading the sample names from barcode labels Other technical data Weight approx. 35 kg Dimensions 380 mm x 435 mm x 530 mm (W x H x D) InnuPure C16 Edition 06/2015... - Page 10 BMPT Vfg. 243/1991 and EN 55022 Class A (electromagnetic compatibility) Environmental conditions Temperature during 5 – 35 °C operation Humidity during op- max. 80% at +30 °C eration Temperature during -10 – 55 °C storage Humidity during stor- max. 80% (use desiccant) Edition 06/2015 InnuPure C16...
-
Page 11: Safety Instructions
Safety instructions General notes For your own safety and to ensure error-free and safe operation of the InnuPure C16, please read this chapter carefully before using the appliance. Comply with all safety instructions contained in this user manual and pay careful attention to all messages and notes which are displayed on the screen by the program. -
Page 12: Safety Markings On The Innupure C16
Safety instructions Safety markings on the InnuPure C16 Safety and notice symbols have been attached to the InnuPure C16 whose content must always be observed. Damaged or missing safety and notice symbols can cause incorrect actions leading to per- sonal injury or material damage! The symbol labels must not be removed! Damaged symbol... -
Page 13: Technical Condition
Safety instructions Technical condition The InnuPure C16 corresponds in its design and construction with the current state-of-the-art technology. Unauthorized modifications or changes, especially such that affect the safety of staff and the environment, are not allowed. Observe the following notes: ... -
Page 14: Safety Instructions - Operation
Observe the following notes: The operator of the InnuPure C16 must make sure before each commissioning that the condition of the device including the safety equipment is sound. This applies in particular after each modification or extension of the device or its repair. -
Page 15: Chemical Resistance Of The Device
If there is no immediate danger of injury, immediately switch the device switch of the InnuPure C16 to the "0" position during dangerous situations or accidents when possible and/or disconnect the mains plugs from the mains outlets! A rapid response can save lives during an emergency, therefore the following has to be en- sured: ... -
Page 16: Standards And Directives
References to potential dangers do not replace the work protection regulations which must be observed. Edition 06/2015 InnuPure C16... -
Page 17: Technical Description
Technical description Basic system design The InnuPure C16 is a flexible and efficient extraction system for the fully automated isola- tion and purification of nucleic acid. The system, developed and produced in Germany, has been designed for low sample throughput. A large selection of different source materials can be used. -
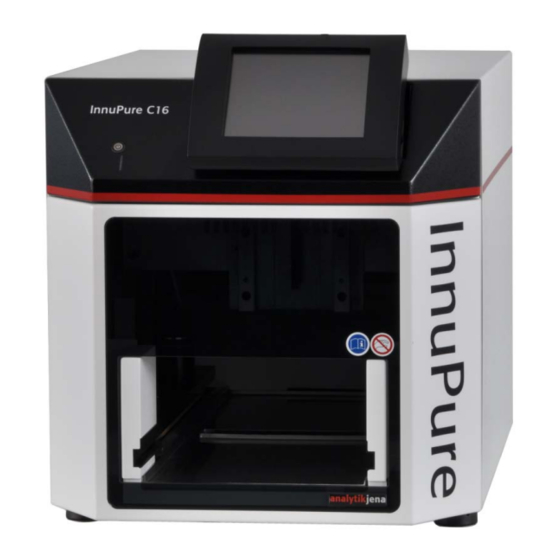
Page 18: Figure 2 Front View Of The Innupure C16
Figure 2 Front view of the InnuPure C16 Mains switch RS 232 interface Fuse holder Bridging switch of the touch sensor (standby switch) Mains connection Type plate Figure 3 Rear connections and switches at the InnuPure C16 Edition 06/2015 InnuPure C16... -
Page 19: Figure 4 Device View With Open Front Door
The loaded sample tray is inserted into the adapter in the front door (3 in Figure 2, p. 16) and then automatically pulled into the correct position in the InnuPure C16. Filter tips Elution vessels for purified... -
Page 20: Figure 6 Priming Station And Optionally Available Perforation Tool
Technical description Figure 6 Priming station and optionally available piercing tool The InnuPure C16 uses the flexible and portable control unit HID-Pro 320 with the large 5.7‘‘ touchscreen. The integrated computer based on Windows CE enables the use of typical Windows functions with a clearly structured menu interface. -
Page 21: Principle Of Operation
After an extraction protocol has started, the InnuPure C16 takes the tips provided from the corresponding row in the tip block of the sample tray. - Page 22 The removal of ethanol residue at the mag- netic particles and within the samples takes place via a drying step. In this step, a heating is activated in the cavity floor, causing the ethanol residue to evaporate. Edition 06/2015 InnuPure C16...
- Page 23 Note: Filling levels and filling colors are only shown for illustration and do not match the actual filling levels and colors of the kit reagents. InnuPure C16 Edition 06/2015...
-
Page 24: First Commissioning
+35 °C Max. humidity: 80% at 30 °C The following requirements are placed on the location of the InnuPure C16: Do not locate the device directly near a door or window. Place the device on a stable surface. -
Page 25: Energy Supply
Take the InnuPure C16 out of its packaging. Check the device for completeness and soundness. Insert the control unit HID-Pro 320 into the interface on the front of the InnuPure C16 (1 in Figure 2 p. 16) Connect the mains cable at the rear. -
Page 26: Switching Off The Innupure C16
InnuPure C16 off from the mains switch at the equipment backplate. Alternatively, you can put the InnuPure C16 into sleep mode. To do so, touch the touch sen- sor for approx. 3 s until the status indication currently flashing green/red changes to red only and the indication at the control unit HID-Pro 320 goes out. -
Page 27: Operation
It is recommended to preheat the thermal mixer for some steps of the lysis in ac- cordance with the kit manual. Preparing the sample tray and inserting it into the InnuPure C16 CAUTION! Nickel allergy! The sample tray is coated with nickel. - Page 28 "AJ" must point to the engraved numbers on the sample tray. Fold down the holding-down clamps to prevent the plates and strips being pulled out of the holder during the ex- traction process. Edition 06/2015 InnuPure C16...
- Page 29 Continue preparing the reagent strips and plates in accordance with the kit descrip- tions. 10. Switch on the InnuPure C16 and wait for device initialization to be completed, which is signaled by a beeping sound. InnuPure C16...
- Page 30 The sample tray is then automati- cally moved to the removal position. 14. Remove the sample tray from the adapter of the InnuPure C16 and move it back into the priming station.
-
Page 31: Operating Innupure C16 With Hid-Pro 320
Operation Operating InnuPure C16 with HID-Pro 320 Device control is via the control unit HID-Pro 320. After switching on the InnuPure C16 a device initialization lasting approx. 30 s is automatically performed, during which testing of various device functions and moving the electro-mechanical drives into their start positions takes place. -
Page 32: Starting And Executing An Extraction Protocol
Hidden behind the clock symbol (2) in top right corner there is a window for configuring the date and time of the InnuPure C16 program (see chapter "Configuring the time" p. 47). Using the [S ] (3) button you can select an installed extraction protocol and ELECT PROTOCOL start it (see chapter "Starting and executing an extraction protocol"... - Page 33 In this case, the protocol is started immediately. If the tool is used, the actual extraction run only starts after this tool has been ex- ited again. Note A detailed explanation of the sample setup tool InnuPure C16 Edition 06/2015...
- Page 34 If not, a prompt appears to insert the sample tray now. In this case, insert the tray as described in the chapter "Preparing the sample trays and inserting them into the InnuPure C16" p. 25 and then confirm the message with [O ]. Se- lect [C...
- Page 35 The sample tray is then au- tomatically moved to the removal position. CAUTION! Risk of burns! Do not reach into the device interior after aborting the extraction protocol. The magnetic strip may be up to 80°C hot! InnuPure C16 Edition 06/2015...
-
Page 36: Copying, Moving Or Deleting Extraction Protocols
Administrator rights are required for moving, deleting or copying extraction protocols! Extraction protocols have already been pre-installed on the InnuPure C16. It might, however, be necessary to install protocols for a new reagent kit and to delete unnecessary protocols or move them temporarily to external data carriers. - Page 37 [S ] button be- TART comes available again. The extrac- tion protocol can now be started. Note: Only remove the USB stick after the device has been switched off. Otherwise the USB stick may be damaged. InnuPure C16 Edition 06/2015...
-
Page 38: Checking And Executing Individual Device Functions With Tools
A sample tray must be in the device to execute the tools. If this is not the case when a tool is started, a prompt to insert a tray is automatically displayed, as already described in the chap- ter "Starting and executing an extraction protocol" p. 30. Edition 06/2015 InnuPure C16... -
Page 39: Using The Sample Setup Tool
The sample tray must be populated with corresponding strips and plates. Control of the heating function Initialization of the InnuPure C16 after protocol abortion or after an NITIALIZATION error... - Page 40 32 characters. A long sample name is displayed with 3 points at the end, but the complete name is saved. A barcode scanner can be used optionally for reading of sample names on barcoded sample labels. Edition 06/2015 InnuPure C16...
-
Page 41: Creating A Sample Setup Via An External Pc
For orientation purposes, it is first useful to copy any sample setup that already exists on the HID-Pro 320 to a USB stick and to edit it on the PC afterwards: Exit the start screen of the InnuPure C16 program. Press the [M ][E ] buttons one after the other and enter the password. -
Page 42: Figure 11 Empty Sample Setup In The Pc Program
ASTE After copying close the window with the [x] symbol. Switch the InnuPure C16 off and remove the USB stick. Editing the setup with a text editor (e.g., Notepad): Now connect the USB stick to a computer with a text editor installed. -
Page 43: Loading A Sample Setup Via The Hid-Pro 320
This also applies to setups which have been created using a laptop/PC and stored on the SD memory card of the HID-Pro 320 or a connected USB stick. ATTENTION! All setup entries that have not been previously saved are automatically lost when a sample setup is loaded! InnuPure C16 Edition 06/2015... -
Page 44: Recording, Downloading And Displaying Logfiles
USB stick: ] [E Exit the start screen of the InnuPure C16 program. Press the [M ] buttons one after the other and enter the password "ipex". Confirm the password and the next dialog with [OK]. -
Page 45: Figure 13 Example Logfile Of A Demo Protocol Run
Operation Figure 13 Example logfile of a demo protocol run The following data is stored in the logfile: Date of execution Logged-in user installed software version installed firmware version Protocol name InnuPure C16 Edition 06/2015... -
Page 46: Working With User Management
Create/delete/block users Control [L ] option OGIN AT START Exit control program of InnuPure C16 Load sample setups via the sample setup tool from SD card/USB Save sample setups via the sample setup tool (only pos- sible in folder defined on SD card) -
Page 47: Creating/Changing/Deleting A User Profile
Selection of the user level (U SER LEV- Note: By enabling the checkbox U SER IS BLOCKED administrator can block an "extended user" profile. Confirm the entries with [O ] and exit the next screen also with [O InnuPure C16 Edition 06/2015... -
Page 48: Switching User Login At Start On/Off
Operation Switching user login at start on/off The automatic user login at the start of the InnuPure C16 is a program default and can be switched on or off by users with administrator rights. Press the [M ] button in the top left corner of the start screen. -
Page 49: Configuring The Time
Operation 6.3.9 Configuring the time The date and time of the InnuPure C16 are configured via the clock symbol in the top right corner of the start screen. Press the clock symbol in the start window. Set the date and time and confirm your entries with [O... -
Page 50: Fault Removal
Reading default values failed Error while reading or writing the default values Writing default values failed Reading calibrate values failed Error while reading or writing the calibration values Writing calibrate values failed Runtime error Undefined error Edition 06/2015 InnuPure C16... -
Page 51: General Information And Tips For Preventing Problems
The InnuPure C16 can be switched off at any time from the mains switch at the equip- ment backplate, even while an extraction protocol is running. Switching off using the touch sensor is only possible if this has been enabled. - Page 52 In this case the sample tray stops during entry and is not initialized. The device can be re-activated by restarting any extraction protocol or device function. To only release the sample tray, use the tool [T Edition 06/2015 InnuPure C16...
-
Page 53: Maintenance And Care
Wipe spilled samples or reagents immediately with an absorbent cloth or piece of paper. If the InnuPure C16 is used for the analysis of infectious material, great care must be taken because the InnuPure C16 cannot be decontaminated as a whole device. ... -
Page 54: Changing Fuses
If an InnuPure C16 has to be sent to Analytik Jena AG for service, a prior decon- tamination must be carried out and documented (see the documents in the product folder). -
Page 55: Software Update
] and wait until the updated software is reloaded (the PDATE TOOL start screen can be seen). The InnuPure C16 is ready for operation again. Note The software update is not tied to user rights! It can be executed by any user! InnuPure C16... -
Page 56: Transport And Storage
ATTENTION! For packaging only use the transport packaging recommended by AJ. Only this provides optimum protection of the InnuPure C16 against transport damage. Notes for assembling the transport box: The transport box consists of a pallet base, two short and two wide side walls and a lit. - Page 57 Pack the InnuPure C16 as follows: Remove remaining consumables from the InnuPure C16. Switch off the device and disconnect the mains plug from the InnuPure C16. Insert the sample tray (1), the priming station (2) and the adapters for rea- gent strips (3) (optional) into the spac- es in the accessory box provided.
- Page 58 Transport and storage Warp the InnuPure C16 into the plas- tic bag to protect it against scratching and place it into the packaging. CAUTION! For reasons of safety two per- sons are required to lift the device and must position themselves on both sides of the equipment.
-
Page 59: Transport Notes
CAUTION Unintentionally dropping the device poses a risk of injury and damage to the device! Move the InnuPure C16 with great care! Two persons are required to lift and carry the de- vice! When moving the InnuPure C16 in the laboratory observe the following: ... -
Page 60: Storage
A suitable desiccant should be added to the equipment to prevent damage from moisture. The following storage conditions must be met: Temperature range: -10 – 55°C Max. humidity: max. 80% (use desiccant) Edition 06/2015 InnuPure C16... -
Page 61: Disposal
Disposal Disposal ENVIRONMENTAL PROTECTION At the end of its service life the InnuPure C16 and all its electronic components must be dis- posed of in accordance with the applicable regulations as electronic waste. InnuPure C16 Edition 06/2015... -
Page 62: Ec Declaration Of Conformity
EC Declaration of Conformity EC Declaration of Conformity Edition 06/2015 InnuPure C16...
Need help?
Do you have a question about the InnuPure C16 and is the answer not in the manual?
Questions and answers