Table of Contents
Advertisement
Quick Links
Advertisement
Table of Contents

Related Manuals for Analytic Jena PCR UV3 HEPA


Summary of Contents for Analytic Jena PCR UV3 HEPA
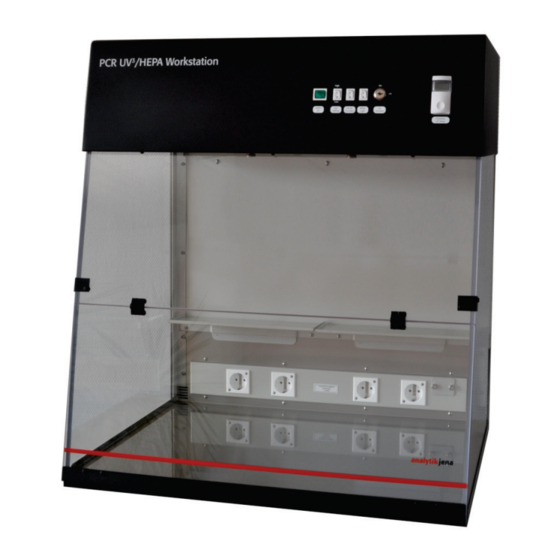
- Page 1 PCR UV HEPA Cabinets and Workstations Installation and User Instructions...
- Page 2 Analytik Jena AG Customer Services Konrad-Zuse-Str. 1 07745 Jena Germany General information about Analytik Jena AG On the internet: http://www.analytik-jena.de Copyrights and Trademarks Makrolon is a registered trademark of Bayer Corp. Documentation number: 37-3700-012-23 Edition – September 2013 (Rev STD) Implementation of the Technical Documentation: Analytik Jena AG This publication describes the state of this product at the time of publishing.
-
Page 3: Table Of Contents
Replacing tubes in the chamber ................ 26 Replacing the fuses ................... 27 Replacing the tube in the UV/Air Circulator ............27 Replacing the filters ................... 28 Replacing UV tube in the filter system .............. 30 Disposal ........................30 PCR UV3 HEPA Systems Edition 09/2013... - Page 4 The filter assembly with the Carbon filter ............28 Figure 16 The filter assembly after the carbon filter has been removed ......29 Figure 17 The filter assembly with the HEPA filter (1) ............29 Edition 09/2013 PCR UV3 HEPA Systems...
-
Page 5: Basic Information
HEPA Systems is regarded as departure from intended use. Follow the safety notes given in particular labels on the device, in section 3 “Safety instructions” and in the description of the required steps of operation. PCR UV3 HEPA Systems Edition 09/2013... -
Page 6: Warranty And Liability
use of other than original spare parts, wearing parts or consumables improper repairs faults due to the non-observance of this user manual Edition 09/2013 PCR UV3 HEPA Systems... -
Page 7: Technical Data
826 x 544 x 610 mm 826 x 737 x 610 mm Interior (W x D): 19.7 x 21.4 in. Interior (W x D): 27.8 x 21.4 in. 500 x 544 mm 706 x 544 mm PCR UV3 HEPA Systems Edition 09/2013... - Page 8 Exterior Aluminum powder coated Door and side panels single panel, Makrolon blocks wavelengths below 400 nm Electrical 115 V 60 Hz 230 V 50 Hz 100 V 50/60 Hz Edition 09/2013 PCR UV3 HEPA Systems...
-
Page 9: Safety Instructions
Indicates a potentially hazardous situation Unless avoided, the product or items in its vicinity may be damaged. IMPORTANT Indicates application hints and other especially useful information without any resulting haz- ardous or damaging situations PCR UV3 HEPA Systems Edition 09/2013... -
Page 10: Safety Markings At The Pcr Uv Hepa Systems
The unit includes shortwave UV, which is a powerful source of UV radiation that will cause damage to unprotected eyes and skin. Before operating any unit, ensure all personnel in the area are properly protected and that instructions for use of this equipment are followed. Edition 09/2013 PCR UV3 HEPA Systems... -
Page 11: Safety Instructions - Transport And Assembly
Avoid exposing the Makrolon panels to heaters or other heat sources, as damage may occur. Do not use a heater exceeding 800 Watts, which can cause the internal chamber to reach a temperature to exceed 140°C. PCR UV3 HEPA Systems Edition 09/2013... -
Page 12: Handling Of Auxiliary And Operating Materials
Use only mild soap and a damp soft cloth or damp sponge to clean the exterior of the unit. Use a mild detergent on the interior surfaces. Never use organic based compounds, Alcohol, or Ammonia containing cleaners. Do not use abrasive pads or cleansers. Edition 09/2013 PCR UV3 HEPA Systems... -
Page 13: Behavior During Emergencies
All equipment for first aid (first-aid kit, eyewash bottles, stretcher, etc.) as well as equipment for firefighting (fire extinguishers) must be within reach and easy to ac- cess. All equipment has to be in a sound condition and should be checked at regu- lar intervals. PCR UV3 HEPA Systems Edition 09/2013... -
Page 14: Technical Description
Power plugs built into the chamber allow use of shakers, rockers, and other equipment for PCR experiments inside the PCR chamber. The equipment can be decontaminated between experiments. The UV/Air Circulator module eliminates amplicons of DNA or genomic DNA from a previ- ously dispensed experiment. Edition 09/2013 PCR UV3 HEPA Systems... -
Page 15: Operational Ratings
Pollution rating 2 or better for laboratory areas Part Number Voltage Max Amps 849-00002-2 230 V 849-00002-3 230 V 849-00002-4 115 V 849-00002-5 110 V 849-00006-2 230 V 849-00006-3 230 V 849-00006-4 115 V 849-00006-5 110 V PCR UV3 HEPA Systems Edition 09/2013... -
Page 16: Assembling The Pcr Uv
Assembling the PCR UV3 HEPA Systems Assembling the PCR UV HEPA Systems Carefully remove the unit from the packaging materials. Follow the assembly instructions provided in this manual. Tools required: Philips head screwdriver Flathead screwdriver Gloves are provided to reduce transfer of fingerprints to PCR components ATTENTION Two people are recommended for assembly or lifting of this equipment. -
Page 17: Figure 2 Attaching The Inner Back Panel
Assembling the PCR UV3 HEPA Systems Attaching the inner back panel ATTENTION Two people are required to hold the panels in place and insert the screws. Position the wires so that they run between the inner back panel and the outer back panel up to the top for later connections to the top assembly. -
Page 18: Figure 3 Assembling The Makrolon Panels
Assembling the PCR UV3 HEPA Systems Assembling the Makrolon panels The frames (two) are designed to hold the Makrolon panels in place against the back as- sembly. Loosen the four screws indicated in the drawing below. Slide the frames for Makrolon panels under the screws on the back panel assembly so that the frames are under the shelf brackets. -
Page 19: Figure 4 Connecting The Bottom And Top Assembly Wires Together
Assembling the PCR UV3 HEPA Systems Assembling the top housing and the shelves WARNING Before assembling top and shelves ensure that the unit is not plugged in. 11. Rest the top assembly on top of the unit. 12. Connect the bottom and top assembly wires together according to their labels, matching wire “A”... -
Page 20: Figure 6 Assembling The Door
Assembling the PCR UV3 HEPA Systems Assembling the door 15. Slide the door assembly up into channel in the top assembly. Holding the door in posi- tion, insert the thumb screws (Qty. 3) inside the top assembly. 16. Secure the door with brackets onto the left and right side panels. -
Page 21: Operating The Pcr Uv Hepa Systems
Operating the PCR UV3 HEPA Systems Operating the PCR UV HEPA Systems Use of PCR equipment inside the Cabinet or Workstation Shelves are provided for placement of small tools for decontamination. The shelves slide into the bracket on back of the unit. -
Page 22: Operating The Hepa/Uv System
Operating the PCR UV3 HEPA Systems Operating the HEPA/UV System Push the HEPA/UV power switch to operate the HEPA/UV filter system. The airflow fan set- ting can be adjusted from Low to High, circulating anywhere from 22 to 50 feet per minute (FPM) of air. -
Page 23: Operating The Overhead Uv And Fluorescent White Light
Operating the PCR UV3 HEPA Systems Operating the overhead UV and fluorescent white light UV Keylock The PCR UV HEPA Systems provide an automated process for eliminating contamination by utilizing the germicidal properties of shortwave 254 nm ultraviolet light. The UV light is typically operated when no samples are inside the chamber. -
Page 24: Measuring The Uv Tube Intensity
Operating the PCR UV3 HEPA Systems To adjust the timer settings: – Turn the system on and wait until the timer reads “OFF”. – Use a small paper clip to press the timer calibration button located in the small hole to the left of the timer for one second. - Page 25 Operating the PCR UV3 HEPA Systems For ordering information on the UVX Radiometer, MS-100 UV Meter, and sensors, refer to the section 8.1 “Replacement parts and accessories”. The bacterial destruction chart below indicates the amount of shortwave (254 nm) UV energy required for complete destruction of various organisms.
-
Page 26: Care And Cleaning
Operating the PCR UV3 HEPA Systems Care and cleaning WARNING Unplug the unit before cleaning around the UV tube contacts and internal plug outlets. ATTENTION Never use organic based compounds, Alcohol, or Ammonia containing cleaners. The door and side panels are made of Makrolon and are subject to scuffing and scratches if improperly cleaned. -
Page 27: Maintenance, Replacement Parts/Accessories
Tube Description Qty. PCR UV HEPA Cabinet 8 W 254 nm UV 849-00002-xx 8 W White PCR UV HEPA Workstation 8 W 254 nm UV 849-00006-xx 8 W White 25 W 254 nm UV PCR UV3 HEPA Systems Edition 09/2013... -
Page 28: Replacing Tubes In The Chamber
The new light tube is ready for operating. Cabinet: Workstation: Outer – white light (8 Watt), Inner – UV (8 Watt) Outer – UV, Inner – white light Figure 11 Light tubes in PCR UV HEPA Cabinet and Workstation Edition 09/2013 PCR UV3 HEPA Systems... -
Page 29: Replacing The Fuses
Replace the place cap back into position and reattach the two thumb knobs. The new tube is ready for operating. Circulator cap with UV tube Figure 13 Replacing the tube in the UV/Air Circulator PCR UV3 HEPA Systems Edition 09/2013... -
Page 30: Replacing The Filters
If the filter does not slide out easily, loosen the thumb screws in front of the filter. thumb screws Carbon filter Figure 15 The filter assembly with the Carbon filter Edition 09/2013 PCR UV3 HEPA Systems... -
Page 31: Figure 16 The Filter Assembly After The Carbon Filter Has Been Removed
Insert the carbon filter. Tighten the carbon filter thumbscrews if loose. Close filter door. Retighten the knobs (2) on the workstation ceiling. Figure 17 The filter assembly with the HEPA filter (1) The filters have been replaced. PCR UV3 HEPA Systems Edition 09/2013... -
Page 32: Replacing Uv Tube In The Filter System
Replace carbon filter and retighten the knobs (2) on the workstation ceiling. Disposal At the end of its service life the PCR UV HEPA Systems and all its electronic components must be disposed of in accordance with the applicable regulations as electronic waste. Edition 09/2013 PCR UV3 HEPA Systems...
Need help?
Do you have a question about the PCR UV3 HEPA and is the answer not in the manual?
Questions and answers