Table of Contents
Advertisement
Quick Links
Advertisement
Table of Contents

Related Manuals for PAR PHYSIO-PORT


Summary of Contents for PAR PHYSIO-PORT
- Page 1 User manual PHYSIO-PORT Ambulatory Blood Pressure Monitor (ABPM) Version 2017-11-12 PAR Medizintechnik GmbH & Co. KG Sachsendamm 6 10829 Berlin - 0482 Germany Tel.: +49 30/ 2350700 Fax: +49 30/2138542 E-Mail: info@par-berlin.com Web: http: www.par-berlin.com Printed in Germany...
-
Page 2: Table Of Contents
Biocompatibility................................- 9 - Standards ..................................- 9 - SAFETY INSTRUCTION AN USE ........................ - 10 - PHYSIO-PORT RECORDER ........................... - 11 - Operations controls ............................... - 11 - Button functions ................................- 12 - LCD display .................................. - 13 - 4.3.1... - Page 3 PHYSIO-PORT User Manual Version 2017-11-12 Connecting the recorder .............................. - 28 - Starting the program ..............................- 28 - Selecting a patient ................................. - 29 - 6.3.1 Known patient ................................ - 29 - 6.3.2 Adding a new patient .............................. - 29 - 6.3.3...
- Page 4 PHYSIO-PORT User Manual Version 2017-11-12 10.2 Cleaning and disinfection of cuffs ............................ 46 10.3 Functional check, Maintenance, STC and MTC ......................47 10.3.1 Functional check, Maintenance ........................... 47 10.3.2 Safety- and Measurement- technical check ......................... 47 10.4 Calibration mode ................................47 10.5...
- Page 5 PHYSIO-PORT User Manual Version 2017-11-12 EU Declaration of Conformity PAR Medizintechnik GmbH & Co. KG, Sachsendamm 6, 10829 Berlin We declare that the medical device PHYSIO-PORT, Hardware-Version HW E, Firmware-Version FW 3.0 (Including system-components and accessories) is in conformity with the Medical Device Directive 93/42/EEC Including amendment 2007/47/EC.
-
Page 6: General Information
All trademarks stated and used in the text are the property of the present owner and are protected by law. All reproduction, translation and duplication in any shape or form – including extracts – require the written approval of the manufacturer. This manual is subject to updates by PAR Medizintechnik GmbH & Co. KG... - Page 7 All rights are reserved for devices, circuits, techniques, software programs, and names appearing in this manual. The quality assurance system used by PAR Medizintechnik GmbH & Co. KG in all the company facilities complies with standard EN ISO 13485. The safety instructions in this manual are indicated in the following way:...
-
Page 8: Intended Use
(max. 400 individual measurements) and store the measurement results . Notes on foreseeable misuse PHYSIO-PORT must not be used for newborn babies and is not suitable for use in Intensive Care Units. During a long-term blood pressure measurement, the instructions for the safety and functional reliability of the device must be observed. -
Page 9: Biocompatibility
– come into contact with patients, have been explained in such a way that they conform to the biocompatibility requirements of the relevant standard when used for their intended purpose. If you have any questions in this regard, then please contact PAR Medizintechnik GmbH & Co. KG or one of its representatives. -
Page 10: Safety Instruction An Use
Compliance with the standard IEC 60601-1 must always be ensured. PHYSIO-PORT may be connected to a PC with the Physioportwin program. While connected to any of these devices, PHYSIO-PORT must be disconnected from the patient. -
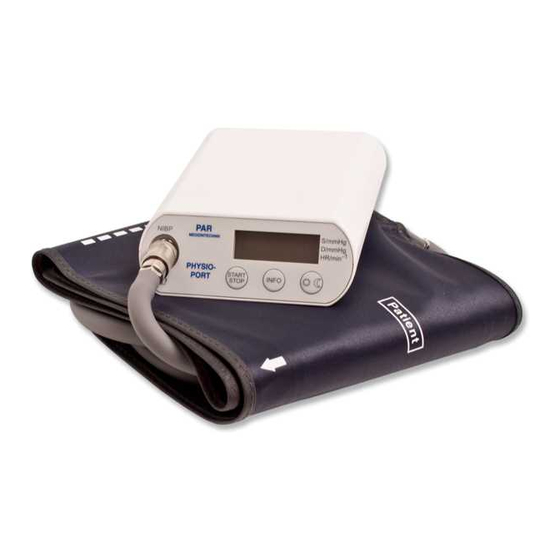
Page 11: Physio-Port Recorder
PHYSIO-PORT User Manual Version 2017-11-12 PHYSIO-PORT Recorder Operations controls Cuff connection Start/Stop button to trigger addittional measurements and to interrupt a measurement in process. Day/Night button to change the measurement interval between day and night interval. Info button to display the most recently values. -
Page 12: Button Functions
PHYSIO-PORT User Manual Version 2017-11-12 Button functions During an ongoing long-term blood pressure measurement, the recorder keys have the following function To start and stop a measurement To call the last measured values or the last error message. Event marking:... -
Page 13: Lcd Display
4.3.3 Functional control The PHYSIO-PORT recorder will automatically carry out a self-test when it is switched on, which will activate all symbols and segments of the LCD display. The device will then check the inserted (rechargeable) batteries and will display the available capacity. - Page 14 PHYSIO-PORT User Manual Version 2017-11-12 In order to carry out a 24 hour measurement, the capacity needs to be at least 90%. If the capacity is below 90%, then you will need to insert new batteries or fully-charged rechargeable batteries.
-
Page 15: Power Supply
Power supply 4.4.1 General The PHYSIO-PORT Recorder requires either two nickel metal hydride rechargeable batteries, or two alkaline batteries. When starting the recorder via the Physioportwin software, please ensure that the relevant power source has been selected (see 6.6 Programming the recorder). -
Page 16: Physio-Port Cuffs
PHYSIO-PORT User Manual Version 2017-11-12 PHYSIO-PORT Cuffs Various cuff sizes are available for the PHYSIO-PORT (standard, large and children size). Please select the correct cuff size (see printed text on the cuff) . Replace the cuffs at regular intervals. CAUTION •... -
Page 17: Software Installation
PHYSIO-PORT User Manual Version 2017-11-12 Software Installation PC software Physioportwin Insert the Physioportwin CD in the CD ROM drive. If the CD drive does not automatically start up, start "setup.exe" (on the Physioport CD ) via Windows Explorer CAUTION The program must be installed with Administrator rights. - Page 18 PHYSIO-PORT User Manual Version 2017-11-12 Selection of the destination. folder. Click Change to install to a different folder or click Next to install to this default folder. Figure 10: Destination Folder Displaying of the installation settings. Click Install to begin of...
-
Page 19: Settings
PHYSIO-PORT User Manual Version 2017-11-12 Click Finish to complete the software installation.. Figure 12: End of the software installation Settings Click Settings to get the configuration of the program. Figure 13: Settings The different settings are split on four tabs... -
Page 20: System
Figure 16: Recorder connection This setting allows to start the recorder with or without patient data. Figure 17: Enter of patient data The database folder for PHYSIO-PORT can be set to another folder (see network Figure 18: Database folder installation). The function [EXPORT] backups the database into the backup folder. -
Page 21: Gdt Interface
PHYSIO-PORT User Manual Version 2017-11-12 CAUTION • Lost of data • The restoration [IMPORT] of the database overwrites the actual database! It´s recommended to save the actual database before importing the database. The program language, date format and time format can be selected manually. - Page 22 The ID is a unique identifier that consists of a minimum of 1 and a maximum of 8 characters, which uniquely identifies the PHYSIO-PORT system during GDT data transfer. File name: The file names that are used for the communication between...
- Page 23 PHYSIO-PORT User Manual Version 2017-11-12 Folder for communication data files: The data transfer folder can Figure 24: Folder for communication data files be created where you want. In order to avoid any networks errors, a separate folder should be created for each individual work station (e.g.
-
Page 24: Print/Export
PHYSIO-PORT User Manual Version 2017-11-12 5.2.3 Print/Export The default setting for printing and exporting of analysis are made on this tabsheet. Figure 27: Setting page for print and export of analysis Print out: Set of the default printout pages, preview and colored print out. - Page 25 PHYSIO-PORT User Manual Version 2017-11-12 Export: Physioportwin can stores print outs as PDF file (file extension .PDF) und the measurements as CSV file (file extension .TXT). The file name contains all relevant information. P^<type>_<workstation>^<slot#>_<id>^<last>^<first>_<StartTime>_<exportTime> . PDF / .TXT = Delimiter within the block = “REPORT”...
-
Page 26: Parameter
PHYSIO-PORT User Manual Version 2017-11-12 5.2.4 Parameter The default setting for analysis of long time measurements are made on this tab sheet. Figure 33: Configuration of parameter Day and night phase: Default values can be set. Figure 34: Default values for day and night phase... -
Page 27: Network Installation
To this end, a corresponding directory is first created on the central server. This folder must be connected as a 'drive' on all workstations. A local program installation is then carried out on all workstations that will use the PHYSIO-PORT PC Software (as described in Section 5 Installation). -
Page 28: Commencing Long Term Blood Pressure Measurement
Version 2017-11-12 Commencing Long Term Blood Pressure Measurement Connecting the recorder Connect the PHYSIO-PORT Recorder to the PC and switch on the recorder. The on/off switch is located beneath the lid of the battery compartment. The recorder display will show after self-test:... -
Page 29: Selecting A Patient
PHYSIO-PORT User Manual Version 2017-11-12 Selecting a patient 6.3.1 Known patient The selection window of the patient database appears: In the 'NAME' field, enter the first letter of the patient's surname. All patients whose names start with this letter will then be displayed (e.g. -
Page 30: Programming Recorder
Programming recorder After you have selected the patient, a window will appear for configuring and programming the PHYSIO-PORT Recorder. Figure 41: Configuration of the measurement Number of measurement intervals: Up to 4 different measurement intervals can be selected. The standard setting is at 2 intervals (day and night phase) . - Page 31 PHYSIO-PORT User Manual Version 2017-11-12 Upward measurement on: The inflation measurement method is activated (Inflation Measurement Technology, IMT) Activate buzzer: The internal buzzer(optional) can be switched on and off. If the buzzer is on, than an acoustic signal sounds when the device is switched on, before the measurement or in case of faulty measurement.
-
Page 32: Attaching The Cuff
Figure 42: Attaching the cuff pressure on the veins Switch on the PHYSIO-PORT Recorder and place Attaching the belt it in the carrier bag. Use the belt to attach the bag to the body of the patient. For hygienic reasons, the bag should not come into direct contact with the skin. -
Page 33: Instructing The Patient
Stay calm during the measurement, so that there will be no incorrect readings as a result of any movement by the patient; • During the night, it is best to place the PHYSIO-PORT Recorder in its carrier bag on the bedside table; •... -
Page 34: Important Measurement Information
Download Connecting the recorder Connect the PHYSIO-PORT Recorder to the PC and switch on the recorder. The on/off switch is located beneath the lid of the battery compartment. The recorder display will show after self-test:... -
Page 35: Start Program
PHYSIO-PORT User Manual Version 2017-11-12 Start program After PHYSIO-PORT software has started, the main screen appears. program the recorder, click on the [Download] button to open the relevant menu. The measured values are read from the recorder and stored in the database for the corresponding patient. -
Page 36: Find/Delete Measurement Results
PHYSIO-PORT User Manual Version 2017-11-12 Find/delete measurement results The selection window of the patient database is displayed. Select the required patient. The measurement result selection window appears for those patients whose data have been stored in the database. You can request the... -
Page 37: Representations
PHYSIO-PORT User Manual Version 2017-11-12 Representations 8.3.1 Single values This graph displays the results of all individual measurements. The set critical values for the day and the night phase are displayed as red lines. Figure 46: Graphical single values All measurement results are... -
Page 38: Magnifying Glass
PHYSIO-PORT User Manual Version 2017-11-12 The limit values, day / night phase, the tabular and graphic individual values are summarized. The limit values and the day / night phase can be set individually. The following settings are available for the limit values: Default setting, JNC 7, AHA, ESH and custom. -
Page 39: Overview / Statistics
PHYSIO-PORT User Manual Version 2017-11-12 8.3.3 Overview / statistics The overview displays a numerical summary of the long-term blood pressure measurements, as well as the statistical measurement results, for the whole monitoring period, according to day and night phase. Figure 51: Overview statistics... -
Page 40: Hourly Mean Values
PHYSIO-PORT User Manual Version 2017-11-12 8.3.4 Hourly mean values Figure 53: Tabular hourly mean values In order to ensure a clear representation, the calculated hourly mean values are only displayed as a graph and a table. 8.3.5 Comparison A comparison or a contrasting of two measurement series in both graphical and tabular form is also possible. -
Page 41: Histogram
PHYSIO-PORT User Manual Version 2017-11-12 8.3.6 Histogram The histogram presentation of measured values is possible. Figure 55: Histogram of the measurered values 8.3.7 Pie graphic The measured values can also be displayed as a pie graphic. Figure 56: Presentation of the values a pie graphic... -
Page 42: Correlation
PHYSIO-PORT User Manual Version 2017-11-12 8.3.8 Correlation This diagram shows the correlation of diastolic to systolic blood pressure. Each dot corresponds to one measurement. Figure 57: Correlation of blood pressure values Additional buttons 8.4.1 Findings report You can create a small report in relation to the findings of the long-term blood pressure measurements. This text will be summarised and can –... -
Page 43: Print
PHYSIO-PORT User Manual Version 2017-11-12 8.4.2 Print Figure 57: Selection of pages You can print every page displaying measurement results by using the [Print] button. The size of the printout can be determined on an individual basis. You can define a standard format under 'Settings' 8.4.3... -
Page 44: Gdt -Export To General Practice It System
GDT -Export to general practice IT system If the PHYSIO-PORT software of the general practice IT system interface has been activated, you can then create a GDT file in accordance with the selected settings by using the [GDT export] tab, which will be saved in the configured directory. -
Page 45: Error Codes
At least 8 oscillations need to be detected for a correct measurement. The cuff should be attached sufficiently tightly (you should be able to put one finger beneath the cuff, but not two). PHYSIO-PORT will regulate the deflation rate for follow-up measurements accordingly. E 10 Memory full. -
Page 46: Cleaning And Maintenance
10.1 Cleaning and disinfection of device surface Switch off the PHYSIO-PORT Recorder. Wipe the device down with a soft, lint-free cloth for cleaning. Liquids must not penetrate the device. Spray disinfection has proved successful. Incidin® Foam or equivalent disinfectants that are used in practices or hospitals are suitable (Please respect the information of the manufacturer especially regarding the exposure time). -
Page 47: Functional Check, Maintenance, Stc And Mtc
Press the INFO button 3 times: the display shows an internal value, which should be between 25 and 100. If the displayed value is outside this range, then the PHYSIO-PORT Recorder must be sent away for maintenance. Press the Start/Stop button: ... -
Page 48: Technical Information
PHYSIO-PORT User Manual Version 2017-11-12 Technical Information Measuement Measurement method oscillometric 30 – 45 sec. (depends on patient) Measurement duration Data preservation unlimited 2 – 120 min., programmable Measurement intervals Capacity Up to 600 measurements Measurement range 40 – 260 mmHg Systole 25 –... -
Page 49: Charger
PHYSIO-PORT User Manual Version 2017-11-12 Charger CAUTION If the recorder is powered by rechargeable • Equipment damage, risk to patients • batteries (4 of them are shipped with the The charger is not a medical device. It must not equipment), they should be recharged be used in the patient environment . -
Page 50: Delivery Overview
Version 2017-11-12 Delivery overview 13.1 Standard delivery Please note the latest accessories list! PHYSIO-PORT recorder (Part no: S185) Connection cable, USB Interface cable (Part no: A867) Battery charger (Part no: A2093) Rechargeable NiMH battery (4 pcs) (Part no: A2004) ... -
Page 51: Explanation Of Signs And Symbols
PHYSIO-PORT User Manual Version 2017-11-12 Explanation of Signs and Symbols 14.1 Symbols used on the equipment Refer to instruction manual/booklet This symbol indicates that the waste of electrical and electronic equipment must not be disposed as unsorted municipal waste and must be collected separately. Please contact an authorized representative of the manufacturer for information concerning the decommissioning of your equipment.
Need help?
Do you have a question about the PHYSIO-PORT and is the answer not in the manual?
Questions and answers