Table of Contents
Advertisement
Available languages
Available languages
Advertisement
Chapters
Table of Contents

Related Manuals for auna Scala VCD


Summary of Contents for auna Scala VCD
-
Page 3: Table Of Contents
Sehr geehrter Kunde, wir gratulieren Ihnen zum Erwerb Ihres Gerä- tes. Lesen Sie die folgenden Hinweise sorgfäl- tig durch und befolgen Sie diese, um möglichen Schäden vorzubeugen. Für Schäden, die durch Missachtung der Hinweise und unsachgemäßen Gebrauch entstehen, übernehmen wir keine Haf- tung. -
Page 4: Technische Daten
TECHNISCHE DATEN Artikelnummer 10035423, 10035424, 10035425 Radio: Digital (DAB/DAB+), FM Frequenzen Digital Band III 174–240 MHz, FM 87.5-108 MHz (with RDS). BT-Version V5.0 + EDR BT Frequenzbereich 2.402-2.480 GHz Lautsprecher 3.0" Breitband-Treiber, 2 CH x 10 W Ausgang Stromversorgung 100-240V~, 50/60Hz Ausgänge 3.5mm Kopfhöreranschluss Standby-Verbrauch... - Page 5 ERKLÄRUNG DER SYMBOLE AUF DEM GERÄT CAUTION RISK OF ELECTRIC SHOCK DO NOT OPEN VORSICHT: DAS GEHÄUSE NICHT ÖFFNEN, UM EINEN STROMSCHLAG UND ERNSTE PERSONENVERLETZUNGEN ZU VERMEIDEN. IM INNEREN KEINE VOM KUNDEN ZU WARTENDEN KOMPONENTEN. WENDEN SIE SICH AUSSCHLIESSLICH AN QUALIFIZIERTE FACHLEUTE. WARNUNG: UM DIE GEFAHR EINES BRANDS ODER EINES STROMSCHLAGS ZU VERRINGERN, DAS GERÄT NICHT IN WASSER, REGEN ODER FEUCHTIGKEIT AUSZUSETZEN.
-
Page 6: Sicherheitshinweise
SICHERHEITSHINWEISE Lesen Sie die Anleitung. Alle Anwendungshinweise müssen vor der Verwendung des Geräts gelesen werden. • Kinder ab 8 Jahren, psychisch, sensorisch und körperlich eingeschränkte Menschen dürfen das Gerät nur benutzen, wenn sie vorher von einer für sie verantwortlichen Aufsichtsperson ausführlich mit den Funktionen und den Sicherheitsvorkehrungen vertraut gemacht wurden und die damit verbundenen Risiken verstehen. - Page 7 auf das Gerät gestellt werden. • Um die Stromzufuhr vollständig zu trennen, muss der Netzstecker des Gerätes vom Netz getrennt werden, da die Trennvorrichtungen der Netzstecker des Gerätes sind. • Der Netzstecker des Geräts darf nicht verstopft sein ODER sollte bei bestimmungsgemäßer Verwendung leicht zugänglich sein.
-
Page 8: Gerätebeschreibung
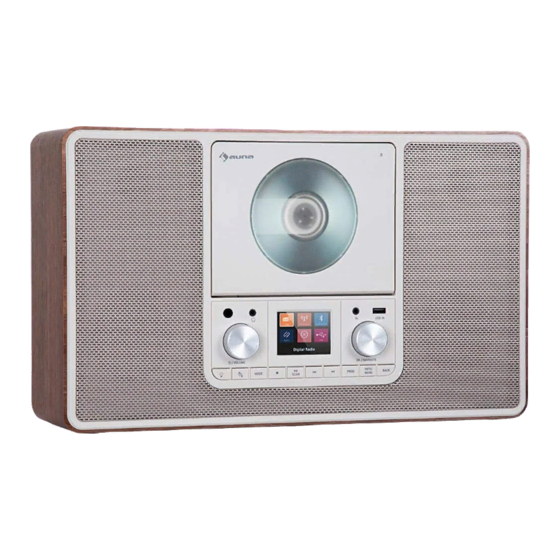
GERÄTEBESCHREIBUNG... - Page 9 LCD-Anzeige Kopfhöeranschluss Sensor für die Fernbedieung STANDBY/ VOLUME-Drehregler Licht ein/aus Beleuchtungsmodus Modus (Betriebsart) Stopp Wiedergabe PAUSE / SCAN button 10 Titel zurück (im CD/BT-Betrieb)/ FM-Radio Abstimmung zurück Titel vor (im CD/BT-Betrieb)/ FM-Radio-Abstimmung vor 12 Programm 13 Infor/MEnü 14 zurück 15 CD-Fach 16 AUX IN - Anschluss 17 USB-Anschluss 18 OK/NAVIGATE - Bestätigen/Naviationsrad...
-
Page 10: Fernbedienung
FERNBEDIENUNG... - Page 11 ON/STANDBY-Taste Taste NUMERIC ; CURSOR UP-Taste Lautstärke - MODE-Taste MENÜ-Taste Licht ein/aus SCAN-Taste Titel zurück (CD/BT) Senderabstimmung zurück 10 Stumm Programm 12 Lautstärke + 13 OK (Bestätigen) 14 Nach unten navigieren 15 BACK-Taste 16 Information 17 Beleuchtungsmodus 18 FM ST/MONO-Taste 19 Wiederholen Zufallswiedergabe 20 Wiedergabe/Pause 21 Titel vor (CD/BT)
- Page 12 Einlegen der Batterien in die Fernbedienung Öffnen Sie den Batteriefachdeckel. Setzen Sie die mitgelieferte Batterie entsprechend der im Batteriefach angegebenen Polung ein. Schieben Sie die Batterie beim Einsetzen oder Entfernen in Richtung der (-) Batteriepole. Schließen Sie den Deckel. Vorsicht •...
-
Page 13: Anschluss Des Systems
ANSCHLUSS DES SYSTEMS Netzanschluss: Nachdem Sie überprüft haben, dass alle Verbindungen korrekt hergestellt wurden, stecken Sie das Netzkabel dieses Geräts in die Wandsteckdose. Hinweis: Ziehen Sie das Netzkabel aus der Steckdose, wenn das Gerät über einen längeren Zeitraum nicht benutzt wird. DAB/FM-Antennenanschluss Mitgelieferte DAB/FM-Antenne: Schließen Sie den DAB/FM-Antennendraht an die DAB/FM-Buchse an und... -
Page 14: Montage
MONTAGE Wandmontage Vorsicht • Achten Sie bei der Wandmontage sehr sorgfältig darauf, dass das Gerät (2,1 kg) nicht herunterfällt. • Prüfen Sie vor der Montage die Wandstärke. (Nicht auf den Furnierputz oder die gekalkte Wand legen, das Gerät könnte herunterfallen.) Wenn Sie sich unsicher sind, wenden Sie sich an einen qualifizierten Servicetechniker. - Page 15 Machen Sie mit einem Bohrer ein Loch in die Wand, indem Sie den Schraubenpunktmarkierungen auf der Papierschablone folgen. Wand Befestigen Sie einen Dübel zur Wandmontage mit einem Hammer in der Bohrung, bis er bündig mit der Wandoberfläche abschließt. Wand Befestigen Sie die Schrauben wie unten dargestellt an der Wand. (Schrauben insgesamt: 2 Stück).
-
Page 16: Bedienung
BEDIENUNG Ein/Aus-Schalter - Inbetriebnahme des Sytems: 1. Drücken Sie die Ein/Aus-Taste zum Einschalten des DAB-Digitalradios. Wenn das DAB-Digitalradio zum ersten Mal eingeschaltet wird, startet es den DAB-Modus. Es sucht automatisch nach den verfügbaren Radiosendern. 2. Halten Sie die Einschalttaste 2 Sekunden lang gedrückt, um den Standby-Modus zu aktivieren.’... -
Page 17: Funktionen
FUNKTIONEN Menüanzeige Drücken Sie die Taste 'MODE', um das Hauptemenü anzuzeigen. Drehen und drücken Sie den NAVIGATE-Drehregler, um zwischen den Eingangsquellen umzuschalten. Beschreibung Funktion DAB Radio Hören Sie einen digitalen Radiosender. FM Radio Hören Sie einen FM-Radiosender. Hören Sie Inhalte, die von Ihrem Telefon oder Tablet gestreamt werden. - Page 18 Ändern der auf dem Bildschirm angezeigten Informationen Wenn Sie einen DAB- oder FM-Radiosender hören, können Sie die Informationen ändern, die auf dem Bildschirm angezeigt werden. Digitales Radio Wenn Sie Digitalradio hören, drücken Sie die INFO-Taste auf dem Gerät oder der Fernbedienung, um die auf dem Bildschirm angezeigten Informationen zwischen Lauftext, Programmtyp, Ensemble, Kanal/Frequenz, Signalstärke/Fehler, Bitrate oder Datum zu wechseln.
-
Page 19: Dab/Fm-Radio
DAB/FM-RADIO Wechseln digitaler DAB-Sender 1. Drücken Sie die MODE-Taste auf dem Gerät oder der Fernbedienung, drehen und drücken Sie das NAVIGATE-Einstellrad, um 'DAB-Radio' auf dem Startbildschirm auszuwählen. Wenn Sie zum ersten Mal DAB-Radio wählen, führt DAB einen automatischen Sendersuchlauf durch, um alle verfügbaren Sender zu finden, und stellt nach Abschluss des Suchlaufs einen Sender ein. - Page 20 So speichern Sie einen Sender schnell auf einer Speichertaste (1-10) Stellen Sie den DAB- oder FM-Radiosender ein, den Sie speichern möchten. Halten Sie eine der nummerierten Vorwahltasten (1-10) auf der Fernbedienung zwei Sekunden lang gedrückt, bis eine Meldung erscheint, die bestätigt, dass die Voreinstellung gespeichert wurde. So speichern Sie einen Sender in der Voreinstellungsliste (11-30) 1.
- Page 21 Scala VCD her. 3. Wählen Sie Ihren Lieblingstitel, tippen Sie auf die Taste ⏯ auf Ihrem BT-Gerät oder auf die Taste auf dem auna Scala VCD, um den Titel von Ihrem BT-Gerät abzuspielen oder anzuhalten. 4. Drücken Sie die Taste ⏮ oder ⏭ , um den nächsten oder vorherigen Titel auszuwählen.
-
Page 22: Cd-Player
CD-PLAYER Eine CD einlegen und abspielen 1. Drücken Sie die MODE-Taste am Gerät oder auf der Fernbedienung, um den CD-Modus zu wählen. 2. Legen Sie eine Audio-CD mit der beschrifteten Seite nach außen zur CD- Tür gerichtet auf die mittlere Spindel, schließen Sie das CD-Fach. Wiedergabe/Pause Um die Wiedergabe zu unterbrechen, drücken Sie die Taste CD PLAY/ PAUSE. - Page 23 Zufallswiedergabe Drücken Sie während der Wiedergabe die Taste auf der Fernbedienung, um 'Zufallswiedergabe' zu wählen. um Musik in zufälliger Reihenfolge abzuspielen. Auf dem Display erscheint . Drücken Sie die Taste erneut, um mit der normalen Wiedergabe fortzufahren. Programmierte Wiedergabe Dieses Gerät kann so programmiert werden, dass es eine Reihe ausgewählter Titel abspielt.
-
Page 24: Usb-Wiedergabe
USB-WIEDERGABE Drücken Sie im USB-Player-Modus Select NAVIGATE oder verwenden Sie die Tasten ∨ Select ∧ auf der Fernbedienung, um die USB-Wiedergabe zu wählen, und drücken Sie die OK-Taste zur Bestätigung.. Drücken Sie Select NAVIGATE oder verwenden Sie die Tasten ∨ Select ∧ auf der Fernbedienung zur Auswahl und drücken Sie ENTER zur Bestätigung einer MP3/WMA-Datei Drücken Sie auf , um den gerade wiedergegebenen Titel zu pausieren. -
Page 25: Wecker Und Timer Stellen
WECKER UND TIMER STELLEN Weckzeit stellen 1. Halten Sie die Menü-Taste auf dem Hauptgerät oder der Fernbedienung gedrückt und drehen und drücken Sie das Naviationsrad, um 'Hauptmenü' zu wählen. 2. Drücken Sie Select, um 'Alarm' auf 'Ein' zu stellen. 3. Drehen und drücken Sie das Naviationsrad, um die 'Frequenz' zu ändern. 4. - Page 26 Drücken in der unten angegebenen Reihenfolge: Ausschlafen - 15 Min. - 30 Min. - 45 Min. - 60 Min. Einstellung von Zeit und Datum Die Uhr stellt sich automatisch über das digitale Radiosignal oder das FM-Radiosignal ein. Wenn die Uhrzeit oder das Datum nicht automatisch aktualisiert wird, können Sie sie mit dieser Option manuell einstellen.
- Page 27 2. Drehen und drücken Sie das Naviationsrad oder verwenden Sie die Tasten SELECT auf der Fernbedienung, um 'Hauptmenü' > 'Systemeinstellungen' > 'Uhrzeit/Datum' auszuwählen. 3. Drehen und drücken Sie das Naviationsrad oder verwenden Sie die Tasten SELECT auf der Fernbedienung, um 'Format einstellen' zu wählen. 4.
- Page 28 'Systemeinstellungen' > 'Hintergrundbeleuchtung' zu wählen. 3. Drehen und drücken Sie das Navigationsrad, um '100%'75%,50%,20%,0FF' zu wählen. Stufe der abgedunkelten Helligkeit 1. Halten Sie die Menü-Taste auf dem Gerät oder der Fernbedienung gedrückt und drehen und drücken Sie das Naviationsrad um 'Hauptmenü' zu wählen.
- Page 29 1. Drücken Sie die MENU-Taste auf der Fernbedienung oder halten Sie die MENU-Taste wiederholt am Gerät gedrückt, um die MENU-Funktion auszuwählen. 2. Drehen und drücken Sie das Naviationsrad oder verwenden Sie die Tasten SELECT auf der Fernbedienung, um 'Prune invalid' zu wählen. 3.
-
Page 30: Pflege Von Cds
Orange (7 Farben). • Die Farbe der AmbiLight-Anzeige hängt davon ab, welche Farbe Sie auf der Taste behalten. • Hinweis: Wenn die Helligkeit gleißend ist, schalten Sie die Raumbeleuchtung ein oder schalten Sie die LED-Lichtshow aus. Energiesparfunktion Aufgrund der ErP-Stufe 2-Anforderung und zum Schutz der Umwelt schaltet sich das Gerät automatisch in den Standby-Modus ab, wenn etwa 15 Minuten lang keine Musik abgespielt wurde, außer im AUX-Modus. -
Page 31: Hinweise Zur Entsorgung
HINWEISE ZUR ENTSORGUNG Befindet sich die linke Abbildung (durchgestrichene Mülltonne auf Rädern) auf dem Produkt, gilt die Europäische Richtlinie 2012/19/EU. Diese Produkte dürfen nicht mit dem normalen Hausmüll entsorgt werden. Informieren Sie sich über die örtlichen Regelungen zur getrennten Sammlung elektrischer und elektronischer Gerätschaften. - Page 33 Dear Customer, Congratulations on purchasing this equipment. Please read this manual carefully and take care of the following hints to avoid damages. Any failure caused by ignoring the items and cautions men- tioned in the instruction manual are not covered by our warranty and any liability.
-
Page 34: Specifications
SPECIFICATIONS Item number 10035423, 10035424, 10035425 Radio: Digital (DAB/DAB+), FM Frequencies Digital Band III 174–240 MHz, FM 87.5-108 MHz (with RDS). BT version V5.0 + EDR BT frequncy range 2.402-2.480 GHz Display 2.4", 320 x 240, TFT colour display Speaker 3.0"... - Page 35 EXPLANATION OF THE WARNING SYMBOLS CAUTION RISK OF ELECTRIC SHOCK DO NOT OPEN AUTION: TO REDUCE THE RISK OF ELECTRIC SHOCK AND SERIOUS PERSONAL INJURY, DO NOT REMOVE ANY COVER. NO USER-SERVICABLE PARTS INSIDE. REFER SERVICING TO QUALIFIED SERVICE PERSONNEL ONLY. WARNING.
-
Page 36: Safety Instructions
SAFETY INSTRUCTIONS Read these instructions. All uses guidelines must be read before using the device. Keep the instructions for future use. • Children over the age of 8 and persons with reduced physical, sensory or mental capabilities or those with a lack of experience and knowledge may only use the device if they are instructed on how to do so by a person responsible for their safety, or if they are supervised and understand the hazards associated with the use of the device. - Page 37 easily accessed during intended use. • Excessive sound pressure form earphones and headphones can cause hearing loss. • No naked flame sources such as lighted candles should be placed on the apparatus; • Attention should be drawn to the environmental aspects of battery disposal;...
-
Page 38: Product Description
PRODUCT DESCRIPTION... - Page 39 LCD display Phone jack Remote sensor STANDBY/ VOLUME dial LIGHT ON/OFF button LIGHT MODE button MODE button STOP button PLAY PAUSE button / SCAN button 10 CD/BLUETOOTH SKIP PREVIOUS / FM TUNE– button CD/BLUETOOTH SKIP NEXT/FM TUNE+ button 12 PROG button 13 INFO/MENU button 14 BACK button 15 CD door...
-
Page 40: Remote Control
REMOTE CONTROL... - Page 41 ON/STANDBY button NUMERIC button ; CURSOR UP button VOLUME DOWN button MODE button MENU button LIGHT ON/OFF button SCAN button CD/BLUETOOTH SKIP PREVIOUS / FM TUNE- 10 MUTE button PROG button 12 VOLUME UP button 13 OK button 14 CURSOR DOWN button 15 BACK button 16 INFO button 17 LIGHT MODE button...
- Page 42 Putting the batteries into the remote 1. Open the battery cover. 2. Insert the supplied battery according to the terminal indicated in the battery compartment. When inserting or removing the battery, push it towards the (–) battery terminals. 3. Close the cover. Caution •...
-
Page 43: System Connections
SYSTEM CONNECTIONS Ac power connection: After checking all the connections have been made correctly, plug the AC power lead of this unit into the wall socket. Note: Unplug the AC power lead from the wall socket if the unit will not be in use for a prolonged period of time. -
Page 44: Installation
INSTALLATION To mount the unit on the wall CAUTION: • Be very careful to prevent the unit 2.1 kg (4.2 bs.) from falling when mounting on the wall. • Before mounting, check the wall strength. (Do not put on the veneer plaster or whitewashed wall. - Page 45 Make a hole on the wall following the screw point marks on the pattern paper by using a drill. Fix a wall mount plug into the hole using a hammer,until it is flush with the wall surface. Fasten the screws to the wall as shown below. (Total screws: 2 ps). Fasten the screws to the wall as shown below.
-
Page 46: Operation
OPERATION Power button - Main unit operation: 1. Press the Power Button for Turn on the DAB Digital Radio . The first time the DAB Digital Radio is switched, it will start up DAB mode. It will automatically scan for the available radio stations. 2. -
Page 47: Features
FEATURES DISPLAY SOURCE MENU Press the MODE button to display the ‘MODE’ menu. Turn and press the NAVIGATE dial to switch between input sources. Description Function DAB Radio Listen to a digital radio station. FM Radio Listen to an FM radio station. Listen to content streamed from your phone or tablet. - Page 48 Changing the information shown on screen When listening to a DAB or FM radio station, you can change the information that is displayed on the screen. Digital radio When listening to digital radio, press the Select dial to toggle the information displayed on screen between Scrolling text, Programme type, Ensemble, Channel / frequency, Signal strength / error, Bitrate or Date.
-
Page 49: Listening To Digital Or Fm Radio
LISTENING TO DIGITAL OR FM RADIO Changing digital DAB stations 1. Press the MODE button on main unit or remote control and turn and press the NAVIGATE dial to select ‘DAB radio’ from the Home screen. The first time you select DAB radio,DAB will perform an auto tune to find all available stations and will tune into one when finished. -
Page 50: Using The Auxiliary Input
, remembers it for the next time. Listening to a Bluetooth device 1. Press the MODE button on main unit or remote control to select ‘Bluetooth’. 2. On your Bluetooth device auna Scala VCD, switch Bluetooth on and connect. -
Page 51: Cd Operation
3. Select your favorite song, tap the PLAY/PAUSE button on your BT device or the PLAY/PAUSE button on the auna Scala VCD to play or pause the song from your Bluetooth device. 4. Press the Button or Button to select the Next or Previous track. - Page 52 High-Speed Music Search During playback press & hold the PREVIOUS or NEXT button to start high- speed searching. When you release the PREVIOUS or NEXT button normal speed playback will resume. Repeat Playing You can use the setting to repeat the track that is currently playing or the entire CD.
-
Page 53: Usb Operation
USB OPERATION ∨ ∧ During USB Player mode, Press Select NAVIGATE or use the Select buttons on the remote control to button to select USB playback and press OK button to confirm. ∨ ∧ Press Select NAVIGATE or use the Select buttons on the remote control to button to select and press ENTER to confirm a MP3/WMA file... - Page 54 press the Select dial to select ‘Last listened’ or turn and press the Select dial to choose a radio station from the preset list. Note: Skip this step if you are setting a Tone alarm. 7. Turn and press the Select dial to select ‘Duration’. Turn and press the Select to set the duration that the alarm will sound in minutes.
- Page 55 Time and date synchronization options You can synchronize the time and date on the FM, or digital radio signal. To specify the clock synchronization options: 1. Press and hold the Menu button to view the main menu. 2. Turn and press the Select NAVIGATE to select ‘System settings’ > ‘Time/ Date’.
- Page 56 brightness of the screen when it times out. ON level To adjust the duration of the screen backlight before dimming: 1. Press and hold the Menu button on main unit or remote control and turn and press the Select dial to select ‘Main Menu. 2.
- Page 57 Prune invalid To remove inactive stations from the station list: 1. Press and hold the Menu button on main unit or remote control and turn and press the Select dial to select ‘Main Menu. 2. Turn and press the NAVIGATE dial or use the <OK> buttons on the remote control to choose ‘Prune invalid’.
-
Page 58: Care Of Compact Discs
LED light shows 1. Tap the LIGHT ON/OFF button on main unit or remote control, the LED light ON 2. Repeatedly tap the LIGHT ON/OFF button to select a LED light brightness.The unit brightness turn 100%,70%,50%,20%. 3. Press hold LIGHT ON/OFF button long 2S on main unit or remote control, Turns off the light. -
Page 59: Disposal Considerations
DISPOSAL CONSIDERATIONS According to the European waste regulation 2012/19/ EU this symbol on the product or on its packaging indicates that this product may not be treated as household waste. Instead it should be taken to the appropriate collection point for the recycling of electrical and electronic equipment. - Page 61 Cher client, Toutes nos félicitations pour l’acquisition de ce nouvel appareil. Veuillez lire attentivement les instructions suivantes de branchement et d’utilisation afin d’éviter d’éventuels dommages. Le fabricant ne saurait être tenu pour responsable des dommages dus au non-respect des consignes de sécurité...
-
Page 62: Fiche Technique
FICHE TECHNIQUE Numéro d'article 10035423, 10035424, 10035425 Radio : Digital (DAB/DAB+), FM and internet radio (via Wi-Fi). Fréquences Digital Band III 174–240 MHz, FM 87.5-108 MHz (avec RDS). Version de BT V5.0 + EDR Plage de fréquences 2.402-2.480 GHz Enceintes Pilote haut débit de 3.0", sortie 2 CH x 10 W Alimentation 100-240V~, 50/60Hz... - Page 63 EXPLICATION DES SYMBOLES SUR L'APPAREIL CAUTION RISK OF ELECTRIC SHOCK DO NOT OPEN ATTENTION : N'OUVREZ PAS LE BOÎTIER POUR ÉVITER LES CHOCS ÉLECTRIQUES ET LES BLESSURES GRAVES. PAS DE COMPOSANTS INTERNES À ENTRETENIR PAR LE CLIENT. NE CONTACTER QUE DES PROFESSIONNELS QUALIFIÉS.
-
Page 64: Consignes De Sécurité
CONSIGNES DE SÉCURITÉ Lisez les instructions. Toutes les instructions d'utilisation doivent être lues avant d'utiliser l'appareil. • Les enfants à partir de 8 ans ainsi que les personnes aux capacités physiques, mentales ou sensorielles réduites ne doivent utiliser l’appareil qu'après avoir été familiarisés par une personne responsable de leur sécurité... - Page 65 • La fiche d'alimentation de l'appareil ne doit pas être bloquée OU doit être facilement accessible lorsqu'elle est utilisée comme prévu. • N'exposez pas la batterie à une chaleur excessive comme le soleil, le feu ou autre. • Une pression sonore excessive provenant des écouteurs et des casques peut entraîner une perte d'audition.
-
Page 66: Aperçu Des Appareils
APERÇU DES APPAREILS... - Page 67 Écran LCD Prise casque Capteur de la télécommande Molette de VEILLE / VOLUME Éclairage marche/arrêt Mode d'éclairage Mode (type de fonctionnement) Stop Lecture PAUSE / bouton de SCAN 10 Titre précédent (en mode CD/BT) / réglage de la radio Titre suivant (en mode CD/BT) / réglage de la radio FM 12 Mémorisation des stations 13 Info/Menu 14 Retour...
-
Page 68: Télécommande
TÉLÉCOMMANDE... - Page 69 Touche ON/VEILLE Touche NUMERIC ; CURSOR UP Volume Touche MODE MENU Éclairage marche/arrêt Touche SCAN Titre précédent ( CD/BT) 10 Sourdine Programme 12 Volume + 13 OK (confirmer) 14 Navigation vers le bas 15 BACK 16 Information 17 Mode d'éclairage 18 Touche FM ST/MONO 19 Répétition lecture aléatoire 20 Lecture / Pause...
- Page 70 Insertion des piles dans la télécommande Ouvrez le couvercle du compartiment à pile. Insérez la pile fournie en respectant la polarité indiquée dans le compartiment à pile. Pour insérer ou retirer la pile, faites-la glisser dans le sens des bornes (-) de la pile. Fermez le couvercle. Attention •...
-
Page 71: Branchement De La Chaîne
BRANCHEMENT DE LA CHAÎNE Branchement sur le secteur : Après avoir vérifié que toutes les connexions ont été effectuées correctement, branchez le cordon d'alimentation de cet appareil dans la prise murale. Remarque: Débranchez le cordon d'alimentation de la prise si l'appareil n'est pas utilisé pendant une longue période. -
Page 72: Montage
MONTAGE Montage mural Attention • Lors du montage de l'appareil sur le mur, faites attention à ne pas le faire tomber (2,1 kg). • Vérifiez l'épaisseur de la paroi avant le montage. (Ne le placez pas sur le plâtre de placage ou sur un mur chaulé, l'appareil pourrait tomber). Si vous n'êtes pas sûr, contactez un technicien de service qualifié. - Page 73 Avec une perceuse, faites un trou dans le mur en suivant les marques des vis sur le gabarit en papier. Utilisez un marteau pour insérer une cheville murale dans le trou jusqu'à ce qu'elle affleure la surface du mur. Fixez les vis au mur comme indiqué ci-dessous. (Total vis: 2 pièces). Fixez les vis au mur comme indiqué...
-
Page 74: Utilisation
UTILISATION Interrupteur de marche/arrêt - mise en marche de la chaîne : 1. Appuyez sur le bouton Marche / Arrêt pour allumer la radio numérique DAB. Lorsque vous allumez la radio numérique DAB pour la première fois, elle démarre en mode DAB et recherche automatiquement les stations de radio disponibles. -
Page 75: Fonctions
FONCTIONS Affichage du menu Appuyez sur MODE pour afficher le menu principal. Tournez et appuyez sur le sélecteur NAVIGATE pour basculer entre les sources d'entrée. Description Fonction Radio DAB Écoutez une station de radio numérique. Radio FM Écoutez une station de radio FM. Écoutez du contenu diffusé... - Page 76 Pour changer les informations affichées à l'écran Lors de l'écoute d'une station de radio DAB ou FM, vous pouvez modifier les informations qui s'affichent à l'écran. Radio numérique Lorsque vous écoutez la radio numérique, appuyez sur INFO sur l'appareil ou la télécommande pour faire basculer les informations affichées à l'écran entre le texte défilant, le type de programme, l'ensemble, le canal / fréquence, la force / erreur du signal, le débit binaire ou la date.
-
Page 77: Radio Dab/Fm
RADIO DAB/FM Changer de station DAB 1. Appuyez sur MODE sur l'appareil ou la télécommande, tournez et appuyez sur la molette NAVIGATE pour sélectionner "DAB Radio" sur l'écran d'accueil. La première fois que vous sélectionnez la radio DAB, DAB recherche automatiquement toutes les stations disponibles, puis se règle sur la première station une fois la recherche terminée. - Page 78 sur la télécommande pendant deux secondes jusqu'à ce qu'un message apparaisse confirmant que le préréglage a été enregistré. Comment enregistrer une station dans la liste des préréglages (11-30) 1. Réglez la station de radio DAB, FM ou Internet que vous souhaitez enregistrer.
- Page 79 Écoute d'un appareil BT 1. Appuyez sur MODE sur l'appareil ou la télécommande pour sélectionner 2. Allumez AUNA Scala VCD-IR BT sur votre appareil BT et établissez une connexion. 3. Choisissez votre titre préféré, appuyez sur ⏯ sur votre appareil BT ou sur l'AUNA Scala pour lire ou mettre en pause la piste depuis votre appareil 4.
-
Page 80: Utilisation Cd
UTILISATION CD Insertion et lecture d'un CD 1. Appuyez sur MODE sur l'appareil ou la télécommande pour sélectionner le mode CD. 2. Placez un CD audio sur l'axe central avec l'étiquette tournée vers l'extérieur vers le plateau de CD et fermez le compartiment de CD. Lecture / Pause Pour interrompre la lecture, appuyez sur la touche CD PLAY / PAUSE. - Page 81 Lecture aléatoire Pendant la lecture, appuyez sur la touche de la télécommande pour sélectionner "Lecture aléatoire" et lire de la musique dans un ordre aléatoire. apparaît sur l'affichage. Appuyez à nouveau pour reprendre la lecture normale.abzuspielen. Lecture programmée Cet appareil peut être programmé pour lire une série de pistes sélectionnées.
-
Page 82: Lecture Usb
LECTURE USB En mode lecteur USB, appuyez sur la touche Select NAVIGATE ou utilisez les touches∨ Select ∧ de la télécommande pour sélectionner la lecture USB et appuyez sur OK pour confirmer. Appuyez sur la touche Select NAVIGATE ou utilisez ∨ Select ∧ sur la télécommande pour sélectionner et appuyez sur ENTER pour confirmer un fichier MP3/WMA ⏯... -
Page 83: Réglage De L'alarme Et De La Minuterie
RÉGLAGE DE L'ALARME ET DE LA MINUTERIE Réglage d'une alarme 1. Appuyez sur la touche Menu de l'unité principale ou de la télécommande et maintenez-la, puis tournez et appuyez sur la molette de sélection pour sélectionner Menu principal. 2. Appuyez sur le sélecteur pour régler Alarme sur Oui. 3. - Page 84 Réglage de la date et de l'heure L'horloge se règle automatiquement par votre signal radio numérique, votre signal radio FM ou votre réseau. Si l'heure ou la date ne se met pas à jour automatiquement, vous pouvez utiliser cette option pour la définir manuellement.
- Page 85 3. Tournez et appuyez sur la molette de navigation ou utilisez les touches SELECT de la télécommande pour sélectionner "Définir le format". 4. Tournez et appuyez sur la molette de navigation ou utilisez les touches SELECT de la télécommande pour choisir entre '12' et '24'. Modification du format de la date 1.
- Page 86 Niveau d'atténuation de l'éclairage 1. Maintenez la touche Menu de l'appareil ou de la télécommande, puis tournez et appuyez sur la molette pour choisir Menu principal. 2. Tournez et appuyez sur la molette de sélection NAVIGATE pour choisir Paramètres système > Rétroéclairage. 3.
- Page 87 3. Tournez et appuyez sur la molette Navi ou utilisez les touches SELECT de la télécommande pour sélectionner "Oui". Supprime toutes les stations inactives de la liste des stations Dynamic Range Control Le contrôle de la plage dynamique (DRC) sert à renforcer les sons plus faibles d'une émission de radio numérique dans un environnement bruyant.
-
Page 88: Entretien Des Cd
Fonction d'économie d'énergie En raison de l'exigence de niveau ErP 2 et pour la protection de l'environnement, l'appareil passe automatiquement en mode veille si aucune musique n'a été lue pendant environ 15 minutes, sauf en mode AUX. Si le mode AUX est utilisé pendant plus de 4 heures, l'appareil passe en mode veille. -
Page 89: Informations Sur Le Recyclage
INFORMATIONS SUR LE RECYCLAGE Vous trouverez sur le produit l’image ci-contre (une poubelle sur roues, barrée d‘une croix), ce qui indique que le produit se trouve soumis à la directive européenne 2012/19/UE. Renseignez-vous sur les dispositions en vigueur dans votre région concernant la collecte séparée des appareils électriques et électroniques. - Page 91 Estimado cliente: Le felicitamos por la adquisición de este producto. Lea atentamente el siguiente manual y siga cuidadosamente las instrucciones de uso con el fin de evitar posibles daños. La empresa no se responsabiliza de los daños ocasionados por un uso indebido del producto o por haber desatendido las indicaciones de seguridad.
- Page 92 DATOS TÉCNICOS Número de artículo 10035423, 10035424, 10035425 Radio: Digital (DAB/DAB+), FM y radio internet (vía WiFi). Frecuencias Banda digital III 174–240 MHz, FM 87.5-108 MHz (con RDS). Versión BT V5.0 + EDR Rango de 2.402-2.480 GHz frecuencia BT Altavoz Controlador de banda ancha 3.0", salida 2 CH x 10 W Suministro eléctrico...
- Page 93 EXPLICACIÓN SÍMBOLOS DEL DISPOSITIVO CAUTION RISK OF ELECTRIC SHOCK DO NOT OPEN ATENCIÓN: PARA REDUCIR EL RIESGO DE DESCARGAS ELÉCTRICAS Y LESIONES PERSONALES, NO ABRA LA CARCASA. NO HAY PIEZAS QUE PUEDAN SER REPARADAS POR EL USUARIO DENTRO DE LA UNIDAD. EN CASO DE REPARACIÓN, CONTACTE SÓLO CON PERSONAL CUALIFICADO.
-
Page 94: Instrucciones De Seguridad
INSTRUCCIONES DE SEGURIDAD Lea las instrucciones. Todas las instrucciones de uso deben ser leídas antes de usar el aparato. • Los niños a partir de los 8 años de edad y las personas con discapacidades mentales, sensoriales y físicas sólo podrán utilizar el dispositivo si un supervisor responsable les ha familiarizado a fondo con las funciones y las precauciones de seguridad y comprenden los riesgos asociados. - Page 95 • dispositivos de desconexión son los enchufes del dispositivo. • El enchufe de la red del aparato no debe estar bloqueado O debe ser fácilmente accesible cuando se utiliza según lo previsto. • La batería no debe ser expuesta a un calor excesivo como la luz del sol, el fuego o similares.
-
Page 96: Descripción Del Aparato
DESCRIPCIÓN DEL APARATO... - Page 97 Pantalla LCD Conexión para auriculares Sensor para el mando a distancia Regulador STANDBY/VOLUME Luz on/off Modo de iluminación Modo (Tipo de funcionamiento) Stop Botón de reproducción PAUSE/SCAN 10 Pista anterior (en modo CD/BT)/ sintonización en radio Pista siguiente (en modo CD/BT)/ sintonización en radio 12 Memoria de emisoras 13 Info/Menú...
-
Page 98: Mando A Distancia
MANDO A DISTANCIA... - Page 99 Botón ON/STANDBY Teclado numérico Botón cursor arriba Volumen - Botón MODE Botón MENÚ Luz on/off Botón SCAN Pista anterior (CD/BT) 10 Silencio Programación 12 Volumen + 13 OK (confirmar) 14 Navegar hacia abajo 15 Botón BACK (atrás) 16 Información 17 Modo de iluminación 18 Botón FM ST/MONO 19 Repetir /reproducción aleatoria 20 Reproducción/pausa...
- Page 100 Colocar las pilas en el mando a distancia Abra la tapa del compartimento de las pilas. Coloque las pilas incluidas siguiendo la polaridad indicada en el compartimento. Deslice la pila al colocarla o extraerla en dirección al polo negativo (-). Cierre la tapa. Atención •...
-
Page 101: Conexión Del Sistema
CONEXIÓN DEL SISTEMA Conexión para la fuente de alimentación: Después de haber comprobado que todas las conexiones se han establecido correctamente, conecte el cable de alimentación del aparato a una toma de corriente. Nota: Desconecte el cable de alimentación de la toma de corriente si no utiliza el aparato durante un periodo prolongado de tiempo. -
Page 102: Montaje
MONTAJE Montaje en pared Atención • Durante el montaje en pared, asegúrese de que el aparato (2,1 kg) no se caiga. • Compruebe la solidez de la pared antes de realizar el montaje. (No colocar en paredes encaladas o con paneles de yeso, el aparato podría caerse). - Page 103 Perfore un orificio en la pared siguiendo las marcas de perforación que aparecen en la plantilla de papel. Pared Fije un taco en el orificio con un martillo para realizar el montaje en pared hasta que quede al ras con la superficie de la pared. Pared Fije los tornillos a la pared como se muestra a continuación.
-
Page 104: Manejo
MANEJO Interruptor on/off - Puesta en funcionamiento del sistema: 1. Pulse el botón on/off para encender la radio digital DAB. Cuando la radio digital DAB se enciende por primera vez, se inicia el modo DAB. Busca automáticamente las emisoras de radio disponibles. 2. -
Page 105: Funciones
FUNCIONES Visualización del menú Pulse el botón MODE para visualizar el menú principal. Gire y presione el regulador de navegación para cambiar entre las fuentes de entrada. Descripción Función Radio DAB Escuche una emisora de radio digital. Radio FM Escuche una emisora de radio FM. Escuche los contenidos que se transmiten desde su teléfono o tablet. - Page 106 Modificación de la información mostrada en pantalla Si quiere escuchar una emisora DAB o FM, puede modificar la información que se visualiza en pantalla. Radio digital Si escucha la radio digital, pulse el botón INFO en el aparato o en el mando a distancia para cambiar la información mostrada en la pantalla entre texto corrido, tipo de programa, ensemble, canal/frecuencia, intensidad/error de señal, tasa de bits o fecha.
-
Page 107: Radio Dab/Fm
RADIO DAB/FM Cambiar las estaciones DAB 1. Pulse el botón MODE en el aparato o en el mando a distancia, presione y gire el regulador de navegación para seleccionar "Radio DAB" en la pantalla de inicio. Si selecciona la radio DAB por primera vez, la DAB realiza una búsqueda automática de emisoras para encontrar todas las emisoras disponibles y, al finalizar, sintoniza una de ellas. - Page 108 Para guardar rápidamente una emisora en un botón de preselección (1-10) Ponga la emisora de radio DAB o FM que quiera guardar. Mantenga pulsado uno de los botones numerados de preajuste (1-10) del mando a distancia durante dos segundos hasta que aparezca un mensaje que confirme que el preajuste ha sido almacenado.
- Page 109 3. Seleccione su música favorita, toque el botón ⏯ en su dispositivo BT o el botón X del Auna Scala para reproducir o detener una pista desde su dispositivo BT. 4. Pulse el botón ⏮ o ⏭ para seleccionar la pista anterior o siguiente.
-
Page 110: Uso De Cd/Usb
USO DE CD Introducir y reproducir un CD 1. Pulse varias veces MODE en el aparato o en el mando a distancia para seleccionar el modo CD. 2. Introduzca un CD de audio con la cara impresa en dirección a la puerta del compartimento y colóquelo sobre el eje central. - Page 111 Reproducción aleatoria Durante la reproducción, pulse el botón en el mando a distancia para elegir "Reproducción aleatoria" y reproducir la música en orden aleatorio. En la pantalla aparece . Pulse de nuevo el botón para continuar con la reproducción normal. Reproducción programada Esta unidad puede ser programada para reproducir una serie de pistas seleccionadas.
-
Page 112: Reproducción Usb
REPRODUCCIÓN USB En el modo de unidad USB, pulse el botón Select NAVIGATE o utilice el touches ∨. Seleccione ∧ en el mando a distancia para seleccionar la reproducción USB y pulse OK para confirmar. Pulse el botón Select NAVIGATE o utilice ∨. Seleccione ∧ en el mando a distancia para seleccionar y pulse ENTER para confirmar un archivo MP3/ WMA. -
Page 113: Configurar Despertador Ytemporizador
CONFIGURAR DESPERTADOR Y TEMPORIZADOR Configurar una alarma 1. Pulse el botón de menú del aparato o del mando a distancia y gire y presione el regulador de selección para seleccionar "Menú principal". 2. Pulse el botón de selección para colocar "Alarma" en "Activada". 3. - Page 114 Configuración de hora y fecha La hora se configura automáticamente a través de la señal de radio digital, FM o de su red. Si no se actualiza la hora o la fecha automáticamente, puede configurarla manualmente con esta opción. Nota: todas las actualizaciones de fecha y hora recibidas desde las emisoras digitales sobrescribirán a los ajustes manuales.
- Page 115 selección del mando a distancia para elegir "Configurar formato". 4. Gire y presione el regulador de selección o utilice los botones de selección del mando a distancia para elegir entre "12" y "24". Cambiar el formato de la fecha 1. Mantén pulsado el botón PMenu de la unidad principal o del mando a distancia, y luego gira y pulsa el dial para seleccionar Menú...
- Page 116 3. Gire y presione el regulador de selección para elegir "Nivel de atenuación". 4. Gire y presione el regulador de navegación para elegir entre "Alto" "Medio" y "Bajo". Restablecer los valores de fábrica Al restablecer, se eliminan todas las configuraciones previas, estaciones guardadas, alarmas y otras opciones para retomar los ajustes estándar.
- Page 117 Control del rango dinámico El rango de compresión dinámica (DRC) se utiliza para escuchar mejor los tonos bajos en una emisión de radio digital a bajo volumen o en entornos ruidosos. Infórmese de qué emisoras utilizan DRC. Para modificar la configuración DRC: 1.
-
Page 118: Mantenimiento De Cd
en pantalla. Para abandonar el modo AUX, puede pulsar RANDOM. Si, debido al ErP, el aparato se apaga, puede pulsar el botón STANDBY para volver a encender el aparato. MANTENIMIENTO DE CD Los discos compactos son bastante resistentes a daños, aunque pueden sufrir errores en la reproducción debido a la acumulación de polvo en su superficie. -
Page 119: Retirada Del Aparato
RETIRADA DEL APARATO Si el aparato lleva adherida la ilustración de la izquierda (el contenedor de basura tachado), entonces rige la Directiva Europea 2012/19/UE. Estos productos no pueden depositarse en los contenedores destinados a la basura común. Infórmese sobre las leyes territoriales que regulan la recogida separada de aparatos eléctricos y electrónicos. - Page 121 Gentile cliente, La ringraziamo per aver acquistato il dispositivo. La preghiamo di leggere attentamente le seguenti istruzioni per l’uso e di seguirle per evitare possibili danni tecnici. Non ci assumiamo alcuna responsabilità per danni scaturiti da una mancata osservazione delle avvertenze di sicurezza e da un uso improprio del dispositivo.
- Page 122 DATI TECNICI Codice articolo 10035423, 10035424, 10035425 Radio: Digitale (DAB/DAB+), FM e radio internet (tramite Wi-Fi). Frequenze Banda digitale III 174-240 MHz, FM 87.5-108 MHz (con RDS). Versione BT V5.0 + EDR Intervallo di 2.402-2.480 GHz frequenza BT Altoparlanti Driver a banda larga da 3,0”, 2 CH x 10 W uscita Alimentazione 100-240V~, 50/60Hz Uscite...
- Page 123 SPIEGAZIONE DEI SIMBOLI DEL DISPOSITIVO CAUTION RISK OF ELECTRIC SHOCK DO NOT OPEN ATTENZIONE: NON APRIRE L’ALLOGGIAMENTO ONDE EVITARE SCOSSE ELETTRICHE E GRAVI LESIONI PERSONALI. IL PRODOTTO NON CONTIENE COMPONENTI CHE NECESSITANO DI ASSISTENZA DA PARTE DEL CLIENTE. RIVOLGERSI ESCLUSIVAMENTE A TECNICI QUALIFICATI.
-
Page 124: Avvertenze Di Sicurezza
AVVERTENZE DI SICUREZZA Leggere le istruzioni. Tutte le istruzioni per l'uso devono essere lette prima di utilizzare l'apparecchio. • Questo dispositivo può essere utilizzato dai bambini maggiori di 8 anni e dalle persone con limitate capacità fisiche, sensoriali o mentali o da persone con esperienza e conoscenze insufficienti, solo se sono stati informati sulle funzioni del dispositivo e sono consapevoli dei rischi e dei pericoli connessi. - Page 125 • necessario staccare la spina del dispositivo. • La spina di rete dell'apparecchio non deve essere bloccata OPPURE deve essere facilmente accessibile quando viene utilizzata come previsto. • La batteria non deve essere esposta a calore eccessivo come la luce del sole, il fuoco o simili.
-
Page 126: Descrizione Del Prodotto
DESCRIZIONE DEL PRODOTTO... - Page 127 Display LCD Collegamento cuffie Sensore per il telecomando Manopola STANDBY/VOLUME Luce on/off Modalità d’illuminazione Modalità Stop Riproduzione PAUSE / SCAN 10 Brano indietro (in modalità CD/BT) / sintonizzazione radio FM Brano avanti (in modalità CD/BT) / sintonizzazione radio 12 Memoria emittente 13 Info/Menù...
-
Page 128: Telecomando
TELECOMANDO... - Page 129 Tasto ON/STANDBY Tasto NUMERICO Tasto CURSOR UP Volume - Tasto MODE Tasto MENU’ Luce on/off Tasto SCAN Brano indietro (CD/BT) 10 Mute Programma 12 Volume + 13 OK (conferma) 14 Naviga in giù 15 Tasto BACK 16 Informazione 17 Modalità d’illuminazione 18 Tasto FM ST/MONO 19 Ripete riproduzione casuale 20 Riproduzione/pausa...
- Page 130 Come inserire le pile nel telecomando Aprire il vano pile. Inserire la pila inclusa rispettando la polarità indicata nel vano. Durante l’inserimento o la rimozione spingere la pila in direzione del polo della batteria (-). Chiudere il coperchio. Attenzione • Togliere le pile se il dispositivo non viene utilizzato per lunghi periodi.
-
Page 131: Collegamento Al Sistema
COLLEGAMENTO AL SISTEMA Connessione di rete: Dopo aver verificato che tutti i collegamenti sono stati instaurati correttamente, inserire il cavo del dispositivo nella presa a muro. Nota: Scollegare il cavo di alimentazione dalla presa di corrente se non si utilizza l'apparecchio per un lungo periodo di tempo. -
Page 132: Montaggio
MONTAGGIO Montaggio a parete Attenzione • Durante il montaggio a parete, assicurarsi che l'unità (2,1 kg) non cada. • Controllare la resistenza della parete prima del montaggio (non collocarla su pareti imbiancate o con il cartongesso, l'apparecchio potrebbe cadere). In caso di dubbio, contattare un tecnico dell'assistenza qualificato. - Page 133 Praticare un foro nel muro seguendo i segni di perforazione sulla sagoma di carta. Parete Fissare un tassello nel foro con un martello per il montaggio a parete fino a quando non è pari con la superficie. Parete Stringere le viti nel muro come sotto raffigurato. (Numero totale di viti: 2 unità).
-
Page 134: Utilizzo
UTILIZZO Interruttore on/off - Avvio del sistema: 1. Premere il tasto on/off per accendere la radio digitale DAB. Quando viene accesa per la prima volta funziona in modalità DAB e cerca automaticamente le stazioni radio disponibili. 2. Tenere premuto per 2 secondi il tasto on/off per attivare la modalità standby. -
Page 135: Funzioni
FUNZIONI Display del menù Premere il tasto ‘MODE’ per visualizzare il menù principale. Girare tenendo premuta la manopola NAVIGATE per spostarsi da una fonte d’ingresso all’altra. Descrizione Funzione Radio DAB Si ascolta una stazione radio digitale. Radio FM Si ascolta una stazione radio FM. Si ascoltano contenuti scaricati in streaming dal proprio telefono o tablet. - Page 136 Modificare le informazioni indicate sul display Quando si ascolta una stazione radio DAB o FM, è possibile modificare le informazioni che vengono indicate sul display. Radio digitale Quando si ascolta la radio digitale premere il tasto INFO sul dispositivo o sul telecomando per modificare le informazioni mostrate a display come testo scorrevole, tipo di programma, ensemble, canale/frequenza, potenza del segnale/errore, Bit Rate o data.
-
Page 137: Radio Dab/Fm
RADIO DAB/FM Cambiare le stazioni OBD 1. Premere il tasto MODE sul dispositivo o sul telecomando, girare tenendo premuta la manopola NAVIGATE per selezionare ‘Radio DAB’ sullo schermo iniziale. Quando si seleziona radio DAB per la prima volta, il dispositivo esegue una ricerca automatica delle emittenti per trovare tutte le stazioni disponibili e imposta poi una stazione al termine della ricerca. - Page 138 Come salvare velocemente una stazione su un tasto memoria (1-10) Impostare l’emittente radio internet, DAB o FM che si vuole salvare. Tenere premuto per due secondi uno dei tasti di scelta numerati (1-10) sul telecomando finché appare un avviso che conferma l’avvenuto salvataggio. Come salvare un’emittente nell’elenco di default (11-30) 1.
- Page 139 1. Premere il tasto MODE sul dispositivo o sul telecomando per selezionare ‘BT’. 2. Accendere il proprio dispositivo BT AUNA Scala VCD-IR BT e instaurare un collegamento. 3. Selezionare il brano preferito, premere il tasto ⏯ sul dispositivo BT o il tasto sull’AUNA Scala per riprodurre o fermare il brano dal proprio...
-
Page 140: Uso Cd/Usb
USO CD Inserire e riprodurre un CD 1. Premere il tasto MODE sul dispositivo o sul telecomando per selezionare la modalità CD. 2. Inserire un CD audio con l’etichetta rivolta verso l’alto verso lo sportello del CD. Chiudere il vano CD. Riproduzione / Pausa Per interrompere la riproduzione, premere il tasto CD PLAY / PAUSE. - Page 141 selezionare [Riproduzione casuale]. Il display visualizza . Premere nuovamente il tasto per proseguire con la riproduzione normale. Riproduzione programmata Il dispositivo può essere programmato in modo tale da riprodurre una sequenza di brani scelti. 1. Inserire un CD e premere il tasto PROG in modalità Stop. Viene visualizzato “P-01”...
-
Page 142: Riproduzione Usb
RIPRODUZIONE USB In modalità drive USB, premere il tasto Seleziona NAVIGAZIONE o utilizzare i tasti ∨ . Selezionare ∧ sul telecomando per selezionare la riproduzione USB e premere OK per confermare. Premere il tasto Seleziona NAVIGAZIONE o utilizzare ∧. Selezionare ∧ sul telecomando per selezionare e premere ENTER per confermare un file MP3/ WMA. -
Page 143: Impostazione Sveglia E Timer
IMPOSTAZIONE SVEGLIA E TIMER Impostare l’ora della sveglia 1. Tenere premuto il tasto Menù sul dispositivo principale o sul telecomando e girare la manopola tenendola premuta per selezionare ‘menù principale’. 2. Premere Select per posizionare ‘Allarme’ su ‘On’. 3. Girare e tenere premuta la manopola per modificare la ‘Frequenza’. 4. - Page 144 si può farlo manualmente con questa opzione. Nota: tutti gli aggiornamenti di data e ora che vengono captati da un programma digitale sovrascrivono le impostazioni manuali. puede configurarla manualmente con esta opción. Nota: tutti gli aggiornamenti di data e ora ricevuti dalle stazioni digitali sovrascriveranno le impostazioni manuali.
- Page 145 4. Ruotare e premere il selettore o usare i tasti di selezione sul telecomando per scegliere tra "12" e "24". Modifica del formato della data 1. Tenere premuto il tasto PMenu sull'unità principale o sul telecomando, quindi ruotare e premere il selettore per selezionare il Menu principale. 2.
- Page 146 3. Girare e tenere premuta la manopola NAVIGATE per selezionare ‘Standby Level’. 4. Girare e tenere premuta la manopola NAVIGATE per selezionare ‘High’, ‘Medium’ o ‘Low’. Ripristino delle impostazioni di fabbrica Quando si ritorna alle impostazioni di fabbrica si rimuovono tutte le impostazioni predefinite, le stazioni memorizzate e gli allarmi, ma tutte le altre opzioni ritornano alle impostazioni di default.
- Page 147 Dynamic Range Control Il Dynamic Range Control (DRC) si usa per poter ascoltare meglio i suoni bassi in una stazione radio digitale con volume basso oppure in un ambiente rumoroso. Informarsi se le emittenti utilizzano DRC. Per modificare la configurazione DRC: 1.
-
Page 148: Manutenzione Cd
Se il dispositivo è spento a causa dell’ErP, premere il tasto STANDBY per riaccenderlo. MANUTENZIONE CD I compact disc sono piuttosto resistenti contro i danni, però si possono verificare errori a causa di accumuli di sporco sulla superficie del CD. Seguire le seguenti linee guida per poter usare al meglio il lettore CD e la propria collezione di CD. -
Page 149: Smaltimento
SMALTIMENTO Se sul prodotto è presente la figura a sinistra (il bidone dei rifiuti con le ruote), si applica la direttiva europea 2012/19/UE. Questi prodotti non possono essere smaltiti con i rifiuti normali. Informarsi sulle disposizioni vigenti per la raccolta di dispositivi elettrici ed elettronici.
Need help?
Do you have a question about the Scala VCD and is the answer not in the manual?
Questions and answers