Table of Contents
Advertisement
Available languages
Available languages
Manufacturer of gas ceramic hobs DynaCook
DynaCook X series
Camping & Yacht
Garantiekarte / Bedienungs- und Montageanleitung
Warranty card / Installation and use manual
Tu wklej numer seryjny płyty
Identifikationsdaten (Seriennummer) Ihrer DynaCook Kochplatte
DynaCook identification data (serial number)
Advertisement
Chapters
Table of Contents

Subscribe to Our Youtube Channel
Related Manuals for Dynaxo DynaCook X Series

Summary of Contents for Dynaxo DynaCook X Series
- Page 1 Manufacturer of gas ceramic hobs DynaCook DynaCook X series Camping & Yacht Garantiekarte / Bedienungs- und Montageanleitung Warranty card / Installation and use manual Tu wklej numer seryjny płyty Identifikationsdaten (Seriennummer) Ihrer DynaCook Kochplatte DynaCook identification data (serial number)
- Page 2 DE – Garantiekarte, Bedienungs- und Montageanleitung des Gas- Keramikkochplatte DynaCook X Serie Camping & Yacht GB - Warranty Card, Installation and operating manual gas ceramic hotplate DynaCook X series Camping & Yacht...
-
Page 3: Anschlusszeugnis
Anhang Nr. 1 zu Garantiebedingungen SEHR GEEHRTE DAMEN UND HERREN ! SORGEN SIE, BITTE FÜR EIGENE SICHERHEIT UND FÜR GARANTIERECHTE MACHEN SIE SICH MIT DEN UNTEN GENANNTEN INFORMATIONEN BEKANNT ANSCHLUSSZEUGNIS Der Keramikplatte DynaCook X Serie Camping & Yacht Der berichtigte Installateur mit gültigen Gasberechtigungen füllt das Anschlusszeugnis der Gas- Keramikkochplatte aus und unterschreibt es. -
Page 4: Garantie, Serviscebedienung
Bedienungs- und Montageanleitung bekannt gemacht hat, die im Anhang Nr. 2 zu Garantiebedingungen darstellt.. Dynaxo Sp. z o. o. mit Sitz in Wronki, Popowo 2A, 64-510 Wronki, Polen, eingetragen in das Unternehmerregister des Nationalen Gerichtsregisters unter der Nummer KRS 0000163601, USt.-IdNr.: 763-00-16-420, weiter als Garant genannt, erteilt dem Kunden (Endbenutzer) die Garantie für Gas-Keramikkochplatte, Typ GCH, die weiter als Produkt genannt wird, mit Identifikationsdaten, die in der... - Page 5 Nutzer allein und auf eigene Kosten verantwortlich ist. 13. Die notwendige Bedingung für die Annahme der Reklamation ist Anmeldung in schriftlicher Form per E-Mail an serwis@dynaxo.pl oder per Post an folgende Adresse: Dynaxo Sp. z o.o., Popowo 2a, 64-510 Wronki, der folgenden Informationen: a) Bereitstellung der Daten der Person, die der Reklamation einreicht (Telefon, verantwortliche Person) b) Angabe der Adresse des Produktinstallationsortes;...
- Page 6 Anhang Nr. 2 zu Garantiebedingungen Bedienungs- und Montageanleitung des Gas-Keramikkochplatte DynaCook X Serie Camping & Yacht...
-
Page 7: Table Of Contents
INHALTSVERZEICHNIS ANSCHLUSSZEUGNIS ..............................3 GARANTIE, SERVISCEBEDIENUNG .......................... 4 GARANTIEKARTE ................................ 4 HINWEISE BETREFFEND DER GEBRAUCHSSICHERHEIT ..................8 SICHERE BEDIENUNG ......................................... 9 UMWELTSCHUTZ ..............................12 WIE KANN MAN ENERGIE SPAREN ................................12 AUSPACKEN ........................................12 ENTFERNEN DER GERBAUCHTEN GERÄTE ..............................12 BEDIENUNGSANLEITUNG DER PLATTE DYNACOOK X SERIE CAMPING &... -
Page 8: Hinweise Betreffend Der Gebrauchssicherheit
Nutzer übergeben, hängen Sie an das Gerät diese Anleitung an. Die Einhaltung der Bedienungsanleitung lässt Sie unglückliche Unfälle vermeiden. Bevor die Kochplatte DynaCook eingepackt und an Sie geschickt wurde, wurde sie in DYNAXO auf Kontrollstellen sorgfältig hinsichtlich der Sicherheit und Funktionalität überprüft. -
Page 9: Sichere Bedienung
SICHERE BEDIENUNG Man soll die in dieser Bedienungsanleitung enthaltenen Regeln und Bestimmungen unbedingt beachten. Die Keramikplatte darf nicht von den Personen bedient werden, die sich mit dem Inhalt dieser Bedienungsanleitung bekannt gemacht haben. Auf diese Weise können wir uns Sicherheit gewährleisten und die Beschädigung der Platte verhindern. Besondere Beachtung soll Kindern geschenkt werden, damit sie nicht mit der Keramikplatte spielen. - Page 10 Man soll die Hinweise bezüglich der Pflege und Reinigung der Keramikplatte gemäß des Kapitels Reinigung und Wartung. Im Fall der Unrichtigkeiten im Verfahren mit der Platte, verantwortet DYNAXO nicht für die Beschädigungen, die durch die nicht richtige Arbeit, Pflege und Reinigung der Platte verursacht wurden.
- Page 11 Wenn Sie Zweifeln haben, dass nicht alles, was Sie in der Anleitung gelesen haben, verständlich ist – schreiben Sie an Servicezentrum, wo Sie vielseitige Hilfe finden. E-Mail: serwis@dynaxo.pl www.dynacook.pl www.dynacook-leisure.pl Der Hersteller ist nicht rechtlich für den Gebrauch und die Montage der Keramikplatte verantwortlich, die...
-
Page 12: Umweltschutz
UMWELTSCHUTZ WIE KANN MAN ENERGIE SPAREN Wer die Energie verantwortlich nutzt, schützt nicht nur das Hausbudget, sondern er handelt bewusst für die Umwelt. Helfen wir daher und sparen wir die Energie! Es funktioniert folgendermaßen: Verwenden Sie die Gefäße zum Kochen. Töpfe mit dem flachen und dicken Boden lassen bis 1/3 der Energie sparen. ... -
Page 13: Bedienungsanleitung Der Platte Dynacook X Serie Camping & Yacht
Die Platte ist nur für den Gebrauch im Haus/Camping geeignet: Kochen, Braten, Aufwärmen der Gerichte. Moderne Lösungen, die durch DYNAXO patentiert werden und die bei DynaCook angewendet werden, sichern komfortable Bedienung, niedrige Arbeitskosten, und erfüllen die größte Stufe der Sicherheit, die durch Normen beschrieben werden. -
Page 14: Dynacook X2
DynaCook X2 Allgemeine Aussicht der Platte DynaCook X2 1. Großer Brenner B 2. Mittlerer Brenner M 3. Heiße Gegend 4. Auslauf der heißen Abgasen 5. Bedienpult Bedienpult der Platte DynaCook X2 1. Sperre der Platte 2. Schalter ON/OFF 3. Verringerung des Feldleistung 4. -
Page 15: Dynacook X3
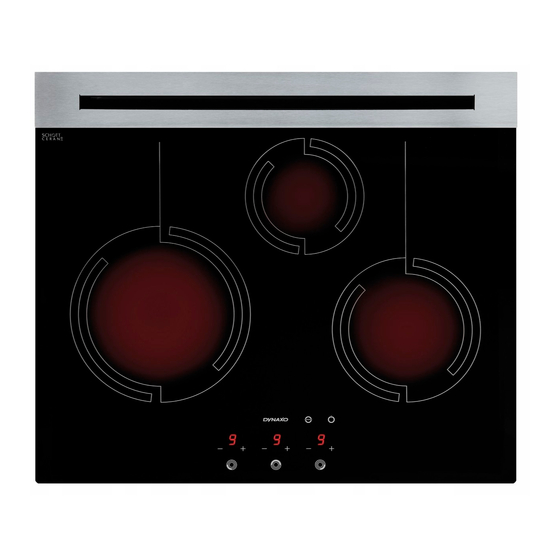
DynaCook X3 Allgemeine Aussicht der Platte DynaCook X3 1. Großer Brenner B 2. Kleiner Brenner S 3. Mittlerer Brenner M 4. Heiße Gegend 5. Auslauf der heißen Abgasen 6. Bedienpult Bedienpult der Platte DynaCook X3 1. Sperre der Platte 2. Schalter ON/OFF 3. -
Page 16: Dynacook X4
DynaCook X4 Allgemeine Aussicht der Platte DynaCook X4 1. Mittlerer Brenner Links ML 2. Großer brenner B 3. Mittlerer Brenner Rechts MR 4. Kleiner Brenner S 5. Heiße Gegend 6. Auslauf der heißen Abgasen 7. Bedienpult Bedienpult der Platte DynaCook X4 1. -
Page 17: Dynacook X5
DynaCook X5 Allgemeine Aussicht der Platte DynaCook X5 1. Kleiner Brenner Links SL 2. Mittlerer Brenner Links ML 3. Großer Brenner B 4. Mittlerer Brenner Rechts MR 5. Kleiner Brenner Rechts SR 6. heiße Gegend 7. Auslauf der heißen Abgasen 8. -
Page 18: Bedienung Der Platte
Bedienung der Platte Vor der ersten Betätigung der Platte Reinigen Sie zuerst die Platte. Behandeln Sie die Platte wie Glasflächen, Führen Sie die Bedienungstätigkeiten unter der Einhaltung von Sicherheitshinweisen und den in dieser Anleitung beschriebenen Regeln aus. Erste Betätigung des Kochfeldes nach dem Umtausch der Gasflasche oder nach dem Rückgang vom Gas in der ... - Page 19 EINSCHALTEN DES KOCHFELDES/DER KOCHFELDER: a) Stellen Sie den Topf mit dem Inhalt auf entsprechendes Kochfeld, b) Berühren Sie mit dem Finger den Sensor des Hauptschalters ON/OFF (auf Anzeigen der Leistung von Kochfeldern erscheinen Ziffer 0), [ + ] - berühren Sie innerhalb von 10 Sekunden den Sensor : es stellt die Leistung des Kochfeldes auf die Stufe „...
-
Page 20: Funktion Des Schnellen Aufkochens (9.)
Wenn das Kochfeld/die Kochfelder auf Leistungsanzeigen der Brenner abgeschaltet werden (Abb. 2), kann der Buchstabe „H” oder „h“ erscheinen – es ist Signalisierung des heißen Kochfeldes (siehe: Anzeige des Resterwärmens). Funktion des schnellen Aufkochens (9.) Die Funktion des schnellen Aufkochens hat zum Ziel maximale Beschleunigung des Aufkochens (besonders der größeren Menge von Wasser), was durch die Anzeige des Ziffers „9.”... -
Page 21: Sicherung Vor Kindern / Sperre Des Bedienpultes
Sicherung vor Kindern / Sperre des Bedienpultes Wenn Sie unkontrollierte Betätigung der Platte vorbeugen wollen (z.B. von Kindern oder Haustieren, z.B. Katzen), sollen sie die Funktion der Sperre des Bedienpultes nutzen. Einschalten der Sperre: Berühren Sie den Sensor der Sperre mindestens 2 Sek., ... -
Page 22: Nutzung Der Wärme Des Verbrannten Gases
Nutzung der Wärme des verbrannten Gases Die keramische Platte DynaCook hat Kochfeld/Kochfelder, die die Wärme des verbrannten Gases aus dem arbeitenden Brenner nutzt (Kochfeld – siehe Aufbau der Platte Abb. 1). Dieses Feld kann man für Aufwärmen der Gerichte, Erhalten der Wärme der Gerichte verwenden. -
Page 23: Reinigung Und Wartung
Um die Kochzeit maximal zu verkürzen, ist es besonders wichtig, dass: - der Topfboden flach, stabil ist, damit der Topf mit der ganzen Bodenfläche am Kochfeld der Keramikplatte anliegt. Der Boden mit scharfen Kanten, Dornen und mit verkohlten Gerichtresten kann die Keramikplatte kratzen und schleifend wirken. - der Topf entsprechenden Deckel hat, - der Durchmesser des Topfbodens mit der Tabelle Nr. -
Page 24: Optimale Und Empfohlene Ausstattung Für Reinigung Und Wartung Der Platte
Man darf das Reinigungsmittel auf das warme keramische Glas auflegen. Das Reinigungsmittel soll man mit dem feuchten Lappen vor dem vorherigen Aufwärmen der Keramikplatte abwischen. Sonst können die Reinigungsmittel ätzend für das Glas wirken. Optimale und empfohlene Ausstattung für Reinigung und Wartung der Platte Der Schaber dient zur Entfernung der Anbrennungen und starken Verschmutzungen auf dem Glas (Keramik). -
Page 25: Reinigung Des Glases Der Keramikplatte
Reinigung des Glases der Keramikplatte Die Platte soll erst dann gereinigt werden, wenn sie kalt ist. Man soll ausschließliche Reinigungsmittel für Glaskeramik verwenden und Hinweise des Herstellers beachten, die auf der Verpackung dieser Präparate angegeben werden. Bei der Reinigung der Glaskeramik gelten dieselben Regeln, wie im Fall der Glasflächen. Verwenden Sie auf keinem Fall: - Schleifmittel, aggressive Mittel oder ätzende Mittel, - Sand für Scheuern, - Mittel für Entfernung der Rost,... - Page 26 Art der Verschmutzung Reinigungsart – REIHENFOLGE DER SCHRITTE 1. Leichte, nicht angebrannte a) Wischen Sie es mit dem feuchten Schwamm für die Reinigung der Gefäße mit der Verschmutzungen, Streifen kleinen Menge der Milch für die Reinigung der keramischen Platten ab b) Nach dem Waschen - das Glas wischen, bis es trocken ist a) mit dem Schaber für die Reinigung der keramischen Platten soll man alle Anbrennungen und feste Teilchen entfernen,...
-
Page 27: Wartung Des Glases Der Keramikplatte
Beispiele der Mängel vom Glas der Keramikplatte, die die Garantie nicht berücksichtigt: Abgewischter Aufdruck des Glases – Ergebnis der Feste Beschädigung der Fläche des Glases durch Zucker Anwendung vom nicht richtigen Reinigungsmittel. und Produkte, die Zucker enthalten. Körnchen des Sandes , die eventuell auf die Küchenplatte während des Kartoffeln-Schälens oder Salat- Waschens fallen können, können die Fläche bei der Verschiebung der Töpfe kratzen. -
Page 28: Reinigung Des Auslaufs Der Heißen Abgasen
Reinigung des Auslaufs der heißen Abgasen Metallteile der Platte sollen erst dann gereinigt werden, wenn sie kalt sind. Bei der Reinigung der Elemente des Auslaufs der heißen Abgasen wird besondere Vorsicht geboten, hinsichtlich der Risiko, sich mit der Blechkante zu verletzen, von dem diese Elemente hergestellt werden. Bei der Reinigung der Metallelemente soll man keinen Schaber für Reinigung der keramischen Platten verwenden. - Page 29 Demontage des Auslaufs der heißen Abgasen Elemente Demontage der Abschirmung des Auslaufs der heißen Abgasen ( Demontage der Einlage des Auslaufs der heißen Abgasen (...
- Page 30 Montage des Auslaufs der heißen Abgasen Elemente Montage der Einlage des Auslaufs der heißen Abgasen ( Falsch Falsch Falsch Metallelemente der Kochplatte sollen erst dann gereinigt werden, wenn sie kalt sind.
- Page 31 Montage des Auslaufs der heißen Abgasen Elemente Montage der Abschirmung des Auslaufs der heißen Abgasen ( Falsch Metallelemente der Kochplatte sollen erst dann gereinigt werden, wenn sie kalt sind.
- Page 32 I. Abschirmung des Auslaufs der heißen Abgasen - Reinigung Art der Verschmutzung Reinigungsart a) Wenn es nötig ist, nehmen Sie die Abschirmung des Auslaufs der heißen Abgasen ab b) Wischen Sie mit dem leicht feuchten Lappen für Reinigung der Gefäße mit der kleinen Leichte, nicht Menge der Milch für Reinigung der keramischen Platten angebrannte...
- Page 33 II. Einlage des Auslaufes der heißen Abgasen – Reinigung Scheuern kann die Lackschicht der Einlage B beschädigen, daher soll man Scheuern der Einlage mit Schleifmaterialien, mit dem schleifenden Teil des Schwammes vermeiden, Schaber. Art der Verschmutzung Reinigungsart a) Nehmen Sie die Abschirmung des Auslaufes der heißen Abgasen b) Nehmen Sie die Abschirmung des Auslaufes der heißen Abgasen c) Wischen Sie mittels des Schwammes oder Lappens mit dem Spülmittel Flecke, Verschmutzungen...
-
Page 34: Verfahrensweise Bei Störungen
Verfahrensweise bei Störungen ALARMZUSTÄNDE AUF DEM STEUERPANEEL Lfd. Beschreibung der Signalisierung Problem ANMERKUNGEN Lichtsignal Tonsignal 1. Sicherstellen, dass sich Gas in der Installation befindet, Blinkendes oder etwa durch Prüfung, ob andere mit Gas betriebene durchgehendes Geräte funktionieren. Aufleuchten der „ “... - Page 35 Lfd. Beschreibung der Signalisierung Problem ANMERKUNGEN Lichtsignal Tonsignal Mindestens 30 Minuten bis zum Abkühlen der Platte warten. In dieser Zeit kann die Blinkendes Aufleuchten Überschreitung der Platte nicht eingeschaltet werden. der Buchstaben Kurzes Signal aller zulässigen Prüfen, ob der Austritt der heißen Abgase nicht abgedeckt oder verstopft ist. „...
-
Page 36: Montageanleitung
MONTAGEANLEITUNG Um das Risiko des Unfalls zu vermeiden, ist es notwendig, dass das Gerät gemäß dieser Anleitung installiert wird. Der Hersteller verantwortet rechtlich nicht für irgendwelche Schäden, die infolge der nicht nach dieser Anleitung ausgeführten Montage entstehen. Irgendwelche Änderung im Gerät, die vom Nutzer ausgeführt wird, kann gefährlich sein und ist verboten! Raum (Gravitationslüftung, z.B. -
Page 37: Montage Der Keramikplatte
NUR RICHTIGE MONTAGE SICHERT RICHTIGES FUNKTIONIEREN DER PLATTE, DAHER WENN SIE IRGENDWELCHE ZWEIFELN IM BEREICH DER PLATTENMONTAGE IM KÜCHENMÖBEL HABEN, BITTEN WIR SIE UM KONTAKT MIT DEM SERVICEZENTRUM unter der serwis@dynaxo.pl E-Mail: www.dynacook.pl www.dynacook-leisure.pl ES IST VERBOTEN, PLASTISCHE MASSEN ZU GEBRAUCHEN (z.B. SILIKONE), DIE DIE KANTEN DER KERAMIKPLATTE MIT DER PLATTE DICHTEN. -
Page 38: Lüftung Der Platte
Lüftung der Platte Damit die Keramikplatte richtig funktioniert, und nicht beschädigt wird, soll man ihr entsprechende Lüftung sicherstellen. Es ist verboten, die Platte in Schränken zu montieren, ohne sicherzustellen, richtige frische Luft zuzuführen. Die Zwischenräume zwischen der Platte und Elementen von Küchenmöbeln (z. B. der Rückwand des Schranks, ... - Page 39 • Einbau in der Platte des Tragschranks ohne Schubladen und ohne Backofen – erforderlich ist Sicherung der richtigen Lüftung der Platte durch Erfüllung der in der Abbildung unten beschriebenen Bedingungen Auslauf der heißen Abgasen Plattenmodel L – Fach Abmessung Fach DynaCook X2 272 mm DynaCook X3...
- Page 40 • Einbau in der Platte des Tragschranks mit Schubladen und ohne Backofen – erforderlich ist Sicherung der richtigen Lüftung der Platte durch Erfüllung der in der Abbildung unten beschriebenen Bedingungen Auslauf der heißen Abgasen Fach Plattenmodel L - Fach Abmessung DynaCook X2 272 mm DynaCook X3...
-
Page 41: Ausschneiden Der Öffnung In Der Küchenplatte Und Montage Der Platte In Der Küchenplatte
Ausschneiden der Öffnung in der Küchenplatte und Montage der Platte in der Küchenplatte Ausschneiden in der Küchenplatte soll genau ausgeführt werden. Die Platte soll vom Staub gereinigt werden. Schritt Nr. 1: Je nach der Situation bereiten Sie die Stelle (Öffnung) in der Küchenplatte gemäß der Montageskizze: LOCH IN DER ARBEITSPLATTE Kochplattenabmessungen Abmessung... -
Page 42: Gasinstallation
Gasinstallation Wir haben mit dem Gas zu tun. Daher soll die Gasplatte an die Gasinstallation vom berechtigten Installateur an solches Gas angeschlossen werden, das sie angepasst wurde. Information über die Art. des Gases, an die sie angepasst ist, befindet sich auf dem Leistungsschild der Keramikplatte. -
Page 43: Flüssiges Gas (Z.b. Propan/Butan)
Der Installateur muss nach dem Montieren der Keramikplatte erste Betätigung ausführen. Bei der ersten Betätigung der Küche kann die Erscheinung von „fauchen” auf dem Auslauf der heißen Abgasen eintreten. Es ist normale Erscheinung, die durch Vergasen der Gasleitungen und Brenner entsteht. Diese Erscheinung wird nach der ersten Betätigung nicht mehr eintreten. - Page 44 DynaCook X3 Rückansicht der Platte Kabel 12 VDC 2. Kabel SCHWARZ VDC (Erdung) 3. Gasanschluss R1/2 DynaCook X4 Rückansicht der Platte Kabel 12 VDC 2. Kabel SCHWARZ VDC (Erdung) 3. Gasanschluss R1/2 DynaCook X5 Rückansicht der Platte Kabel 12 VDC 2.
-
Page 45: Kontrolle Und Aufsicht Über Die Gasinstallation, Elektrische Installation Und Lüftungsinstallation
Wenn es Notwendigkeit besteht, die Platte an eine andere Art des Gases anzupassen, kontaktieren Sie sich mit dem Servicezentrum: E-mail: serwis@dynaxo.pl www.dynacook.pl www.dynacook-leisure.pl um die Bedingungen der Anpassung der Platte an eine andere Art des Gases, als das sich aus dem Leistungsschild der Platte ergibt. -
Page 46: Technische Daten
TECHNISCHE DATEN Nennwärmebelastung von Brennern für verschiedene Gase G30 (3B/P) G30 (3B/P) (3P) G31 (3P) Druck [mbar] 0,95 0.95 0.75 kleiner Brenner (S) 1,90 1.80 1.50 mittlerer Brenner (M) 2,50 2.50 1.95 großer Brenner (B) Nennwärmebelastungen von DynaCook Platten G30 (3B/P) G30 (3B/P) (3P) G31 (3P) -
Page 47: Connection Certificate
PLEASE CAREFULLY READ THE INFORMATION PRESENTED BELOW CONNECTION CERTIFICATE Ceramic DynaCook X series cooktop The Connection Certificate is filled out and signed by an authorised installation technician holding appropriate and valid certification. In order for the warranty covering the purchased cooktop to be... -
Page 48: Warranty, Servicing
Servicing In the event of any problems with your DynaCook, you can count on the Dynaxo Service Centre for quick and professional assistance. We want to guarantee full convenience in use of the DynaCook to everyone who placed their trust in the Dynaxo brand. - Page 49 34. Acceptance of complaints for processing is conditioned by delivery of the appropriate notice in writing by e-mail to the address of serwis@dynaxo.pl or by traditional mail to the following address: Dynaxo Sp. z o.o., Popowo 2a, 64-510 Wronki, POLAND, as well as by the following: inclusion of the personal data of the individual filing the complaint (telephone number, responsible individual);...
- Page 50 Attachment no. 2 to the Terms of Warranty Installation and Operation Manual DynaCook X series Ceramic Gas Cooktop Camping & Yacht...
- Page 51 SAFETY GUIDELINES ..............................52 SAFE USE ............................................53 ENVIRONMENT PROTECTION ..........................56 SAVING ENERGY ......................................56 UNPACKING........................................56 REMOVING USED APPLIANCES ................................... 56 DYNACOOK X SERIES OPERATION MANUAL ....................57 GETTING TO KNOW YOUR D ..........................57 ..........................................57 URPOSE ..........................................57 ESIGN X2 ........................................
-
Page 52: Safety Guidelines
Before your the DynaCook was packaged and shipped out to you, its safety and functions were subject to extensive testing by DYNAXO’s quality control. After unboxing, please check the condition of the device. Do not install it if it is damaged. -
Page 53: Safe Use
SAFE USE Always obey the standards and provisions of this Manual. Never let anyone who is not acquainted with the content of the Manual use the ceramic cooktop. This way, you are ensuring your safety and preventing the cooktop from being damaged. - Page 54 GAS SYSTEM IF YOU SHOULD SUSPECT A GAS LEAK, DO NOT: light matches, lighters, or cigarettes, turn electrical appliances (e.g. a bell or light) on or off, or use other electrical and mechanical appliances producing an electrical or electrostatic discharge spark.
- Page 55 If you have any concerns or have trouble understanding something in this manual – call our Service Centre for assistance. tel. +48 606 649 549 e-mail: serwis@dynaxo.pl www.dynacook.pl www.dynacook-leisure.pl The manufacturer cannot be held liable in any way for use of the ceramic cooktop not in accordance with...
-
Page 56: Environment Protection
ENVIRONMENT PROTECTION SAVING ENERGY If you consume energy responsibly, you not only help out your household budget, but you are also consciously benefiting the natural environment. Let’s all do our part and conserve energy! We can do so by: Using appropriate cookware. Cookware with flat and heavy bottoms will save up to 1/3 of energy. ... -
Page 57: Dynacook X Series Operation Manual
The cooktop is intended for the following types of household use only : cooking, frying, and heating food. The innovative solutions patented by DYNAXO and applied in the DynaCook ensure convenient use and low exploitations costs with fulfilment of top safety standards. -
Page 58: Dyna Cook X2
DynaCook X2 General view of the DynaCook X2 Big burner B 2. Medium burner M 3. Residual heating zone 4. Hot air exhaust 5. Control panel View of the DynaCook X2 control panel 1. Cooktop lock 2. ON/OFF switch 3. Reduce heating power 4. -
Page 59: Dyna Cook X3
DynaCook X3 General view of the DynaCook X3 1. Big burner B 2. Small burner S 3. Medium burner M 4. Residual heating zone 5. Hot air exhaust 6. Control panel View of the DynaCook X3 control panel Cooktop lock ON/OFF switch Reduce heating power Increase heating power... -
Page 60: Dyna Cook X4
DynaCook X4 General view of the DynaCook X4 1. Medium left burner ML 2. Big burner B 3. Medium right burner MR 4. Small burner S 5. Residual heating zone 6. Hot air exhaust 7. Control panel View of the DynaCook X4 control panel 1. -
Page 61: Dyna Cook X5
DynaCook X5 General view of the DynaCook X5 1. Small left burner SL 2. Medium left burner ML 3. Big burner B 4. Medium right burner MR 5. Small right burner SR 6. Residual heating zone 7. Hot air exhaust 8. -
Page 62: Using The Cooktop
Using the Cooktop Before first use First of all, please carefully clean the ceramic cooktop. Treat the ceramic surface as you would treat a glass surface. Perform all maintenance tasks with preservation of safety precautions and the standards specified in this manual. ... - Page 63 TURNING ON A HEATING ZONE/HEATING ZONES a) place the cookware with food on the appropriate heating zone b) touch the sensor of the main ON/OFF switch with your finger (the digits 0 will appear on the heating zone power displays) - touch sensor [ + ] with your finger within 10 seconds: this will set the heating zone to level “9”...
-
Page 64: Fast Boil Function (9.)
After the heating zone/heating zones is/are turned off, the burner indicator may display the letter “H” or “h” to indicate a hot heating zone (see: Residual heat indicator). Fast boil function (9.) The fast boil function is intended to accelerate boiling to maximum (especially when we need a high volume of hot water) and is indicated by displaying the digit “9.”... -
Page 65: Child Protection/Control Panel Lock
Child protection/Control panel lock In order to prevent accidental activation of the ceramic cooktop (e.g. by a child or household pet, e.g. cat), please use the control panel lock function. Turning on the lock: touch the lock sensor for at least 5 s. The control panel lock will be activated when you see the lock symbol appear and hear the sound signal. -
Page 66: Taking Advantage Of The Heat Produced By Combusted Gas
Taking advantage of the heat produced by combusted gas The DynaCook ceramic gas cooktop has a heating zone/heating zones taking advantage of the heat produced by the gas combusted by an active burner (residual heating zone – see: Cooktop design). This zone can be used to heat up your food or to keep it warm. -
Page 67: Cleaning And Maintenance
In order to reduce the cooking time to maximum, please ensure the following: - the cookware bottom must be flat and stable to ensure that the entire bottom surface adheres to the heating zone of the ceramic cooktop (bottoms with sharp or jagged edges and charred food remains may scratch the ceramic cooktop and produce an abrasive effect), - the cookware should have a tightly fitting lid, - the diameter of the cookware’s bottom should correspond to that presented in the table in the chapter entitled FHZ... -
Page 68: Optimal And Recommended Cooktop Cleaning Instruments
Optimal and recommended cooktop cleaning instruments The scraper is used to remove burnt on layers and strong residue on the glass (ceramic surface). The ceramic surface of the cooktop can be cleaned only with an extended scraper blade in accordance with its instruction manual. -
Page 69: Cleaning The Ceramic Cooktop Surface
Cleaning the Ceramic Cooktop Surface Do not clean the cooktop until it is cold. Use only cleaning agents dedicated to ceramic glass surfaces and follow the guidelines of the manufacturer presented on the packaging of said agents. Cleaning of a ceramic surface is subject to the same guidelines as cleaning of a glass surface. Never use the following: - abrasive, aggressive, or corrosive cleaning agents, - scrubbing powder, sandpaper, - corrosion removal agents,... - Page 70 Contamination type Cleaning method – ORDER OF STEPS wipe off with a wet dish sponge with a little ceramic surface cleaning agent Light non-burnt residue, streaks d) after cleaning - wipe the surface dry use a ceramic surface scrubber to remove all burnt on and solid pieces collect the dirt removed by the ceramic surface scrubber with a wet sponge/cloth apply a ceramic surface cleaning agent onto the strong residue, distribute with...
-
Page 71: Maintenance Of The Ceramic Cooktop Surface
Examples of damaged ceramic surfaces not covered by the warranty: Surface decoration damaged due to application of an Permanent damage to the surface with sugar and inappropriate cleaning agent. products containing sugar. Grains of sand, which may fall on the cooktop when you are peeling potatoes, rinsing lettuce, etc. may scratch the surface when you move the cookware. -
Page 72: Cleaning The Hot Air Vent
Cleaning the hot air vent Do not clean the hot steam vent elements of the cooktop until they are cold. When cleaning the hot steam vent elements, please take particular care due to the risk of cutting yourself with an edge of the material used to make said elements. When cleaning hot steam vent elements made of materials other than glass, do not use the ceramic surface scraper. - Page 73 Removing exhaust vent elements Removing the outer exhaust vent element ( Removing the inner exhaust vent element (...
- Page 74 Installing exhaust vent elements Installing the inner exhaust vent element ( Good Do not clean the metal elements of the cooktop until they are cold.
- Page 75 Installing exhaust vent elements Installing the outer exhaust vent element ( Good Do not clean the metal elements of the cooktop until they are cold.
- Page 76 I. Outer exhaust vent element - cleaning Contamination type Cleaning method e) if necessary, remove outer exhaust vent element gently wipe off with a wet dish sponge with a little ceramic surface cleaning agent Light, non-burnt residue, stains g) wipe dry h) reinstall outer exhaust vent element g) if necessary, remove outer exhaust vent element INOX (silver) stainless steel outer exhaust element:...
- Page 77 II. Inner exhaust vent element – cleaning Scrubbing may damage the varnish layer of inner exhaust vent element B, which is why you should avoid scrubbing the element with abrasive materials, the rough side of a sponge, or scrapers. Contamination type Cleaning method remove outer exhaust vent element g) remove inner exhaust vent element...
-
Page 78: Troubleshooting. What To Do When
Troubleshooting. What to do when... CONTROL PANEL ALARM STATES Indication type Problem CONDUCT Light Sound 5. Make sure that gas is being supplied to the system, e.g. Flashing or by checking the operating order of other gas-powered continuous “G” or appliances. - Page 79 Indication type Problem CONDUCT Light Sound Wait minimum 30 minutes until the cooktop cools off. During this time, the cooktop Flashing Maximum permitted cannot be activated. “U” and “H” operating Check if the hot air exhaust is not obstructed or clogged up. Short signal, every 2 temperature of the Check if the outer exhaust vent element (A) and the inner exhaust vent element (B) are...
-
Page 80: Installation Manual
INSTALLATION MANUAL In order to avoid the risk of potential accidents, it is required that the appliance be installed according to this Manual. The manufacturer is not held liable for any damage resulting from installation of the appliance inconsistently with the Installation Manual. All unauthorised modifications performed in the appliance by the user may be potentially dangerous and are strictly prohibited! Room The kitchen space should be dry, airy, and equipped with a natural (gravity) ventilation system discharging the exhaust... -
Page 81: Installing The Ceramic Cooktop
Service Centre. tel. +48 606 649 549 e-mail: serwis@dynaxo.pl www.dynacook.pl www.dynacook-leisure.pl Use of formable masses (e.g. silicone) to seal the edges of the ceramic cooktop to the counter is strictly prohibited. -
Page 82: Cooktop Ventilation
Cooktop ventilation In order to ensure that the ceramic cooktop is in proper operating order and does not suffer any damage, you must ensure appropriate ventilation. Installation of the cooktop in cabinets without an appropriate supply of fresh air ensured is strictly prohibited. •... - Page 83 • Installation in a cabinet without drawers or an oven – proper cooktop ventilation must be ensured by fulfilling the requirements specified in the figure presented below. Hot exhaust outlet Cooktop model L - Partition length Partition DynaCook X2 272 mm DynaCook X3 DynaCook X4 322 mm...
- Page 84 • Installation in the counter of a load-bearing cabinet with drawers and with no oven – proper cooktop ventilation must be ensured by fulfilling the requirements specified in the figure presented below. Hot exhaust outlet Cooktop model L - Partition length Partition DynaCook X2 272 mm...
-
Page 85: Cutting Out The Kitchen Counter And Installing The Cooktop In The Cutout
Cutting out the kitchen counter and installing the cooktop in the cutout The cutout in the counter must be precise. Remember to clean all dust and dirt from the counter. Step 1: Prepare the point (opening) in the kitchen counter according to the installation diagram: COUNTER CUTOUT Cooktop size Size... -
Page 86: Gas System
Connect the cooktop to the gas system (see section: Gas system) and power supply (see section: Electrical power supply). Check for operating order. Gas system We are dealing with gas. The ceramic gas cooktop can be connected to an LPG tank or existing gas network only by a certified gas installation technician with preservation of all safety standards. -
Page 87: Liquid Gas (E.g. Propane-Butane)
• Check the following: ½” - the cap/seal on the R connector - ventilation efficiency, i.e. air exchanges inside the room, - tightness of the gas fittings. • Perform the initial activation Following installation of the ceramic cooktop, the gas installation technician must perform the initial activation. When the cooktop is activated for the first time, it may produce momentary “snorting”... - Page 88 DynaCook X3 Rear view of the cooktop RED wire 12 VDC 2. BLACK wire VDC (Ground) 3. Gas connection R1/2 DynaCook X4 Rear view of the cooktop RED wire 12 VDC 2. BLACK wire VDC (Ground) 3. Gas connection R1/2 DynaCook X5 Rear view of the cooktop RED wire...
-
Page 89: Controlling And Monitoring The Gas, Electrical Power, And Ventilation Systems
If the need to convert the cooktop to a different type of gas should arise, please contact the Service Centre: tel. +48 606 649 549 e-mail: serwis@dynaxo.pl www.dynacook.pl www.dynacook-leisure.pl in order to arrange the terms for converting the cooktop to a type of gas other than that specified in its rating plate. -
Page 90: Technical Data
TECHNICAL DATA Rated thermal loads of burners for various gases G30 (3B/P) G30 (3B/P) (3P) G31 (3P) Pressure [mbar] 0,95 0,95 0,75 Small burner (S) 1,90 1,80 1,50 Medium burner (M) 2,50 2,50 1,95 Large burner (B) Rated thermal loads of DynaCook cooktops G30 (3B/P) G30 (3B/P) (3P) -
Page 91: Safety Certificate
SAFETY CERTIFICATE... - Page 92 Vielen Dank, dass Sie sich für eine DynaCook Kochplatte entschieden haben Thank you for choosing DynaCook Manufacturer of gas ceramic hobs DynaCook DYNAXO Sp. z o.o. Popowo 2A 64-510 Wronki www.dynaxo.pl Benötigen Sie Hilfe? Sie finden es hier: Need support? You can find it here: DynaCook Service Centre tel.
Need help?
Do you have a question about the DynaCook X Series and is the answer not in the manual?
Questions and answers