
Related Manuals for MOTOYAMA EA91A


Summary of Contents for MOTOYAMA EA91A
- Page 1 Bulletin No. MIE-B6104K INSTRUCTION MANUAL ELECTRO-PNEUMATIC VALVE POSITIONERS Models EA91A Flameproof Type of Explosion-protected Construction Model EA90A Intrinsic Safety Type of Explosion-protected Construction...
- Page 2 ⑶ As the result of studying and improving this product without notice, the specifications, dimensions, adjustments, illustrations, and other items included in this manual might be different in details. For any questions about the delivered product or this instruction manual, contact MOTOYAMA sales office or sales agency for purchase before operation. Safety Information To handle this product safely, the symbol marks and signal words shown below ...
-
Page 3: Table Of Contents
Model EA91A&EA90A CONTENTS Page Page ………………2 ……………15 1. SAFETY INSTRUCTIONS 5. EXTERNAL CONNECTION …………2 …………15 1.1 General Safety Instructions 5.1 Piping and Wiring Systems ………………………16 1.2 Safety Instructions on Model EA91A Electro 5.2 Pneumatic Piping …………2 -pneumatic Valve Positioner ………………………16 5.3 Electrical Wiring 1.3 Safety Instructions on Model EA90A Electro …………3 -pneumatic Valve Positioner ……………………………19 6. ADJUSTMENT ………………4 ………………19 2. GENERAL INFORMATION 6.1 Pre-adjustment Check ……………………………………4 …………………20 2.1 Purpose 6.2 Adjusting Procedure …………………4 2.2 Applicable Regulation 6.3 Zero Adjustment …20 (Linear Type, Cam Type:Common) ……………………………4 2.3 Specifications ……………20 6.4 Zero Adjustment for Cam... -
Page 4: Safety Instructions
Model EA91A&EA90A SAFETY INSTRUCTIONS 1.1 General Safety Instructions 1.1.1 Compliance with Safety Instructions CAUTION When handling and operating the electro-pneumatic valve positioner, all the safety instructions herein should be securely followed. CAUTION 1.1.2 Conformance with Specifications Both the Model EA91A Electro-pneumatic Valve Positioner (flameproof explosion-protected construction) and the Model EA90A Electro-pneumatic Valve Positioner (intrinsically safe explosion-protected construction) have been approved in accordance with the Labor Safety and Hygiene Law of "Technical Criteria of Electrical -mechanical Equipment Explosion-protected Construction"(hereafter referred to as "Technical Criteria"). The certified seal, and the nameplate or the cautionary label describing the specifications to be required protecting explosion are attached to each valve positioner in conformance with all specified requirements. Check the items described in the certified seal, and the nameplate or the cautionary label, and use this product. Model No. Applicable Installation Location Explosion-protection Type Explosive Gases All gases classified in Group left and Div.1 and 2 Hazard Flameproof Type EA91A ⅡC T6 -ous Area. Non-Hazardous Area. (Locations specified in Technical Criteria, Ex sd ⅡC T6X Technical Criteria and Division 1 and 2 Hazardous Area) All gases classified in Group left and Div.0, 1 and 2 Hazard Intrinsic Safety Type EA90A ⅡC T5 -ous Area. All Non-Hazardous Area. (Locations specified in Technical Criteria, Ex ia ⅡC T6... -
Page 5: Safety Instructions On Model Ea90A Electro-Pneumatic Valve Positioner
Model EA91A&EA90A 1.3 Safety Instructions on Model EA90A Electro-pneumatic Valve Positioner The EA90A Electro-pneumatic Valve Positioner (intrinsically safe explosion-protected construction) consists of one intrinsic safety device (electro-pneumatic valve positioner) designed and produced following to the new Technical Criteria and one intrinsic safety related device (safety barrier). Use the safety barrier individually passed the device test for combining with the EA90A Electro-pneumatic Valve Positioner. Select the safety barrier that complies with the combination conditions described in Item 2.6.2 "Model EA90A Electro-pneumatic Valve Positioner (Intrinsic Safety Type) in this manual. 1.3.1 Limitation of Installation Location WARNING The electrical device with the intrinsically safe explosion-protected construction consists of the combination of the intrinsic safety device (EA90A Electro-pneumatic Valve Positioner) to be installed in hazardous area and the safety barrier (intrinsic safety related device) to be installed in non-hazardous area. The EA90A Valve Positioner can be installed in hazardous area according to the available explosive gas of the intrinsic safety device. However, do not install the safety barrier to be electrically connected to the EA90A Valve Positioner in hazardous area unless the safety barrier is used in combination with other ... -
Page 6: General Information
Model EA91A&EA90A GENERAL INFORMATION 2.1 Purpose The Model EA91A and EA90A Electro-pneumatic Valve Positioners are mounted to control valves. They convert electric signals from the controller into pneumatic pressure to control the opening of the control valve properly. The valve positioners are of explosion-protected construction, and are improved the positioning accuracy and response performance of process control valves installed in hazardous areas. 2.2 Applicable Regulation The valve positioners delivered are passed the test in accordance with technical criteria of explosion- protected construction standard for electrical machine and equipment (issued by the Ministry of Labor in Japan, No. 556, 1996). 2.3 Standard Specifications Model EA91A Model EA91AC Model EA90A Model 90AC Type Lever Type Cam Type Lever Type Cam Type (Single Action) (Single Action) (Single Action) (Single Action) Input Current 4〜20mADC Input Resistance 250Ω Supply Air Pressure Max. 500kPaG(5.0kgf/cm Flame-proof type Intrinsic safety type (JIS) Ex sd ⅡC T6X (JIS) Ex ia ⅡC T5 Explosion-protection (NEPSl) Ex dm ⅡC CT6 (NEPSl) Ex ia ⅡC T5 (KOSHA) Ex dmb ⅡC T6 Certifd No.12-AV4BO-0114 Protection Class... -
Page 7: Specifications
Displacement transfer Method Cam Type C Conduit Type (standard) (Blank) Method of Leading External Cable T Explosion-proof conector with packing Type(option) 【Note】 If method of leading external cable is explosion-proof connector(Spec. code:T), applicable standard is JIS, flame-proof. In case of NEPSI flame-proof type, flame-proof packing connector(cable glands), certified by NEPSI, shall be supplied by customer. 2.5 Nameplate Identification (1) The safety certified seal nameplate (Official Certification Plate) is attached on the top of positioner case. Flameproof ( EA91A, EA91AC) Intrinsic Safety (EA90A, EA90AC) 労(平25.5)検 ※ 労(平25.4)検 ※ 第TC17951号 第TC17899号 ※Described date may be differed by 本山製作所 本山製作所 株式 株式 会社 time of manufacture. -
Page 8: Construction
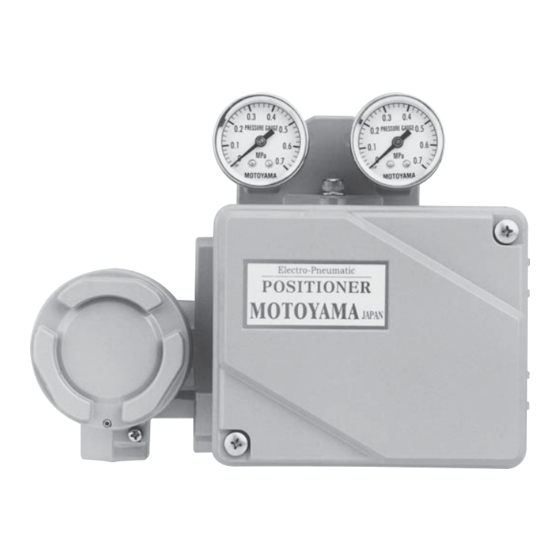
Model EA91A&EA90A 2.6.2 Model EA90A Electro-Pneumatic Positioner (Intrinsic Safety Type) Hazardous area Non hazardous area Electro-pneumatic positioner Safety barrier General device EA90A Source 4〜20mA DC Earth bus bar Safety earth To combine with a safety barrier The safety barrier which is used in combination with electro-pneumatic positioner EA90A must be TIIS certified type. ※2 For the safety barrier selection, please refer to the following data for Intrinsically safe approval of model EA90A. ① Performance classification and Group ia II C ② Permissible maximum values Ui = 30V, Ii = 100mA , Pi = 0.75W ③ Parameters Ci = negligibly small Li = negligibly small TIIS ; Technology Institution of Industrial Safety (JAPAN) ※2 ※ Motoyama distribute recommended safety barriers (MTL made, 787S+ 728+ type). If you are interested or have any questions about the product, please contact our sales offices or sales agents. 2.7 Construction 2.7.1 Lever Type 2.7.2 Built-in Cam Type Right-hand lateral face Restriction Supply Air Connection Output Air Connection Supply Pressure Gauge Output Pressure Gauge Auto/Manual Switching Screw Stroke Zero Adjustment Knob... -
Page 9: Principle Of Operation
Model EA91A&EA90A PRINCIPLE 0F OPERATION The Model EA91A and EA90A Electro-Pneumatic Positioner is used as accessory measuring instrument to pneumatic control valves. This converts electric signals from the controller into pneumatic pressure to position the opening of pneumatic control valve. As the signal current from the controller or manual operator increases, the torque motor coil generates magnetic pole on the armature. The armature receives rotary torque in the counter-clockwise direction, and varies the distance between the nozzle and the flapper. As a result, the nozzle back pressure changes, and the pilot valve reacts accordingly. The output air of pilot valve is supplied to the diaphragm motor, and moves the control valve. The valve stem movement is mechanically transmitted to the feedback spring through feedback lever, transmission lever, and stroke adjustment lever, and balances the valve movement at a position that is equal to the generated torque due to the signal current. Figure of Principle of Operation Nozzle Auto/Manual Feedback Spring Pilot Valve Back Pressure... -
Page 10: Installation
INSTALLATION 4.1 Dimensions Unit : mm Type Actuator Size(Outer Dia.) A φ200〜φ330 Lever Type Air Connection B φ400〜φ650 2-Rc 1/4 (Left Lateral View) 45.5 Conduit Connection 58.5 146 (A Type) 206 (B Type) G 1/2 Built-in Cam Type (See above as left lateral view) 45.5 Leading External Cable ◇Conduit Type ◇Flameproof Packing Type (Additional Option):Applicable cable OD:φ9.1〜φ11 Model : EA91A(C), EA90A(C) Model : EA91A(C)T KXB-LO-16 KXB-LO-16F (Standard) (Special Option) -
Page 11: Installation Conditions
Model EA91A&EA90A 4.2 Installation Conditions 4.2.1 Locations for Installation Model Model EA91A Model EA90A The models EA91A and EA90A electro-pneumatic Flameproof Type Intrinsic Safety Type Environmental positioner can be installed and used at the hazardous Conditions area in accordance with gases to be used. −20〜60℃ Ambient Temp. −20〜60℃ 4.2.2 Environmental Conditions Atmospheric 80〜110 kPa, Absolute Press. Pressure The applicable environmental conditions are shown in the right table. ※The ambient temperature in the non-explosion- protected environment is ‒40 to 100℃ ①If the equipment may cause to be exposed to the radiation from plant facilities and the ambient temperature may be abnormally high, take appropriate measures to insulate the heat. ② If installing the equipment under the special conditions (vibration, corrosive atmosphere, CAUTION always be exposed to drain), take appropriate measures to protect from such conditons. ※If the device is in conditions of ① or ②, contact our sales branch or sales agent. Bracket 4.3 Pre-Installation Check For Model 2800 (1) Nameplate Check (related to specifications and ... -
Page 12: Installation To Linear Motion Actuator
Model EA91A&EA90A Installation Drawing of 4.4 Installation to Linear Motion Actuator Actuator for Model 3800 Use bracket suitable for actuator, and install the Actuator Positioner properly. When installing, use mounting threaded hole on the back of the Positioner and mount- ing threaded hole in the front of the actuator. ⑴ Attach the stem clamp to diaphragm stem. Diaphragm Stem At this point, attach the stem clamp upward approx. 5 to 10 mm from lock nut. Fix the connector arm so as to be parallel to the front IMPORTANT 5〜10mm surface of actuator. ⑵ Attach the bracket to actuator. Fixing Bolt ⑶ Install the Positioner to bracket. -
Page 13: Installation To Rotary Motion Actuator
Model EA91A&EA90A 4.5 Installation to Rotary Motion Actuator ⑴ Attach the spacer bolt. Tighten the spacer bolt to crank box. (Screw short side of spacer bolt threaded part.) ⑵ Mount the connecting shaft. Insert the lock nut, spring washer, and indicator to connecting shaft, and screw the connecting shaft to M8 screw of valve shaft. ⑶ Fix the indicator. Check that valve action is air failure-open or air-failure close. Then, fix the indicator to appropriate position, open or close, on indicator scale with lock nut. ※The hole position of set spring must be vertical to connecting shaft. Set the inserting hole on connecting shaft vertically and the set screw on connecting rod horizontally to proper position. IMPORTANT ⑷ Attach the bracket. Attach the bracket to the preinstalled spacer bolt. ⑸ Attach the connecting pipe. Attach the connecting pipe to the serrated portion of the feedback shaft at back side of the positioner with set screw. ※The position of the set screw must be horizontal. ⑹ Mount the positioner. Insert the connecting shaft to the connecting pipe and mount the positioner to spacer bolt. Check the positioner and connecting shaft the connecting pipe and the feedback shaft are ... -
Page 14: Conformity Of Capacity And Characteristics
Model EA91A&EA90A 4.6 Conformity of Capacity and Characteristics 4.6.1 Selection of Orifice Plate for Actuator Capacity For the purpose of obtaining stable actuation of positioner with small-capacity actuator to large-capacity actuator, the Models EA91A and EA90A Electro-pneumatic Positioner are equipped with appropriate orifice plate in accordance with actuator size. ⑴ The orifice plate has two types in accordance with the actuator size. One standard plate can be compatible with three kinds of size of actuator. ⑵ When using each size of orifice plate, align V groove position of orifice plate with cut position of gasket. ⑶ When replacing or changing the position of orifice plate, remove pilot cover, and loosen three screws fixing pilot assembly. ⑷ General classification for usage of orifice plate, see table below. ⑸ To install booster relay for actuator size ∅270 and larger, use V groove 1 of orifice plate No.1. ⑹ Model 3800 actuator ∅280 and larger with rated travel 15, 20, 25mm and spring range 20-100kPaG(0.2-1.0kgf/cm ), use V groove 3 of orifice plate No. 1. Orifice Plate Orifice Plate for for Standard Size Small Size Actuator Positioner No. of Groove Actuator Size Types for Identification V Groove 1 V Groove with Black-coating... - Page 15 Model EA91A&EA90A 4.6.2 Selection of Buit-in Cam ⑴ The cam for linear motion has three types. The three types of cam are described in the table below. Flange Nut Action Characteristics Rotating Angle ① Linear 60° , 90° DA, RA ② Eq% 60° DA, RA ③ Eq% (Available only for 70° DA, RA Model No. 3993) ⑵ The starting point for characteristics and identification of DA (start air supply) and RA (stop air supply) are stamped on the cam. ⑶ Loosen flange nut to select cam or to adjust position of cam. Eq% Cam Linear Cam 70° Eq% Cam Starting Point Starting Point Starting Point of Cam of Cam of Cam Back Side of DA 4.6.3 Selection of Pilot Cover The exhaust hole of pilot cover changes due to installation position of the positioner. Refer to the figure below, and check the top and bottom of pilot cover. ※The pilot cover is machined to meet designated position if the installation position is specified. However, if changing ...
-
Page 16: Installing Dimensions
Model EA91A&EA90A 4.7 Installation Dimensions 4.7.1 Model 3800 Actuator Unit : mm Actuator Size N33S 4.7.2 Model 2800 Actuator Unit : mm Actuator Size 240, 280 400, 500 650S 4.7.3 Model 2900 Actuator Unit : mm Dimension A Actuator Size #2916B (V) #2992 (−A) 240H 280H 330H 400H 500H... -
Page 17: External Connection
Model EA91A&EA90A EXTERNAL CONNECTION 5.1 Piping and Wiring Systems 5.1.1 Model EA91A Electro-pneumatic Valve Positioner (Flameproof Explosion-protected Construction) Air Filter Regulator Control Valve Supply Pressure Model EA91A Electro-pneumatic Valve Positioner (Official Certif'd No. TC17951) Electro-controller Non-hazardous Hazardous Area Area 5.1.2 Model EA90A Electro-pneumatic Valve Positioner (Intrinsic Safety Construction) Air Filtere Regulator Supply Pressure Control Valve Electro-controller Model EA90A Electro-pneumatic Valve Positioner (Official Certif'd No. TC17899) Non-hazardous Hazardous Area Area Safety Barrier... -
Page 18: Pneumatic Piping
⑸ After completing conduit piping, check for leakage from piping. 5.3 Electrical Wiring ※If there is a possibility of the influence on the positioner due to noise, use shielded cable for avoiding the noise. 5.3.1 Model EA91A Electro-pneumatic Valve Positioner (Flameproof Explosion-protected Construction) ⑴ Connect wires in accordance with the wiring diagram in Item 5.1.1. Example of Leading ⑵ The ... - Page 19 Model EA91A&EA90A 5.3.1.2 Leading Procedure for Flameproof 5.3.1.3 Connecting Procedure Packing Type (Optional Specifications) ⑴ Loosen the shrouding screw (M3 Hexagon For connector of flameproof packing type, use Socket Set Screw), and remove terminal cover. the following two connectors certified at the ⑵ Connect cable to terminal block. same time of EA91A and EA91AC. Terminal Screw Size : M4 ① KXB-LO-16 (Standard) Standard Wiring (Positioner Wiring) ② KXB-LO-16F Right Terminal (−) (Black Colored Lead Wire) (Specified, Special Specifications) Left Terminal (+) (Red Colored Lead Wire) ※Impossible to use connector other than two Reverse Positioner (Model EA90A is not applicable) connectors described above. Right Terminal (Red Colored Lead Wire) Left Terminal (Black Colored Lead Wire) KXB-LO-16 KXB-LO-16F Even if connecting reverse positioner, perform (Standard) (Special Specifications) wiring in accordance with the indication of ...
- Page 20 Model EA91A&EA90A 5.3.2 Model EA90A Electro-pneumatic Valve Positioner (Intrinsically Safe Explosion-protected Construction) CAUTION The Model EA90A Electro-pneumatic Valve Positioner is designed to ensure intrinsically safe. However, electric or magnetic energy from other electric apparatuses and wires may cause adverse affections on the intrinsic safety system. To avoid these affections, perform external wiring in accordance with the instructions described below. For details, refer to"New Recommended Practice for Explosion-protected Electrical Installations". ⑴ Identify intrinsically safe circuits and un-instrinsically safe circuits, and separate intrinsically safe circuits from other electric circuits. ⑵ Take appropriate measures to prevent influences such as electrostatic induction and electromagnetic induction. ⑶ Minimize inductance and capacitance of the wires as much as possible, and always make them lower than maximum value if operating condition is specified. ⑷ Protect the wires against external damages. ⑸ Be sure to ground uncharged open metallic parts. ■Wiring Procedure ⑴ Connect wires in accordance with the wiring diagram shown in Item 5.1.2. ⑵ The parallel pipe female thread G1/2 (PF1/2) female screw is used for conduit connection. ⑶ Condition for External Wiring of Intrinsically Safe Circuit : Set the parameter of intrinsically safe circuit and the parameter of safety barrier so that the conditions described below are satisfied. Lw ≦ Lo Cw ≦ Co Lw : Inductance of External Wiring of Intrinsically Safe Circuit Lo : Permissible Inductance of Intrinsically Safe Circuit Cw : Capacitance of External Wiring of Intrinsically Safe Circuit Co : Permissible Capacitance of Intrinsically Safe Circuit Effective internal inductance and effective internal capacitance of EA90A Electro-pneumatic Valve Positioner are negligibly small. ...
-
Page 21: Adjustment
Model EA91A&EA90A CALIBRATION Each unit of the Positioner is completely calibrated and inspected before delivery. However, slight error may occur due to vi- bration and impact during transportation. IMPORTANT Be sure to perform calibration and loop test of the Positioner before operation. WARNING Zero Adjustment Knob Supporting Point (Decrease output: Do not open the cover of the terminal box for turn upward, using Flameproof Explosion-protected type Increase output: turn downward) (Model EA91A) during power-on. When Supporting circumstances require opening the cover during Lock Screw power-on, properly make sure that no explosive gases are present using gas detector before maintenance.In this connection, it is possible to inspect and adjust with the cover removed. However, be very careful not to generate impact sparks during maintenance. Stroke Adjustment Lever Stroke Adjustment Knob 6.1 Advance Check before Calibration... -
Page 22: Adjusting Procedure
Model EA91A&EA90A 6.2 Adjusting Procedure 6.5 Stroke Adjustment (Common to Linear Type and ⑴ Set input signal to 50%. Then, adjust to 50% Built-in Cam Type) point of specified stroke with zero adjustment knob. ⑴ Loosen lock screw fixing stroke adjustment ⑵ Move the input signal between 25% and 75%, knob of the stroke adjustment lever. and make sure that the stroke is set to 25% ⑵ If making the stroke (angle) wider, adjust and 75% of specified stroke. If the stroke is ... - Page 23 Model EA91A&EA90A (4) Lever Type: Actuator Type #3800 (7) Built-in Cam Type: Linear Cam (Size: N24〜N40), Stroke: 5〜65mm (0〜60°or 0〜90° ) Zero Zero Kinds of Spring Feedback Spring Kinds of Spring Feedback Spring Adjustment Adjustment Identification Color None Blue None Blue Black White Red Yellow Identification Color None Blue None Blue Black White Red Yellow Note.8 Note.1 Note.1 Standard ● ● Standard ●...
-
Page 24: Reverse Positioner Adjustment (Linear Type, Cam Type: Common)
Model EA91A&EA90A 6.8 Manual Switching Mechanism (10) Calculating Method for Lever Type Positioner(Example) -A/M Switching (Common to Lin Rated -ear Type and Built-in Cam Type) Split Range Required Stroke Calculation Stroke Before operating manual switching mechanism, 30 mm 15 × 2 = 30mm 15 mm make sure that the filtered regulator is placed at the line of supply side of the positioner.(Due to 72 mm 38 mm 38 × 2 = 72mm supply bypass method) 38 mm 114 mm 38 × 3 = 114mm ①If not venting through the filtered ※Therefore, when the stroke is greater than 65mm, the regulator, it might apply excessive feedback spring (or zero adjustment spring) will be ... -
Page 25: Maintenance
Model EA91A&EA90A MAINTENANCE CAUTION Be sure to move the Valve Positioner to non-hazardous area for repairing or maintaining incident to part replacement. 7.1 Periodic Maintenance Periodic maintenance and check are important in preventing occurrence of non-conformance and extending service life of the positioner. A definite maintenance program should be established and followed using the Periodic Check List shown below as a guide. Periodic Check List ※Before inspection of each part, check for damage of appearance, abnormal rust, air leakage, etc. Periodic Check Frequency (Yr.) Check Item Remarks Check for presence or absence of ○ Pressure Gauge damage and for accuracy Restriction (Fixed Restriction) ○ Refer to Item 7.2.1 Filter ○ Refer to Item 7.2.1 Diaphragm ○ Check for wear and tear, Refer to Item 7.2.2 Gasket Packing ○... -
Page 26: Maintenance Procedure
Model EA91A&EA90A 7.2 Maintenance Procedure 7.2.1 Restriction and Filter ⑻ Reset the supply air pressure to original The restriction of air pipe, clogging and dirt pressure. Then, check for leakage from the of filter in the positioner might cause failure. Clean gasket and the pilot assembly. the air pipe and the filter periodically. ⑼ Align the opening of the pilot cover with ⑴ Set supply air pressure at zero. original position, and mount the pilot cover. ⑵ Loosen the drain cock of the filtered pressure reducing valve. Then, drain and purge properly. ⑶ Remove the restriction. ⑷ Clean overall restriction by inserting a ∅0.2 mm wire into hole of restriction. ⑸ Remove the filter of nozzle base. Then, clean and purge properly. ⑹ Apply a coating of silicon grease thinly and ... -
Page 27: Troubleshooting
Model EA91A&EA90A TROUBLESHOOTING Following problems and causes are non-conformances expected to encounter in routine operation. Take following remedy if the non-conformances are encountered. Troubleshooting Chart Problem Cause Corrective Action Turn manual switching mechanism to "M", adjust Positioner does not supply air pressure, and check whether control Abnormal control valve work normally valve works normally or not. If abnormality is present, disassemble control valve. Wear of contacting face Excessive vibration in Replace positioner. between nozzle and flapper control valve Incorrect selection of orifice plate, ... -
Page 28: Reference Information
Model EA91A&EA90A REFERENCE INFORMATION 9.1 Predicted Service Life The predicted service life of each part used in Model EA91A/EA90A Electro-pneumatic Positioner is listed below. However, since this predicted values will differ depending on the operating temperature, operating pressure, operating frequency, and operating environment, use this list when performing periodic repair and periodic maintenance as the reference value. Therefore, take note that the predicted service life listed below is not assured by MOTOYAMA. The product will be warranted for one year after delivering this product in principle. Model : EA91A/EA90A (Predicted Service Life:10 Years) Main Part Name Material Predicted Service Spare Parts Remarks Life (Yr.) Pressure Gauge Stainless/C6872T 3 − Pilot Valve Aluminum Alloy/Rubber with Cloth 5 Presence Replace packing at replacement. Restriction Stainless 5 Presence Replace 0 ring at replacement. ... -
Page 29: Dimension Of Fitting
Model EA91A&EA90A 9.2. Dimension of Fitting 【Note】 ※1. Actuator Type:The bracket for ♯3800, ♯3400, and ♯3300 can be attached to Model EA91A electro-pneumatic valve positioner and MR2000 pressure reducing valve. ※2. Actuator Type:When attaching the bracket for ♯2800, ♯2600 to MR2000 air filter regulator, special brackets shown below are required. ⑴ Bracket Mounting Eye for MR2000 Mounting Eye for MR2000 Mounting Eye for MR2000 Use backside of left dwg. Actuator Type : ♯3800, Size:N24 to N33S Actuator Type : ♯3800, Size:N40 Actuator Type : ♯3800, Size:N40 (W/Side Handle) (W/O Side Handle) (W/Side Handle : Common) For φ240 to 280 For φ330 to 500 Mounting Eye for MR2000 Actuator Type : ♯2800, Size :φ240 to 500 Actuator Type : ♯2800, Size :φ650 Actuator Type : ♯3400 (For φ240 to 280, W/Side Handle : Common) - Page 30 Model EA91A&EA90A (3)Connector Arm Actuator Type : #2800 Lifting Range Actuator Size (mm) Actuator Type : #3400 5 〜10 ∅240〜∅330 Actuator Size ∅240〜∅330 15〜38 15〜65 ∅400〜∅500S ∅200 ∅500 70〜100 ∅270 ∅500SH-BL 15〜65 70〜100 ∅500SH-BL ∅650 15〜65 Actuator Type : #3300 70〜130 ∅650 Actuator Type : #3800 Lifting Range Actuator Size (mm) N24〜N33S 5 〜10 15〜38 N24〜N33S N33L〜N40 15〜65 Lift 5 to10mm Lift 15 to 65mm...
- Page 31 Bulletin No.MIE-B6104K http://www.motoyama-cp.co.jp TEL(022)344‐4511(代表) / FAX(022)344‐4522 本 社 工 場 〒981‐3697 宮城県黒川郡大衡村大衡字亀岡5-2 E‐mail : info@motoyama‐cp.co.jp Main Office & Factory 5‐2, Ohira Aza Kameoka, Ohira‐mura, Kurokawa‐gun, Miyagi, 981‐3697, Japan TEL +81‐22‐344‐4511 / FAX +81‐22‐344‐4522 E‐mail : info‐overseas@motoyama‐cp.co.jp 販売・サービスネットワーク ● TEL(044)381‐8770( ) FAX(044)381‐8772 〒210‐0007 東 京 支 店 神奈川県川崎市川崎区駅前本町 10-5 クリエ川崎 11F 代表 TEL(06)6535‐8111( ) FAX(06)6535‐8655 〒550‐0014 大 阪 支 店...
Need help?
Do you have a question about the EA91A and is the answer not in the manual?
Questions and answers