Advertisement
Quick Links
Advertisement

Related Manuals for Siamp 50 6189 00


Summary of Contents for Siamp 50 6189 00
- Page 1 Asean N 50 ASSEMBLY INSTRUCTIONS...
-
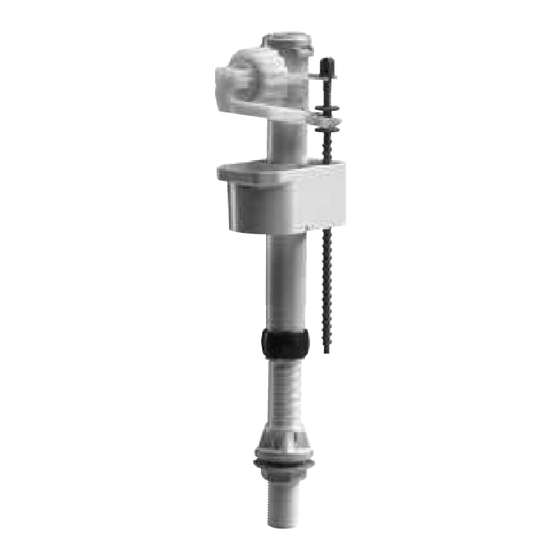
Page 2: Maintenance
Inlet 3 - Do not use connector handling the internal part of the rubber Backnut inlet valve. washer SIAMP will be not responsible in case these warnings are Seal not respected. COMPACT 99T WITH TELESCOPIC TUBE Adjust telescopic tube ➊... - Page 3 HANDY 93T WITH TELESCOPIC TUBE Adjust telescopic tube ➊ (a) raise the grey blocking ring (b) screw or unscrew the gradiated tube Blocking ring in way so that the inlet top not exceed the top of the tank (c) position back the grey ring Place inlet valve through inlet hole with ➋...
-
Page 4: Installation
I - PREPARATION OF THE MECHANISM 33A/22A Measure the cistern: - H (from top of lid to inside bottom of cistern) - D (diameter of hole in lid) ➍ ➌ Check the positioning of the stirrup if the stirrup is positioned correctly with reference to the table below, move on to step ➑... - Page 5 III - ASSEMBLY OF CISTERN TANK IV - ADJUSTMENT OF WATER LEVEL First connect your float valve to the water system, open the stop valve and adjust the water level using the float valve (see page 2 or 3). Overflow 20 mm ➊...
- Page 6 I - PREPARATION OF THE MECHANISM Measure the cistern: - H (from top of lid to inside bottom of cistern) ➍ - D (diameter of hole in lid) ➌ Check the positioning of the stirrup ➊ ➋ if the stirrup is positioned correctly with reference to the table below (pin clipped into the right notch), move on to step ➒...
- Page 7 III - ASSEMBLY OF CISTERN TANK IV - ADJUSTMENT OF HALF FLUSH First connect your float valve to the water system, open the stop valve and adjust the Full flush level using the float valve (see page 2 or 3). NB: the maximum water level should be 20 mm below the overflow.
- Page 8 I - PREPARING THE MECHANISM Measure the cistern -H (from the top of the lid to the inside base of the cistern) -D (diameter of the hole in the lid) ➊ ➋ ➋ Check the position of the stirrup If the stirrup is correctly positioned on ➊...
- Page 9 III - ASSEMBLING BOWL AND CISTERN IV - SETTING WATER LEVEL After having connected your ballcock to the water supply, open the tap and set the level of the long flush using the ballcock (see overleaf). Note: The max. water level should be 20 mm lower than the overflow tube.
- Page 10 I - PREPARING THE MECHANISM Measure the cistern -H (from the top of the lid to the inside base of the cistern) -D (diameter of the hole in the lid) In the table below, choose the right level ➊ for the overflow shortening ➋...
- Page 11 III - ASSEMBLING BOWL AND CISTERN IV - SETTING WATER LEVEL After having connected your ballcock to the water supply, open the tap and set the level of the long flush using the ballcock (see overleaf). Note: The max. water level should be 20 mm lower than the overflow tube.
- Page 12 I - INSTALLATION ➊ Position the mechanism in the cistern and attach it with the nut. II - ASSEMBLY OF CISTERN TANK Attach the screws to the bottom of the cistern ➊ (see stack of parts indicated below ➋ Position the foam seal on the nut Screw M6x78 Washer Tapered joint...
Need help?
Do you have a question about the 50 6189 00 and is the answer not in the manual?
Questions and answers