Table of Contents
Advertisement
Available languages
Available languages
Quick Links
Advertisement
Chapters
Table of Contents

Related Manuals for LG G7000


Summary of Contents for LG G7000
- Page 1 ESPAÑOL ENGLISH GPRS-Teléfono MANUAL DE USUARIO MODELO: G7000 Lea este manual atentamente antes de hacer funcionar su aparato. Guárdelo para consultarlo en el futuro. ISSUE 1.0 P/N : MMBB0074704 PRINTED IN KOREA...
- Page 2 ESPAÑOL Teléfono GPRS MANUAL DE USUARIO MODELO: G7000 Lea este manual atentamente antes de hacer funcionar su equipo. Guárdelo para consultarlo en el futuro.
- Page 4 El elegante acabado del G7000 proporciona un tacto agradable y una gran comodidad de manejo. Teléfono G7000...
- Page 5 Recomendaciones de seguridad Todos los transmisores de radio pueden causar interferencias en los equipos electrónicos que se encuentren próximos a ellos. Dentro de un avión, los teléfonos GSM han de estar desactivados en todo momento. Evite mirar directamente al puerto de infrarrojos si está activo. No active el teléfono cerca de surtidores de gasolina, depósitos de combustible, plantas de fabricación de productos químicos, ni lugares en los que se estén realizando trabajos...
- Page 6 Use sólo las baterías y cargadores especificados. El uso de otros productos puede causar desperfectos en el teléfono. Aviso importante: Deseche las baterías inutilizables de acuerdo con la legislación vigente. Use sólo accesorios ORIGINALES. El uso de otros productos puede causar desperfectos en el teléfono. Algunos de los servicios descritos en este manual no son admitidos por todas las redes.
-
Page 7: Table Of Contents
índice Descripción general ..................Accesorios ............... Partes del teléfono • Vista frontal ................10 • Vista posterior ................11 • Subpantalla LCD del teléfono ............. 12 ............Descripción de las teclas • Teclas laterales ................14 • Teclas alfanuméricas ..............14 Información ofrecida en pantalla .......... - Page 8 Descripción del menú ................. Agenda telefónica ................Àrbol de Menús ................ Mensajes [Menú 1] • Escribir [Menú 1-1] ..............26 • Buzón entrada [Menú 1-2] ............30 • Buzón salida [Menú 1-3] ............. 30 • Servicio info. [Menú 1-4] ............. 31 •...
- Page 9 • Config. GPRS [Menu 4-7] ............52 • Reinicicializar [Menú 4-8] ............52 ............Desvío de llamadas [Menú 5] • Todas llam. voz [Menú 5-1] ............53 • Si ocupado [Menú 5-2] ............... 53 • Si no responde [Menú 5-3] ............53 •...
-
Page 10: Descripción General
Accesorios Descripción general Compruebe que dispone de todos los componentes que se ilustran a continuación. Tarjeta de Batería Estándar Manual de Teléfono garantía usuario Cargador de Viaje Manos Libres Portátil Solución para Datos <Accesorios opcionales> Cargador de Mechero Solución Manos Libres... -
Page 11: Partes Del Teléfono
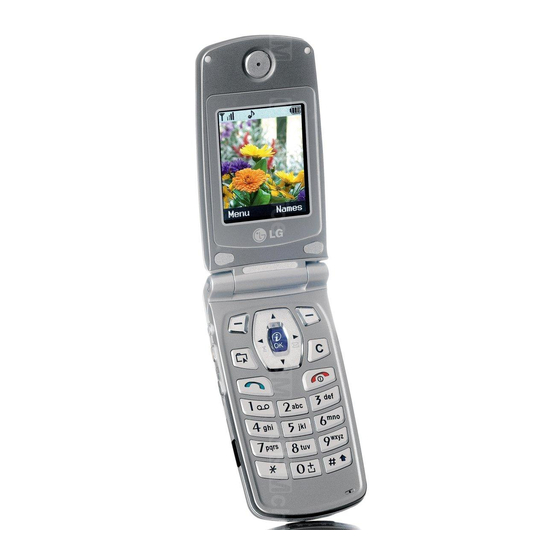
Partes del teléfono Descripción general Vista frontal 1 Auricular 10 Tecla multifuncional derecha 2 Tapa articulada activa 11 Tecla borrar 3 Pantalla 12 Tecla ENCENDIDO/ APAGADO 4 Tecla multifuncional izquierda 13 Teclas numéricas 5 Tecla lateral de volumen 14 Tecla “Almohadilla” 6 Tecla “Confirmar”... -
Page 12: Vista Posterior
Descripción general Vista posterior Batería Conector para cable/ Conector para cargador de batería/ Conector para la solución manos libres Terminales de la batería Espacio para la tarjeta SIM Orificio para la correa de transporte Pestillo de la batería 7 Conector para Manos Libres Portátil... -
Page 13: Subpantalla Lcd Del Teléfono
Partes del teléfono Descripción general Subpantalla LCD del teléfono 1 Subpantalla LCD 2 Luz indicadora de llamada Puede ver el icono de recepción de mensaje de texto o buzón de voz aunque no abra la tapa. Además, puede comprobar el nombre y el número de las llamadas entrantes. -
Page 14: Descripción De Las Teclas
Descripción de las teclas Descripción general A continuación se muestran las teclas del teléfono. Descripción del teclado Tecla Descripción Tecla de selección izquierda / Tecla de selección derecha Cada una de estas teclas realiza la función indicada por el texto de la pantalla situada justo encima. Teclas de navegación / Tecla de navegación izquierda Se utiliza como tecla rápida para acceder a Perfiles. -
Page 15: Teclas Laterales
Descripción de las teclas Descripción general Teclas laterales Tecla Descripción Tecla lateral arriba/abajo Puede controlar el volumen del tono de las teclas en modo en espera, así como controlar el volumen durante una llamada. Tecla Grabar Para utilizar la nota de voz pulse y mantenga pulsada esta tecla durante unos segundos. -
Page 16: Información Ofrecida En Pantalla
Información ofrecida en la pantalla Información ofrecida en pantalla En la pantalla del teléfono aparecen diversos iconos. A continuación se explica el significado de cada uno de ellos. Iconos que aparecen en la pantalla Icono o indicador Descripción Indica la potencia de la señal de la red. Se ha establecido la conexión. - Page 17 Información ofrecida en la pantalla Información ofrecida en pantalla Iconos del menú superior Icono Descripción Mensajes Registro de llamadas Perfiles Configuración Desvio de llamadas Planificador Juegos y utilidades Internet Servicios SIM...
-
Page 18: Preliminares
Instalación Preliminares – Colocación de la tarjeta SIM Localice el espacio reservado para la tarjeta SIM, situado en la parte trasera del teléfono. Siga los pasos que se indican a continuación para instalar la tarjeta SIM. 1. Quite la batería, si está acoplada al teléfono. 2. -
Page 19: Carga De La Batería
Instalación Preliminares ˜ Carga de la batería Para conectar el cargador de viaje al teléfono, es necesario haber instalado la batería. 1. Introduzca un extremo del cable del cargador de viaje en la base del teléfono. 2. Conecte el otro extremo del cable del cargador de viaje a la toma de corriente alterna (CA) de la pared. -
Page 20: Desconexión Del Cargador
Preliminares ™ Desconexión del cargador Desconecte del teléfono el cargador de viaje presionando en los botones laterales de éste. Importante • La batería suministrada con su teléfono debe ser cargada completamente antes de usarla. • No extraiga la batería ni la tarjeta SIM durante la carga. •... -
Page 21: Secuencia De Encendido
Secuencia de encendido Preliminares – Primeros pasos con el teléfono 1. Para encender el teléfono, mantenga presionada la tecla hasta oír un tono. 2. Según cuál sea la configuración del Código PIN [Menú 4-5-1], tendrá o no que introducir un código PIN. 3. -
Page 22: Códigos De Acesso
Códigos de Acesso Preliminares Puede usar los códigos de acceso descritos en esta sección para impedir el uso no autorizado del teléfono. Los códigos de acceso (salvo los códigos PUK y PUK2) pueden modificarse usando el [Menú 4-5-4]. Código PIN (4 a 8 dígitos) El código de número de identificación personal (PIN) impide el uso no autorizado de la tarjeta SIM. -
Page 23: Cómo Realizar Y Responder A Las Llamadas
Cómo realizar y responder a las llamadas Preliminares Cómo realizar una llamada 1. Introduzca el número de teléfono incluido el prefijo. Para editar un número en la pantalla, pulse para mover el cursor a la izquierda y para mover el cursor a la derecha. 2. -
Page 24: Descripción Del Menú
Agenda telefónica Descripción del menú Para seleccionar un menú de la Agenda telefónica, pulse en [Nombr.] en el modo de espera, y luego desplácese hasta la opción deseada. Nombres Descripción Buscar Permite buscar un nombre determinados. Añadir nueva Permite añadir números nuevos. Grupos usuarios Proporciona una lista de los grupos en que se organizan los nombres y números de la agenda. -
Page 25: Àrbol De Menús
Àrbol de Menús Descripción del menú 1 Mensajes 3 Perfiles 1 Escribir 1 Sólo vibrac. 2 Buzón entrada 2 Silencio 3 Buzón salida 3 General 4 Servicio info. 4 Fuerte 5 Mensajes de voz 5 Auriculares 6 Acuse recibo 6 Coche 7 Plantillas 8 Configuración 9 Borrar todo... - Page 26 Descripción del menú 5 Desvío de llamadas 8 Internet 1 Todas llam. voz 1 Inicio 2 Si ocupado 2 Favoritos 3 Si no responde 3 Mens. Push 4 Si fuera alcan. 4 Perfiles 5 Tod llam datos 5 Ir a URL 6 Todas llam fax 6 Confg.
-
Page 27: Mensajes [Menú 1]
Mensajes [Menú 1] Descripción del menú Mensajes Volver Este menú incluye funciones relacionadas con el Servicio de mensajes cortos (SMS), buzón de voz y mensajes de servicio de red. Escribir [Menú 1-1] Puede escribir y editar mensajes de texto de hasta 480 caracteres. Además, puede ir comprobando los demás caracteres mientras escribe el mensaje. - Page 28 EMS. Nota • Es posible que no pueda enviar o recibir mensaje EMS debido a la incompatibilidad entre el G7000 y teléfonos de otro tipo. Diccionario Puede agregar, eliminar y editar una palabra en el diccionario eZi. Si guarda la palabra en el diccionario, ésta tendrá...
- Page 29 Mensajes [Menú 1] Descripción del menú • Cómo eliminar una palabra del diccionario 1. Desplácese a la opción Diccionario para resaltarla. 2. Seleccione la palabra que desea eliminar y pulse [Opción]. 3. Seleccione la opción Borrar. • Cómo editar una palabra 1.
- Page 30 Descripción del menú Atención 1. Puede cambiar el idioma con la tecla key. 2. Cuando haya pulsado la tecla correspondiente, la tecla aparecerá como “Cambiar”. A continuación, podrá cambiar las mayúsculas con la tecla (Pulse Cambiar). Por ejemplo : usted © u.s.t.e.d ©U.S.T.E.D. ©USTED Después de seleccionar la palabra, la tecla volverá...
-
Page 31: Buzón Entrada [Menú 1-2]
Mensajes [Menú 1] Descripción del menú Buzón entrada [Menú 1-2] Cuando reciba un mensaje de texto, en la pantalla aparecerá el símbolo . Puede guardar el mensaje en la lista de mandeja de entrada. Seleccione el mensaje que desee desplazándose con . -
Page 32: Servicio Info. [Menú 1-4]
Descripción del menú Reenviar [Menú 1-3-1] Puede reenviar el mensaje a otro destinatario. Borrar [Menú 1-3-2] Puede eliminar el mensaje. Usar número [Menú 1-3-3] Si el mensaje incluye un número de teléfono, podrá extraerlo y guardarlo en una agenda telefónica. También puede realizar una llamada a este número. -
Page 33: Mensajes De Voz [Menú 1-5]
Mensajes [Menú 1] Descripción del menú Asuntos [Menú 1-4-3] Si desea crear nuevos temas, pulse [OK]. A continuación, seleccione la opción Nuevos temas pulsando [Selec]. Si ya dispone de otros temas, puede eliminarlos, editarlos y activarlos pulsando [Opción]. Aviso [Menú 1-4-4] •... -
Page 34: Acuse Recibo [Menú 1-6]
Descripción del menú Núm. buzón voz [Menú 1-5-2] En este menú se introduce el número del buzón del buzón de voz. Acuse recibo [Menú 1-6] En este menú puede leer y eliminar los informes de entregas de mensajes. Plantillas [Menú 1-7] El teléfono dispone de una lista de 10 plantillas predefinidas. -
Page 35: Borrar Todo [Menú 1-9]
Mensajes [Menú 1] Descripción del menú Periodo validez [Menú 1-8-3] Este servicio de red permite definir el tiempo que permanecerán los mensajes de texto en el centro de mensajes mientras se intenta entregarlos a su destinatario. Acuse recibo [Menú 1-8-4] Si ha definido este menú... -
Page 36: Registro De Llamadas [Menú 2]
Registro de llamadas [Menú 2] Descripción del menú (Depende de la red) [Pulse una vez] Volver Puede comprobar el registro de las llamadas perdidas, recibidas y enviadas sólo si la red admite la identificación de llamada dentro del área de cobertura. En las opciones de las llamadas perdidas, recibidas y enviadas puede: •... -
Page 37: Borrar Últ Llam. [Menú 2-4]
Registro de llamadas [Menú 2] Descripción del menú (Depende de la red) Borrar [Menú 2-3-2] Puede eliminar el registro de los números marcados. Guardar [Menú 2-3-3] Puede guardar la información del número marcado. Llamar [Menú 2-3-4] También puede realizar una llamada a este número. Borrar Últ llam. -
Page 38: Coste Llamadas [Menú 2-6]
Descripción del menú Coste llamadas [Menú 2-6] Este servicio de red permite comprobar el coste de la última llamada y del total de todas las llamadas. Para borrar los contadores, debe introducir el código PIN2. Coste últ llam. [Menú 2-6-1] Función que permite reiniciar el coste de la última llamada. -
Page 39: Información Gprs [Menú 2-8]
Registro de llamadas [Menú 2] Descripción del menú (Depende de la red) Información GPRS [Menú 2-8] Con esta función puede comprobar la duración y el volumen de datos del paquete descargado o cargado mediante GPRS. Debe introducir el código de seguridad para aplicar esta función. WAP [Menú... -
Page 40: Perfiles [Menu 3]
Perfiles [Menu 3] Descripción del menú Perfiles [Pulse dos veces] Volver En este menú se pueden ajustar y personalizar los tonos del teléfono para diversas ocasiones, entornos y grupos de llamadas. (Por ejemplo, si va en el coche, puede elegir el perfil Coche, etc.) 1. -
Page 41: General [Menú 3-3]
Perfiles [Menu 3] Descripción del menú General [Menú 3-3] Activar [Menú 3-3-1] Puede ajustar el perfil como General si necesita que el teléfono esté definido en modo general. Personalizar [Menú 3-3-2] Puede cambiar los valores de los submenús de Perfiles. Fuerte [Menú... -
Page 42: Coche [Menú 3-6]
Descripción del menú Coche [Menú 3-6] Activar [Menú 3-6-1] Puede ajustar este perfil al activar el kit de manos libres. Personalizar [Menú 3-6-2] Puede cambiar los valores de los submenús de Perfiles. Nota Si conecta los auriculares o el kit de manos libres a un teléfono, cada menú... - Page 43 Perfiles [Menu 3] Descripción del menú Tipo aviso mens [Menú 3-x-x-4] Con esta función se emite la señal que mejor se ajuste al entorno. Una vez, Vibración, Sonido y vibración, Sonido después de vibración, Ninguno. Aviso mensaje [Menú 3-x-x-5] Permite definir el tono de señal para mensajes que mejor se ajuste al entorno.
-
Page 44: Configuración [Menú 4]
Configuración [Menú 4] Descripción del menú [Pulse tres veces] Volver Alarma [Menú 4-1] En este menú puede definir la alarma del teléfono. • Activada Se define la hora y minuto a la que sonará la alarma. 1. Acceda al menú. 2. -
Page 45: Fecha Y Hora [Menú 4-2]
Configuración [Menú 4] Descripción del menú Fecha y hora [Menú 4-2] El teléfono tiene un reloj propio. En este menú puede definir el formato de hora en 12 y 24 horas. Establecer hora [Menú 4-2-1] En este menú puede definir la hora del teléfono. 1. -
Page 46: Conf. Teléfono [Menú 4-3]
Descripción del menú Conf. teléfono [Menú 4-3] Puede definir la configuración del teléfono como desee. Desplácese para resaltar Configuración del teléfono y pulse [Selec]. Idioma [Menú 4-3-1] Menú que proporciona los diferentes idiomas. Si está definido en Automático, el idioma se seleccionará según la tarjeta SIM actual. Se definirá... -
Page 47: Conf. Llamadas [Menú 4-4]
Configuración [Menú 4] Descripción del menú Cont.pant. [Menú 4-3-5] Puede ajustar el brillo de la pantalla deseado mediante Conf. llamadas [Menú 4-4] Con esta opción puede definir el menú relacionado con una llamada pulsando [OK] en el menú Configuración. Modo resp. [Menú 4-4-1] •... - Page 48 Descripción del menú Serv llam esp. [Menú 4-4-3] Si este servicio está activado, podrá aceptar una llamada entrante en espera. Si este servicio está desactivado, no podrá reconocer la entrante en espera. • Activar [Menú 4-4-3-1] Se activa el servicio correspondiente. •...
- Page 49 Configuración [Menú 4] Descripción del menú Modo datos [Menú 4-4-7] (depende de la red) Si está disponible el servicio de numero único, podrá utilizar el teléfono conectado a un ordenador para enviar y recibir faxes, datos y voz. Si selecciona uno de estos modos, podrá recibir datos, faxes o voz en cada caso.
-
Page 50: Conf. Seguridad [Menú 4-5]
Descripción del menú Conf. seguridad [Menú 4-5] Solicitud PIN [Menú 4-5-1] En este menú, puede definir que el teléfono, cuando se encienda, solicite el código PIN de la tarjeta SIM. Si se activa esta función, se le solicitará la introducción del código PIN. 1. - Page 51 Configuración [Menú 4] Descripción del menú • Tod llam datos [Menú 4-5-2-6] Puede restringir todas las llamadas de datos. • Todas llam fax [Menú 4-5-2-7] Puede restringir todas las llamadas de fax. • Canc. restric. [Menú 4-5-2-8] Puede cancelar todos los servicios de restricción de llamadas. Submenús del Servicio de restricción de llamadas - Activar [Menú...
-
Page 52: Config. Red [Menú 4-6]
Descripción del menú 5. Si el código PIN2 es correcto, podrá ver los siguientes submenús. • Activar : puede restringir las llamadas salientes a números de teléfono seleccionados. • Desactivar : puede llamar sin restringir los números de teléfono. • Lista marc fija : puede ver números de conexión fijos y agregarlos, editarlos y eliminarlos. -
Page 53: Config. Gprs [Menu 4-7]
Configuración [Menú 4] Descripción del menú Config. GPRS [Menu 4-7] Puese configurar el teléfono para que se registre automáticamente en una red GPRS al encender el teléfono. Tipo terminal [Menu 4-7-1] • Dual [Menu 4-7-1-1] • Sólo GPRS [Menu 4-7-1-2] •... -
Page 54: Desvío De Llamadas [Menú 5]
Desvío de llamadas [Menú 5] Descripción del menú (depende de la red y de la subscripción) [Pulse cuatro veces] Volver El servicio de desvío de llamadas permite desviar las llamadas de voz, de fax y de datos entrantes a otro número. Para obtener más información, póngase en contacto con el proveedor de servicios. -
Page 55: Todas Llam Fax [Menú 5-6]
Desvío de llamadas [Menú 5] Descripción del menú (depende de la red y de la subscripción) Todas llam fax [Menú 5-6] Desvía a un número con una conexión de fax sin distinción. (depende de la red y de la subscripción) Submenús [Menú... -
Page 56: Planificador [Menú 6]
Planificador [Menú 6] Descripción del menú Planificador [Pulse cinco veces] Volver Plan [Menú 6-1] Al acceder a este menú aparecerá el calendario. En la parte superior de la ventana hay secciones para fecha e iconos. Puede cambiar el día, el mes y el año con . -
Page 57: Memmoria [Menú 6-2]
Planificador [Menú 6] Descripción del menú Memmoria [Menú 6-2] 2. Desplácese para resaltar Memmoria. 3. Pulse [OK]. 4. Introduzca la nota y, a continuación, pulse [Guardar]. 5. Puede ver los siguientes submenús. Editar [Menú 6-2-1] Puede editar la nota seleccionada. Borrar [Menú... - Page 58 Descripción del menú 3. Puede buscar una entrada por número. 4. Seleccione [Buscar]. 5. Si desea editar, ver, eliminar, copiar o realizar una llamada a esa entrada, seleccione [Opción]. Aparecerá el siguiente menú. • Editar : para editar el nombre, el número, la dirección de correo electrónico y el fax pulse [OK].
- Page 59 Planificador [Menú 6] Descripción del menú • Teléfono: Puede agregar un nombre, un número (de móvil, de casa, de la oficina), una dirección de correo electrónico, un grupo y una nota. a. Escriba el nombre que desee agregar. b. Pulse [OK].
- Page 60 Descripción del menú • Icono grupo Puede seleccionar el icono de cada grupo. • Color LED Puede seleccionar el color del indicador LED de cada grupo. Marcac. rápida [Menú 6-3-4] Puede asociar cualquiera de las teclas de a una entrada de la agenda.
- Page 61 Planificador [Menú 6] Descripción del menú Borrar todo [Menú 6-3-6] Puede eliminar todas las entradas de SIM y Teléfono. Para utilizar esta función se necesita un código de seguridad. 1. Pulse [Nombr.] para acceder a la agenda telefónica en modo de espera.
- Page 62 Descripción del menú Información [Menú 6-3-8] Puede seleccionar un número de marcación de servicio, comprobar la memoria y la lista de números propios. • Nº marc. serv. [Menú 6-3-8-1] Utilice esta función para acceder a una lista particular de servicios que proporcione su operador de red (si la tarjeta SIM lo admite).
-
Page 63: Juegos Y Utilidades [Menú 7]
Juegos y utilidades [Menú 7] Descripción del menú Juegos y utilidades [Pulse seis veces] Volver Juego [Menú 7-1] Su teléfono dispone de divertidos juegos para su distracción. Mi carpeta [Menú 7-2] Puede ver, eliminar y controlar el contenido descargado. Imagen [Menú 7-2-1] Animación [Menú... -
Page 64: Conver. Unid. [Menú 7-3]
Descripción del menú Conver. unid. [Menú 7-3] Esta función convierte cada una de las unidades de medida en la unidad que desee. Hay 4 tipos que se pueden convertir en unidades: Longitud, Superficie, Peso y Volumen. 1. Para seleccionar uno de los cuatro tipos pulse la tecla [Sig.]. -
Page 65: Reloj Mundial [Menú 7-5]
Juegos y utilidades [Menú 7] Descripción del menú Reloj mundial [Menú 7-5] Puede ver la hora de cada ciudad del mundo. Asimismo, puede definir la hora actual en la hora de la ciudad que seleccione. 1. Para elegir la ciudad que pertenece a la zona horaria pulse la tecla 2. -
Page 66: Internet [Menú 8]
Internet [Menú 8] Descripción del menú Internet [Pulse siete veces] Volver El teléfono admite servicios de Internet basados en el Protocolo de Aplicaciones Inalámbricas (WAP). Puede acceder a los servicios que admita su red. El menú Servicios permite obtener información como, por ejemplo, noticias, pronósticos meteorológicos y horarios de vuelos. -
Page 67: Perfiles [Menú 8-4]
Internet [Menú 8] Descripción del menú Buzón entrada [Menú 8-3-1] Puede leer o eliminar los mensajes push. Recibir [Menú 8-3-2] Puede definir la opción para determinar si recibirá o no el mensaje. Perfiles [Menú 8-4] Puede crear un máximo de 5 perfiles y activar sólo uno de ellos. Desplácese al perfil que desee y pulse para acceder a las opciones disponibles. - Page 68 Descripción del menú • Inf pasarela [Menú 8-4-2-5] Casi ninguna pasarela WAP solicita una identificación y contraseña de usuario. Si la pasarela no dispone de estos elementos, la red es la que los debe proporcionar. Asimismo, se deben definir antes de navegar por sitios WAP.
-
Page 69: Ir A Url [Menú 8-5]
La memoria caché sólo se comprueba al iniciar WAP. • Desactivada [Menú 8-6-2-3] La memoria caché no se comprueba nunca. Info WAP [Menú 8-7] Puede ver información sobre el navegador WAP de G7000. Rest. perfil [Menú 8-8] Puede restablecer la configuración de fábrica para todos los valores. -
Page 70: Internet On-Line Menú
Internet On-line menú Descripción del menú Si está conectado, podrá ver los siguientes menús: ❏ Inicio Es igual que el [Menú 8-1]. ❏ Recargar Recarga la página actual. ❏ Favoritos Es igual que el [Menú 8-2]. ❏ M ensaje ❏ Mens. Push ❏... -
Page 71: Cuidado Y Mantenimiento
Cuidado y mantenimiento Cuando utilice esta unidad, siga siempre las siguientes precauciones de seguridad: • No toque el transformador de corriente con las manos mojadas. • No desmonte la unidad. (Si es necesario repararla, llévela a un técnico cualificado). • Mantenga la unidad lejos de aparatos electrónicos tales como televisores, radios, u ordenadores personales. - Page 72 A diferencia de otros sistemas de batería, no existe efecto memoria que pudiera comprometer las prestaciones de la misma. • Utilice solo baterías y cargadores LG. Los cargadores LG son diseñados para preservar la vida de la batería. • No desmonte ni cortocircuite la batería.
-
Page 73: Datos Técnicos
Datos Técnicos General Nomber del Producto : G7000 Sistema : GSM 900 / DCS 1800 Temperatures Ambiente Máxima : +55°C MÍnima : -10°C... - Page 75 Memo...
- Page 76 ENGLISH GPRS Phone USER’S MANUAL MODEL: G7000 Please read this manual carefully before operating your set. Retain it for future reference.
- Page 78 G7000 has a polished style which provides users’ a better feel and convenience. G7000 Phone...
- Page 79 For Your Safety All radio transmitters carry risks of interference with electronics in close proximity. GSM Phones must be switched off at all times in an aircraft. Avoid pointing active infrared port at eyes. Do not activate near petrol stations, fuel depots, chemical plants or blasting operations.
- Page 80 For your safety, use ONLY specified ORIGINAL batteries and chargers. Please note: Unusable batteries should be disposed of in accordance with relevant legislation. Only use ORIGINAL accessories to avoid damage to your phone. Emergency call may not be available under all cellular networks.
- Page 81 Contents Overview ..................Accessories ................Part of the Phone • Front of the Phone ..............10 • Rear of the Phone ............... 11 • Sub LCD of the phone ..............12 ................Key Description • Side of the Key ................14 •...
- Page 82 Menu Description ..................Phonebook ..................Menu Tree ............... Messages [Menu 1] • Write message [Menu 1-1] ............26 • Inbox [Menu 1-2] ................. 30 • Outbox [Menu 1-3] ............... 31 • Info service [Menu 1-4] ............... 31 • Voice messages [Menu 1-5] ............32 •...
- Page 83 • GPRS settings [Menu 4-7] ............51 • Restore factory settings [Menu 4-8] ..........51 ............... Call divert [Menu 5] • All voice calls [Menu 5-1] ............52 • If busy [Menu 5-2] ............... 52 • If not answered [Menu 5-3] ............52 •...
-
Page 84: Overview
Accessories Overview Check to make sure that you have all the parts shown below. Warranty Card User’s manual Handset Standard Battery Travel Adapter Handsfree portable Data Kit <Optional Accessories> Cigar Lighter Adapter Handsfree Kit... -
Page 85: Part Of The Phone
Part of the Phone Overview Front of the Phone 1 Earpiece 10 Soft Right Key 2 Active Folder 11 Clear Key 3 Display Screen 12 End / Power Key 4 Soft Left Key 13 Numeric Keys 5 Record Key 14 Hash Keys 6 Confirm Key 15 Microphone 7 Up/Down Side Key... -
Page 86: Rear Of The Phone
Overview Rear of the Phone 1 Battery 2 Cable Connector/ Battery Charging Connector/ Hands-Free Car kit Connector 3 Battery Terminals 4 SIM Card Socket 5 Handstrap Hole 6 Battery Lock 7 Ear microphone connector... -
Page 87: Sub Lcd Of The Phone
Part of the Phone Overview Sub LCD of the phone 1 Sub LCD 2 Call Indicator Light You can view the icon of receiving text message or voicemail even not opening folder. In addition, you can check the name and number for incoming calls. -
Page 88: Key Description
Key Description Overview The following shows key components of the phone. Keypad Description Description Soft Left Key / Soft Right Key Each of these keys performs the function indicated by the text on the display immediately above it. Navigation Keys Left navigation key Used to Profile hot key and Menu options key. -
Page 89: Side Of The Key
Key Description Overview Side of the Key Description Up/Down Side Key You can control the volume of key tone in standby mode and also control the volume during a call. Record Key You can use voice memo by pressing and holding this key for a few seconds. -
Page 90: Display Information
Display Information Display Information The screen displays several icons the following describe each of them you may see on the phone. On-Screen Icons Icon/Indicator Description Tells you the strength of the network signal. Call is connected. Shows that you are using a roaming service. The alarm has been set and is on. - Page 91 Display Information Display Information Top Menu Icons Icon Description Messages Call register Profiles Settings Call divert Organizer Fun & Tools Internet SIM service (Dependent on SIM card)
-
Page 92: Getting Started
Installation Getting Started – Inserting the SIM Card Locate the SIM card socket in the back of the phone. Follow the steps below to install the SIM card. 1. Remove the battery if attached. 2. Slide the SIM card into the slot, under the silvery holders, with the golden connectors facing down and the cut corner to the right. -
Page 93: Charging The Battery
Installation Getting Started ˜ Charging the Battery To connect the travel adapter to the phone, you must have installed the battery. 1. Insert one end of the travel adapter into the bottom of the phone. 2. Connect the other end of the travel adapter to an AC wall outlet. -
Page 94: Disconnecting The Charger
Getting Started ™ Disconnecting the charger Disconnect the travel adapter from the phone by pressing its side buttons. Notice • The battery delivered with your phone has to be fully charged before using it. • Do not remove your battery or the SIM card while charging. •... -
Page 95: Powering On Sequence
Powering On Sequence Getting Started – To get started with the phone 1. Press and hold [Power/End Key] until you hear a tone. 2. Depending on setting PIN code request [Menu 4-5-1], you can enter it or not. 3. If your phone connects to a network, the network name will be displayed shortly. -
Page 96: Access Codes
Access Codes Getting Started You can use the access codes described in this section to avoid unauthorized use of your phone. The access codes (except PUK and PUK2 codes) can be changed by using Change codes [Menu 4-5-4]. PIN code (4 to 8 digits) The PIN (Personal Identification Number) code protects your SIM card against unauthorized use. -
Page 97: Making And Answering Calls
Making and Answering calls Getting Started Making a call 1. Key in phone number including the area code, To edit a number on the display, press to move cursor to the left and press to move cursor to the right. 2. -
Page 98: Menu Description
Phonebook Menu Description To select a menu in phonebook, press [Names] in standby mode and then scroll to a desired item. You can also access this menu through Organizer. Name Description Name Description Search Allows you to search for a specific name, number. Add new Allows you to add new names and numbers. -
Page 99: Menu Tree
Menu Tree Menu Description 1 Messages 3 Profiles 1 Write message 1 Vibrate only 2 Inbox 2 Silent 3 Outbox 3 General 4 Info service 4 Loud 5 Voice messages 5 Headset 6 Delivery reports 6 Car 7 Templates 8 Settings 9 Delete all 4 Settings 1 Alarm clock... - Page 100 Menu Description 5 Call divert 8 Internet 1 All voice calls 1 Home 2 If busy 2 Bookmarks 3 If not answered 3 Push messages 4 If out of reach 4 Profiles 5 All data calls 5 Go to URL 6 All fax calls 6 Cache settings 7 Cancel all diverts...
-
Page 101: Messages [Menu 1]
Messages [Menu 1] Menu Description Messages Back This menu includes functions related to SMS (Short Message Service), voice mail, as well as the network’s service messages. Write message [Menu 1-1] You can write and edit text message up to 480 characters. In addition, you can check the rest of characters in writing message. - Page 102 Note • You may not send or receive the message through EMS due to the incompatibility between G7000 phone and the others. eZi dictionary You can add, delete and edit a word in eZi dictionary. If you save it in a dictionary, this word has a high priority than others.
- Page 103 Messages [Menu 1] Menu Description • How to edit a word in a dictionary 1. Scroll to highlight eZi dictionary. 2. Select a word you want to edit, and then press [Option]. 3. Select Edit menu. How to use eZi text eZi text mode allows you to type a word easily and quickly.
- Page 104 Menu Description Notice 1. You can change a language with key. 2. Once you press corresponding key, key will be changed to “Change”. Then you can change the capital form with [Change] For example : you © y.o.u. © Y.O.U. © YOU After choose the candidate, key will be return to “Symbol”.
-
Page 105: Inbox [Menu 1-2]
Messages [Menu 1] Menu Description Note 1. If you want to space, press 2. To delete a letter, use key. Inbox [Menu 1-2] When you receive a text message, the symbol is displayed on the screen. You can save it in the incoming message lists. Select the desired message by scrolling , you can delete all incoming messages by selecting Delete all at the bottom of the list. -
Page 106: Outbox [Menu 1-3]
Menu Description Outbox [Menu 1-3] When you enter this menu, you can see the outgoing message list. You can select the desired message by scrolling and press [OK] to read it. And if you want to exit Outbox menu, press [Back]. -
Page 107: Voice Messages [Menu 1-5]
Messages [Menu 1] Menu Description Inbox [Menu 1-4-2] You can read and delete received CB messages. Topics [Menu 1-4-3] If you want to create new topics, press [OK]. Then, you select New topics menu by [Select]. If you have already topics, you can delete, edit, and activate by pressing [Option]. -
Page 108: Delivery Reports [Menu 1-6]
Menu Description Voice mailbox number [Menu 1-5-2] You can input voice mailbox address number. Delivery reports [Menu 1-6] You can read and delete delivery report messages. Templates [Menu 1-7] You can see 10 pre-defined messages in the list. You can view templates already saved in a list before editing it. -
Page 109: Delete All [Menu 1-9]
Messages [Menu 1] Menu Description Delivery reports [Menu 1-8-4] If you set Yes in this menu, you can check whether your message is sent to the other party successfully or not. Pay for reply [Menu 1-8-5] When the other party replies to your message, you can pay for this. Bearer setting [Menu 1-8-6] You can set the bearer data service. -
Page 110: Call Register [Menu 2]
Call register [Menu 2] Menu Description (Dependent on the network service) [Press once] You can check the record of missed, received, and dialled calls only if the network supports the Calling Line identification (CLI) within the service area. In the options of missed calls, received calls, and dialled numbers you can check: •... -
Page 111: Clear Recent Calls [Menu 2-4]
Call register [Menu 2] Menu Description (Dependent on the network service) Delete You can delete the record of the dialed numbers. Save You can save the information of dialed call. Call You can call by this number. Clear recent calls [Menu 2-4] This function allows you to delete Missed, Received, and Dialled call lists. -
Page 112: Call Costs [Menu 2-6]
Menu Description Call costs [Menu 2-6] This network service allows you to check the costs of your last call costs and all call costs. To clear the counters, you need the PIN 2 Code. Last call’s cost [Menu 2-6-1] This function allows you to reset the last call costs. You need to input PIN2 code. -
Page 113: Gprs Information [Menu 2-8]
Call register [Menu 2] Menu Description (Dependent on the network service) GPRS information [Menu 2-8] You can check the amount of data transferred over the network through GPRS. In addition, you can also view how much time you are online. 1. -
Page 114: Profiles [Menu 3]
Profiles [Menu 3] Menu Description Profiles [Press twice] Back In this menu, you can adjust and customize the phone tones for different events, environments and caller’s group. (e.g. When you are in car, you can choose the Car profile, Etc) 1. -
Page 115: General [Menu 3-3]
Profiles [Menu 3] Menu Description General [Menu 3-3] Activate [Menu 3-3-1] You can adjust the profile as General if you need General mode. Personalise [Menu 3-3-2] You can change the values of Profile submenus. Loud [Menu 3-4] Activate [Menu 3-4-1] You can adjust the profile as outdoor if you are in a noisy environment. - Page 116 Menu Description A Group of Personalise submenus Personalise menu have the submenus as shown below. Incoming call alert [Menu 3-x-x-1] Allows to set the incoming call alert type for adjusting environment. Ring, Vibrate, Ring & Vib, Ring after vib, Off. Ringing tone [Menu 3-x-x-2] Allows to set the ring tone for adjusting environment.
-
Page 117: Settings [Menu 4]
Settings [Menu 4] Menu Description Settings [Press three times] Back Alarm clock [Menu 4-1] You can set the phone to alarm time within this menu. • On You can set the time (Hour and Minute) for raising the alarm. 1. Enter the menu. 2. -
Page 118: Date & Time [Menu 4-2]
Menu Description Date & Time [Menu 4-2] The phone has its own clock. In this menu you can set the time format between 12-hour and 24-hour. Set the time [Menu 4-2-1] You can set time of your phone in this menu. 1. -
Page 119: Phone Settings [Menu 4-3]
Settings [Menu 4] Menu Description Phone settings [Menu 4-3] You can set the phone as you want. Scroll to highlight Phone settings menu, and then press [Select]. Language [Menu 4-3-1] This menu provides you with selection of the language. If Automatic is set, the language is chosen based on the current SIM card. -
Page 120: Call Settings [Menu 4-4]
Menu Description Call settings [Menu 4-4] You can set the menu relevant to a call by pressing [OK] in Setting menu. Answer mode[Menu 4-4-1] • On folder open [Menu 4-4-1-1] If you select this menu, you can receive an incoming call when only opening folder. - Page 121 Settings [Menu 4] Menu Description Call wait service [Menu 4-4-3] If this service is enabled, you can accept a waiting (incoming) call. If this service is disabled, you cannot recognize the waiting (incoming) call. • Activate [Menu 4-4-3-1] Activating the corresponding service. •...
- Page 122 Menu Description Data transfer mode [Menu 4-4-7] (network dependent) In case of Single Numbering Service, you can use the phone and the connected PC to send and receive fax, data, and voice. If you select the mode, you can receive data, fax, or voice for each mode. Once you enter this menu, following options are displayed.
-
Page 123: Security Settings [Menu 4-5]
Settings [Menu 4] Menu Description Security settings [Menu 4-5] PIN code request [Menu 4-5-1] In this menu, you can set the phone to ask for the PIN code of your SIM card when the phone is switched on. If this function is activated, you’ll be requested to enter the PIN code. - Page 124 Menu Description • All data calls [Menu 4-5-2-6] You can bar all data calls. • All fax calls [Menu 4-5-2-7] You can bar all fax calls. • Cancel all barrings [Menu 4-5-2-8] You can cancel all call barring services. The Submenus of Call Barring Service - Activate [Menu 4-5-2-x-1] If you apply call barring service to service provider, you can use it.
-
Page 125: Network Settings [Menu 4-6]
Settings [Menu 4] Menu Description Fixed dial number [Menu 4-5-3] (SIM dependent) You can restrict your outgoing calls to selected phone numbers. The numbers are protected by your PIN2 code. 1. Press [Menu] in standby mode. 2. Press key for direct access or use to enter Settings. -
Page 126: Gprs Settings [Menu 4-7]
Menu Description Manual [Menu 4-6-2] The phone will find the list of available networks and show you them. Then you can select the network that you want to use if this network has a roaming agreement with your home network operator. GPRS settings [Menu 4-7] You can set the phone to automatically register to a GPRS network when you switch the phone on. -
Page 127: Call Divert [Menu 5]
Call divert [Menu 5] Menu Description (Network and subscription dependent) Call divert [Press four times] Back The Call divert service allows you to divert incoming voice calls, fax calls, and data calls to another number. For more information, contact your service provider. -
Page 128: Cancel All Diverts [Menu 5-7]
Menu Description The submenus [Menu 5-x-x] Call Divert menu has the submenus as shown below. Activate [Menu 5-x-1] Activating the corresponding service. • To voice mailbox Forwards to message center. This function is not included in All data calls and All fax calls menus. •... -
Page 129: Organizer [Menu 6]
Organizer [Menu 6] Menu Description Organizer [Press five times] Back Schedule [Menu 6-1] When you enter this menu Calendar will show up. On top of the screen there are sections for date and icons. You can change the day, month and year by using . -
Page 130: Memo [Menu 6-2]
Menu Description Memo [Menu 6-2] 1. Scroll to highlight Memo. 2. Press [OK]. 3. Input the memo and then press [Save]. 4. You can view the following submenus. Edit [Menu 6-2-1] You can edit the selected memo. Delete [Menu 6-2-2] You can delete the selected memo. - Page 131 Organizer [Menu 6] Menu Description 5. If you want to edit, view, delete, copy and call by the entry, select [Option]. The below menu will be displayed. • Edit : You can edit the name, number, E-mail, and fax by pressing [OK].
- Page 132 Menu Description • Phone : You can add name, number (mobile, home, office), E-mail address, group and memo. a. Write a name to add. b. Press [OK]. c. You can select the number entry you want to input by pressing and then press d.
- Page 133 Organizer [Menu 6] Menu Description Speed dials [Menu 6-3-4] You can associate any of the keys with a Name list entry. You can call directly by pressing this key for 2-3 seconds. 1. Open the phonebook first by pressing [Names] in standby mode. You can also go Phonebook menu by scrolling 2.
- Page 134 Menu Description Copy all [Menu 6-3-7] You can copy/move entries from SIM card memory to Phone memory or from Phone memory to SIM card memory. 1. Open the phonebook first by pressing [Names] in standby mode. 2. Scroll to Copy all, then press [OK] to enter this menu.
- Page 135 Organizer [Menu 6] Menu Description Information [Menu 6-3-8] You can select a service dial number, check memory and own number list • Service Dial Number [Menu 6-3-8-1] Use this function to access a particular list of services provided by your network operator (if supported by the SIM card).
-
Page 136: Fun & Tools [Menu 7]
Fun & Tools [Menu 7] Menu Description [Press six times] Back Game [Menu 7-1] You can enjoy the games in a phone. My folder [Menu 7-2] You can view, delete, and control download contents. Picture [Menu 7-2-1] Animation [Menu 7-2-2] Sound [Menu 7-2-3] The Submenus for each main one [Menu 7-2-x-x] •... -
Page 137: Unit Converter [Menu 7-3]
Fun & Tools [Menu 7] Menu Description Unit converter [Menu 7-3] This converts any measurement into a unit you want. There are 4 types that can be converted into units: Length, Surface, Weight, and Volume. 1. You can select one of four unit types by pressing [Next] key. -
Page 138: Voice Recorder [Menu 7-6]
Menu Description Voice recorder [Menu 7-6] You can save and play 3 voice messages and each one can be recorded up to 30 seconds. Infrared [Menu 7-7] If you activate this function, you can use PC-sync by infrared. In addition, you can’t use Handsfree and infrared function at the same time. -
Page 139: Internet [Menu 8]
Internet [Menu 8] Menu Description Internet [Press seven times] Back Your phone supports internet sevices based on Wireless Application Protocol (WAP). You can access services supported by your network. The services menu allows you to get the information such as news, weather forecast, and flight time. -
Page 140: Push Messages [Menu 8-3]
Menu Description Push messages [Menu 8-3] You can manage an inbox and a message for using push service. Inbox [Menu 8-3-1] You can read or delete the push messages. Receive [Menu 8-3-2] You can set the option whether you will receive the message or not. Profiles [Menu 8-4] You can make up to 5 profiles and activate only one out of them. - Page 141 Internet [Menu 8] Menu Description • Secure setting [Menu 8-4-2-4] This option can be set None or Secure depends on the gateway. If you want to connect “Secure”, select Secure. If not, you select None. The gateway should support this option. •...
-
Page 142: Go To Url [Menu 8-5]
The cache is only checked when the WAP is started. • Off [Menu 8-6-2-3] The cache is never checked. WAP information [Menu 8-7] You can view the information about G7000 WAP. Reset profiles [Menu 8-8] You can reset all setting values to the factory default. -
Page 143: Internet On-Line Menu
Internet On-line menu Menu Description If you are on line, you can view the following menus. ❏ Home This is the same as [Menu 8-1]. ❏ Reload This reloads the current page. ❏ Bookmarks This is the same as [Menu 8-2]. ❏... - Page 144 Care and Maintenance When using this unit, basic safety precautions as below should be always followed. • Do not touch the adapter with wet hands. • Do not disassemble this unit. (Take it to a qualified service technician when repair work is required.) •...
-
Page 145: Care And Maintenance
Unlike other battery systems, there is no memory effect that could compromise the battery’s performance. • Use only LG batteries and chargers. LG chargers are designed to maximize the battery life. • Do not disassemble or short-circuit the battery pack. -
Page 146: Technical Data
Technical data General Product name : G7000 System : GSM 900 / DCS 1800 Ambient temperatures Max: +55°C Min: -10°C...
Need help?
Do you have a question about the G7000 and is the answer not in the manual?
Questions and answers