Table of Contents
Advertisement
Quick Links
Advertisement
Table of Contents

Related Manuals for Speedball 004230

Summary of Contents for Speedball 004230
- Page 1 ETCHING PRESS MANUAL FOR ALL SPEEDBALL ETCHING PRESSES Updated August 2018...
-
Page 2: Table Of Contents
TABLE OF CONTENTS Delivery Notes Unpacking Floor Stands Alignment Safety Tips Maintenance Diagram(s) 9-10 Warranty Information Warranty Card... -
Page 3: Delivery Notes
This manual is applicable to the following Speedball Etching Press models: [004230] 12 x 24 Tabletop Phenolic Bed; Direct Drive; Crank Handle ▪ [004231] 12 x 24 Tabletop Metal Bed; Direct Drive; Crank Handle ▪ [004232] 12 x 24 Tabletop Phenolic Bed; Gear Drive; Crank Handle ▪... -
Page 4: Unpacking
mounting brackets. If an Etching Press Floor Stand will be used, ensure it is on a level surface and prepared for the Etching Press to be mounted to it appropriately. UNPACKING If you received your Etching Press in a corrugate box/top that was damaged during shipment, be sure to make a full description of the breakage and/or damage as soon as possible. - Page 5 (1) Plain washer (1) M8 hex nut (4) Phillips head mounting screws Gently slide the press from the box onto the floor. With both hands, carefully lift the press from the ends and place it on your desired tabletop. Note: Keep the crank lever off the tabletop surface. Using the provided Philips head mounting screws, secure the press onto your desired tabletop surface.
-
Page 6: Floor Stands
Remove the polystyrene blocks and set aside. Using Philips screwdriver, unscrew legs of press from mounting clamps (blocks of wood) inside the frame of the press. This will “free” the press from the pallet. If you will be attaching your Etching Press to a Floor Stand, save one of the blocks of wood. -
Page 7: Alignment
▪ Replace the legs with the provided mounting clamps for the Floor Stand. ▪ Once complete, repeat on the other side. ALIGNMENT Your Speedball Etching Press is factory-aligned, however, it can become misaligned during shipment. Prior to use, we recommend checking the alignment to ensure it is precise. Phenolic Bed Check to ensure the Eccentric Pins and Reel Bearings are not interfering with the movement of the press bed or causing the press bed to not operate smoothly. -
Page 8: Maintenance
Keep out of the reach of small children. Do not attempt to lift or move the 24x36 Etching Press by yourself. The Etching Press should be lifted with at least three other individuals to avoid injury. MAINTENANCE For proper operation, always keep your Etching Press clean and away from water. Prior to each printing session, check and if necessary, remove any dust, excess oil, particles, ink, etc. -
Page 9: Diagram(S)
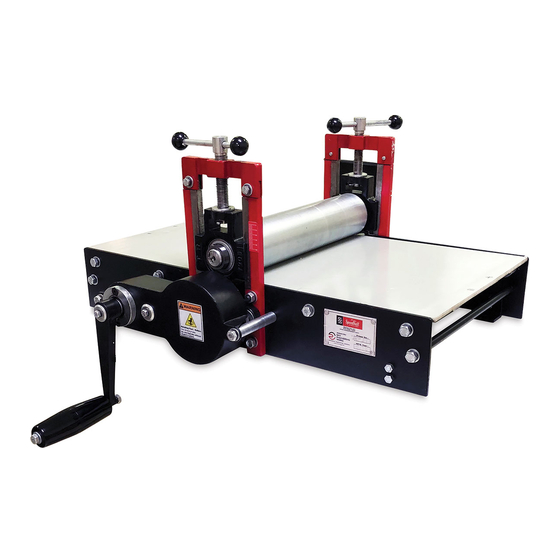
DIAGRAM 12 x 24 ETCHING PRESS | DIRECT DRIVE 1. Black Plastic Handle 2. Crank Lever 3. Direct Drive System 4. Pressure Lever 5. Pressure Screw 6. Top Roller 7. Bed Plate 8. Bottom Roller 9. Eccentric Guide 10. Tie Rod 11. - Page 10 24 X 36 ETCHING PRESS | GEAR DRIVE 1. Star Wheel Assy. 2. Star Wheel Rod 3. Gear Drive System 4. Pressure Lever 5. Pressure Screw 6. Top Roller 7. Bed Plate 8. Eccentric Guide 9. Reel Bearing 10. Tie Rod 11.
-
Page 11: Warranty Information
WARRANTY Speedball Art Products, LLC warrants this Speedball Etching Press to be free from defects in materials and workmanship under normal use and service, that would affect its operation for a period of 5 (five) years from the date of purchase. This warranty applies to the original buyer only and cannot be extended to a successive buyer even within the warranty period. - Page 12 Warranty Replacement If parts are in need of repair or replacement, the buyer can contact Speedball three ways: Online – https://www.speedballart.com/customer-service/ Phone – 1.800.898.7224 Email – placeanorder@speedballart.com...
Need help?
Do you have a question about the 004230 and is the answer not in the manual?
Questions and answers