Advertisement
Advertisement
Table of Contents

Related Manuals for Speedball 004230

Summary of Contents for Speedball 004230
- Page 1 ETCHING PRESS MANUAL FOR ALL SPEEDBALL ETCHING PRESSES Updated October 2018...
-
Page 2: Table Of Contents
TABLE OF CONTENTS Delivery Notes Unpacking Floor Stands Safety Tips Maintenance Diagram Warranty Card... -
Page 3: Delivery Notes
This manual is applicable to the following Speedball Etching Press models: [004230] 12 x 24 Tabletop Phenolic Bed; Direct Drive; Crank Handle ▪ [004231] 12 x 24 Tabletop Metal Bed; Direct Drive; Crank Handle ▪ [004232] 12 x 24 Tabletop Phenolic Bed; Gear Drive; Crank Handle ▪... -
Page 4: Unpacking
*If a Speedball Etching Press Floor Stand will be used, ensure it is on a level surface and prepared for the etching press to be mounted to it appropriately before beginning the unpacking process of the etching press. UNPACKING If you received your Etching Press in a corrugate box/top that was damaged during shipment, be sure to make a full description of the breakage and/or damage as soon as possible. - Page 5 24x36 ETCHING PRESS Your 24x36 Etching Press is packed and strapped to a 39x39 wooden pallet with a heavy- duty corrugate TOP. Remove the shrink wrap and carefully cut the plastic straps attached to the wooden pallet. Lift off the corrugated box top to remove it from the pallet. Remove the polystyrene blocks and set aside.
-
Page 6: Floor Stands
FLOOR STANDS If you purchased a Speedball Etching Press Floor Stand, you need to ensure the stand is completely level. If uneven, adjust the M10 hex bolts provided at the bottom of each leg. Tighten the hex nut after setting up the bolt. -
Page 7: Maintenance
MAINTENANCE For proper operation, always keep the etching press clean and away from water. Prior to each printing session, check and if necessary, remove any dust, excess oil, particles, ink, etc. from the press. Perform the following steps periodically: Apply an all-purpose lubricating oil on screw threads and top roller sliding guides. -
Page 8: Diagram
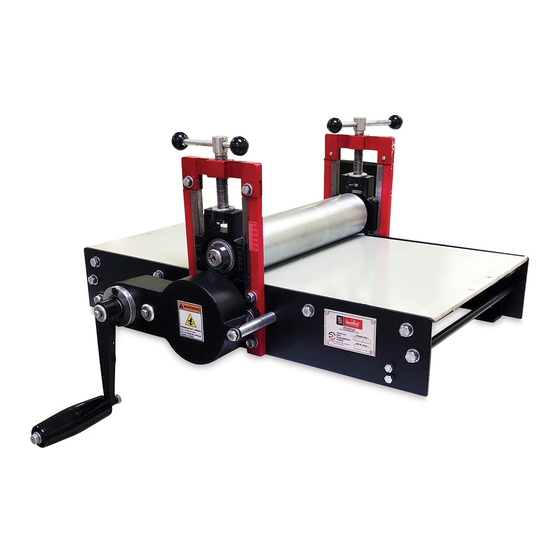
DIAGRAM(S) 12 x 24 ETCHING PRESS | DIRECT DRIVE 1. Black Plastic Handle 2. Crank Lever 3. Gear Drive System 4. Pressure Lever 5. Pressure Screw 6. Top Nut 7. Top Roller 8. Bed Plate 9. Bottom Roller 10. Eccentric Guide 11. -
Page 9: Warranty Card
All expenses related to replacing or repairing a defective part under this warranty shall be assumed by Speedball Art Products. The limit of this warranty includes the product only and not any loss of work time or contract due to inability to use the Etching Press.
Need help?
Do you have a question about the 004230 and is the answer not in the manual?
Questions and answers