Table of Contents
Advertisement
Quick Links
Advertisement
Table of Contents

Subscribe to Our Youtube Channel
Related Manuals for RICHTECH V2 LITE

Summary of Contents for RICHTECH V2 LITE
- Page 2 Copyright© 2020 – RICHTECH SYSTEM LTD All rights reserved. Document No.:RICHTECHV2LITE001 Second edition, September 2020, revised by Operation Guidelines Notice Please follow the recommendations listed below for optimal performance. Please make sure that the system is deployed in a well-lit area.
-
Page 3: Table Of Contents
1.2.2 Display Pedestal Installation................- 5 - 2. AATSS V2 Lite Configuration Instructions..............- 10 - 2.1. V2 Lite – Connect to the Network................- 10 - 2.2 Settings of V2 Lite IP address..................- 11 - 2.3 Management Terminal....................- 12 - 2.3.1 Login interface.................... -
Page 4: Introduction
The Automated AI Temperature Screening System (AATSS V2 Lite is your company’s first line of defense against COVID-19 and other infectious diseases. As a fully automated system, the AATSS V2 Lite provides extremely accurate temperature readings, immediate temperature alerts through multiple notification channels, and automatically records data for easy recordkeeping and reporting. -
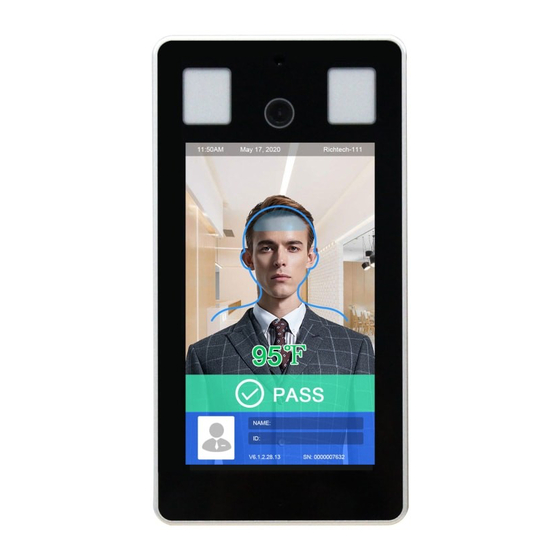
Page 5: Screen And Icon
1.1.2 Screen and Icon 1.2 AATSS V2 Lite Installation 1.2.1 Table Stand Installation Step 1. Slip the V2 Lite interface cables through the center hole of the Stand Base. - 3 -... - Page 6 Step 2. Screw the V2 Lite mount into the base stand and secure it from the bottom using the helix nut provided. The mount is meant to be screwed in, not forced in directly. Step 3. Connect the Ethernet and Power Cable to the Stand Base connectors.
-
Page 7: Display Pedestal Installation
Step 4. Completed installation: 1.2.2 Display Pedestal Installation If you ordered a Display Pedestal, the installation method is very similar to the Table Stand. - 5 -... - Page 8 Step 1. Open the stand base and use the screwdriver to remove the backside cover. Step 2. Slip the V2 Lite interface cables through the center hole of the Stand Base. - 6 -...
- Page 9 Step 3. Pass all the data interface cables through the hole in the stand backside cover. Step 4. Connect the USB, Ethernet, and Power Cable to the Stand Base connectors. - 7 -...
- Page 10 Step 5. Screw the V2 Lite mount into the base stand and secure it from the bottom using the helix nut provided. The mount is meant to be screwed in, not forced in directly. Step 6. Secure the backside cover using screws.
- Page 11 30 - 40 seconds. If you need to manage the V2 Lite through a network, connect the base to your router via an ethernet cable. For instructions on how to set up the network, please refer to the following Software section.
-
Page 12: Aatss V2 Lite Configuration Instructions
Note: We recommend using Windows 10 to manage the AATSS V2 Lite. 2.1. V2 Lite – Connect to the Network If you need to manage the V2 Lite through a network, please connect the base to your router using an ethernet cable. See below:... -
Page 13: Settings Of V2 Lite Ip Address
The V2 Lite will show the IP address on the screen 20 seconds after the device is switched on. The IP address will be shown for 1 min at most. See the below example where the IP address is 192.168.0.25 2.2 Settings of V2 Lite IP address... -
Page 14: Management Terminal
The V2 Lite will reboot again, and the IP address will be adjusted to the static IP address, e.g. 192.168.0.25. Gateway is 192.168.0.1 2.3 Management Terminal 2.3.1 Login interface When you open the management terminal (web) for the first time, please input the device IP address, e.g. -
Page 15: System
2.3.2 System a. Account management You may change the username/ password and change the advertisement as needed as follows. b. System info You can get the device information and firmware version - 13 -... -
Page 16: System Time
c. System time You can change the time zone and set time preferences. d. Maintenance In Windows, browsers that are supported are Google Chrome, Firefox and Microsoft Edge. In MacOS, Firefox is supported. Step 1: Log into the Web Management Terminal and go to “System\Maintenance”. - Page 17 2.3.3 Screen Screen Parameter Options: Auto mode, Always bright, Time. - 15 -...
-
Page 18: Network
2.3.4 Network a. LAN The default DHCP is "enable". After the V2 Lite is connected to the network, it will get IP address automatically, so please disable the DHCP. Save the current IP address. b. RTSP RTSP (Real Time Streaming Protocol) can be connected to third party software to monitor the V2 Lite stream. -
Page 19: Ai Settings
rtsp://192.168.2.241:554/stream_1 2.3.5 AI Settings If enabled, an alert will show on the screen when Mask Detection one is detected to be not wearing a mask. If enabled, it will display the body temperature on Temperature Screening the screen; if disabled, won't show body temperature. -
Page 20: Volume
3. Maintenance Thermal infrared detection works most accurately indoors. The AATSS V2 Lite is resistant to sunlight interference and can be used outdoors. However, please avoid direct sunlight on the device or the face of the person being screened whenever possible. We... -
Page 21: Specifications
Limit exposure to weather and rain. When installing the AATSS V2 Lite, please avoid heat sources such as vents and hot electronic equipment. Standard cleaning products can be used to clean the device. -
Page 22: Warranty
Power Consumption 7W (Max) Dimensions 9.37” x 4.82” x 1.24” Weight 2.65 pounds 5. Warranty Full 1-year manufacturer warranty. (Extendable up to 3 years) Return Policy: Return within 14 days of receiving your shipment for a full refund minus return shipping. If the return is due to a manufacturing defect, all shipping costs will be covered. - Page 23 856-363-0570 - 1 -...
Need help?
Do you have a question about the V2 LITE and is the answer not in the manual?
Questions and answers