
Subscribe to Our Youtube Channel
Related Manuals for HunterDouglas Platinum Technology


Summary of Contents for HunterDouglas Platinum Technology
- Page 1 P latinum t ec hn ology ™ Wireless Wall Switch Guide for PowerRise , Powerglide , and Powertilt Systems ™ ® ®...
-
Page 2: Table Of Contents
Control Like Never Before This guide shows you how to set up and operate Hunter Douglas motorized products using the Platinum Technology wireless wall ™ switch. The wireless wall switch uses radio control for normal operation, but uses an infrared (IR) signal for some setup tasks. Method of Operation Radio Control •... -
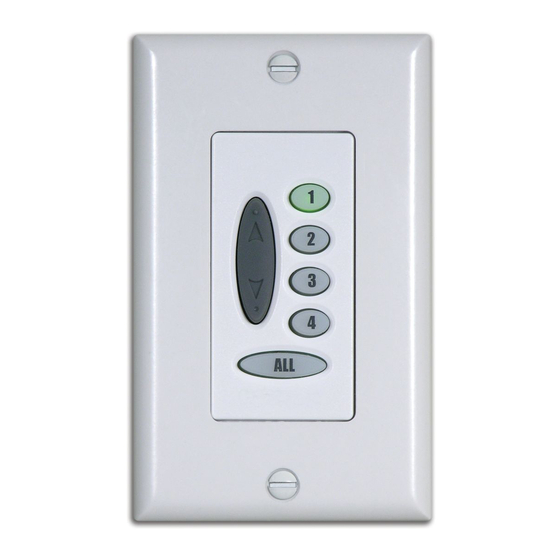
Page 3: Getting Started
Getting Started Install batteries in the Platinum ™ wireless wall switch. Platinum Wireless Wall Switch Front Back Setup Group 1 Group 2 Group 3 DOWN Master Group 4 Reset Groups Battery Compartment This guide is intended for use with Hunter Douglas Platinum Technology products manufactured after September 2012. -
Page 4: Sensor Eye Locations
Sensor Eye Locations Sensor eyes can be found in the following locations (depending on product and installation options chosen): In the Headrail On a Satellite Eye Below the Headrail Note: The manual control button, used for operating a window covering without a wireless wall switch, is usually adjacent to the sensor eye. -
Page 5: Radio Control
Radio Control Getting Started Radio control gives you the ability to control individual window coverings or multiple window coverings at the same time, even if they are in another room. Group Assignment To use the wireless wall switch, each window covering must first be assigned to a group. - Page 6 Radio Control Group Addition or Removal Before you begin, operate the window covering using the manual control button to make sure that it is working properly. tip: Move the wireless wall switch as close as possible (2"– 3") to the sensor eye when assigning groups. 1.
- Page 7 Radio Control Basic Operation Operating your window coverings using the wireless wall switch allows you to control multiple window coverings at the same time from a central location. 1. Press the group button assigned to the window coverings. 2. Press the UP button to open the window covering or the DOWN...
- Page 8 Radio Control Setting Up a Duplicate Wall Switch If you want a backup for your primary wireless wall switch or remote, you can quickly duplicate the current transmitter. When this procedure is complete, any change made with any of the transmitters also affects the operation of the other wireless wall switches and remotes.
-
Page 9: Installation
Installation The Platinum wireless wall switch can be installed either as a ™ surface mount or a flush mount. Surface Mount Flush Mount Installing the Platinum Wireless Wall Switch as a Surface Mount 1. Remove the back cover from the switch. 2. -
Page 10: Intermediate Stops
Intermediate Stops This section includes information on intermediate stops for PowerRise and PowerGlide products. The PowerTilt system ™ ® ® for horizontal blinds does not offer the intermediate stop feature. Setting Intermediate Stops An intermediate stop allows a window covering to be preset so that it will stop at the same “intermediate”... -
Page 11: Express Mode
Express Mode Express Mode When the window covering is in any position, you can open or close it fully (bypassing the intermediate stop) as follows: 1. Press the appropriate group button. 2. Press and hold the UP DOWN button for 2 seconds. The window covering opens or closes fully. - Page 12 Applause , Duette , and Vignette ® ® ® Tiered Shades ™ This section includes additional operating information for the following PowerRise products: ® Applause honeycomb shades ■ ® Duette honeycomb shades ■ ® Vignette Tiered Modern Roman Shades ■ ®...
-
Page 13: Applause , Duette , And Vignette Tiered Shades
Applause , Duette , and Vignette ® ® ® Tiered Shades ™ Lower the Bottom Rail 1. With the middle rail fully raised, press the group button assigned to the shade. 2. Press the DOWN button to lower the bottom rail and cover the window. -
Page 14: Roller, Screen, Pleated, Solera ™ , And Vignette Shades
Nantucket Roller, Screen, Pleated, , Pirouette , and Silhouette ® ® ™ Solera Window Shadings , and Vignette Shades ® ™ Other than basic radio control operation, no additional operating information is needed for the following PowerRise products: ® Alustra Woven Textures and Screen Shades ■... -
Page 15: Nantucket , Pirouette , And Silhouette Window Shadings
Nantucket , Pirouette , and Silhouette ® ® ™ Window Shadings This section includes additional operating information for the following PowerRise products: ® Nantucket window shadings ■ ™ Pirouette window shadings ■ ® Silhouette window shadings ■ ® Radio Control Operation Press and release the assigned group button (or the ALL button to select all groups) and press UP to open the shadings or... -
Page 16: Luminette And Skyline Products
Luminette and Skyline Products ® ® This section includes additional operating information for the following PowerGlide products: ® Luminette Privacy Sheers and Modern Draperies ■ ® Skyline Gliding Window Panels ■ ® Traversing Luminette Products Traversing Closed 1. Press and release the assigned group button. - Page 17 Luminette and Skyline Products ® ® Tilting Luminette Privacy Sheer Vanes Luminette Privacy Sheers have a sheer face fabric to let light in ® and integrated soft fabric vanes that tilt to keep light out. Note: Luminette Modern Draperies Full Panel and Skyline ®...
-
Page 18: Horizontal Blinds
Horizontal Blinds This section includes additional operating information for the following PowerTilt products: ™ EverWood Collection alternative wood blinds ■ ® Modern Precious Metals aluminum blinds ■ ® Parkland wood blinds ■ ™ Tilting the Slats 1. Press and release the assigned group button. 2. -
Page 19: Troubleshooting
Troubleshooting Problem Window covering does not operate with the wall switch. Solution 1. Make sure a group button illuminates when you try to operate the window covering. If the group button does not illuminate ➤ when you press a button, replace the batteries in your wall switch. - Page 20 Troubleshooting Problem Window covering does not operate. Solution Make sure you have added the window covering to a group. For more information, see “Group Assignment” on page 3. Make sure you have pressed the group button for the group to which the window covering has been assigned.
- Page 21 Troubleshooting Problem Window covering does not open or close fully or has an intermediate stop that is no longer wanted. Solution Make sure the movement of the window covering is not obstructed. Reset the window covering as described in “Resetting a Window Covering” on page 20. Problem Cannot add window covering to group.
- Page 22 Troubleshooting Problem If you cannot resolve your problem with these guidelines: Solution Check the Troubleshooting section of the Installation, Operation, and Care instructions for the window covering. If you still cannot resolve the problem, contact the Hunter Douglas Customer Information Center at 1-888-501-8364.
-
Page 23: Group Assignment Worksheet
Group Assignment Worksheet Before assigning window coverings to groups, Hunter Douglas recommends that you plan your group assignments. For example, you might create a group for all window coverings in a single room or a group just for all window coverings on one wall. Note: A window covering can be a member of more than one group. -
Page 24: Product And Operating System Information
Product and Operating System Information PowerRise PowerTilt ® ™ Alustra Woven Textures EverWood Collection alternative ® ® ® Screen Shades wood blinds Applause honeycomb shades Modern Precious Metals aluminum ® ® blinds Designer Roller and Screen Shades Parkland wood blinds ™...
Need help?
Do you have a question about the Platinum Technology and is the answer not in the manual?
Questions and answers