
Related Manuals for PPI SMART ROLL

Summary of Contents for PPI SMART ROLL
- Page 1 READ THESE INSTRUCTIONS CAREFULLY BEFORE STARTING INSTALLATION OPERATION & MAINTENANCE SMART ROLL & SMART MONITOR...
-
Page 2: Table Of Contents
Selecting how many pulses per revolution for the Smart Roll . . . . . . . . . . . . . . . -
Page 3: Smart Roll Selection Guide
47269 Smart Monitor 220VAC 4-20mA output Attention must be given to the location of the Smart Roll so that it is always in contact with the belt . Failure to mount properly may void warranty and could cause damage to conveyor belt and other components . -
Page 4: Installing And Mounting The Smart Roll
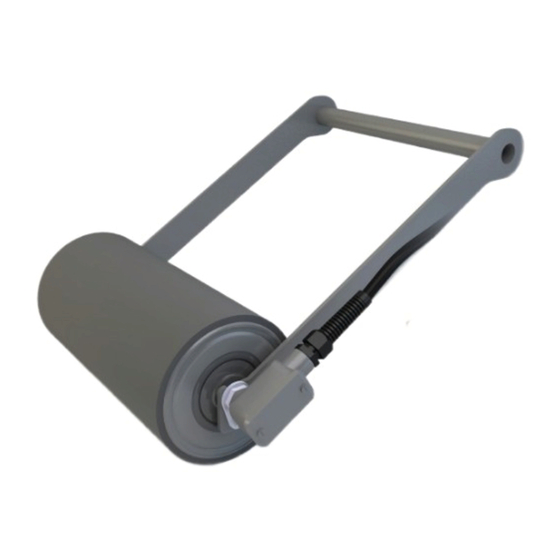
. Wires that are scraped, pinched, or crushed during shipping, handling or installation will void the warranty . Installing the Clean Side Return (CSR) Smart Roll is shown to the right . This is the most commonly used Smart Roll . For mounting the Universal, Trougher or Return Smart Rolls see the appendix . -
Page 5: Test Fit The Mounting Assembly
. Welding to be performed by qualified individuals trained to AWS, or equivalent . PPI is not capable of being aware of all site specific and industry welding requirements for an application, and cannot be held liable for non-compliant installations. -
Page 6: Pivot / Hinge Option 1: Welding Pivot Rod To Conveyor Frame
PIVOT / HINGE OPTION 1: WELDING PIVOT ROD TO CONVEYOR FRAME ASSEMBLIES CARBON STEEL STAINLESS STEEL ASSEMBLY PART # ASSEMBLY PART # 42971 42971S4 42972 42972S4 COMPONENTS 4 FEET LONG – CARBON STEEL ITEM DESCRIPTION PART # 3/4” diameter x 4’ long rod 43180 Shaft Collar SC0012... -
Page 7: Clean Side Return Smart Roll Diagram & Parts List
CLEAN SIDE RETURN SMART ROLL DIAGRAM & PARTS LIST ASSEMBLY COMPONENTS ITEM DESCRIPTION PART # Smart Roll TABLE CSR Bracket 40820 D End Clip 47117 #12-3/8” Self Tapping Screw 31880 B End Clip 31800 Hex Bushing 34461 90º Elbow Conduit Access Port... -
Page 8: Wiring The Smart Roll
DO NOT directly operate a motor with the sensor . Always use a relay or other appropriate device . 2 . At this point a 2 wire cable needs to be routed from the control box housing the Smart Monitor to the Smart Roll . It is recommended to use minimum of 22 AWG shielded cable . -
Page 9: Wiring The Smart Monitor
The digital display shows “RPM” next to the monitored speed . This can be misleading with a 2 or 6 pulse Smart Roll, as the monitor is actually displaying pulses per minute (PPM) . As with any electrical equipment, the Smart Monitor should be installed by trained personnel using appropriate safety practices per the National Electric Code, including electrical disconnect and lockout practices reference ANSI Z244 . - Page 10 4 . Figure 4 . 3 shows a sample wiring diagram of how the Smart Monitor can be wired into your system . If you are familiar with PPI’s older Smart Monitor see Figure 4 . 4 comparing the wiring diagrams on the next page .
- Page 11 Figure 4 . 4 : Installation cross reference for old and new Smart Monitors .
-
Page 12: Smart Monitor Set-Up
SMART MONITOR SET-UP TRIP POINT SET-UP Apply power to the Smart Monitor . If this is the first time powering the unit up, the default trip point is 6 RPM or PPM, the built-in ramp-up timer is disabled and the relay is off (TRIP: 0006 / RAMP: 0S / REL: OFF) . Read through the following instructions before starting the set-up procedure . -
Page 13: Using A Plc
PLC . The Smart Roll sensor has a maximum switching frequency of 20 Hz, or 20 pulses per second . Digital electronic equipment, such as a PLC, takes intermittent sensor readings rather than continuously monitoring the sensor . If the switching of the sensor pulses is faster than the sampling rate of the equipment, errors may occur . -
Page 14: What Is The Pulse Duration And Calculating Pulse Duration
• Select a roll with a lower number of pulses per revolution . If you are using a Smart Roll with 6 pulses per revolution, switch to a 2 pulse or 1 pulse per revolution Smart Roll . The PLC will have more time between pulses and longer pulse duration . This is the preferred method . -
Page 15: Frequently Asked Questions
No, the Smart Roll only produces pulses and the Smart Monitor reads the pulses . The Smart Roll / Smart Monitor can only indicate that the roll is turning, i . e . the belt is moving, but cannot indicate the direction in which the belt is traveling . In addition the Smart Roll / Smart Monitor cannot be running one direction, stop, and then start running the other direction and continue uninterrupted operation . - Page 16 UNIVERSAL MOUNT SMART ROLL MOUNTING INSTRUCTIONS Attention must be given to the location of the Smart Roll so that it is always in contact with the belt . Failure to mount properly may void warranty and could cause damage to conveyor belt and other components .
-
Page 17: Appendix
Smart Roll away from electrical power conduit as the electrical power may cause electromagnetic interference (EMI) in the signal from the Smart Roll . If EMI is present the signal from the Smart Roll may not make it to the Smart Monitor or PLC . -
Page 18: Universal Mount Smart Roll Diagram & Parts List
• Attach the Smart Roll wires to the wires from the control box . Cut wires to proper length to fit in junction box . DO NOT apply power to the sensor at this time . The Smart Monitor or PLC provides the power for the Smart Roll . -
Page 19: Troughing Smart Roll
6 . Unscrew the hex bushing from the wired end of the Smart Roll and carefully slide it over the wiring and set aside to be replaced later . 7 . Slide the wires through the largest hole of the end clip and lock this end of the Smart Roll into the end bracket using the end clip and the self-tapping screw . - Page 20 . 4 . Attach the conduit to the 90° elbow access port . 5 . Attach the Smart Roll wires to the wires from the control box . Cut wires to proper length to fit in junction box . DO NOT apply power to the sensor at this time .
-
Page 21: Troughing Smart Roll Diagram And Parts List
. 6 . Place the non-wired end of the Smart Roll in the other drop bracket so the roll is held in place by the flats on the shaft and the drop bracket slot . -
Page 22: Return Smart Roll Diagram & Parts List
. 4 . Attach the conduit to the 90° elbow access port . 5 . Attach the Smart Roll wires to the wires from the control box . Cut wires to proper length to fit in junction box . DO NOT apply power to the sensor at this time . -
Page 23: Smart Roll Sensor Wiring Diagrams And Specifications
A4. SMART ROLL SENSOR WIRING DIAGRAMS AND SPECIFICATIONS Figures A4 . 1 , A4 . 2 , and A4 . 3 show Smart Roll Sensor wiring diagrams . For these diagrams, the Smart Monitor or PLC provides the load . -
Page 24: Additional Smart Monitors
3 . Table A5 . 1 shows connection details for the terminal strip . Make needed connections . No connection No connection 4 . Install Smart Roll . See Section 2: “Installing and Mounting the Smart Roll . ” Sensor Input (+) Set-up and Display Indicators: Sensor Input Common (-) When power is applied to the unit, the display will show the following: “000”... - Page 25 Example below shows the speed information for 150 RPM: This example has an INPUT FREQUENCY RANGE of 0 . 1 66 Hz to 2 . 5 0 Hz . By installing 1 (one) target on the roller or shaft, the following formula can be used to convert to RPM’s: INPUT FREQUENCY * 60 = RPM Examples: 0 .
-
Page 26: Part Number 47268 Smart Monitor 9-36 Vdc
3 . Table A5 . 4 shows connection details for the terminal strip . Make needed connections . No connection No connection 4 . Install Smart Roll . See Section 2: “Installing and Mounting the Smart Roll . ” No connection Trip Point Set-up: No connection Apply power to Smart Monitor . - Page 27 Adjusting Ramp-up Timer after Smart Monitor is Installed and Wired into Control Circuit: There may be times when after installation the ramp-up timer is found to be set to too short a period of time . This presents a problem because when the equipment being monitored is shut down, there is also no power going through the Smart Monitor .
-
Page 28: Part Number 47269 Smart Monitor 220Vac 4-20Ma Output
3 . Table A5 . 6 shows connection details for the terminal strip . Make needed connections . No connection 4 . Install Smart Roll . See Section 2: “Installing and Mounting the Smart Roll” . Sensor Input (+) Set-up and Display Indicators: Sensor Input Common (-) When power is applied to the unit, the display will show the following: “000”... - Page 29 Example below shows the speed information for 150 RPM: This example has an INPUT FREQUENCY RANGE of 0 . 1 66 Hz to 2 . 5 0 Hz . By installing 1 (one) target on the roller or shaft, the following formula can be used to convert to RPM’s: INPUT FREQUENCY * 60 = RPM Examples: 0 .
-
Page 30: Part Numbers
4-20 mA 47268 6 – 3,000 9-36 vdc Relay contacts 47269 6 – 3,000 220 VAC 4 W 4-20mA CLEAN SIDE RETURN SMART ROLL PART NUMBERS PART NUMBER PULSES PER REVOLUTION LAGGING THICKNESS DIAMETER ROLL LENGTH BELT WIDTH SAD5CSRSB-1PL4 PULSE 1/4”... -
Page 31: Troughing Equal Smart Roll Part Numbers
TROUGHING EQUAL SMART ROLL PART NUMBERS PULSES PER LAGGING ROLL ROLL BELT PULSES PER LAGGING ROLL ROLL BELT PART NUMBER PART NUMBER REVOLUTION THICKNESS LENGTH WIDTH REVOLUTION THICKNESS LENGTH WIDTH SAD5TE24SB-1P PULSE no lagging 5 . 0 8 . 9 38... -
Page 32: Flat Return Smart Roll Part Numbers
FLAT RETURN SMART ROLL PART NUMBERS PULSES PER LAGGING ROLL ROLL BELT PULSES PER LAGGING ROLL ROLL BELT PART NUMBER PART NUMBER REVOLUTION THICKNESS LENGTH WIDTH REVOLUTION THICKNESS LENGTH WIDTH SAD6FL24SB-1P PULSE no lagging 6 . 0 27 . 3 75...
Need help?
Do you have a question about the SMART ROLL and is the answer not in the manual?
Questions and answers