
Related Manuals for THRUSTME KICKER


Summary of Contents for THRUSTME KICKER
- Page 1 K I C K E R K K I I C C K K E E R R INSTRUCTION MANUAL INSTRUCTION MANUAL INSTRUCTION MANUAL thrustme.no thrustme.no thrustme.no...
- Page 2 LANGUAGE Page 3-19 English Page 21-38 Norwegian...
- Page 3 T T A A B B L L E E O O F F C C O O N N T T E E N N T T S S What's in the box First time Charging the Kicker and Remote How things work...
- Page 4 INCLUDED KICKER remote Wrist band for remote Magnetic kill switch KICKER safety cord KICKER motor KICKER charger 230V...
-
Page 5: First Time Charging
Congratulations with your KICKER For first time use – please do the following steps For first time use – please do the following steps Connect the charger to the Kicker Connect the charger to the Kicker Red-light on charger indicates charging... -
Page 6: Display Functions
Remote connected Internal battery charging The KICKER is protected with an automatic circuit breaker and temperature sensors. If the motor stops while running, it needs to be reset. Before resetting check that the propeller is free for seaweed or other objects. If the battery temperature is too high, the KICKER needs time to cool down. -
Page 7: Remote Functions
REMOTE FUNCTIONS Remote (removable) Hole for wrist band Reverse thrust (one push = one step) Stop Forward thrust (one push = one step) Charging and indicator light, pulses while charging To change direction you always need to push the stop button first. NOTE: The remote vibrates when a button is pushed NOTE: Remote is equipped with 2,4 GHz system transmitting with only 1mV, so the range is limited to approx. - Page 8 REMOTE FUNCTIONS – PAIRING REMOTE FUNCTIONS – PAIRING REMOTE FUNCTIONS – PAIRING Read thru all steps before you start the paring mode Read thru all steps before you start the paring mode Read thru all steps before you start the paring mode The system needs to be turned off for the The system needs to be turned off for the pairing mode.
-
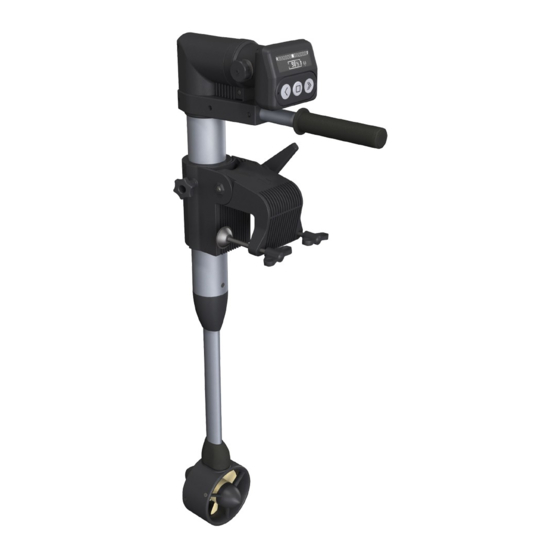
Page 9: Transom Mount
Operating instructions Familiarize yourself with all the motor controls. For instance, you should be able to stop the motor quickly if necessary. Display & Remote Steering handle with adjustable length Twist to fasten and loosen Handle for tilt mechanism Transom mount Adjusting Screw THRUSTER... - Page 10 Operating instructions Attach the motor on the Transom mount Make sure that the adjustment screws are fastened and tightened before using the motor. (After a few minutes of use, please After tightening the screws) Attach the safety band and connect it to the boat to prevent loosing the motor in the water.
- Page 11 Operating instructions Adjusting the length of the motor Loosen the friction screw. When this is almost completely unscrewed, you can pull the motor up from the fastening device There are two screws on the mounting ring. These are loosened and the ring is placed in the desired place to get the right length in relation to the transom...
- Page 12 The KICKER remote is charged by wireless charging (induction). Place the remote in the slot in the KICKER display and the remote will be charged. Charging time: 0-100% approx. 30min Note: Magnetic kill switch needs to be connected to charge the remote.
-
Page 13: Maintenance
MAINTENANCE THE KICKER is designed for minimum maintenance work and we have made great efforts to provide you with a product with a little maintenance as possible The product will last longer and give you a better experience if you do the following : After use in saltwater, run the thruster in fresh water and clean all parts with fresh water to prolong the life of the components. - Page 14 MAINTENANCE Removing/replacing propeller If it should be necessary to remove / replace the propeller follow steps bellow: 1. Unscrew the 3 screws and. 2. Remove the front bracket on the thruster 3. Unscrew the 2 propeller screws. 4. Pull off the propeller and replace the propeller For re-installation do the following steps in reverse order: Remember to replace all parts and make sure that everything is correct assembled and tightened.
- Page 15 WARNINGS Do not put fingers or other objects in the propeller while KICKER is switched on (emergency kill switch magnet connected ) Do not run the motor if not in water. The motor is water-cooled and may be damaged if running without water.
- Page 16 Any unauthorized attempts at repair or reconstruction will result in immediate guarantee and warranty forfeiture. Please note that opening the KICKER main frame will result in guarantee and warranty forfeiture. In warranty cases please read the warranty information on the next page.
-
Page 17: Warranty
(e.g. costs for towing, telecommunications, food, accommodation, loss of earnings, loss of time etc.). The warranty for the KICKER (ex. Batteries) ends two years after original date of purchase. The warranty for batteries is six months. Final purchaser must make any warranty claim within this time period and need to submit a copy of the bill which shows the date of purchase. -
Page 18: Warranty Process
To check a warranty claim and to process a warranty, we require your assistance: For returning the KICKER, we recommend keeping the original THRUSTME packaging. If this is no longer available, packaging that prevents transport damage must be used (as transport damage is not included in the warranty). - Page 19 You can, in line with local regulations, hand in the KICKER at a collecting point. From there it will be professionally disposed. We in the THRUSTME highly recommend you to disposal all parts for recycling for taking good care of our environment. EN EN...
- Page 21 Se etter ikonene øverst på sidene for å finne raskt frem INNHOLDSFORTEGNELSE Eskens innhold Første gang opplading av motor og fjernkontroll Hvordan ting fungerer Montering Hvordan lade og oppbevare batteriene Advarsler / Fare Vedlikehold og service Ekstrautstyr og deler Garantier Resirkulering av produktet...
- Page 22 INKLUDERT KICKER Fjernkontroll Festebånd for fjernkontroll Magnetisk nødbryter ( hovedbryter ) Sikkerhetsbånd til KICKER KICKER motor Lader til Kicker 230V...
- Page 23 QUICK GUIDE Første gang du benytter Kickeren må du gjøre følgende for å sikre at Kickeren og Fjernkontrollen er ladet før bruk. Koble til laderen på KICKER Rødt lys indikerer at ladingen har startet. Monter på den magnetiske Nødstoppen Kontroller at displayet lyser Sett inn fjernkontrollen I lade “Slotten”...
- Page 24 FJERNKONTROLL FUNKSJONER Avtagbar Fjernkontroll Hull for sikkerhetsreim Revers (ett trykk = ett trinn) Stopp For å endre retning fra Forover til revers eller motsatt må alltid stopp knappen trykkes inn. Forover (et trykk = ett trinn) Batteridiode / betjeningsindikator OBS: Fjernkontrollen vibrerer når man trykker på knappene OBS: Fjernkontrollen sender med 2,4 GHz system sendestyrken er 1mV, og rekkevidden er ca.
- Page 25 FJERNKOTROLL FUNKSJONER – PAIRING FJERNKOTROLL FUNKSJONER – PAIRING FJERNKOTROLL FUNKSJONER – PAIRING Les igjennom hele prosessen før du starter Les igjennom hele prosessen før du starter Les igjennom hele prosessen før du starter Systemet må være skrudd av ( nødstopp fjernet Systemet må...
- Page 26 Trådløs fjernkontroll koblet til systemet Lading av internt batteri KICKER er beskyttet med automatisk sikring og temperatursensor system. Hvis motoren stopper mens du kjører, må den nullstilles. Fjern nød bryteren og kontroller om det er objekter i propellen eller om det er andre årsaker til at systemet har stoppet, for eksempel høy temperatur.
- Page 27 Operating instructions Gjør deg godt kjent med alle funksjoner på motoren. Styre håndtak med justerbar lengde Vri for å feste eller løsne Hendel for tilt mekanisme Akterspeilfeste Feste/monterings skrue THRUSTER...
- Page 28 Montering Montering av motoren på akterspeilet Forsikre deg om at feste skruene er strammet til før du bruker motoren. (Etter noen minutters bruk, etter strammes festeskruene for å sikre at motoren sitter godt.)
- Page 29 Montering Justering av lengden på motoren Løsne på friksjons skruen. Når denne er skrudd nesten helt ut kan du trekke motoren opp fra feste anordningen Det er to skurer på feste ringen. Disse løsnes og ringen plasseres på ønskelig sted for å få riktig lengde i forhold til akterspeilet på...
- Page 30 Benytt kun original lader levert fra THRUSTME. Andre ladere kan skade systemene Start aldri lading av KICKER’en hvis den føles varm og aldri bruk den i temperaturer over 40°C. Hold KICKEREN I skyggen når den ikke brukes slik at ikke batteriene blir overopphetet.
- Page 31 VEDLIKEHOLD KICKER`en er designet for at du som bruker skal ha minimalt med vedlikehold. Men den skal alltid spyles i ferskvann etter bruk for å forlenge levetiden på komponentene. Etterbruk i saltvann, vennligst kjør motoren i en bøtte med ferskvann for å fjerne rester av saltvann.
- Page 32 VEDLIKEHOLD FJERNING / UTSKIFTING AV PROPELL Dersom det skulle bli nødvendig å fjerne / skifte ut propell skal stegene under følges: 1. Skru ut de 3 skruene som holder front-braketten 2. Trekk ut front-braketten 3. Skru ut de 2 skruene som holder propellen 4.
- Page 33 KICKER’en skal ikke benyttes til dykking. KICKER’en skal ikke ligge under vann over lengre tid. Pass på at KICKER’en ikke oppbevares eller lades i områder med temperaturer over 40°C Gjør deg kjent med alle advarsler og brukermanualen har før du bruker KICKER...
- Page 34 RESERVEDELER OG EKSTRA UTSTYR Alle reservedeler og ekstra utstyr kan bestilles på vår nettside under KICKER. www.thrustme.no Reparasjoner eller modifiseringer skal kun utføres av autoriserte THRUSTME service sentre. Eventuelle uautoriserte forsøk på reparasjon eller gjenoppbygging vil resultere i umiddelbar brudd av garantien på produktet.
- Page 35 GARANTI THRUSTME garanterer den endelige kjøperen til en KICKER at produktet er fri for material- og produksjonsfeil i perioden som er angitt nedenfor. Uten om dette gjelder Norsk kjøpslov. THRUSTME vil tilse at den endelige kjøperen ikke skal ha noen kostnader for å reparere eventuelle produksjonsfeil.
- Page 36 For å sjekke garantikrav og å behandle en garanti, krever vi din hjelp: For å returnere KICKER anbefaler vi at du holder den originale THRUSTME emballasjen. Hvis dette ikke lenger er tilgjengelig, må...
- Page 37 Du kan, i tråd med lokale bestemmelser, levere inn KICKER til ett godkjent mottak. Derfra vil det bli profesjonelt resirkulert. Vi i THRUSTME setter stor pris på om du tenker på miljøet og leverer inn våre produkter til en gjenvinningsstasjoner slik at vi bevarer miljøet...
- Page 40 THRUSTME AS THRUSTME AS THRUSTME AS THRUSTME AS Kvitsøygata 30 Kvitsøygata 30 Kvitsøygata 30 Kvitsøygata 30 4014 Stavanger 4014 Stavanger 4014 Stavanger 4014 Stavanger Norway Norway Norway Norway www.thrustme.no www.thrustme.no www.thrustme.no www.thrustme.no Designed and developed in Norway Designed and developed in Norway...
Need help?
Do you have a question about the KICKER and is the answer not in the manual?
Questions and answers