Advertisement
Quick Links
2GIG-GB1-345
GLASS BREAK DETECTOR
INSTALLATION INSTRUCTIONS
The Glass Break Detector (2GIG‐GB1‐345) is a fully‐supervised,
tamper‐protected, ceiling‐ or wall‐mounted unit. It communicates
with the control panel using the 345 MHz frequency. The detector
provides a 15 ft (4.6 m) maximum detection range, 360° maximum
horizontal sensing angle, and dual‐stage glass break detection.
Contents
Verify that the package includes the following:
• 1—Glass Break Detector (with Mounting Base)
• 2—Lithium Batteries
• 3—Plastic Wall Anchors with Screws
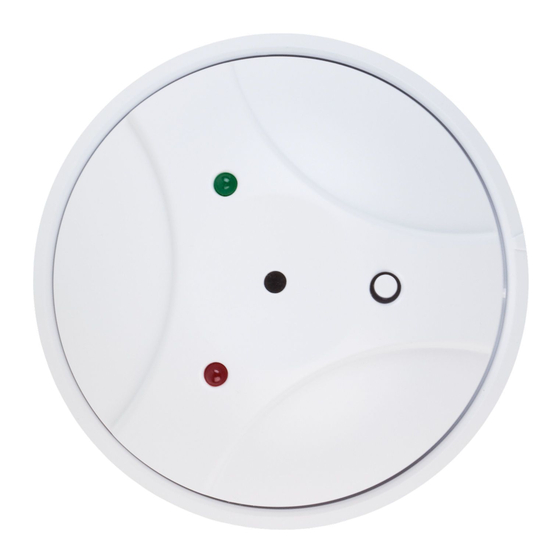
Figure 1 LED Indicators
A RED LED
B
GREEN LED
C
TEST button
D Imprinted arrow (for alignment of cover and base)
Inserting and Replacing the Batteries
To insert or replace the batteries:
Unwrap the detector.
1
Holding the cover and base, twist the cover in a counter‐clockwise
2
motion. When the imprinted arrows on the side of the detector
are aligned, separate the unit.
Remove the old batteries.
3
Always dispose and/or recycle used batteries in
IMPORTANT:
accordance with the hazardous waste recovery and recycling
regulations for your location. Your city, state, or country may
also require you to comply with additional handling, recycling,
and disposal requirements.
Insert the batteries in the compartment. Always match the plus (+)
4
sign on the battery with the flat side of the compartment and the
minus (‐) sign on the battery with the spring side of the
compartment.
It takes approximately five (5) seconds for the detector to power
ON.
Figure 2 Glass Break Detector
A
Tamper switch
B
Battery compartments (RED tabs located behind compartments)
If closing the detector when batteries are not present,
NOTE:
gently push the RED tabs on the backside of the base away
from the detector (see Figure 2 Glass Break Detector—Base).
5
Holding the cover, align the imprinted arrows on the detector and
then twist the cover in a clockwise motion to close the unit.
Failure to follow these warnings and instructions can
WARNING:
lead to heat generation, rupture, leakage, explosion, fire, or
other injury, or damage. Do not insert the battery into the
compartment in the wrong direction. Always replace the
battery with the same or equivalent type (see "Specifications"
on page 2). Never recharge or disassemble the battery. Never
place the battery in fire or water. Always keep batteries away
from small children. If batteries are swallowed, promptly see
a doctor.
Wall Mounting
When wall mounted, the detector provides protection coverage on
the opposite or adjacent window. Windows on the same wall as the
detector are not protected.
To mount the detector to a wall:
If not already installed, insert the batteries (see "Inserting and
1
Replacing the Batteries" on page 1).
2
With the cover off, place the base of the detector on the adjacent
or opposite wall from the window being protected.
3
Use the three (3) Plastic Wall Anchors (provided) to mount the
base of the detector to the wall.
IMPORTANT:
Always mount the detector so the Test button is in
the downward position.
Holding the cover, align the imprinted arrows. Then use a
4
clockwise twist motion to lock the cover into place.
—
Base
Copyright © 2014 Linear LLC
1
Advertisement

Related Manuals for Linear 2GIG-GB1-345

Summary of Contents for Linear 2GIG-GB1-345
- Page 1 To insert or replace the batteries: Unwrap the detector. Wall Mounting Holding the cover and base, twist the cover in a counter‐clockwise When wall mounted, the detector provides protection coverage on motion. When the imprinted arrows on the side of the detector the opposite or adjacent window. Windows on the same wall as the are aligned, separate the unit. detector are not protected. Remove the old batteries. To mount the detector to a wall: If not already installed, insert the batteries (see "Inserting and Always dispose and/or recycle used batteries in IMPORTANT: Replacing the Batteries" on page 1). accordance with the hazardous waste recovery and recycling regulations for your location. Your city, state, or country may With the cover off, place the base of the detector on the adjacent also require you to comply with additional handling, recycling, or opposite wall from the window being protected. and disposal requirements. Use the three (3) Plastic Wall Anchors (provided) to mount the base of the detector to the wall. Insert the batteries in the compartment. Always match the plus (+) sign on the battery with the flat side of the compartment and the IMPORTANT: Always mount the detector so the Test button is in minus (‐) sign on the battery with the spring side of the the downward position. compartment. Holding the cover, align the imprinted arrows. Then use a It takes approximately five (5) seconds for the detector to power clockwise twist motion to lock the cover into place. Copyright © 2014 Linear LLC...
- Page 2 32°‐120° F (0° ‐ 49° C) uncontrolled environment. Avoid operating this product at a Relative Humidity 5‐90% Non‐Condensing distance less than 20 cm from the user. Battery (included, not installed) Two (2) CR 123A 3V or equivalent Lithium Any changed or modifications not expressly CAUTION: batteries approved by the party responsible for compliance could Approved Glass Break Simulator FG‐701 Glassbreak Simulator void the user's authority to operate this equipment. Certification Anatel, ETL, FCC, IC, IFETEL, and NOM Industry Canada (IC) Compliance This device complies with Industry Canada license‐exempt RSS standard(s). Operation is subject to the following two conditions: (1) this device may not cause interference, and (2) this device must accept any interference, including interference that may cause undesired operation of the device. Repairs to certified equipment should be made by an authorized Canadian maintenance facility designated by the supplier. Any repairs or alterations made by the user to this equipment, or equipment malfunctions, may give the telecommunications company cause to request the user to disconnect the equipment. Users should ensure for their own protection that the electrical ground connections of the power utility, telephone lines and internal metallic water pipe system, if present, are connected together. This precaution may be particularly important in rural areas. Copyright © 2014 Linear LLC...
- Page 3 LIMITED WARRANTY This Linear product is warranted against defects in material and workmanship for two (2) years. This warranty extends only to wholesale customers who buy direct from Linear LLC or through Linear LLC’s normal distribution channels. Linear LLC does not warrant this product to consumers. Consumers should inquire from their selling dealer as to the nature of the dealer’s warranty, if any. There are no obligations or liabilities on the part of Linear LLC for consequential damages arising out of or in connection with use or performance of this product or other indirect damages with respect to loss of property, revenue, or profit, or cost of removal, installation, or reinstallation. All implied warranties for functionality, are valid only until the warranty expires. This Linear LLC Warranty is in lieu of all other warranties expressed or implied. 2GIG by Linear 1950 Camino Vida Roble, Suite 150 Carlsbad, CA 92008 USA For technical support in the USA and Canada: 855‐2GIG‐TECH (855‐244‐4832) Email: 2gigtechsupport@linearcorp.com Visit web site for technical support hours of operation For technical support outside of the USA and Canada: Contact your regional distributor Visit dealer.2gig.com for a list of distributors in your region 187‐0721 Rev. C Copyright © 2014 Linear LLC...