
Related Manuals for IOGear GCL1900W

Summary of Contents for IOGear GCL1900W
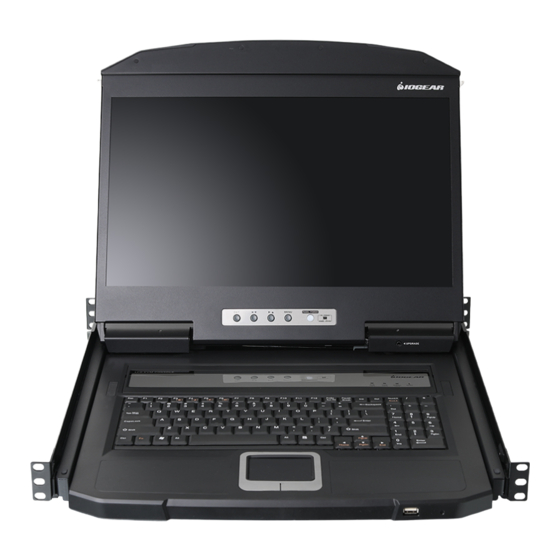
- Page 1 User Manual 18.5” Widescreen Short Depth VGA LCD KVM Console GCL1900W PART NO. M1602 www.iogear.com...
- Page 2 ©2020 IOGEAR. All Rights Reserved. Part No. M1602. IOGEAR, the IOGEAR logo is trademarks of IOGEAR. Microsoft and Windows are registered trademarks of Microsoft Corporation. IOGEAR makes no warranty of any kind with regards to the information presented in this document. All information furnished here is for informational purposes only and is subject to change...
-
Page 3: Table Of Contents
Table of Contents Safety Instructions Rack Mounting Conventions Introduction Package Contents Features Requirements Operating Systems Overview Hardware Setup Hotkey Operation The Firmware Upgrade Utility Specifications Chart Trouble Shooting FCC Information... -
Page 4: Safety Instructions
Safety Instructions ■ Read all of these instructions. Save them for future reference ■ This device is for indoor use only ■ Follow all warnings and instructions marked on the device ■ Do not place the device on any unstable surface (cart, stand, table, etc.). If the device falls, serious damage will result ■... -
Page 5: Rack Mounting
■ If the following conditions occur, unplug the device from the wall outlet and and replace with new power cord o The power cord or plug has become damaged or frayed o Liquid has been spilled into the device o The device has been exposed to rain or water o The device has been dropped, or the cabinet has been damaged o The device exhibits a distinct change in performance, indicating a need for service o The device does not operate normally when the operating instructions are followed... -
Page 6: Conventions
Conventions This manual uses the following conventions Monospaced Indicates text that you should key in Indicates keys you should press. For example, [Enter] means to press the Enter key. Numbered lists represent procedures with sequential steps ■ Bullet lists provide information, but do not involve sequential steps →... -
Page 7: Introduction
The GCL1900W also features a port for an external USB mouse, located on the unit’s front panel, to be used with the built-in keyboard. The GCL1900W LCD monitor supports resolution up to 1366 x 768 and aimed not just to achieve but to exceed the requirements for space utility optimization, adaptive deployment, and operational versatility. -
Page 8: Features
Features • Integrated LCD KVM console with 18.5” widescreen LCD monitor in a single rail housing with top and bottom clearance for smooth operation in a 1U high system rack • LCD monitor supports resolution of 1366 x 768 @60Hz •... -
Page 9: Requirements
Requirements Computers • VGA, SVGA, or MultiSync video graphics card with an HDB-15 port • Type-A USB port • Audio port (optional) External Console • VGA monitor • Standard 2 or 3-button wired USB mouse • Standard 104-key wired USB keyboard •... -
Page 10: Overview
Overview GCL1900W Front View Diagram... - Page 11 Component Description Upper Handle with Pull to slide the LCD module out Release Bar Push to slide the LCD module back in LCD Module After sliding the LCD module out, push the release bar on top of the handle to flip up the cover, accessing the LCD display LCD Controls The buttons to control the position and picture settings of the LCD display are located here...
- Page 12 This is a standard 3-prong AC power socket. Connect power cord from an AC source to this socket Power Switch This is a standard rocker switch that powers the GCL1900W On and Off External Console Connect the KVM cables to this port...
-
Page 13: Hardware Setup
Before Installing Please read Safety Instructions before proceeding with installation Please make sure that all devices including the GCL1900W are powered OFF. Power cords of any computers that have the Keyboard Power On function must be unplugged. Packing material may be inserted from factory to protect GCL1900W during shipping. Slide the LCD module out (see Opening / Closing the Console) until packing material is visible. - Page 14 Standard Rack Mounting Please use the included standard rack mounting kit to mount the GCL1900W in a rack with a depth of 16.5"-28.3". Note: 1.
- Page 15 While one per son inserts the GCL1900W into place by sliding its left and right side bars into the mounting brackets (on the rack), have the second person install four screws in the front tabs to secure the module to the front of the rack.
- Page 16 (microphone not supported) into their respective ports on the Console Section of the GCL1900W 4. Connect the GCL1900W to an AC power source using the included power cord 5. Turn on the GCL1900W power 6. Turn on your PC power...
- Page 17 Operation Basic Operation The GCL1900W’s console is a single rail console: the LCD display module and the keyboard/touch pad module can only slide in/out together. Please refer to the diagram below to open or close the console 1. Pull on the Release Bar on the upper handle. Slide the console module out until it clicks in place, then raise the LCD Module lid 2.
- Page 18 Right! Rest your hands and arms lightly on the keyboard module as you work. Wrong! • DO NOT lean your body weight on the keyboard module • DO NOT place heavy objects on the keyboard module.
- Page 19 LCD OSD Configuration LCD Buttons The LCD OSD allows you to set up and configure the LCD display. Four buttons are used to perform the configuration as described in the table below Function Button MENU Press this button to invoke the Menu function and brings up the Main Menu, if you have not already entered the LCD OSD Menu function Press this button to bring up adjustment screen, if you have...
- Page 20 Adjustment Settings An explanation of the LED OSD adjustment settings is given the below table Setting Explanation Brightness Adjusts the background black level of the screen image Contrast Adjusts the foreground white level of the screen image Phase If the pixel jitters or horizontal line noise is visible on the display, the LED may have the wrong phase setting.
- Page 21 GCL1900W, turn the rear panel power switch back on. Port ID Numbering and Port Selection If a KVM switch is connected to the GCL1900W, Port ID numbering and Port selection will follow the method used by the connected KVM Switch. Please refer to the KVM switch’s...
-
Page 22: Hotkey Operation
Hotkey Operation IOGEAR’s GCL1900W provides an extensive, easy-to-use, hotkey function for convenience in controlling and configuring KVM installation from the keyboard. Console selection is accomplished with the following hotkey combinations: Combination Action Beeps LEDs [Ctrl][Alt][Shift][P][C][Enter] To select normal mode (PC, etc) - Page 23 2. When activating hotkey combinations [Ctrl] [Alt] [Shift], make sure you are using the keys on the same side of the keyboard. 3. Console selections are not saved. If the GCL1900W is powered off, it will revert to the default setting when it is powered on again 4.
- Page 24 Keyboard Emulation Mac Keyboard Emulation The PC compatible (101/104 key) keyboard can emulate the functions of Mac keyboard. The emulation mapping are listed in table below PC Keyboard Mac Keyboard [Shift] Shift [Ctrl] Ctrl [Ctrl][1] [Ctrl][2] [Ctrl][3] [Ctrl][4] [Alt] [Print Screen] [Scroll Lock] [Enter] Return...
- Page 25 Sun Keyboard The PC compatible (101/104 key) keyboard can emulate the functions of the Sun keyboard when the Control key [Ctrl] is used in conjunction with other keys. The corresponding functions are shown in the table below PC Keyboard Sun Keyboard [Ctrl] [T] Stop [Ctrl] [F2]...
-
Page 26: The Firmware Upgrade Utility
3. Use the included Firmware Upgrade Cable to connect a COM port from your computer to the Firmware Upgrade Port of the GCL1900W 4. From your GCL1900W console, login to the OSD as the administrator and select the F4 ADM function. - Page 27 Starting Firmware Upgrade 1. With the GCL1900W on Firmware Upgrade Mode, run the downloaded Firmware Upgrade Package file from your computer – either by double clicking the file icon or by opening a command line and keying the full path and filename 2.
- Page 28 The Utility inspects your installation. All devices capable of being upgraded by the package are listed under the Device List panel 4. Click Next to perform the upgrade. a. If the Check Firmware Version is enabled, the Utility compares the device’s firmware level with that of the upgrade files.
- Page 29 3. Slide the Firmware Upgrade Switch to the Recover position 4. Power ON the GCL1900W and repeat the Firmware Upgrade Procedure 5. After the GCL1900W has been successfully upgraded, power the KVM console OFF, and slide the Firmware Upgrade Switch back to the Normal position.
-
Page 30: Specifications Chart
Specifications Chart Function GCL1900W Computer Connections Direct Console Selection Hotkey Connectors External Console Ports 1 x HDB-15 Female (Blue) 2 x USB Type-A Female 1 x 3.5mm Audio Jack Female (Green) KVM Ports 2 x USB Type-A Female USB Port 1 x 3.5mm Audio Jack Female (Green) - Page 31 Contrast Ratio 700:1 Support Color 16.7M colors Luminance 200 cd/m2 Maximum Input Power 100-240 V AC, 50-60Hz, 1A Rating Power Consumption 110V, 13.8W/220V, 14.1W Environmental Operating Temperature 0-40 C Storage Temperature -20-60 C Humidity 0-80% RH Non-condensing Physical Properties Housing Metal + Plastic Weight 4.13lb...
-
Page 32: Trouble Shooting
Trouble Shooting Symptom Action Some characters entered from the The keyboard layout setting for the port keyboard do not display correctly does not match the keyboard you are using. On your switch, please change the keyboard layout setting for the port to match the layout of the keyboard you are using Cannot use the special keys on Sun... -
Page 33: Fcc Information
FCC Information FEDERAL COMMUNICATIONS COMMISSION STATEMENT: This equipment has been tested and found to comply with the limits for a Class A digital device, pursuant to part 15 of the FCC Rules. These limits are designed to provide reasonable protection against harmful interference when the equipment is operated in a commercial environment.
Need help?
Do you have a question about the GCL1900W and is the answer not in the manual?
Questions and answers