Table of Contents
Advertisement
Quick Links
Advertisement
Table of Contents

Related Manuals for Wine Corner WINE C18IN

Summary of Contents for Wine Corner WINE C18IN
- Page 1 U S E R G U I D E WINE C18 IN D E F Y I N G C O N V E N T I O N...
-
Page 2: Table Of Contents
WINEMASTER C18 IN USER GUIDE INSTRUCTIONS FOR USE TABLE OF CONTENTS Introduction : “From Vineyard to wine” ....... Page 3 1. -
Page 3: From Vineyard To Wine
WINEMASTER C18 IN USER GUIDE FROM VINEYARD TO WINE In former times, good french cellars were built to maintain a temperature not exceeding 14 to 16°C in all seasons. Today, this is rarely the case. Nevertheless, a cellar worthy of the name must be protected against wide variations in temperature, be as damp as necessary and ventilated, dark and free of vibration. -
Page 4: Layout Of Premises
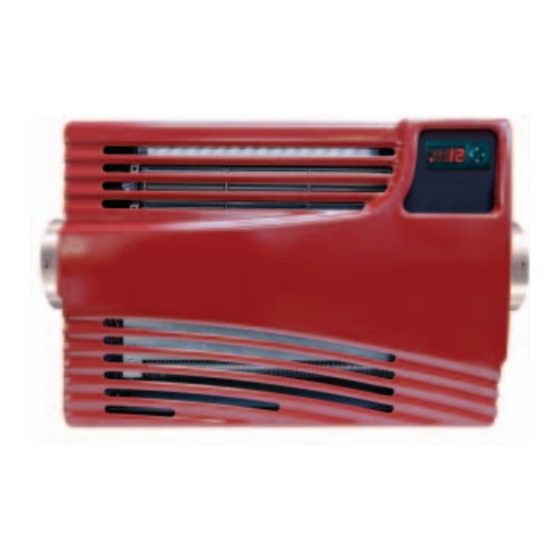
WINEMASTER C18 IN USER GUIDE CHARACTERISTICS WINE C18IN Setting the temperature Preset to 13°C, adjustable between 4 and 15°C* Maximum outdoor temperature 35°C** Cooling power 550 W at 15°C ** Electricity supply 230-240 C - 50 Hz - with earth connection... -
Page 5: Walls And Celling Insulation
WINEMASTER C18 IN USER GUIDE This is very important: it prevents heat and humidity entering from the outside which would counter the effects of regulation. IMPORTANT The validity of the WINEMASTER guarantee depends on the values in the "Choice of insulation" table being strictly respected, for all the cellar walls, including floor and ceiling + door, as well as perfect continuity of insulation. -
Page 6: The Door
WINEMASTER C18 IN USER GUIDE Puncture resistance (feet of shelves in particular) is provided: - by using "complex" insulation panels lined, on the upper surface, with a strong panel. - by facing the insulation with a panel of chipboard (approx. 15 mm thick), or any other suitable covering (plaster and slab, for example). -
Page 7: Dimensions
WINEMASTER C18 IN USER GUIDE 2.2 DIMENSIONS 2.3 FIXING THE WINEMASTER Install the Winemaster on the wall holder. Screw the unit with a 10 key. Page 7... -
Page 8: Installing The Ducts
WINEMASTER C18 IN USER GUIDE 2.4. INSTALLING THE DUCTS The connections must be sealed to prevent condensation forming on the walls of the air-conditioner. Place the inside duct on the Stick the adhesive tape Take it round several times Position the insulation duct flue collar across the flue collar and to ensure a good seal. -
Page 9: Installing The Water Drainage System
WINEMASTER C18 IN USER GUIDE 2.5 INSTALLING THE WATER DRAINAGE SYSTEM Slide on the PVC tube 3 on the condensate container 1. Open the ring 2 and slide along the tube 3. Set the ring as near as possible. Important : Wait for 24 hours before switching on the air-conditioner. -
Page 10: Automatic Defrost
WINEMASTER C18 IN USER GUIDE 3.3 AUTOMATIC DEFROST The program of the thermostat will run an automatic defrost time several times a day. During this position, the compressor cannot sart. Only the fan in the cellar can function. The condensate water produced during this period will be evacuated through the tube 4. -
Page 11: Guarantee
WINEMASTER C18 IN USER GUIDE 5. GUARANTEE 5.1. TWO-YEAR CONTRACTUAL GUARANTEE The air-conditioner is guaranteed for two years against manufacturing defects. During the contractual guarantee period, FONDIS will replace any part recognized as defective, following the intervention of a qualified representative. In the event of an electrical breakdown, FONDIS will replace any part recognized as defective following the intervention of a qualified stockist or his representative. - Page 12 WineMaster user manual, please complete and return this warranty certificate within 15 days from the date of purchase to the following address: WINE CORNER Unit 6, Harworth Enterprise Park, Brunel Industrial Estate, Harworth, South Yorkshire DN11 8SG...
Need help?
Do you have a question about the WINE C18IN and is the answer not in the manual?
Questions and answers