Table of Contents
Advertisement
Quick Links
Quick Installation Guide
Ethernet over Coax Transceiver,
Data/Power supply 270Mbps,
57VDC power input
IAM-6MC1001M0A
Please read carefully the instruction manual before use. Depending
on the model, the image and the actual look of the product may vary.
Package
EPoC Transceiver
DC Cable &
DC Terminal Block
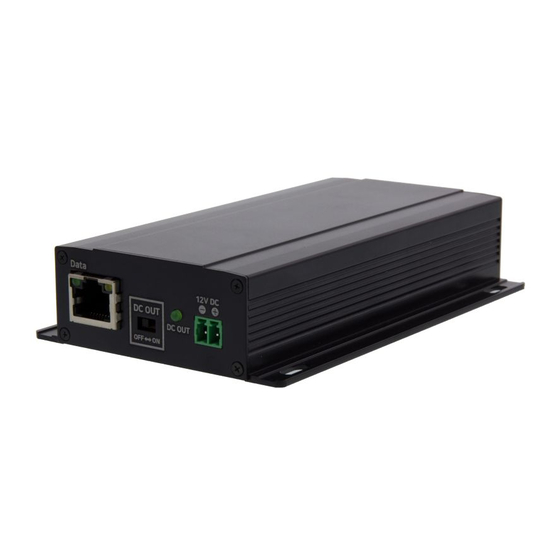
Hardware Overview
Right
EPoC Transceiver
DC 전원 어댑터
DC Power Jack
상태 표시등
Status LED
indicator
Note: The Join Button is currently disabled.
Left
EPoC Transceiver
RJ45
DC OUT스위치
DC OUT
ON / OFF Switch
LED Indicators
Indicator
Color
BNC Join
PWR
LINK
Quality
PWR
Data
DC OUT
Quick
Installation
Guide
Quick Installation
Guide
Join 버튼
Join Button
BNC 커넥터
BNC connector
DC OUT 표시등 터미널 블럭
DC OUT LED
Terminal Block
Function
EPoC Devices connected
56VDC input connected
Good data connection
Poor data connection
Good power supply condition
Additional adapter required
Flashes when data is transferred
DC OUT switch is ON
Overview
This device is a High-Speed, long distance Ethernet & PoE extender
that makes possible to transmit IP data up to 2.4Km up to 1.2Km
through various analog cables in different situations.
It is cost-effective and time saving solution to migrate existing analog
system to IP based system since EPoC Transceiver supports
easy installation utilizing the existing CCTV cable (Coax, UTP, 2wire &
Etc.).
With long distance transmission feature, the device makes to
overcome 100 meters distance limitation easily and reduces the
construction cost significantly compared with fiber optic configuration.
Features
Ethernet over coax (UTP, 2-Wire) communication following
IEEE1901 Standard
Data (or UTP, 2-wire)
Data distance up to 2.4Km
Max. 270Mbps Bandwidth
10/100/1000 Full Duplex
128bit AES network encryption
Supports Multi-connection (Daisy chain, Star, etc.)
Supports UTP, Telephone (2 Pairs), 2-Wire cable communication
(Using BTE Series)
Quality LED (Data & Power)
Plug & Play
Surge Protection
12VDC output (for Non-PoE Camera)
Installation Guide
1. Set the IP address on the camera following the instruction manual
of the camera.
If the camera IP is automatically assigned (DHCP, etc.), there is no
Î
need to set the camera IP separately.
2. Connect BNC of the coaxial cable to each EPoC Transceiver.
3. Connect 56V DC power to EPoC Transceiver first and then to AC
outlet.
transmission up to 1200m over RG6 coaxial cable.
4. When they are correctly connected, PWR/BNC Join/Quality PWR LED
are on.
5. Fix up EPoC Transceiver where it should be placed.
6. Connect the UTP(LAN) cable between EPoC Transceiver and NVR
first and then between EPoC Transceiver and camera.
7. Connect DC Cable between camera and Terminal Block on EPoC
Transceiver.
EPoC Transceiver send data via BNC connector.
Î
the
polarity (+/-) and tie up DC cable on the terminal block.
8. Ping test is recommended to confirm the whole network after
installation.
9. Check the video signal on the monitor.
Mind
Î
Advertisement
Table of Contents

Related Manuals for Eneo IAM-6MC1001M0A

Summary of Contents for Eneo IAM-6MC1001M0A
- Page 1 IP data up to 2.4Km up to 1.2Km through various analog cables in different situations. IAM-6MC1001M0A It is cost-effective and time saving solution to migrate existing analog system to IP based system since EPoC Transceiver supports easy installation utilizing the existing CCTV cable (Coax, UTP, 2wire &...
- Page 2 (2) This device must accept any interference received including interference that may cause undesired operation eneo® is a registered trademark of VIDEOR E. Hartig GmbH Exclusive distribution through specialised trade channels only. VIDEOR E. Hartig GmbH, Carl-Zeiss-Straße 8, 63322 Rödermark/Germany Tel.
Need help?
Do you have a question about the IAM-6MC1001M0A and is the answer not in the manual?
Questions and answers