Table of Contents
Advertisement
Advertisement
Table of Contents

Related Manuals for Neptune Systems COR-15

Summary of Contents for Neptune Systems COR-15
- Page 1 COR USER GUIDE APEX-CONNECTED COR-15 & COR-20...
-
Page 2: Table Of Contents
GET TO KNOW YOUR COR DRIVER .................. 4 GET TO KNOW YOUR COR PUMP ..................5 APEX SYSTEM FIRMWARE REQUIREMENTS..............5 PHYSICAL INSTALLATION – COR-15 AND COR-20 DRIVER ..........6 PHYSICAL INSTALLATION – COR PUMP ................7 COR PUMP AND COR DRIVER CONNECTION ............. 8 COR-20 CONNECTION TO APEX SYSTEM AND POWER ............. -
Page 3: Introduction
WITHOUT connecting it to an APEX. A Neptune Systems APEX controller with a free 1LINK port (provided by either the 1LINK module or Energy Bar 832) is required to utilize the COR-15; it cannot function as a standalone pump. -
Page 4: Cor Features And Specifications
COR FEATURES AND SPECIFICATIONS ❖ COR-20: 2000GPH @ 0’, 90w maximum current ❖ COR-15: 1500GPH @ 0’, 60w maximum current ❖ COR Pump cable length: 9 feet (275cm) ❖ Multicolor status LED to indicate the operating state of the pump system and of any conditions requiring user attention ❖... -
Page 5: What's In The Box
The COR-15 package (not depicted) comes with: ❖ COR-15 driver ❖ COR pump ❖ 10’ (3m) 4-pin 1LINK male-to-male cable for connection of the COR-15 to an APEX system via a 1LINK module or EnergyBar 832. COR User Guide Page 3... -
Page 6: Get To Know Your Cor Driver
COR-15 Driver Connections COR-20 Driver Connections The COR-15 and COR-20 driver provides power and speed control to the COR pump. When connected to an Apex system, the COR driver appears to the Apex as an AquaBus expansion module, and is managed by the Apex like any other Apex expansion module. -
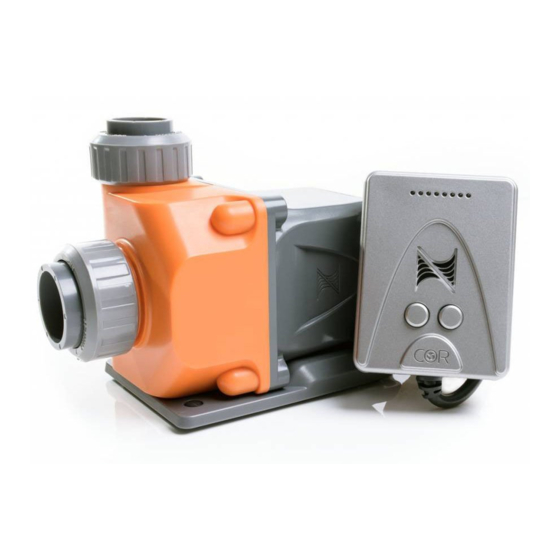
Page 7: Get To Know Your Cor Pump
The COR-15 and COR-20 driver may also be referred to as a ‘module’, however, the term ‘driver’ will be used throughout this user guide. GET TO KNOW YOUR COR PUMP 1.25” output, BSPP threads 1.5” intake, BSPP threads Detachable baseplate... -
Page 8: Physical Installation - Cor-15 And Cor-20 Driver
APEX if needed. PHYSICAL INSTALLATION – COR-15 AND COR-20 DRIVER The COR-15 or COR-20 driver should be securely mounted in a location free from moisture. The COR driver uses an innovative mounting system which provides safe secure mounting yet allows easy removal of the COR from the mounting plate. -
Page 9: Physical Installation - Cor Pump
PHYSICAL INSTALLATION – COR PUMP The COR pump may be installed for use either submerged (in sump) or externally- plumbed. An extensive discussion of aquarium plumbing design, PVC plumbing cementing, etc. is beyond the scope of this user guide; however, some tips and suggestions are provided here. -
Page 10: Cor Pump And Cor Driver Connection
Slip Adapter Collar Mounted on COR Intake Externally-Plumbed Installation If you will install your COR external to the sump, use both supplied slip adapter fittings, or optionally, use the 1-1/2” x 1” slip fitting on the pump intake and the 1-1/4” union on the pump output. -
Page 11: Cor-20 Connection To Apex System And Power
COR-20 CONNECTION TO APEX SYSTEM AND POWER The COR-20 driver communicates with the APEX base unit and other system modules through the AquaBus connectors. The COR-20 has two AquaBus connectors which may be utilized to connect the COR-20 to an APEX system and optionally, daisy-chain an additional module or modules downstream of the COR. -
Page 12: Cor-15 Connection To Apex System
COR-15 CONNECTION TO APEX SYSTEM To connect a COR-15 to an APEX system, that APEX system must be equipped with an available 1LINK port on an EnergyBar 832 or a 1LINK module. The EnergyBar 832 and the 1LINK module each have three 1LINK ports; any of those 1LINK ports may be used. - Page 13 If it shows OLD, then click on the COR line, choose Update Firmware from the Action menu, then click the (Update APEX) button If you have an APEX Classic model, you must use the Classic Dashboard to check the COR firmware version, and if necessary, update it. This cannot be done through APEX Fusion.
-
Page 14: Cor Driver Status Led Panel And Led Bar
Look in the SWRev column; if it says (OK) for your COR, no update is needed. If it shows (OLD), then select the COR using the Module dropdown; after the page refreshes, click Update Firmware, the click Submit Module Change. You can observe the module firmware update progress just above the Module List on that page. - Page 15 The Neptune Systems logo on the face of the COR-15 and COR-20 driver is a multicolor LED panel which indicates the status of the COR. The top bar of 8 small LEDs provides additional information. In most cases, it indicates the approximate speed of the pump.
- Page 16 The COR driver’s internal firmware is being updated by the APEX • One of these conditions exist: The COR-15 driver’s 1LINK cable is disconnected Not Lit The COR-20 in Standalone Mode has no 24VDC power The COR-15 or COR-20 driver has suffered a failure COR User Guide Page 14...
-
Page 17: Cor Driver Buttons
ADDITIONAL NOTES: o Whenever the LED panel is lit red, a specific error message will also be shown on APEX Fusion and APEX Local dashboards; these are not shown on the Classic Dashboard. The error conditions must be enabled however, for these status messages to appear. -
Page 18: Cor Dashboard Tiles
❖ Each button press changes the pump speed by approximately 6% COR DASHBOARD TILES When you connect your COR-15 or COR-20 to your APEX, one or two tiles will be created on your Dashboard, depending on the APEX model and the user interface in use. - Page 19 Click on the button when done. The COR slider tile shows the current state of the COR output: manual OFF, AUTO, or manual ON. The current speed of the COR is shown as a percentage. The COR tile must be in the AUTO position for the COR to be operated under program control. Click on the button on the OFF/AUTO/ON slider tile to configure the COR.
-
Page 20: About Iq-Level
Click on the name of the COR in the tile to configure the COR. Regardless of the APEX model and user interface in use, the default name of a COR-15 or COR-20 output is COR_#_1, where # is the AquaBus address of the COR driver. You may change the name if desired. -
Page 21: Initial Cor Configuration
INITIAL COR CONFIGURATION Using the COR Task in APEX Fusion is the fastest and easiest way to do the initial configuration of a newly-installed COR. The COR Task will guide you through the IQ- Level adjustment process and then through basic programming of the COR. The COR Task will also (optionally) walk you through the process of modifying your skimmer programming so that the skimmer is turned off whenever the COR is off or running at a lower than normal speed. - Page 22 may not be able to find the perfect speed; that’s OK; get as close as you can. You can fine-tune it later. ❖ When setting the minimum speed, use the left and right buttons on the COR driver to set the COR so that the water in the return line plumbing is at a point of equilibrium –...
- Page 23 Go slowly! You have already done the rough calibration, so during this fine-tuning process, make a small adjustment of 1-2%, then click the OK button to apply the change. Observe the water flow in the aquarium for 60 seconds or more in between each change of the minimum or maximum percentage.
-
Page 24: Essentials Of Cor Programming
ESSENTIALS OF COR PROGRAMMING As a new COR owner, you should use the COR Task in APEX Fusion to get up and running your COR quickly and easily. Click on the (Tasks) button, then select the COR Task. Follow the prompts, which will step you through these actions: •... - Page 25 any other type of output, including EnergyBar, virtual, AI (Hydra/Vega), or Radion outputs. Additional notes: • The % symbol should not be used in programming; use only a number when you wish to specify a percentage. • When specifying percentage, use only whole numbers, 0 through 100, such a 25, 77, or 100.
-
Page 26: Cor Errors And Alerts
COR ERRORS AND ALERTS The COR-15, and the COR-20 in APEX-Connected Mode, have the capability to report various abnormal conditions via the APEX Local Dashboard [APEX (2016) models only] and the APEX Fusion Dashboard [all APEX models]; there are 5 types of COR alarms: ❖... - Page 27 For all APEX Classic models, use the Classic Dashboard. Go to the Configuration- >Module Setup page, select then select COR. Click the Update button when done. COR User Guide Page 25...
-
Page 28: Cor Fallback Mode
If none of the COR Alarms are present, the COR tile in APEX Fusion (and in APEX Local for APEX 2016) will show an OK status; if any enabled COR Alarm is active, it will be displayed on the COR tile in APEX Fusion or APEX Local. COR alarms can be reported via APEX Fusion emails, SMS alerts, and Apple Push Notifications (Apple iOS devices only;... - Page 29 Fallback ON has the same effect as Fallback 0 Fallback OFF Neptune Systems recommends the use of either the option for Fallback ON Fallback % the COR when used as a return pump. Other, less-common, cases may be better suited by use of with a reduced pump speed specified.
-
Page 30: Using A Cor-20 In Standalone Mode
If you want or need to operate your COR-20 in Standalone Mode rather than integrated with your Apex, refer to the COR-20 Standalone User Guide found on the Documentation page on the Neptune Systems web site. To put your COR-20 into Standalone Mode: 1. -
Page 31: Cor Pump Maintenance
To disassemble the pump: 1. Disconnect the power cable from the COR-20 driver or disconnect the 1LINK cable from the COR-15 driver 2. Disconnect the pump cable from the COR driver 3. Disconnect plumbing 4. Remove the pump, and drain excess water out 5. - Page 32 be soaked in a vinegar and water solution to remove calcium or hardwater mineral deposits. Gently clean and dry the O-ring with a cloth, then apply a light coating of silicone grease. To reassemble the COR pump: Carefully position the O-ring on the circular ridge on the pump body (see image below) 2.
-
Page 33: Neptune Systems Limited Warranty
1 year from the date of purchase. If repair or adjustment is necessary and has not been the result of abuse, Neptune Systems warrants this product to be free from defects in material and workmanship for a period of 1 year from the date of purchase. - Page 34 The symbols to the right mean that according to local laws and regulations your product should be disposed of separately from household waste. When this product reaches its end of life, take it to a collection point designated by local authorities. Some collection points accept products for free.
Need help?
Do you have a question about the COR-15 and is the answer not in the manual?
Questions and answers