
Related Manuals for Roma Heating RW800i


Summary of Contents for Roma Heating RW800i
- Page 1 UNDERFLOOR HEATING RW800i WiFi Thermostat Instruction The Professionals Choice EASY INSTALL...
- Page 2 Guide Thermostat description Main functions Technical speci cation Display symbols WiFi connection 03 + 04 Function & User operation 05 - 10 Advanced settings 10 + 11 Troubleshooting Scan QR Code To Download App Dimension Installation and wiring instructions 13 + 14...
-
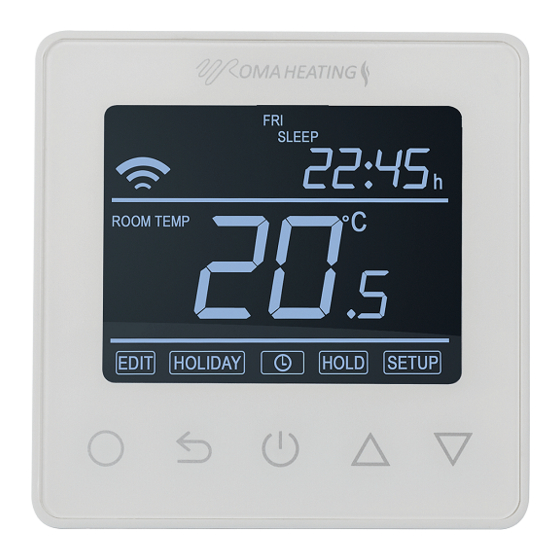
Page 3: Display Symbols
DESCRIPTION DISPLAY SYMBOLS A smart thermostat used to control electric under floor heating systems. Designed to keep your home or office at a comfortable temperature whilst minimizing energy use. It is also a WiFi thermostat that allows you to Day indicator Automated Heating Period Indicator control your heating from smart phone at any time and from anywhere in the world. - Page 4 WIFI CONNECTION Important: Both this thermostat and your smart phone will require a strong WIFI signal to connect and operate correctly. Please make sure your phone WIFI is turned on. Step 5: Warmme APP will ask you to enter your WIFI network Step 4: Hold both the up and down buttons on thermostat for 3 seconds, password on your phone screen, once entered click next.
-
Page 5: Function & User Operation
Key-Lock FUNCTION & USER OPERATION All thermostat keys can be locked, press and holding for 3 seconds to lock all buttons. On/O To unlock buttons simply repeat the process and again hold for 3 seconds to cancel. Press to turn thermostat On/Off. Holiday Mode Note: When frost protection mode is On, the thermostat will automatically turn itself on to maintain the frost protection set temperature. - Page 6 To set HOLD mode press and the clock will start flashing. To set up a new automated cycle press and the clock will start flashing.t Press △ or ▽ to select HOLD. Press △ or ▽ to select EDIT. Press and hold hours will start flashing.
-
Page 7: Advanced Setting
Once programmed the thermostat will turn the heating on or off to try and reach your set temperature for Automated Heating Cycle Default Settings. each period. Once one period ends and the next period starts the thermostat will adjust the heating to try and Week Days WAKE LEAVE... -
Page 8: Troubleshooting
PARAMETER TROUBLESHOOTING Fault Codes Name Default value Ranges E1 = Built-in sensor short-circuit or disconnected. Room temperature calibration - 5℃-- 5℃ ℃ E2 = Floor sensor short-circuit or disconnected. Floor temperature calibration - 5℃-- 5℃ ℃ Note: 1 x floor sensor is supplied with each thermostat and is located in the bottom of each box. If this Frost Protection OFF/ON floor sensor is not connected the thermostat will not function. -
Page 9: Installation And Wiring Instructions
INSTALLATION AND WIRING INSTRUCTIONS Installation Note: This thermostat should be mounted in a standard deep fit 1 gang back box. We recommend a 47mm deep back box. Heating System Loosen fixing screw on the base of Wire the back section in as shown Fix the back section to wall box Replace front panel whilst the thermostat and separate front...
Need help?
Do you have a question about the RW800i and is the answer not in the manual?
Questions and answers