Table of Contents
Advertisement
Quick Links
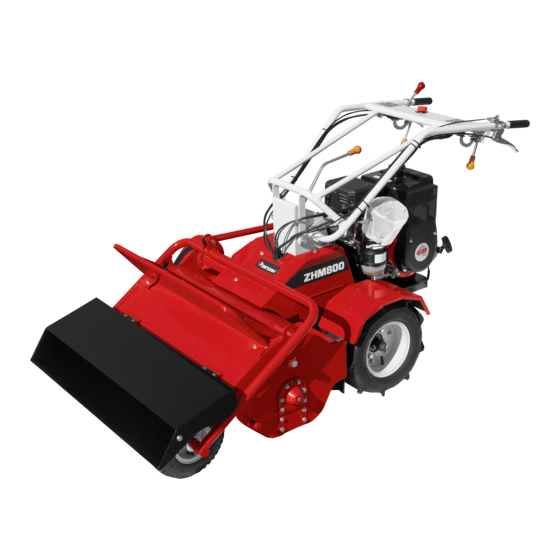
Zenoah Flail Mower
Improper use of this mower may result in serious injury or death. Operators and service managers must read and
understand the contents of this manual before operating, inspecting or servicing the mower. To enable reference
by all operators and service managers who deal with the mower, store this manual in the storage space provided
on the mower, enabling it to be read periodically.
Instruction Manual
Applicable models: #16001 and later
WARNING
70239160000 (E0/A1602)
When lending or
borrowing the mower
as rental equipment,
make sure this manual
is provided with it.
Advertisement
Table of Contents

Subscribe to Our Youtube Channel
Related Manuals for Zenoah ZHM800


Summary of Contents for Zenoah ZHM800
- Page 1 70239160000 (E0/A1602) Zenoah Flail Mower Instruction Manual Applicable models: #16001 and later When lending or borrowing the mower as rental equipment, make sure this manual is provided with it. WARNING Improper use of this mower may result in serious injury or death. Operators and service managers must read and understand the contents of this manual before operating, inspecting or servicing the mower.
- Page 3 After reading this manual, keep it in a readily accessible location next to the mower. Mower Restrictions This mower may not be operated on public roads. Zenoah assumes no liability for accidents or infractions involving the mower on public roads.
-
Page 4: Table Of Contents
CONTENTS SAFETY PRECAUTIONS ................NAMES OF COMPONENTS ..............SAFETY LABEL AND OPERATION LABEL POSITIONS ......PART HANDLING AND OPERATION ............OPERATING THE MOWER 1. Driving the Mower ............2. Cutting Grass ..............3. Shutting Down the Mower ..........4. Transporting the Mower ..........5. -
Page 5: Safety Precautions
1. SAFETY PRECAUTIONS Failure to observe the precautions given in this section could result in injury or death, or cause accidents or damage to the mower. Before operating the mower, read these precautions and the information in the labels on the mower. Be sure to follow these instructions carefully to ensure work is done safely and correctly. - Page 6 Never alter the mower DANGER Altering the mower is strongly discouraged. Never alter the mower. When replacing parts for consumable part replacement or repair, always use genuine Zenoah parts. If not followed: May lead to accidental death, injuries or mower damage.
- Page 7 Stop operation immediately if abnormal vibrations occur WARNING The hammer knives rotate at high speed and create abnormal vibrations if they become unbalanced. Unbalanced hammer knives are dangerous to the operator and anyone nearby, and can damage mower parts. If you experience abnormal vibrations, immediately stop operation, inspect the mower and have it repaired.
- Page 8 Always clean the mower after use on the same day CAUTION Always clean the mower after use, on the same day that it was used. After washing the mower with water, always wipe the mower dry and apply machine oil or grease to sliding parts to prevent rusting. Start the engine to expel water that has accumulated inside the fan cover.
- Page 9 If you find damage to the hose, contact your place of purchase or a Zenoah sales office to have it replaced. Always use genuine Zenoah parts when replacement is needed.
- Page 10 Use a running board of adequate strength, length and width. CAUTION The running board used to load the mower aboard a truck or van must have a loading capacity of at least 0.5 t, be long enough to tilt the mower by no more than 14° (at least 4 times the truck bed height), and have a width of at least 30 cm.
- Page 11 The blades are invisible when rotating at high speed DANGER The blades are invisible when they are rotating at high speed. Do not place hands or feet inside the cutter housing when the blades are rotating. If not followed: May lead to amputated limbs or other injuries. Always ensure the safety of the surrounding area before starting WARNING the engine...
- Page 12 Never start, stop or turn the mower suddenly, or speed excessively WARNING Start and stop the mower slowly. Decrease the mower’s speed sufficiently before turning on uneven land. If not followed: May lead to falls, toppling accidents or mower damage. Before leaving the mower unattended, place it on flat ground and WARNING stop the engine...
- Page 13 Gradient pitch should be no more than 15° left or right WARNING Working on gradients is very dangerous. Gradients should have a pitch or no more than 15° left or right. Do not use the mower on gradients steeper than 15°. If not followed: ...
-
Page 14: Names Of Components
2. NAMES OF COMPONENTS Gear shift lever Front guard Handle Mower right Mower rear Engine Fender Rear wheel Cutter housing Mower front Mower left Front wheel Front wheel arm Front cover * The front, rear, left and right directions in these diagrams apply when the cutter housing is at the front and the handles are at the rear. - Page 15 Throttle lever Side clutch lever (right) Side clutch lever (left) Parking brake lever Engine stop switch Blade clutch lever Drive clutch lever Cut height adjustment handle Belt cover -11-...
-
Page 16: Safety Label And Operation Label Positions
3. SAFETY LABEL AND OPERATION LABEL POSITIONS To ensure safe operation, the positions of the safety labels and operation labels provided on the mower are shown below. Keep these labels clean and undamaged. Replace any labels that become damaged or lost with new labels. - Page 17 WARNING DANGER ● Stones or other debris may The front guard and blade fly out of the mower while cover are designed to WARNING working. Check that no people protect the operator and Stop operation immediately and or vulnerable objects are in prevent foreign objects front of the mower while inspect/repair the mower if it loses...
-
Page 18: Part Handling And Operation
4. PART HANDLING AND OPERATION 1. Drive clutch lever Used to move or stop the mower. Moving the drive clutch lever to the top (ON) position moves the mower forward if the gear shift lever is at the low, medium or high speed setting, or backward if the gear shift lever is at the reverse setting. - Page 19 3. Parking brake lever Parking brake lever Used when parking the mower. Moving the parking brake lever to the ON position sets the parking brake. Moving the lever to the OFF position releases the parking brake. Moving the drive clutch lever to the ON position when the parking brake lever is in the ON position automatically switches the parking brake lever to the OFF position.
- Page 20 5. Throttle lever Increases or decreases the engine speed. Operate the throttle lever by turning it in the arrow directions shown at right. High speed speed Throttle lever 6. Choke knob Choke knob Helps start the engine. Pull the choke knob out when starting the engine. Once the engine has started, push the knob back in while monitoring the engine’s operation.
- Page 21 8. Cut height adjustment handle Used to adjust the grass height when cutting grass. Longer Turn the cut height adjustment handle clockwise for shorter grass or counterclockwise for longer grass. Shorter CAUTION A short grass height setting increases resistance while working, which wears out mower parts faster.
- Page 22 11. Engine Muffler Fuel tank cap Fuel tank cap The mower runs on unleaded automotive gasoline. Supply the mower with the proper amount of fuel, and fasten the fuel tank cap securely afterwards. Recoil starter Used to start the engine. Turn the engine stop switch to the RUN position and pull the recoil starter to start the engine.
-
Page 23: Operating The Mower
5. OPERATING THE MOWER 1. Driving the Mower Fuel cock (1) Turn the engine fuel cock to the “O” (Open) position. (2) Check that the drive clutch lever and blade clutch lever are Closed both in the OFF position. (3) Pull out the choke lever, and move the throttle lever slightly toward the high-speed position. -
Page 24: Cutting Grass
2. Cutting Grass (1) Start the engine as described in Steps (1) to (6) of Section 1 above. (2) Set the gear shift lever to the desired speed. (3) Turn the cut height adjustment handle to set the desired cut height. (4) Move the throttle lever to the neutral position. -
Page 25: Transporting The Mower
4. Transporting the mower When transporting the mower, use a vehicle (truck or van) able to accommodate the mower’s dimensions and weight load. The running board used to load the mower aboard the vehicle must have a loading capacity of at least 0.5 t, be 14°... -
Page 26: Storing The Mower
5. Storing the mower Observe the points below when storing the mower. Wipe off any mud or grass adhering to the mower body. Wash the mower with water, then wipe it dry. Start the engine to expel water that has accumulated inside engine parts. ... -
Page 27: Periodic Inspections
Inspections after 20, 100 and 300 hours should be done by a dealer or repair shop. If problems are found during inspection, contact your dealer or repair shop right away for repairs. Contact your Zenoah sales office for answers to questions. ... - Page 28 Inspected by User Dealer or repair shop Item What to inspect After first 20 Every 100 Every year or Pre-work hours hours 300 hours Do covers have any cracking, deformation or ○ damage? Covers ◎ Have any covers fallen off? Does the engine speed change in response to lever ●...
- Page 29 ○: Item requiring expert knowledge, inspected by a dealer or repair shop. ◎: Item inspected by the user before starting work and before starting the engine. ●: Item inspected by the user before starting work by starting the engine. -25-...
-
Page 30: Pre-Work Inspections
7. PRE-WORK INSPECTIONS Inadequate pre-work inspections may lead to accidents. Getting in the habit of routinely inspecting the mower to keep it in normal working order helps ensure safety, so be sure to inspect the mower. WARNING Place the mower on a flat, stable surface when inspecting parts. Always turn the engine off for all inspection items not requiring engine operation. - Page 31 1-3. Fuel (1) Fuel quantity inspection Check the fuel gauge to see whether there is fuel in the fuel tank. Do not use fuel purchased more than a month ago. Engine performance drops or failure may result. (2) Fuel tank cap inspection Inspect the fuel tank cap to check whether it is closed securely.
- Page 32 300 hours of operation or once per season. (The important safety parts are the parts surrounded by in the diagram above.) Always use genuine Zenoah parts when replacing parts. Tighten bolts and lock nuts securely after replacement. 1-9. Cut height adjustment handle Check that the handle turns smoothly and is effective at adjusting the cut height.
-
Page 33: Inspections Done With The Engine Running
2. Inspections Done With the Engine Running 2-1. Engine stop switch Press and turn the engine stop switch clockwise to the RUN position to check that the engine can be started, then press the switch to check that the engine stops. 2-2. -
Page 34: Troubleshooting
8. TROUBLESHOOTING If you encounter a problem with the mower, start by reviewing the possible causes in the table below. The table below only covers problems that can be remedied by the user. For more serious problems, contact your dealer or repair shop. Problem Cause Solution... -
Page 35: Other
9. OTHER 1. Main Specifications Model ZHM800 Total length (mm) 1,950 Body dimensions Total width (mm) Total height (mm) 1,040 Body weight (kg) Cut width (mm) Cut height (mm) 0 to 95 Number of blades Front wheels 3.50-5 Tires Rear wheels 16x7.00-8... -
Page 36: Main Consumable Parts
2. Main consumable parts Name Code No. V-belt (LB36) 0080320036 V-belt (LB37) 0080320037 V-belt (B58) 0080300058 Throttle wire 70922260100 Wire (side clutch) 70236060200 Wire (drive/blade clutch) 70236060000 Wire (parking brake) 70236060100 Front tire 70230260000 Right tire 70230260100 Left tire 70230260200 Front guard 70235320400 Front cover... -
Page 37: Wiring Diagram
10. WIRING DIAGRAM -33-... - Page 38 Husqvarna Zenoah Co. Ltd. Head Office: 1-9 Minamidai, Kawagoe-shi, Saitama 350-1165 70239160000 (E0/A1602)
Need help?
Do you have a question about the ZHM800 and is the answer not in the manual?
Questions and answers