Advertisement
NOTE. The readings obtained correspond to a 12V power supply. With a load of 4 ohms and a temperature of 19 ° C.
Les valeurs obtenues correspondent à une alimentation 12V. Avec une charge de 4 ohms et une température de 19 ° C.
Las lecturas obtenidas responden a una alimentación de 12V. Con una carga de 4 ohms y una temperatura de 19ºC.
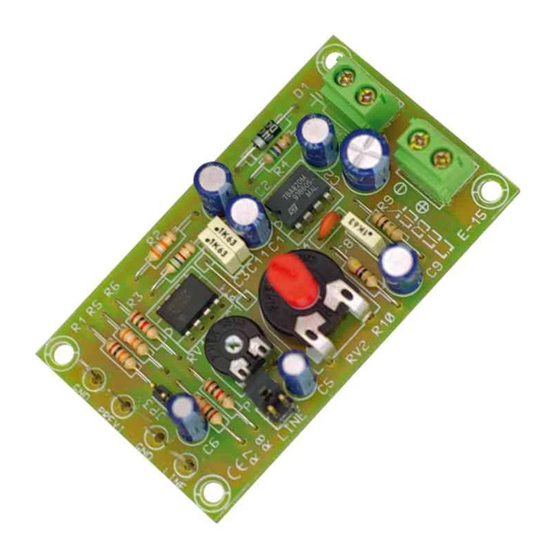
Mono Power Stage 1.8 W. RMS., with two entrances: Previous and Stage. Mono input, preamplificará the input signal before entering the stage. The
entrance to the stage, made directly to amplification.
Includes protection against reverse polarity, gain adjustment, volume control, microphone pre-configuration and connection terminals
POWER. 12V. DC (6 to 12V. DC), we recommend using FE-113/FE-2 Cebek power, which is well suited to the needs of the circuit. Install a fuse and a
switch that are necessary for the protection and safety, as reflected in the CE standard.
Respect the negative and positive connections. The distance between the power supply to the circuit is as short as possible (15cm.max.).
INSTALLATION. Depending on the source of the signal to be injected, must do so on the previous input or the input stage. If the signal level is between
10 to 300 m V. You must use the preamp input. If the signal has a level between 300 and 700 m V. Use the input stage.
Never enter a signal to either of the two inputs, in which the level is above the specified features, (300 m V. In the prior inlet 700 m V. In stage). Doing
so may cause damage still broken.
For installation between the stage and the sound source, the distance has to be as short as possible (max. 50 cm.) And use shielded cable in the
assembly. Connect the positive terminal of the signal to the specified entry (or Previous Stage) and negative (wire mesh), the terminal with the ground
symbol.
Finished power connections and signal input, install a speaker to the terminal indicated. It is imperative that the speaker is a minimum of 2W. Power,
although we recommend the use of one of at least 5W. Use quality speakers, notably an impact on the sound quality.
If you installed on the previous entry, place the JP1 jumper in the previous position. If on the vexed installed on the input stage, I placed the jumper at
the stage. Install it in a metal box and the negative supply to the case for proper shielding.
Mono étage de puissance de 1,8 W. Quadratique moyenne, avec deux entrées: Précédent et la scène. Mono entrée, preamplificará Le signal d'entrée
avant d'entrer dans le stade. L'entrée du stade, faite directement à l'amplification.
Comprend une protection contre les inversions de polarité, réglage du gain, contrôle du volume, microphone pré-configuration et bornes de
raccordement
POWER. 12V. DC (6 à 12V. DC), nous vous recommandons d'utiliser FE-113/FE-2 pouvoir Cebek, qui est bien adapté aux besoins du circuit. Installez
un fusible et un interrupteur qui sont nécessaires à la protection et à la sécurité, comme en témoigne la norme CE.
Respecter les connexions positives et négatives. La distance entre la source d'alimentation pour le circuit est aussi court que possible (15cm.máx.).
INSTALLATION. En fonction de la source du signal à injecter, doit le faire à l'entrée précédente ou l'étage d'entrée. Si le niveau du signal est compris
entre 10 et 300 m V. Vous devez utiliser l'entrée préampli. Si le signal a un niveau compris entre 300 et 700 m V. Utiliser l'étage d'entrée.
Ne jamais entrer dans un signal à l'une des deux entrées, dans lequel le niveau est au-dessus des caractéristiques déterminées (300 m V. Dans le
préalable d'admission 700 m V. Au stade). Cela peut causer des dommages encore cassé.
Pour l'installation entre la scène et la source sonore, la distance doit être aussi court que possible (max. 50 cm.) Et utiliser un câble blindé dans
l'assemblée. Connecter la borne positive du signal à l'entrée spécifiée (ou étape précédente) et négative (treillis métallique), la borne avec le symbole
de terre.
Fini les connexions d'alimentation et de signal d'entrée, installer un haut-parleur à la borne indiqué. Il est impératif que le locuteur est un minimum de
2W. Power, mais nous vous recommandons l'utilisation d'un d'au moins 5W.
Utilisez des enceintes de qualité, notamment un impact sur la qualité sonore.
Si vous avez installé sur l'entrée précédente, placez le cavalier JP1 dans la position précédente. Si la vexé installé sur l'étage d'entrée, j'ai placé le
cavalier à la scène.
Installer dans une boîte métallique et l'alimentation négative pour le cas pour un blindage correct.
Etapa de potencia mono de 1,8W. R.M.S., con dos entradas: Previo y Etapa. La entrada de mono, preamplificará la señal de entrada, antes entrar a la
etapa. La entrada a la Etapa ,realizará directamente la amplificación.
Incorpora protección contra la inversión de polaridad, ajuste de ganancia, control de volumen, pre-configuración para micrófono y bornes de conexión
ALIMENTACION . De 12V. C.C. (De 6 a 12V. C.C.), le recomendamos que utilice fuente de alimentación Cebek FE-113/FE-2, que se adapta
perfectamente a las necesidades del circuito. Instale un fusible y un interruptor que son necesarios para la protección y la seguridad, tal y como refleja
la norma CE.
Supply Voltage......................................................6-12V.CC
Consumption min. / max.......................................10mA./240mA.
Sign min. / Max. Previous Entry into......................5mV./300mV.
Sign min. / Max. Input Stage.................................50mV./700mV.
Input Impedance Previous / Stage........................1K./10K. ohms
Output Impedance.................................................4-8.
Power R.M.S. / Musical.........................................1,8W./2,5W
Frequency Range..................................................30-18.000Hz.
Distortion 1 W. ..................................................... 0,4%
Reverse polarity protection (PIP)...........................Yes
Measures. ............................................................76x42x25mm.
www.cebek.com
-
sat@cebek.com
AMPLIFIER
AMPLIFICATEUR
ETAPA DE POTENCIA
1,8 W
E-15
Technical Characteristics
Advertisement
Table of Contents

Related Manuals for CEBEK E-15


Summary of Contents for CEBEK E-15
- Page 1 Includes protection against reverse polarity, gain adjustment, volume control, microphone pre-configuration and connection terminals POWER. 12V. DC (6 to 12V. DC), we recommend using FE-113/FE-2 Cebek power, which is well suited to the needs of the circuit. Install a fuse and a switch that are necessary for the protection and safety, as reflected in the CE standard.
- Page 2 E-15 Respete el conexionado del negativo y positivo. Procure que la distancia de la fuente de alimentación al circuito sea lo más corta posible, (15 cm.máx.). INSTALACION. Según la procedencia de la señal que desee inyectar , deberá hacerlo sobre la entrada de previo o sobre la entrada de etapa. Si el nivel de señal se encuentra entre los 10 y los 300 m V.
Need help?
Do you have a question about the E-15 and is the answer not in the manual?
Questions and answers