Table of Contents

Related Manuals for Nintendo Wii Fun Center


Summary of Contents for Nintendo Wii Fun Center
- Page 1 Wii Fun Center Operations Manual PN 74462 Rev. A Note: Fun Centers have been rebranded as Starlight Gaming stations. Your device will still refer to “Fun Center.” Any in-person reference to “Gaming station” also refers to this product.
- Page 2 Do you need help or assistance? Visit www.starlight.org/gaming/support/contact for contact information For immediate assistance during the business hours of 6:00 AM to 4:00 PM PST Monday-Friday please call the Gaming station (Fun Center) Support Hotline at 1-877-716-8550 or email funcenter@noa.nintendo.com...
- Page 3 Fun Center Support Hotline: 1-877-716-8550 Manufactured by Nintendo of America Inc. PO Box 957 Redmond, WA 98073 The “Starlight” logo is a trademark of the Starlight Children’s Foundation ® is a trademark of Nintendo and Starlight © 2011 Nintendo PN 77187 Rev. A...
-
Page 4: Table Of Contents
TARLIGHT ENTER PERATION ANUAL ABLE OF ONTENTS 1. Introducing Your New Fun Center Introduction ......... 1 Important Safety Instructions . -
Page 5: Introducing Your New Fun Center
Fun Center is a welcome visitor. Manufactured and supported by one of Starlight’s most dedicated corporate partners, Nintendo of America Inc., these units are sponsored by countless numbers of individuals and corporations that believe in Starlight’s mission. Often, donors commemorate specific events, such as new store openings or product launches with Fun Center placements. - Page 6 TARLIGHT ENTER PERATION ANUAL • Read these instructions—Read all the safety and operating instructions (including the manuals for the TV, DVD player, and Wii) before operating the Fun Center. • Keep these instructions—Keep these safety and operating instructions in a safe place for future reference.
- Page 7 TARLIGHT ENTER PERATION ANUAL Warning Use of controls or adjustments or performance of procedures other than those specified herein may result in hazardous radiation exposure. • Power source—This unit must operate on a power source shown on the specification label.
- Page 8 TARLIGHT ENTER PERATION ANUAL • The unit has been dropped or the cabinet has been damaged. • The unit shows a distinct change in performance or displays an abnormal con- dition. Any noticeable abnormality in the unit indicates that the unit needs servicing.
-
Page 9: How To Operate Your Fun Center
TARLIGHT ENTER PERATION ANUAL OW TO PERATE ENTER This chapter contains information on the following topics: • Moving the Fun Center • Power Up the Fun Center • Play a Wii Game • Watch a Movie • Update Games 2.1 Moving the Fun Center Warning Move with care. -
Page 10: Power Up The Fun Center
6. Press the Wii Remote A Button to start the game. Information All Nintendo games have been rated by the Entertainment Software Ratings Board (ESRB). For information about the ESRB rating, or to comment about the appropriateness of the rating, please visit the ESRB website at www.esrb.org. -
Page 11: Watch A Movie
TARLIGHT ENTER PERATION ANUAL To connect the Nunchuks: Turn the controller select knob on the front of the Fun Center to the right position. To disconnect the Nunchuks: Turn the controller select knob to the left position. Controller select knob is in the right position to connect the Nunchuks. -
Page 12: Update Games
DVD player. 2.5 Update Games To add new games to your Fun Center, Nintendo must authorize a standard PC to download new games and transfer them to the Fun Center. To begin the authorization process, call the Fun Center Support Hotline at 1-877-716-8550 (Monday through Friday, 6:00 AM to 4:30 PM Pacific Time). -
Page 13: How To Troubleshoot Your Fun Center
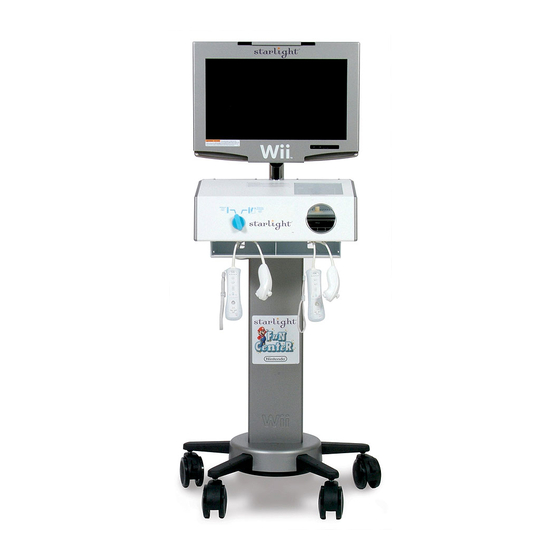
TARLIGHT ENTER PERATION ANUAL OW TO ROUBLESHOOT ENTER The purpose of this section is to describe the different Fun Center components and how they operate together to create the Fun Center experience. This information will help you to troubleshoot the Fun Center, and consists of the following topics. •... - Page 14 TARLIGHT ENTER PERATION ANUAL 22” TV Support pole Power cord Back panel DVD player door Wii console door Controller repeater module connecting Controller the Wii Remote and select knob Nunchuck Pole shroud Controller Pole shroud door storage for access to the isolation transformer DVD player Casters...
- Page 15 TARLIGHT ENTER PERATION ANUAL 3.1.1 Main Power When the main power cord is connected to a working power outlet, the following components can be powered ON: • Wii console • • DVD player If these individual components do not have power, check the power strip and the isolation transformer.
- Page 16 TARLIGHT ENTER PERATION ANUAL 4. Check the fuse for Fuse located behind main power cord damage. 5. Inspect all the cords for damage. 6. Check that each individual component (TV, DVD, Wii console) is properly connected to power. See their respective user manuals for power connection locations.
- Page 17 TARLIGHT ENTER PERATION ANUAL If the TV does not power ON after pressing the Power button, check the TV power connection to the power strip and to the back of the TV. TV Power 3.1 T ECTION ROUBLESHOOTING ENTER OMPONENTS...
- Page 18 TARLIGHT ENTER PERATION ANUAL Press the INPUT button on the TV to cycle through all of the available image/sound sources (DVD and Game). The DVD and Game settings correspond to the connections on the back of the TV. The connections and cables are color-coded.
- Page 19 If the TV input is set to Game, you will also see a “twirling bar” in the lower-left corner of the TV screen. After 10 to 20 seconds, the Nintendo logo appears, followed by the Starlight Children’s Foundation logo. This means the Wii console is powered ON.
- Page 20 TARLIGHT ENTER PERATION ANUAL Press any button on the Wii Remote. The four lights will flash a few times, and then the far left light on the Wii Remote illuminates. This means the Wii Remote is communicating with the Wii console and is “Player 1.”...
- Page 21 TARLIGHT ENTER PERATION ANUAL If the TV is on the correct input, but the Wii console does not power ON or show a picture, check the connections on the back of the Wii console. You will need the Fun Center tool kit to remove the back panel of the main cabinet to access the Wii console.
- Page 22 Fun Center back panel. Press the Power button on the Wii console to power it ON. Wait until the Nintendo logo appears. Locate both SYNC. Buttons. One is located inside the SD card compartment on the front of the Wii console. The other is located through a small hole on the back of the Wii Remote.
- Page 23 TARLIGHT ENTER PERATION ANUAL Use a straightened paper clip to poke through the jacket, then press and release the SYNC. Button inside the Wii Remote. This step must be completed within 30 seconds of the previous step. SYNC. button locations When the Player LEDs stop flashing, one LED is illuminated to indicate the player number (1 or 2).
- Page 24 TARLIGHT ENTER PERATION ANUAL 2. To free a motion sensor, tap the button side of the Wii Remote against the palm of your other hand without using much force. Caution Too much force may damage the motion sensor. Make sure to tap the Wii Remote against the soft part of your palm.
- Page 25 TARLIGHT ENTER PERATION ANUAL 3.1.5 DVD Player Before attempting to use the DVD player: 1. Press the Power button. Power button Make sure the operation buttons illuminate. 2. Press the Eject button. Wait for the mechanism to complete the ejection cycle.
-
Page 26: Fun Center Wire Connections
TARLIGHT ENTER PERATION ANUAL 3.2 Fun Center Wire Connections This section contains information about the types of wire connections. 3.2.1 Bluetooth Connections Inside the cabinet, the Bluetooth cable assembly (shown to the left) carries the signal from the controller repeater module to the Wii console. - Page 27 TARLIGHT ENTER PERATION ANUAL 3.2.2 Wire Harness Connections The wire harness connects components that work together to provide power to the Wii Remote, allow the player to connect/disconnect the Nunchuk, and communicate with the Wii console. When the controller select PCB and controller repeater modules are working, you can see illuminated LEDs.
-
Page 28: Fun Center Glossary Of Terms
TARLIGHT ENTER PERATION ANUAL 3.3 Fun Center Glossary of Terms Bluetooth Cable Assembly. This cable assembly carries the controller information between the Wii console and the controller repeater modules. The assembly consists of: • Two SMB cables (PN 65277) •... - Page 29 TARLIGHT ENTER PERATION ANUAL Component Cable (PN 69056). This cable carries the audio and video information from the Wii console to the TV. Connects to the Wii console Connects to TV red, green, and blue video Connects to TV left and right audio DVD AV Cable (PN 74909).
- Page 30 TARLIGHT ENTER PERATION ANUAL Wii-to-4-Wire Cable (PN 67022). Connects the Wii console to the 4-Wire cable. Connects to the Wii console Connects to the 4-Wire cable 4-Wire Cable (PN 70422). Connects the Wii-to-4-Wire cable to the controller select PCB. Connects to the controller select PCB...
- Page 31 TARLIGHT ENTER PERATION ANUAL Controller Repeater Module (PN 66747). This module is the central communication hub between the controller select PCB, the Wii Remote, and the Wii console. When it has power and is communicating correctly, the controller repeater module has a green light for the Wii Remote and a red light for the Nunchuk.
- Page 32 TARLIGHT ENTER PERATION ANUAL Controller Select PCB AC Adapter (PN 63384). Provides power directly to the Controller Select PCB. Indirectly, it provides power to the controller repeater module, Wii Remote, and Nunchuk. 1 7/8” long 3.3 volts Angled plug DVD AC Adapter (PN 67654).
- Page 33 TARLIGHT ENTER PERATION ANUAL LAN Adapter (PN 62320). Allows certain games to connect to the Internet (not currently used). Broadband (LAN) Extender (PN 65493). It connects to the LAN adapter and to the housing to allow a LAN cable to attach to the Fun Center. Nunchuk (PN 66818).
- Page 34 TARLIGHT ENTER PERATION ANUAL Sensor Bar (PN 69056). Sends out an infrared signal that the Wii Remote uses to position the cursor on the screen. USB Extender (PN 65238). Allows a USB cable to attach to the Fun Center. This connection is used for Fun Center game updates.
-
Page 35: Requesting Further Support
TARLIGHT ENTER PERATION ANUAL Wii Remote Plus (PN 73362). A controller that can be used by all Wii games. 3.4 Requesting Further Support Before seeking assistance, use this manual, and the DVD and TV operation manuals, to troubleshoot the issue. If the Fun Center still does not operate properly after troubleshooting, contact the Fun Center Support Hotline at 1-877-716-8550 (Mon-Fri 6:00 a.m. - Page 36 TARLIGHT ENTER PERATION ANUAL Do you need assistance? Contact the Fun Center Support Hotline 1-877-716-8550 Monday through Friday 6:00 A.M. to 4:30 P.M. Pacific Time PN 77187 R...
Need help?
Do you have a question about the Wii Fun Center and is the answer not in the manual?
Questions and answers