Aethra D2061 User Manual
Adsl tester
Hide thumbs
Also See for D2061:
- Technical specifications (4 pages) ,
- Specifications (2 pages) ,
- Quick manual (160 pages)
Table of Contents
Advertisement
Quick Links
Download this manual
See also:
Quick Manual
Advertisement
Table of Contents

Related Manuals for Aethra D2061

Summary of Contents for Aethra D2061
- Page 1 ADSL TESTER D2061 USER’S MANUAL ADSL TESTER D2061 USER’S MANUAL...
- Page 2 ADSL TESTER D2061 USER’S MANUAL The information contained in this document is the ® property of Aethra S.p.A., it is subject to change without notice and it shall in no way be binding for ® Aethra S.p.A. ® © Copyright Aethra S.p.A.
-
Page 3: Table Of Contents
3.3. COMMON SETUP... 33 3.3.1. ISND ACCESS ... 34 3.3.2. POTS ACCESS... 35 3.4. CONNECTION ... 36 3.5. PING ATM ... 37 3.5.1. SETTING UP ATM PING ... 38 3.5.2. RUNNING AN ATM PING TEST... 39 INDEX ADSL TESTER D2061... - Page 4 ADSL TESTER D2061 3.6. ATM GENERATE TRAFFIC... 40 3.6.1. SETTING UP ATM GENERATE TRAFFIC TEST... 40 3.6.2. RUNNING AN ATM GENERATE TRAFFIC TEST ... 41 3.7. IP PING ... 42 3.7.1. SETTING UP A IP PING TEST... 42 3.7.2. RUNNING AN IP PING TEST ... 44 3.8.
- Page 5 CHANGING THE INFORMATION LANGUAGE ... 99 8.7. SETTING THE DATE AND TIME... 99 8.8. CHANGING THE BAUD RATE ... 99 8.9. SELF DIAGNOSTICS... 100 8.10. SHOW VERSION NUMBER ... 101 8.11. BATTERY MANAGEMENT... 101 8.12. CHANGING THE CONTRAST... 102 INDEX ADSL TESTER D2061...
- Page 6 ADSL TESTER D2061 8.13. SCREEN SAVER MANAGEMENT ... 102 8.14. TEST PROGRAMMING ... 102 USING MEMORY, PRINTER AND PC ... 104 9.1. ABOUT THIS CHAPTER ... 104 9.2. SAVING THE TEST RESULTS... 104 9.3. VIEWING THE TEST RESULTS... 105 9.4.
- Page 7 PERFORMANCE CHARACTERISTICS ... 114 11.1.3. ENVIRONMENTAL DATA... 114 11.2. ADSL ACCESS ... 114 11.3. ISDN ACCESS ... 116 11.4. POTS ACCESS... 116 11.5. MISCELLANEOUS... 117 11.6. ENVIRONMENTAL CHARACTERISTICS ... 118 11.7. REFERENCE REGULATIONS (MARKS AND RELIABILITY TESTS) INDEX ADSL TESTER D2061...
- Page 9 Refer to qualified staff for service. In case of intervention, always check that the power supply has been completely and successfully disconnected. In case of fire, absolutely avoid using water to extinguish it. SAFETY RULES ADSL TESTER D2061...
- Page 10 ADSL TESTER D2061 WARNINGS CAUTION: Many of the components used in this device are sensitive to electrostatic charge. In case of manipulation of the connection cables, disconnect the power supply and avoid direct contacts with the connector terminals. When handling electronic components, to eliminate any static electricity touch a grounded surface.
-
Page 11: Introducing The Instrument
Next you will find information on how to turn on and off the instrument and set it up for the ‘start’ condition. The D2061 ADSL Tester is available in two different versions, one for each technologies supported D2061: ADSL over POTS, G.992.1/2 Annex A ►... -
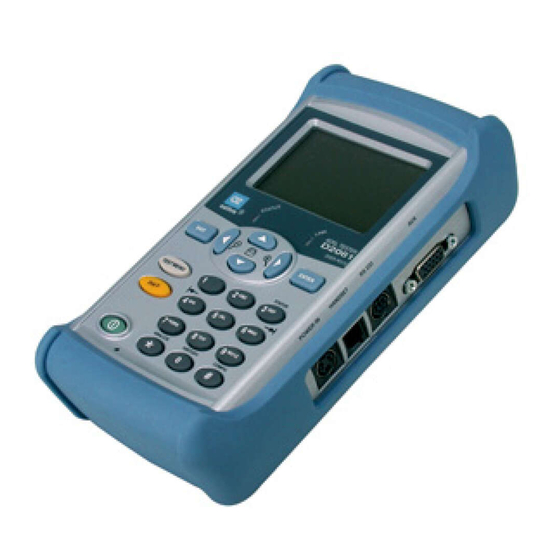
Page 12: Front Panel Features
ADSL TESTER D2061 1.2. Front panel features Refer to Fig. 1.1 for a description of the front panel controls and displays. Fig. 1-1 Front panel LCD screen Displays all menus, data and results. Arrow keys Use these keys to move the cursor in all directions or scroll through pages when prompted. -
Page 13: Network Connections
Refer to Fig. 2.2 for a description of the top case. Fig. 1-2 Top Case with Network Connections LINE Use this connector for all simulation tests on the ADSL interface. CHAPTER 1 - INTRODUCING THE INSTRUMENT ADSL TESTER D2061... -
Page 14: Communication Ports And Connectors
Fig. 1.3 Side of the Instrument POWER IN Connection for the AC/DC adapter supplied with the instrument Warning To avoid electrical shock, use only Aethra 531001457. HANDSET Connection for the external telephone handset. For further information on connection, see appendix A. - Page 15 All the functions and the references regarding ISDN and POTS access are available only with specific options; ST2061 for ISDN and AB2001N for POTS. See Appendix to check how to connect the test equipment on ISDN or POTS line. CHAPTER 1 - INTRODUCING THE INSTRUMENT ADSL TESTER D2061...
-
Page 16: Turning Off The Instrument
ADSL TESTER D2061 Now you can choose to perform one of the following tests for the ADSL: Manual tests. See chapter 3. ► Predefined tests. See chapter 4. ► Automatic tests. See chapter 2. ► 1.6. Turning off the instrument Hold it pressed for min. -
Page 17: The G.u.i. Structure
The various pages of the G.U.I. use the same graphic symbols and keys for navigation. The first line of each page indicates the page name and gives information on the instrument status. CHAPTER 1 - INTRODUCING THE INSTRUMENT ADSL TESTER D2061... - Page 18 ADSL TESTER D2061 Fig. 1-5 Status line The blinking alternation of these two symbols in the monitor in progress icon, means that the available memory is full. This is true if in the background monitor setup is selected circular buffer mode. See chapter 5.
-
Page 19: Fields
Edit fields, the parameter value is modified by inserting data directly Edit fields with help on-line, the keys can be used to activate additional functions CHAPTER 1 - INTRODUCING THE INSTRUMENT ADSL TESTER D2061... -
Page 20: Smart Information Box
ADSL TESTER D2061 USER’S MANUAL 1.7.4. Smart Information Box The right section of the screen shows concise information on the instrument status and on some parameters of the tested line. In particular, when tester is used for ADSL: Current time and date... -
Page 21: Zoom
Fig. 1-9 Example of status column in POTS 1.7.5. Zoom The device is equipped with a zoom feature for an immediate analysis on the screen of the test results. Without ZOOM With ZOOM CHAPTER 1 - INTRODUCING THE INSTRUMENT ADSL TESTER D2061... -
Page 22: Performing A Test
ADSL TESTER D2061 The zoom function doubles the character size on the screen. ZOOM IN function. ZOOM OUT function. When the ZOOM function is active, it displays the upper part of the page. When the ZOOM function is active, it displays the lower part of the page. - Page 23 USER’S MANUAL Connect the instrument to the line according to the instructions given on the display. Press to start the test. CHAPTER 1 - INTRODUCING THE INSTRUMENT ADSL TESTER D2061...
-
Page 24: About This Chapter
ADSL TESTER D2061 USER’S MANUAL 2. PERFORMING AN AUTOMATIC TEST 2.1. About this chapter This chapter describes the procedure used to perform an automatic test. This test allows you to check the ISDN connection. Fig. 2.1 shows the navigation for the automatic test. -
Page 25: Choosing An Automatic Test
Setting appropriately the parameters above-mentioned, the user can decide the test sequences to perform. Setting the value “Automatic”, the device will carry out a complete test sequence, checking all the parameters regarding the interested level. CHAPTER 2 - PERFORMING AN AUTOMATIC TEST ADSL TESTER D2061... -
Page 26: Setting Up An Automatic Access Test
ADSL TESTER D2061 If it is chosen: “L2: Point to Point” and / or “L3: User”, the relative values must be programmed before in the COMMON SETUP page The test sequence configured can be saved with a name defined by the user, in order to be recalled for future uses. - Page 27 If the service is not avaiable, the couse is shown using a code number (couse code). Use the right arrow key to display information on the couse codes on pages 5 and 6. “ - -“ appears if the profile has not been verified yet. CHAPTER 2 - PERFORMING AN AUTOMATIC TEST ADSL TESTER D2061...
- Page 28 ADSL TESTER D2061 USER’S MANUAL Page 3 shows an overview of the supplementary services analyzed by the instrument. The following table shows the displayed symbols with their meaning. YES Implemented, active or actionable service NO* Implemented, but not subscribed, service...
- Page 29 To automatically obtain a complete indication on the access configuration, enter the number of the tested access as “CALLED NUMBER”. Specific manual tests are recommended in case of not available services or profiles. See chapter 3. CHAPTER 2 - PERFORMING AN AUTOMATIC TEST ADSL TESTER D2061...
-
Page 30: About This Chapter
ADSL TESTER D2061 USER’S MANUAL 3. PERFORMING A MANUAL TEST 3.1. About this chapter This chapter describes the procedure used to perform a manual test. For specific tests you can define all parameters manually. This test allows you to test and verify line quality in detail. -
Page 31: Selecting A Manual Test
Choose the test you want to perform. Once configured all the parameters regarding the test chosen, select °Use this setup for testing°. Each test is described in the following pages. CHAPTER 3 - PERFORMING A MANUAL TEST ADSL TESTER D2061... - Page 32 ADSL TESTER D2061 The functions in the TEST MENU may differ according to the selected network configuration. Connection Background monitor ATM Ping IP Ping ATM Gen. Traffic IP Gen. Traffic Telephone Tone Generator BER (Bit Error Rate) Unframed BER Loop Box Table 3-1 Manual tests vs.
-
Page 33: Common Setup
Timeout max (0=OFF): It’s the maximum waiting time before closing an opening link request when no answer comes from the DSLAM. VPI: Virtual Path Identifier, default value is 8. VCI: Virtual Channel Identifier, default value is 35. CHAPTER 3 - PERFORMING A MANUAL TEST ADSL TESTER D2061... -
Page 34: Isnd Access
ADSL TESTER D2061 Gain Rx (dB): The user can modify the gain in reception of the device. Gain Tx (dB): In this field it is possible to modify the level of the signal transmitted by the device. Thresholds: to insert measure thresholds in order to signal variations of the data operated to you. -
Page 35: Pots Access
Calls accept: select the incoming calls that will be automatically answered. 3.3.2. POTS access The following parameters can be defined in the COMMON SETUP for the POTS access termination. Select the line impedance value according with local loop impedance. CHAPTER 3 - PERFORMING A MANUAL TEST ADSL TESTER D2061... -
Page 36: Connection
ADSL TESTER D2061 The instrument supports four impedance models: 600Ω resistive, CTR21 standard, complex impedance (Belgium), complex impedance (Germany, Spain). Line current limit (mA): Maximum current load that the instrument puts on the line Selection mode: select the dialing mode for the telephone number between tone (DTMF) and pulse (decade) 40/60 or 33/66. -
Page 37: Ping Atm
The display shows the Test Status (running or not). The LED STATUS is OFF if no test running, is ON (green) during regular test ► running, is ON (red) when an error/alarm occurs. CHAPTER 3 - PERFORMING A MANUAL TEST ADSL TESTER D2061... -
Page 38: Setting Up Atm Ping
ADSL TESTER D2061 The LED LINK is OFF if the physical connection is not active, is ON (solid ► yellow) during the connection phase, is ON (solid green) when the connection is active, is ON (solid red) when an error occurs. -
Page 39: Running An Atm Ping Test
Round Trip Delay ► Errors (missed cell, time) ► If the ADSL connection is down, first of all the D2061 tries to make up the link with the ATU-C. If it’s not possible to open the ADSL connection, the PING test fails. -
Page 40: Setting Up Atm Generate Traffic Test
This kind of test is more exhaustive instead the simple ATM PING. D2061 is able to generate different types of traffic such as OAM F4 and F5 maintenance cells both End-to-End and Segment, but also predefined packets already encapsulated at AAL5 level. -
Page 41: Running An Atm Generate Traffic Test
In order to obtain correct data, the remote device must be enabled for managing the OAM maintenance cells or it may perform a loop of AAL5 packet, or it must be another D2061. Once defined the parameters to perform the IP Ping test, continue as follows: Select ‘Use this setup for testing’. -
Page 42: Setting Up A Ip Ping Test
ADSL TESTER D2061 The results page displays the following items: Date, time and elapsed time ► Transmitted cells and Received cells ► Average rate obtained in reception and transmission expressed in cells per ► second transmitted and received Ratio between average rate reached and average rate set expressed in ►... - Page 43 USER’S MANUAL In order to carry out the IP Ping test by using only one D2061, do not insert any data into the field and press ENTER. The will set automatically the item “Myself “ and will use its own IP address as remote IP.
-
Page 44: Running An Ip Ping Test
PPP type: Allows to select the PPP protocol simulation type performed by the device: • Client: D2061 simulates a user terminal, with authentication request to a remote server. • Client + link verify: The device, in Client simulation, sends an echo request every ten seconds in order to verify if the link is still active. - Page 45 The results pages can indicates the following items: PPP link state and response messages (once the link is active, the PPP item ► changes in PING) Date, time and elapsed time ► CHAPTER 3 - PERFORMING A MANUAL TEST ADSL TESTER D2061...
-
Page 46: Ip Generate Traffic
IP address of the possible gateway, in BRIDGE mode ► Subnet Mask value, in BRIDGE mode with IP dynamic ► URL address ► Local IP address, D2061 ► Server’s IP address ► Remote IP address ► Trace routing and relative response times ►... -
Page 47: Setting Up An Ip Generate Traffic Test
(e.g. D2000 Packets timeout (s): Set the maximum waiting time for the AKNOWLEDGE message, after which the device considers the transmitted packet lost. CHAPTER 3 - PERFORMING A MANUAL TEST ADSL TESTER D2061... - Page 48 PPP type: Allows to select the PPP protocol simulation type performed by the device: • Client: The D2061 simulates a user terminal, with authentication request to a remote server. • Client + link verify: The device, in Client simulation, sends an echo request every ten seconds in order to verify if the link is still active.
-
Page 49: Running An Ip Generate Traffic Test
Start the IP GENERATE TRAFFIC test. The LED RUN goes on and the test results appear on the screen. Scroll through the result pages. The result pages display the following information: CHAPTER 3 - PERFORMING A MANUAL TEST ADSL TESTER D2061... - Page 50 ADSL TESTER D2061 The Status line indicates the status of the test and the TFTP line indicates the status of the file in transfer: Uploading, Downloading, Complete and, at the end of the test, the disconnection causes. Date, time and elapsed time ►...
-
Page 51: Performing A Call Test (Isdn And Pots Only)
Sub number: If necessary, enter the sub address of the called party. Only ISDN. To add the SENDING COMPLETE information element, enter '#' at the end of the number. ISDN only. CHAPTER 3 - PERFORMING A MANUAL TEST ADSL TESTER D2061... -
Page 52: Running A Call Test
ADSL TESTER D2061 3.9.2. Running a call test When you have defined the setup for the call test, continue as follows: Select ‘Use this setup for testing’ in the first SETUP page. Connect the instrument as displayed on the screen and press the RIGHT CURSOR key. -
Page 53: Answering An Incoming Call
You can manually answer incoming calls under the following condition: The instrument is in the MAKE A CALL. ► The incoming call is compatible with the number and profile set in the ► instrument. CHAPTER 3 - PERFORMING A MANUAL TEST ADSL TESTER D2061... -
Page 54: Checking The Supplementary Services
ADSL TESTER D2061 To answer an incoming call: An incoming call is received and the device generates an acoustic tone. The softkey START changes to ANSWER. ISDN POTS Answer the call using the instrument’s internal microphone at the front and the speaker at the rear, or using the external telephone handset that is connected to the HANDSET jack of the instrument. -
Page 55: Tone Generator Test (Ab2001N Option)
3.10. Tone Generator test (AB2001N option) By the use of this test the device works as generator of sinusoidal signals with phonic band frequency included between 300 - 3400 Hz. CHAPTER 3 - PERFORMING A MANUAL TEST ADSL TESTER D2061... -
Page 56: Setting Up A Tone Generator Test
ADSL TESTER D2061 USER’S MANUAL The test allows to send on line a single tone or to carry out a scansion of the band both, in manual and automatic mode. The level value is definable by the user as well as the scanning time and the delta frequency in Hz. -
Page 57: Running A Tone Generator Test
The test does not provide specific results, the results page displays besides frequency values transmitted and relative level, all ‘telephonic’ data available on the line like in MAKE A CALL test. CHAPTER 3 - PERFORMING A MANUAL TEST ADSL TESTER D2061... -
Page 58: Performing A Ber Test
ADSL TESTER D2061 3.11. Performing a BER test Available only with ST2061 OPTION. The most used way to verify the transmission quality of a data connection, is performing a BER (BIT ERROR RATE) test. In order to perform this test , the device... -
Page 59: Setting Up A Ber Test
• Remote number in outgoing mode (end to end 1B) • None in incoming mode (1B) • Local number in autocall (selfcall 2B) Sub number: If necessary, enter the subaddress of the called party. CHAPTER 3 - PERFORMING A MANUAL TEST ADSL TESTER D2061... - Page 60 ADSL TESTER D2061 Mode: Select the Call mode. • Outgoing 64k/56K: the instrument generates a call to a remote instrument. Once connected the instrument sends its sequence and at the same time measures the received one. This makes it possible to test a single network section and identify the “noisiest”...
- Page 61 PC. • time interval: 15 or 30 minutes • DM: when the DM threshold value is overcame • End of cycle: results are printed every cycle ending CHAPTER 3 - PERFORMING A MANUAL TEST ADSL TESTER D2061...
-
Page 62: Running A Ber Test
ADSL TESTER D2061 Duration: Choose the duration of the test from the predefined list or define your own duration. Measurement cycles: Set the number of tests the instrument has to do on the network. Is only active in Outgoing 64k/56K mode. Set together with the pause between cycles. -
Page 63: Acting As Loop Box
A compatible call will be accepted. An incompatible call will be disconnected and a cause message is sent back. By default the loop box runs automatically in the background. The activation of the loop box function enables automatic answering without pickup. CHAPTER 3 - PERFORMING A MANUAL TEST ADSL TESTER D2061... -
Page 64: Setting Up A Loop Box Test
ADSL TESTER D2061 3.13. Setting up a Loop Box test Define the following parameters to operate the instrument as loop box: Call accept: Choose the control mode on incoming calls. • Only Compatible, the loopbox function only accepts incoming calls compatible with the set profile. -
Page 65: About This Chapter
USER’S MANUAL ADSL TESTER D2061 4. PREDEFINED TEST 4.1. About this Chapter You can save the setup of the most frequent used tests for later use. This setup is then added to the list of predefined tests. Make use of these predefined tests to have a quick and faultless test setup of your instrument. -
Page 66: Saving A Predefined Test
ADSL TESTER D2061 4.2. Saving a Predefined Test First you have to add a predefined test setup to memory. The following example shows how to save the test setup of a BER test: The internal memory of the device can store up to 10 different predefined setup for each kind of test. -
Page 67: Performing A Predefined Test
The following example shows how to run a predefined BER test. Open the TEST MENU screen. Open the PREDEFINED TESTS screen. Select the desired test, i.e. Last test. Select the test, i.e. IP Ping CHAPTER 4 - PREDEFINED TEST ADSL TESTER D2061... - Page 68 ADSL TESTER D2061 The screen gives all the test parameters in the way they have been saved. For example Select “Use this setup for testing” Connect the instrument as displayed on the screen and press the RIGHT CURSOR key. Start the test.
-
Page 69: Default Predefined Test
Opens the TEST MENU: PREDEFINED screen. Selects the type of test, i.e. BER. To highlights the field Press Enter to: and set the operation to be carried out on the file, with "Set as Ф test" CHAPTER 4 - PREDEFINED TEST ADSL TESTER D2061... -
Page 70: Deleting A Predefined Test
ADSL TESTER D2061 Selects the test to be carried out as predefined, as you switch on the instrument. Cancels the current selection. 4.4. Deleting a predefined test To delete a test from the predefined ones: Open the TEST MENU screen. -
Page 71: Using The Shortcut Feature (Favorites)
To add a predefined test into the shortcut list follow the steps listed below: Choose the setup that you want to save Open the ‘Save setup as predefined’ screen and name the setup CHAPTER 4 - PREDEFINED TEST ADSL TESTER D2061... - Page 72 ADSL TESTER D2061 Confirm and save the test setup. Now the setup has been added to the list of the predefined tests. Recall the test setup previously saved and select, ‘Press ENTER to: ’Add shortcut’ Select the test to add and press ENTER.
-
Page 73: About This Chapter
USER’S MANUAL ADSL TESTER D2061 5. USING THE DEVICE FOR MONITORING 5.1. About this Chapter This chapter gives detailed information of all parameters used to setup the instrument for monitoring of events relevant to ADSL connection or to D channel traffic in an ISDN access and signaling over POTS access. -
Page 74: Setting Up For Monitoring
5.2. Setting up for monitoring The following example describes the setup for ADSL monitoring. D2061 performs the background monitor during the ATU R simulation and can save all the modem events. Differences to other monitoring modes will be indicated throughout the text. -
Page 75: Start Monitoring
Select “Use this setup for monitoring”, connect the instrument as indicated and start monitoring. Start monitoring. If the previous trace has not been saved, the device asks for a confirmation to start a new capture session overwriting the data previously stored. CHAPTER 5 - USING THE DEVICE FOR MONITORING ADSL TESTER D2061... -
Page 76: Stop Monitoring
ADSL TESTER D2061 ISDN ADSL Note that: The START key changes to STOP. For “High impedance mode” in POTS connect the adapter as shown below: 5.4. Stop monitoring Before saving the trace you need to stop monitoring. Stop monitoring. 5.5. Saving the trace When you have stopped the signaling monitoring you can save the trace as follows: Open the SAVE THIS RESULT screen. - Page 77 Printing a hard copy of the trace. See chapter 9. ► Download traces to a PC. See chapter 9. ► Analyze traces directly on the screen. See chapter 7. ► CHAPTER 5 - USING THE DEVICE FOR MONITORING ADSL TESTER D2061...
-
Page 78: About This Chapter
ADSL TESTER D2061 6. SMART STATUS 6.1. About this Chapter This chapter gives you information of how to display and read the status of the instrument and the tested interface. 6.2. Reading the ADSL Access Status The Smart Status™ menu contains various result displays like a live status report on the modem. - Page 79 For example, if there is a major drop at 772 kHz, this most likely represents an interfering T1 signal. This configuration is a little bit difference between an ADSL access over Pots and ADSL Access over ISDN. CHAPTER 6 - SMART STATUS ADSL TESTER D2061...
- Page 80 ADSL TESTER D2061 Cursor Status bar Tone Tone number frequency Press to move the focus. After this operation, a status row appears underneath the graphic. Use the keys to move the cursor along the frequency axis. In the last row the instrument display: Tone number ►...
-
Page 81: G.826
USER’S MANUAL ADSL TESTER D2061 The bar at the top of the graphic indicates the part examined. To view the bits per tone in a tabular format press the key and go on page 3 of 6. Now each tone is listed along with the number of bits assigned. -
Page 82: Adsl Alarm Status
ADSL TESTER D2061 USER’S MANUAL Values are shown both in absolute (ABS) and ration (RATIO) format. The PASS/FAIL test refers to the quality objectives set in G.826. Resets counters. 6.2.3. ADSL Alarm Status The Alarms Status screen provides a current and history status of any alarm conditions. -
Page 83: Adsl Errors Status
USER’S MANUAL ADSL TESTER D2061 the previous super frame. LOF: Loss of Frame Near-End: indicates that the sum of the number of tones with a mismatch between the expected and measured bit pattern exceeds the threshold in 2 consecutive synchronization symbols. -
Page 84: Atm Cells Statistic
ADSL TESTER D2061 USER’S MANUAL or the other. Therefore, if the circuit under test uses the fast path, refer to the FAST results. FEC Forward Error Correction FEC indicates the number of super frames that had at least one forward error correction in one of its 68 data frames. -
Page 85: Reading The Isdn Basic Rate Status
Scroll to page 2. La pagina mostra tutti i canali B con lo stato relativo secondo le icone seguenti: Channel not used. Activity (in monitor mode) or test in progress (in simulation mode). CHAPTER 6 - SMART STATUS ADSL TESTER D2061... - Page 86 ADSL TESTER D2061 B channel data connected to the internal audio circuit. B channel data connected to the external HANDSET plug. Incoming call (only if the answer is set in Manual mode) Active loop. BER test in progress. Channel cross-looped with <ch> channel.
-
Page 87: Reading The Instrument Status
6.5. Reading the instrument status You can view the status of internal batteries or battery recharge at any time. Select page 4 (ISDN). If powered with batteries, the instrument displays the battery voltage. CHAPTER 6 - SMART STATUS ADSL TESTER D2061... - Page 88 ADSL TESTER D2061 USER’S MANUAL CHAPTER 6 - SMART STATUS...
-
Page 89: About This Chapter
Filters and display modes are different for POTS accesses. 7.2. Analyzing a trace To analyse a trace in overview mode: Open the HISTORY menu. Select the list of saved MONITOR tests. CHAPTER 7 - ANALYZING A MONITOR TRACE ADSL TESTER D2061 NT). - Page 90 ADSL TESTER D2061 Select the trace to be analyzed, i.e. “ae pppoe” Open the last saved TRACE directly. Use this menu to set up the filters that remove some of the messages in the trace. Show layer: Display all layer 3, 2 and/or 1 messages.
-
Page 91: Analyzing A Trace In Full Decoding Mode
Now you can display each message in more detail for further analysis. To display a message in detail, continue from step 6 as follows: This screen gives more detailed information on the selected message, including direction and absolute time. CHAPTER 7 - ANALYZING A MONITOR TRACE ADSL TESTER D2061 ISDN cursor moves... - Page 92 ADSL TESTER D2061 To display the selected message more in detail. ISDN ADSL Scroll the message contents. ADSL ISDN CHAPTER 7 - ANALYZING A MONITOR TRACE USER’S MANUAL POTS...
-
Page 93: Analyzing A Trace In Mix Decoding Mode
7.5. Analyzing a trace in Mix Decoding Mode From the full decoding mode you can display the trace in mix decoding mode as follows: Select an event. The screen changes to mix-decoding mode. CHAPTER 7 - ANALYZING A MONITOR TRACE ADSL TESTER D2061... -
Page 94: Analyzing A Trace In Hexadecimal Decoding Mode
ADSL TESTER D2061 The screen displays all information on the selected message, indicating the octet value and the length of each single message. Scroll through the pages with information on the selected message. Select another message. To return to the overview mode: Return to the overview mode. - Page 95 Scroll through the pages with information on the selected message. Select another message. To return to the overview mode: Return to the overview mode. To go to the full decoding mode: Change decoding mode. CHAPTER 7 - ANALYZING A MONITOR TRACE ADSL TESTER D2061...
-
Page 96: About This Chapter
ADSL TESTER D2061 8. CONFIGURING THE INSTRUMENT 8.1. About this Chapter This chapter describes the general configuration of the instrument. You can change default settings or prepare the instrument for specific use. 8.2. Opening the Configuration Menu Open the Config. menu. - Page 97 Select “Save this entry” to add the new name and number to the phonebook. To modify an existing entry. To delete a name from the phonebook. To scroll the name according to the list. CHAPTER 8 - CONFIGURING THE INSTRUMENT ADSL TESTER D2061...
-
Page 98: Adjusting The Volume
ADSL TESTER D2061 Go to full decoding mode 8.4. Adjusting the volume Select the Volume Levels submenu. Audio: use the arrow keys to adjust the speaker volume. Keypad Beep: to adjust the keypad beep volume. The instrument beeps according to the selected volume each time you change the value. -
Page 99: Changing The Information Language
8.8. Changing the Baud Rate Select the RS232 BAUDRATE submenu. You can choose the baud rate for serial communication with a computer or a printer. Use the arrow keys to change the baud rate. CHAPTER 8 - CONFIGURING THE INSTRUMENT ADSL TESTER D2061... -
Page 100: Self Diagnostics
ADSL TESTER D2061 8.9. Self Diagnostics You can perform several self diagnostics to check the functionality of the instrument. To perform a self diagnostic: Select the DIAGNOSTIC submenu. Perform the selected test. The screen displays the results of the diagnostics test. -
Page 101: Show Version Number
The instrument is provided with an automatic battery recharge circuit. To start the recharge cycle, you only need to connect the external mains adapter 531000971. Recharge time is approx. 3 hours with the instrument off, and approx. 6 hours with the instrument on. CHAPTER 8 - CONFIGURING THE INSTRUMENT ADSL TESTER D2061... -
Page 102: Changing The Contrast
ADSL TESTER D2061 8.12. Changing the Contrast You can set the contrast of the screen to your preference. Use the arrow keys to change and relate to the pattern on bottom of the screen. 8.13. Screen Saver Management Select the SCREEN SAVER MANAGEMENT submenu. - Page 103 START time, if any. In simulation mode, you can set the automatic start of the MONITOR IN BACKGROUND function. Set the start date and time Select the AutoMonitor function Starts the selected test Cancels the function. CHAPTER 8 - CONFIGURING THE INSTRUMENT ADSL TESTER D2061...
-
Page 104: Using Memory, Printer And Pc
Saving and viewing of test results or monitored traces ► Printing test results or monitored traces ► Communicating with a PC using the AETHRA “PC108 for Windows ► software. 9.2. Saving the Test Results You can save results to memory from any RESULT screen. This enables you to view, analyze, and print the test result at a later date. -
Page 105: Viewing The Test Results
Press ENTER to: set the operation to be performed on the selected file, “Select” or “Delete”. Select and open the test results from the list. CHAPTER 9 - USING MEMORY, PRINTER AND PC ADSL TESTER D2061... -
Page 106: Printing The Test Results Or Monitored Traces
ADSL TESTER D2061 The test results appear on the screen. You can recall the results of the last test by selecting the “Last test” option in the “Selected test” field. The test settings shall be automatically restored when recalling results from the memory. - Page 107 All screens are presented as a single result when printing. 9.5. Using the “PC108 for Windows To use the Aethra “PC108” software you need to connect the instrument to a computer. Use the RS 232 cable to connect a computer to the RS 232 port of the instrument.
-
Page 108: Maintaining The Instrument
ADSL TESTER D2061 USER’S MANUAL 10. MAINTAINING THE INSTRUMENT 10.1. About this Chapter This chapter covers basic maintenance procedures that can be performed by the user. 10.2. Cleaning and Storage 10.2.1. Cleaning the Instrument Clean the instrument with a damp cloth and a mild soap. Do not use abrasives, solvents or alcohol, since they may damage the instrument. -
Page 109: Extending Battery Operation Time
This indicates that the batteries are very low and that they need to be recharged. Operating time will be reduced if the instrument is used or handled at temperatures that differ from the recommended values. CHAPTER 10 - MAINTAINING THE INSTRUMENT ADSL TESTER D2061... -
Page 110: Replacing The Nimh Battery Pack
ADSL TESTER D2061 10.3.3. Dimming the Backlight At power-up the screen has a high bright display. To save battery power, the screen has an economic brightness when operated on the battery pack (no power adapter connected). When you connect the power adapter, the screen automatically changes to maximum brightness. -
Page 111: Protective Label
Disconnect the two battery plugs from the connectors. Install a new battery pack. Ensure that the batteries are placed in the battery compartment as shown in Fig. 10-2. Use only the Aethra battery pack 621070426. Reinstall the battery cover and secure the device with its rubbery holster. - Page 112 ADSL TESTER D2061 Item NiMH Batteries (installed) Battery Charges, available model: Europe 230V, 50-400 Hz. * The 230V version is not for use in North America. A line plug adapter complying with the applicable National Requirements may be provided to alter the blade configuration for a specific country.
-
Page 113: The Software Does Not Recognize The Instrument
If not, select another baud rate. See 8.8: “Changing the Baud Rate”. 10.6.6. The instrument gets stuck In the presence of an internal control firmware error, hold the on/off button pressed for min. 10 secs. CHAPTER 10 - MAINTAINING THE INSTRUMENT ADSL TESTER D2061... -
Page 114: Safety Characteristics
11.1.2. Performance characteristics Aethra guarantees the properties expressed in numerical values with the stated tolerance. Specified non-tolerance numerical values indicate those that could be nominally expected from the mean of a range of identical instruments. - Page 115 G.992.1, Annex A (ADSL over POTS) G.DMT G.992.1, Annex B (ADSL over ISDN) U-R2 (ADSL over POTS/ISDN T- DSL) G. Lite G. 992.2 D2061 over POTS D2061-I over ISDN ATM Layer Stack OAM loopback cells ITU-T I.610 OAM Implementation ATM Adaptation Layer...
-
Page 116: Pots Access
ADSL TESTER D2061 11.3. ISDN access ISDN Basic Rate Access [ST2061 option] S/T-interface Conforms at ITU-T (CCITT) Rec.I.430, ETS 300 Connector RJ45 (ISO 8877), pin 3,4,5,6 User Bit Rate 144 Kbps Impedance High impedance or 100 Ohm, menu selectable Euro-ISDN Layer [ST2061 option]... -
Page 117: Miscellaneous
Up to 115.200 bit/s Default data rate 19.200 bit/s Supported output formats ASCII, property format for dump, setting and remote control Auxiliary Interface Connector DB15HD, VGA style 15 wires connector for external adapters CHAPTER 11 - SPECIFICATIONS ADSL TESTER D2061... -
Page 118: Environmental Characteristics
ADSL TESTER D2061 Power Connector Power in Mini-DIN, 4 wires connector for external AC/DC adapter 11.6. Environmental Characteristics Dimension Weight, with battery ≅ 500 gr. Dimensions, with holster (mm) 100 (w) x 180 (l) x 50 (d) Power Battery Type... -
Page 119: Reference Regulations (Marks And Reliability Tests)
2-2 - IEC 68-2-3 - IEC 68-2-14 - CEI 50-6 Conducted emissions CEI EN 55022 Irradiated emissions CEI EN 55022 Immunity CEI EN 50082-1 Safety CEI EN 61010-1 - CEI EN 41003 - IEC CHAPTER 11 - SPECIFICATIONS ADSL TESTER D2061... - Page 120 ADSL TESTER D2061 USER’S MANUAL APPENDIX A APPENDIX A...
- Page 121 PLUG ISO 8/8 Rem. Pwr* Tx. + Pwr + Rx. + Pwr - Rx. - Pwr + Tx. - Pwr + The remote power supply is the supply provided by the NT1 in normal operation conditions. APPENDIX A ADSL TESTER D2061...
- Page 122 ADSL TESTER D2061 A.3. POTS access RJ11 PLUG ISO 4/6 Line Line A.4. RS.232 Pin* RS.232 D2061 Personal computer C104 Transmission Reception C103 Reception Transmission C102 Ground Signal Ground Signal *Ending with 9-pole standard connector. A.5. Handset PLUG RJ9 Function...
Need help?
Do you have a question about the D2061 and is the answer not in the manual?
Questions and answers