Table of Contents
Advertisement
Available languages
Available languages
Quick Links
Advertisement
Table of Contents

Subscribe to Our Youtube Channel
Related Manuals for CASO DESIGN DryAged Master 380 Pro


Summary of Contents for CASO DESIGN DryAged Master 380 Pro
- Page 1 Original-Bedienungsanleitung DryAged Master 380 Pro (691)
-
Page 2: Table Of Contents
Braukmann GmbH Raiffeisenstraße 9 D-59757 Arnsberg Service-Hotline International: Tel.: +49 (0) 29 32 / 80 55 4 – 99 Fax: +49 (0) 29 32 / 80 55 4 – 77 eMail: kundenservice@caso-germany.de Sie finden die aktuellste Version der Bedienungsanleitung auch auf unserer Homepage: www.caso-germany.de Dokument-Nr.: 00691 18-08-2020 Druck- und Satzfehler vorbehalten. - Page 3 3.6 Elektrischer Anschluss ..................18 Aufbau und Funktion ..................19 4.1 Gesamtübersicht ....................19 4.1.1 Herausnehmen der Edelstahlroste ..............20 Bedienelemente und Betrieb ................20 5.1 Bedienelemente und Anzeige ................20 5.2 Bedienung ......................20 5.3 Typenschild ......................22 Dry-Aging ......................22 6.1 Sicherheitshinweise ....................
- Page 4 14.2 Delivery scope and transport inspection ............36 14.3 Unpacking ......................36 14.4 Disposal of the packaging .................. 36 14.5 Setup ........................37 14.5.1 Setup location requirements:................37 14.5.2 Feet ........................37 14.5.1 The handle installing ..................38 14.6 Electrical connection ..................38 Design and Function ...................
- Page 5 24.3 Sources de danger ....................54 24.3.1 Danger d’incendie/Danger dû à des matériaux inflammables. Danger d'incendie et d'explosion ......................... 54 24.3.2 Dangers du courant électrique ................55 Mise en service ....................56 25.1 Consignes de sécurité ..................56 25.2 Inventaire et contrôle de transport ..............56 25.3 Déballage ......................
- Page 6 33.2 Informazioni su queste istruzioni d’uso ............72 33.3 Indicazioni d’avvertenza ..................72 33.4 Limitazione della responsabilità ................ 73 33.5 Tutela dei diritti d’autore ..................73 Sicurezza ......................73 34.1 Utilizzo conforme alle disposizioni ..............73 34.2 Indicazioni generali di sicurezza ................ 74 34.3 Fonti di pericolo ....................
- Page 7 40.1 Indicazioni di sicurezza..................88 40.2 Cause malfunzionamenti e risoluzione ............. 88 Smaltimento dell’apparecchio obsoleto ............90 Garanzia ....................... 90 Dati tecnici ......................91 Manual del usuario ....................93 44.1 Generalidades ...................... 93 44.2 Información acerca de este manual ..............93 44.3 Advertencias ......................
- Page 8 49.3 Información sobre el curado ................105 Limpieza y conservación .................. 105 50.1 Instrucciones de seguridad ................105 50.2 Limpieza ......................106 50.3 Sustitución de la bombilla de la lámpara de luz ultravioleta ......108 50.4 Transporte del aparato..................109 Resolución de fallas ..................
- Page 9 Bediening en gebruik ..................123 59.1 Bedieningselementen en display: ..............123 59.2 Bediening: ......................123 59.3 Typeplaatje ......................125 Dry-Aging ......................125 60.1 Veiligheidstips ....................125 60.2 Afwijzing van aansprakelijkheid: ..............126 60.3 Informatie over dry-aging ................. 126 Reiniging en onderhoud ................... 126 61.1 Veiligheidsvoorschriften ...................
- Page 10 68.5.1 Требования к месту установки: ..............141 68.5.2 Опорные ножки ....................141 68.5.3 Установка ручки ..................... 142 68.6 Электрическое подключение ................ 142 Конструкция и работа ..................142 69.1 Общий обзор ....................143 69.1.1 Удаление металлических полок ..............144 Эксплуатация и работа ................... 144 70.1 Элементы...
-
Page 11: Bedienungsanleitung: Allgemeines
Wir wünschen Ihnen viel Freude beim Gebrauch. 1.1 Informationen zu dieser Anleitung Diese Bedienungsanleitung ist Bestandteil des DryAged Master 380 Pro (nachfolgend als Gerät bezeichnet) und gibt Ihnen wichtige Hinweise für die Inbetriebnahme, die Sicherheit, den bestimmungsgemäßen Gebrauch und die Pflege des Gerätes. Die Bedienungsanleitung muss ständig am Gerät verfügbar sein. -
Page 12: Haftungsbeschränkung
1.3 Haftungsbeschränkung Alle in dieser Anleitung enthaltenen technischen Informationen, Daten und Hinweise für die Installation, Betrieb und Pflege entsprechen dem letzten Stand bei Drucklegung und erfolgen unter Berücksichtigung unserer bisherigen Erfahrungen und Erkenntnisse nach bestem Wissen. Aus den Angaben, Abbildungen und Beschreibungen in dieser Anleitung können keine Ansprüche hergeleitet werden. -
Page 13: Allgemeine Sicherheitshinweise
2.2 Allgemeine Sicherheitshinweise Beachten Sie für einen sicheren Umgang mit dem Gerät die folgenden allgemeinen Sicherheitshinweise: ► Kontrollieren Sie das Gerät vor der Verwendung auf äußere sichtbare Schäden. Nehmen Sie ein beschädigtes Gerät nicht in Betrieb. ► Bei Beschädigung der Anschlussleitung oder des Steckers, müssen diese durch den Hersteller oder dessen Servicebeauftragten ersetzt werden, um Gefahren vorzubeugen. -
Page 14: Gefahrenquellen
► Defekte Bauteile dürfen nur gegen Original-Ersatzteile ausgetauscht werden. Nur bei diesen Teilen ist gewährleistet, dass sie die Sicherheitsanforderungen erfüllen werden. ► Das Gerät ist nicht zum Räuchern geeignet. ► Das Gerät reguliert die gewünschte Luftfeuchtigkeit aktiv. Im Gerät dürfen keine Salzblöcke zur Regulierung der Luftfeuchtigkeit eingesetzt werden. -
Page 15: Gefahr Durch Elektrischen Strom
► Verwenden Sie keine mechanischen Vorrichtungen, um den Abtauvorgang zu beschleunigen. ► Reinigen Sie Gerät und Geräteteile nie mit leicht entzündbaren Flüssigkeiten. Die daraus entstehenden Gase können eine Brandgefahr darstellen oder explodieren. ► Lagern oder verwenden Sie kein Benzin oder andere feuergefährliche Gase und Flüssigkeiten in der Nähe von diesem oder anderen Gerät(en). -
Page 16: Inbetriebnahme
• Schließen Sie das Gerät erst nach 24 Stunden Wartezeit an das Stromnetz an und schalten Sie es ein, legen Sie erst dann Fleisch in den DryAged Master 380 Pro. ► Entfernen Sie die Schutzfolie erst kurz bevor das Gerät am Einsatzort aufgestellt wird,... -
Page 17: Entsorgung Der Verpackung
3.4 Entsorgung der Verpackung Die Verpackung schützt das Gerät vor Transportschäden. Die Verpackungsmaterialien sind nach umweltverträglichen und entsorgungstechnischen Gesichtspunkten ausgewählt und deshalb recycelbar. Die Rückführung der Verpackung in den Materialkreislauf spart Rohstoffe und verringert das Abfallaufkommen. Entsorgen Sie nicht mehr benötigte Verpackungsmaterialien an den Sammelstellen für das Verwertungssystem »Grüner Punkt«. -
Page 18: Anbringung Des Griffes
3.5.1 Anbringung des Griffes Bitte beachten Sie , dass Sie den mitgelieferten Edelstahlgriff vor dem ersten Gebrauch an die Tür des Gerätes anschrauben müssen. Dazu schieben Sie das Dichtungsgummie an der Rückseite der Tür zur Seite, um die vorgebohrten Löcher freizulegen. Mithilfe der beiliegenden Schrauben können Sie den Griff an der Tür montieren. -
Page 19: Aufbau Und Funktion
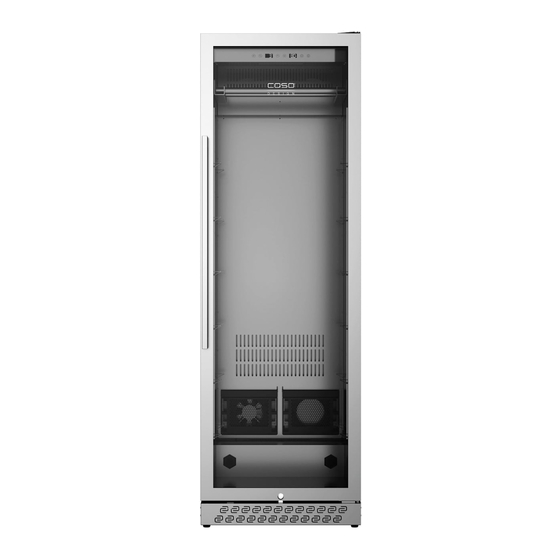
4 Aufbau und Funktion In diesem Kapitel erhalten Sie wichtige Hinweise zum Aufbau und Funktion des Gerätes. Gesamtübersicht 1 Aktivkohlefilter (2 Stück) 2 H2OSpeicher (2 Stück) 3 Edelstahlroste (7 Stück) 4 Hängegestell 5 Bedienfeld 6 Scharnier 7 Haken (6 Stück) 8 Türrahmen (abschließbar) 9 Auffangblech 10 UV-Lampe (Noch hinter dem... -
Page 20: Herausnehmen Der Edelstahlroste
4.1.1 Herausnehmen der Edelstahlroste Um einen Edelstahlrost herauszunehmen, nehmen Sie zuerst das Fleisch heraus. Verwenden Sie Handschuhe, die für den Kontakt mit Lebensmitteln geeignet sind. Dann heben Sie den Edelstahlrost leicht an und ziehen ihn dann heraus. ► Achten Sie sorgfältig darauf, dass die Edelstahlroste bzw. das Hängegestell für die Fleischer-Haken richtig eingerastet sind, bevor Sie Fleisch darauflegen bzw. - Page 21 3. Schalten Sie anschließend das UV Licht für mindestens 2 Stunden ein, um den Innenraum zu entkeimen. Dafür die Taste drücken. 4. H2O Speicher 300 ml Trinkwasser je H2O Speicher einfüllen bevor Sie Fleisch ins Gerät geben. Entfernen Sie vorher die Plastik-Verpackung. ►...
-
Page 22: Typenschild
6. LED-Licht- und UV-Licht-Einstellung Drücken Sie , um das LED-Licht einzuschalten, dieses schalten sich automatisch nach 4 Stunden aus. Die Taste drücken, um das UV-Licht einzuschalten. ► Die Tür verfügt über einen Sicherheitsschalter. Wenn Sie die Tür des Gerätes öffnen, schaltet sich das UV-Licht automatisch aus. -
Page 23: Haftungsausschluss
6.2 Haftungsausschluss: Der Hersteller übernimmt keine Haftung für Schäden am Kühlgut, auch nicht bei Defekt des Gerätes innerhalb der Garantiezeit. Ebenso schließt der Hersteller eine Haftung für Personenschäden, durch unsachgemäß gelagerte Ware, die anschließend verzehrt wird, aus. 6.3 Informationen zum Dry-Aging Das trockene Reifen (dry-aging) von Rind- &... -
Page 24: Reinigung
► Wenn der Reife-Prozess gescheitert ist und das Fleisch verdorben ist bzw. Wildschimmel entstanden ist, dann kontaktieren Sie bitte unseren Kundenservice, um das weitere Vorgehen abzustimmen. 7.2 Reinigung 2a H2O-Speicher 2b Speicherhalterung 2c Abtropfschale ◆ H2O-Speicher Speicherhalterung mit Abtropfschale aus dem Gerät entnehmen, Speicher entfernen und Abtropfschale durch Druck unten an der Seite der Halterung lösen und dann... - Page 25 ◆ Kondenswasser-Auffangbehälter/Auffangschale (K) Prüfen Sie regelmäßig den Kondenswasser-Auffangbehälter. Dieser befindet sich auf der Rückseite des Gerätes unten rechts. Entfernen Sie falls notwendig das Kondenswasser mit einem Schwamm. ◆ Manuelles Abtauen: Nach jedem Reifevorgang das Gerät 24 Stunden abtauen lassen. Schalten Sie das Gerät aus aber ziehen Sie nicht den Netzstecker.
-
Page 26: Wechsel Der Uv-Lampe
7.3 Wechsel der UV-Lampe Schrauben vorsichtig lösen. Abdeckung entfernen. UV-Lampe festhalten und im 45° Winkel drehen, dann herausziehen und austauschen. Einbau entsprechend rückwärts. -
Page 27: Bewegen Ihres Gerätes
7.4 Bewegen Ihres Gerätes Wenn Sie das Gerät an einen anderen Platz stellen wollen: Schalten Sie das Gerät aus. Räumen Sie den Inhalt heraus. Kleben Sie sicherheitshalber alle losen Elemente im Innenraum fest. Kleben Sie die Tür zu. Das Gerät sollte nur aufrecht transportiert werden. 8 Störungsbehebung In diesem Kapitel erhalten Sie wichtige Hinweise zur Störungslokalisierung und Störungsbehebung. -
Page 28: Entsorgung Des Altgerätes
Kompressor startet nicht Der Kompressor startet nicht, wenn die Raumtemperatur niedriger ist, als die gewünschte Temperatur. Tau auf der Oberfläche Besonders wenn das Gerät in einer feuchten des Gerätes Umgebung steht, bildet sich Tau auf der Glasfront. Es resultiert aus der Feuchtigkeit der Luft, die mit dem Gerät in Berührung kommt. -
Page 29: Garantie
Lieferung anzuzeigen. Weitere Ansprüche sind ausgeschlossen. Zur Geltendmachung eines Garantieanspruches setzen Sie sich bitte vor einer Rücksendung des Gerätes (immer mit Kaufbeleg!) mit uns in Verbindung. 11 Technische Daten Name DryAged Master 380 Pro Artikelnr. Leistung 240 W Spannung 220 V - 240 V; 50 Hz Maße außen (B/H/T) - Page 30 Original Operating Manual DryAged Master 380 Pro (691)
-
Page 31: Operating Manual
12.2 Information on this manual These Operating Instructions are a component of the DryAged Master 380 Pro (referred to hereafter as the device) and provide you with important information for the initial commissioning, safety, intended use and care of the device. -
Page 32: Limitation Of Liability
12.4 Limitation of liability All the technical information, data and notices with regard to the installation, operation and care are completely up-to-date at the time of printing and are compiled to the best of our knowledge and belief, taking our past experience and findings into consideration. No claims can be derived from the information provided, the illustrations or descriptions in this manual. -
Page 33: General Safety Information
13.2 General Safety information PLEASE NOTE Please observe the following general safety notices with regard to the safe handling of the device. ► Examine the device for any visible external damages prior to using it. Never put a damaged device into operation. ►... -
Page 34: Sources Of Danger
PLEASE NOTE ► Defective components must always be replaced with original replacement parts. Only such parts will guarantee that the safety requirements are fulfilled. ► The device actively regulates the desired humidity. Do not use salt blocks for regulation of humidity in the device. The device could be damaged. -
Page 35: Dangers Due To Electrical Power
DANGER ► Do not store or use gasoline or any other flammable vapours and liquids in the vicinity of this or any other appliance. The fumes can create a fire hazard or explosion. 13.3.2 Dangers due to electrical power Mortal danger due to electrical power! Mortal danger exists when coming into contact with live wires or subassemblies! Observe the following safety notices to avoid dangers due to... -
Page 36: Delivery Scope And Transport Inspection
14.2 Delivery scope and transport inspection As a rule, the device is delivered with the following components: • DryAged Master 380 Pro • 7 stainless steel shelves • 2 H2O-reservoir +2 replacement reservoir • holders for the reservoirs with drip tray •... -
Page 37: Setup
14.5 Setup 14.5.1 Setup location requirements: In order to ensure the safe and trouble-free operation of the device, the setup location must fulfil the following prerequisites: • Place your appliance on a floor that is strong enough to support the appliance when it is fully loaded. -
Page 38: The Handle Installing
14.5.1 The handle installing The device comes with one metal stainless steel handle. To install simply screw them to the door with the supplied screws. To do this, slide the rubber seal on the back of the door to the side to lay open the predrilled holes. -
Page 39: Design And Function
15 Design and Function This chapter provides you with important safety notices on the design and function of the device. 15.1 Complete overview 1 activated carbon filter (2 pieces) 2 H2O-reservoir (2 pieces) 3 stainless steel shelves (7 pieces) 4 hanging rack 5 touch control panel 6 hinge 7 butcher hooks (6 pieces) -
Page 40: Removal Of Stainless Steel Shelves
15.1.1 Removal of stainless steel shelves To remove a stainless stell shelf, first remove the meat. Use gloves which are suitable for contact with food. Lift the stainless steel shelf upwards and the gently pull it out PLEASE NOTE ► Carefully ensure that the stainless steel shelves and/or hanging rack for the butcher hooks is correctly locked into position before you place meat on it or suspend meat from 16 Operation and Handing This chapter provides you with important notices with regard to operating the device. - Page 41 3. Switch on the UV light for at least 2 hours to sterilize the interior. To do this, press the button. 4. H2O reservoir Fill 300 ml of drinking water into each H2O reservoir before placing meat into the device. Remove the plastic packaging beforehand. Please note ►...
-
Page 42: Rating Plate
Press to switch the UV light on. Please note ► The door has a safety switch. When you open the door of the device, the UV light switches off automatically. When you close the door, the UV light will turn on again. ►... -
Page 43: Information About Dry Ageing
17.3 Information about dry ageing The dry ageing of beef, pork and poultry is an expensive process and requires time and ideal conditions. You will be able to store good quality meat on the metal storage shelves or to suspend it on the meat hooks inside the equipment. -
Page 44: Cleaning
18.2 Cleaning 2a H2O-reservoir 2b Holder of reservoir 2c drip tray of reservoir ◆ H2O-reservoir Remove holder of reservoir with drip tray from the device. Remove the H2O- reservoir. Release the drip tray by pressing at the bottom side of the holder and then pull it out. -
Page 45: Changing The Uv Lamp
◆ If the device is iced up, proceed as follows: Remove the meat from the device. Cover it with cling film or, if possible, place it in a foil bag and refrigerate it in a suitable refrigerator. Switch off the device. Fill the pot with hot tap water but water which is no longer boiling and place the pot on a cloth on the lower metal shelf. -
Page 46: Moving The Appliance
Remove the cover Hold the UV lamp firmly and turn it at a 45 ° angle, then pull it out and replace it. Installation backwards accordingly. 18.4 Moving the appliance Turn off the appliance first. Remove all content. Shurely tape down all lose items inside your appliance. -
Page 47: Safety Notices
19.1 Safety notices Attention ► Only qualified electricians, who have been trained by the manufacturer, may carry out any repairs on electrical equipment. ► Improperly performed repairs can cause considerable dangers for the user and damages to the device. 19.2 Fault indications and rectification of faults The following table assists in localizing and rectifying minor faults. -
Page 48: Disposal Of The Old Device
Error code Problem Solution Problem with contact of Contact customer door. service Problem with sensor Contact customer H2, H5 service Problem with cooling Contact customer service Problem with humidity Contact customer service Problem with defrosting Defrost the device Problem with display Contact customer service PLEASE NOTE... -
Page 49: Technical Data
Any pending faults must be reported within 14 days of delivery. All further claims are excluded. To enforce a guarantee claim, please contact us prior to returning the device (always provide us with proof of purchase). 22 Technical Data Name DryAged Master 380 Pro Article No. Power 240 W Connection 220 V - 240 V;... - Page 50 Mode d'emploi original DryAged Master 380 Pro (691)
-
Page 51: Mode D´emploi : Généralités
Nous vous souhaitons beaucoup de plaisir lors de son utilisation. 23.1 Informations relatives à ce manuel Ce mode d'emploi appartient au DryAged Master 380 Pro (nommé par la suite l'appareil) et vous donne des indications importantes pour la mise en service, la sécurité, l'utilisation conforme et l'entretien de l'appareil. -
Page 52: Limite De Responsabilités
23.3 Limite de responsabilités Tous les renseignements techniques, données et instructions d'installation, de fonctionnement et d'entretien contenus dans ce manuel sont parfaitement actuels au moment de la publication et tiennent compte de notre expérience réalisée jusqu'ici et de nos connaissances actuelles en toute bonne foi. Les indications, illustrations et descriptions contenues dans ce manuel ne peuvent donner lieu à... -
Page 53: Consignes De Sécurités Générales
24.2 Consignes de sécurités générales Remarque Pour une utilisation en toute sécurité de l'appareil veuillez observer les consignes générales de sécurités suivantes : ► Avant son utilisation s'assurer qu'il ne comporte pas de défauts visuels. Ne jamais mettre en marche un appareil détérioré. -
Page 54: Sources De Danger
Remarque ► Les pièces défectueuses doivent être remplacées uniquement par des rechanges d'origine. Ces pièces sont seules capables de répondre aux exigences de sécurité. ► L’appareil régule activement l’humidité de l’air souhaitée. Il ne faut pas introduire des blocs de sel dans l’appareil pour réguler l’humidité... -
Page 55: Dangers Du Courant Électrique
Danger ► Ne nettoyez pas l’appareil ni ses pièces avec des liquides inflammables. Les gaz qu’ils dégagent peuvent provoquer un incendie ou exploser. ► Ne stockez pas et n’utilisez pas d’essence ou autres liquides risquant de s’enflammer à proximité de cet appareil ou d’autres. -
Page 56: Mise En Service
25.2 Inventaire et contrôle de transport Le DryAged Master 380 Pro est livré de façon standard avec les composants suivants : • DryAged Master 380 Pro • 7 grilles en acier inoxydable 2 réservoirs H2O + 2 réservoirs de rechange •... -
Page 57: Elimination Des Emballages
25.4 Elimination des emballages L'emballage protège l'appareil contre les dégâts de transport. Les matériaux d'emballage ont été choisis selon des critères environnementaux et de techniques d'élimination, c'est pourquoi ils sont recyclables. Le retour des emballages dans le circuit des matières épargne les matières premières et restreint le volume des déchets. -
Page 58: Les Pieds
25.5.2 Les pieds Láppareil est livré avec tres pieds et un pied separate. Pour niveler votre appareil, ajustez les pieds frontaux qui se trouvent sous l’appareil. L’installation de la 25.5.1 poignée Veuillez noter que, avant la première utilisation, vous devez visser la poignée en inox jointe à... -
Page 59: Structure Et Fonctionnement
26 Structure et fonctionnement Ce chapitre est consacré à des indications importantes sur la structure et le fonctionnement de l'appareil. 26.1 Vue d'ensemble 1 Filtre à charbon actif (2 pièces) 2 Réservoir H2O (2 pièces) 3 Grille en acier inoxydable (7 pièces) 4 Support de suspension 5 Panneau de contrôle tactile 6 Charnière... -
Page 60: Retrait Des Grilles En Acier Inoxydable
26.1.1 Retrait des grilles en acier inoxydable Pour retirer une grille en acier inoxydable, il faut d'abord sortir la viande. Utilisez des gants adaptés au contact avec les aliments. Soulevez ensuite légèrement la grille en acier inoxydable, puis tirez-la. REMARQUE ►... - Page 61 4. Réservoir H2O Ajoutez 300 ml d'eau potable par réservoir H2O avant de mettre la viande dans la machine. Retirez l'emballage plastique avant de le faire. REMARQUE ► Si l'humidité affichée pendant le processus de maturation ne correspond pas au réglage souhaité, vous devez humidifier à...
-
Page 62: Plaque Signalétique
Appuyez sur pour allumer la lumière UV. REMARQUE ► La porte est munie d'un interrupteur de sécurité. Lorsque vous ouvrez la porte de l'appareil, la lumière UV est automatiquement éteinte. ► La lumière UV est utilisée pour nettoyer l'intérieur avant, pendant et après le processus de maturation. -
Page 63: Exclusion De Responsabilité
27.2 Exclusion de responsabilité : Le fabricant décline toute responsabilité pour les dommages subis par les produits stockés, même en cas de défaut de l'appareil pendant la période de garantie. Le fabricant décline également toute responsabilité pour les dommages aux personnes dus à... -
Page 64: Nettoyage
Prudence ► Si vous n'utilisez pas l'appareil pendant une longue période, sortez tous les rayonnages métalliques, la suspension métallique et le crochet à viande et nettoyez l'appareil à fond. ► Si le processus de maturation n’a pas fonctionné, veuillez contacter notre service clients pour définir la marche à... - Page 65 ◆ Collecteur de condensation (K) Vérifiez régulièrement le récipient de collecte de l'eau de condensation. Il est situé à l'arrière de l'unité, en bas à droite. Si nécessaire, retirez l'eau de condensation à l'aide d'une éponge. ◆ Dégivrage manuel : Faites dégeler l'appareil pendant 24 heures après chaque maturation.
-
Page 66: Changer La Lampe Uv
28.3 Changer la lampe UV Desserrer les vis avec précaution. Retirez le couvercle. Tenez la lampe UV et tournez- la à un angle de 45°, puis retirez-la et remettez-la en place. Installation en conséquence à l'envers. -
Page 67: Déplacement De Votre Appareil
28.4 Déplacement de votre appareil Si vous voulez mettre l’appareil à un autre endroit : Arrêtez l’appareil. Sortez le contenu. Par mesure de sécurité, scotchez tous les éléments en vrac à l'intérieur. Scotchez la porte. Assurez-vous que l’appareil reste bien droite pendant le transport. 29 Réparation des pannes Ce chapitre est consacré... -
Page 68: Elimination Des Appareils Usés
Le compresseur ne démarre Le compresseur ne démarre pas si la température ambiante est inférieure à la température souhaitée. Surtout lorsque l’appareil est dans un environnement Givre sur la surface de l’appareil humide, du givre se forme sur la vitre frontale. Il est dû à l’humidité... -
Page 69: Garantie
Ne jamais jeter les anciens appareils avec les ordures ménagères. Remarque ► Portez les vieux appareils électriques et électroniques dans les points de collecte et de recyclage près de chez vous. Le cas échéant informez-vous auprès de la mairie, des services des ordures ou de votre concessionnaire. -
Page 70: Caractéristiques Techniques
32 Caractéristiques techniques Désignation DryAged Master 380 Pro N° d’article Puissance 240 W Tension 220 V - 240 V; 50 Hz Dimensions extérieures (l/h/p) 595 x 1865 x 750 mm Poids 118 kg Classe climatique Capacité de charge par grille 20 kg Capacité... - Page 71 Istruzioni d’uso originali DryAged Master 380 Pro (691)
-
Page 72: Istruzioni D´uso
33 Istruzioni d´uso 33.1 In generale Legga le informazioni qui contenute, affinché acquisti rapidamente familiarità con il suo apparecchio e affinché possa utilizzare appieno le sue funzioni. Il Suo l´apparecchio Le renderà un buon servizio per molti anni, se lo tratterà e lo curerà in modo adeguato. -
Page 73: Limitazione Della Responsabilità
Indicazione Un indicazione contrassegna inoltre delle informazioni, che facilitano l’utilizzo della macchina. 33.4 Limitazione della responsabilità Tutte le informazioni tecniche, tutti i dati e le indicazioni per l’installazione, il funzionamento e la cura, contenute in queste istruzioni d’uso, corrispondono all’ultimo stato dell’arte al momento della messa in stampa e sono forniti in considerazione delle nostre attuali esperienze e conoscenze, secondo scienza e coscienza. -
Page 74: Indicazioni Generali Di Sicurezza
Avviso Pericolo per un utilizzo non conforme alle disposizioni! Dall’apparecchio possono derivare pericoli, nel caso di un utilizzo non conforme alle disposizioni e/o nel caso di un utilizzo differente. ► Utilizzare l’apparecchio esclusivamente in conformità alle disposizioni. ► Rispettare le procedure descritte in queste istruzioni d’uso. Pretese di qualsiasi genere, per danni dovuti ad un utilizzo non conforme alle disposizioni, sono escluse. -
Page 75: Fonti Di Pericolo
Indicazione ► L’apparecchio non è un frigorifero. Non conservare nell’apparecchio nessun genere alimentare che quello indicato al capitolo „Impiego conforme alla destinazione“. ► Una riparazione dell’apparecchio dovrà essere effettuata soltanto da un servizio Clienti autorizzato dal produttore, altrimenti decade ogni diritto di garanzia per danni che ne conseguono. -
Page 76: Pericolo Dovuto A Corrente Elettrica
Pericolo ► Non conservare sostanze esplosive, come bombolette spray con propellenti infiammabili in questa unità. ► Il propellente all'interno dell'unità è combustibile. ► Non danneggiare il circuito di raffreddamento. ► Non utilizzare nessun apparecchio elettrico all interno dell apparecchio. ► Non utilizzare nessun dispositivo meccanico per accelerare la procedura di sbrinamento. -
Page 77: Messa In Funzione
► A causa dell’elevato peso dell’apparecchio, si consiglia di effettuare in due persone il trasporto, il disimballaggio ed il posizionamento. 35.2 Insieme della fornitura ed ispezione trasporto Il DryAged Master 380 Pro viene fornito standard con le seguenti componenti: • DryAged Master 380 Pro • 7 griglie d’acciaio inox •... -
Page 78: Disimballaggio
• Pulire l’interno con acqua tiepida e un panno morbido. • Collegare l’apparecchio solo dopo 24 ore di attesa alla rete elettrica e accenderlo, solo poi mettere della carne dentro al DryAged Master 380 Pro (refrigeratore a secco). Indicazione ► Tolga la pellicola protettiva blu solo poco prima che l'apparecchio venga posizionato nel luogo di posizionamento, per evitare graffi e sporco. -
Page 79: Piedini
• La presa dovrà essere facilmente accessibile, in modo tale che il cavo elettrico possa essere facilmente estratto, in casi d'emergenza. • Il montaggio di questo apparecchio in luoghi di posizionamento non stazionari (per esempio navi) dovrà essere effettuato esclusivamente da aziende/persone specializzate, se i presupposti per un utilizzo conforme alla sicurezza dell'apparecchio sono dati. -
Page 80: Costruzione E Funzione
• La sicurezza elettrica dell’apparecchio viene garantita solo se ci si connette ad un conduttore di terra installato in conformità alle disposizioni. In caso di dubbio, faccia controllare l’installazione di casa mediante un tecnico elettricista specializzato. Il produttore non può essere considerato responsabile per danni, provocati da una conduttura di terra mancante o interrotta. -
Page 81: Estrazione Delle Griglie D'acciaio Inox
Estrazione delle griglie d’acciaio inox 36.1.1 Per estrarre una griglia d’acciaio inox, togliere dapprima la carne. Utilizzare dei guanti adatti al contatto con generi alimentari. Poi alzare leggermente la griglia d’acciaio inox ed estrarla. Indicazione ► Prima di metterci sopra ovvero appendere la carne, fare accuratamente attenzione che le griglie d’acciaio inox ovvero la sospensione per i ganci da macellaio siano correttamente innestati. - Page 82 3. Quindi accendere la luce UV per almeno 2 ore per sterilizzare l'interno. A tal proposito, premere il tasto 4. Serbatoio H2O Riempire 300 ml di acqua potabile in ogni serbatoio H2O prima di mettere la carne nell'apparecchio. Rimuovere prima l'imballaggio di plastica. Indicazione ►...
-
Page 83: Targhetta Di Omologazione
6. Impostazione della luce LED e luce UV Premere 1 volta , per accendere la luce LED. Questa poi si spegne automaticamente dopo 4 ore. Premere per 5 secondi, si accende la luce UV. Indicazione ► Lo sportello dispone di un interruttore di sicurezza. Con l’apertura dello sportello dell’apparecchio, la luce UV si spegne automaticamente. -
Page 84: Esclusione Dalla Responsabilità
38.2 Esclusione dalla responsabilità Il fabbricante non si assume alcuna responsabilità per danni ai prodotti refrigerati, anche in caso di difetto dell’apparecchio durante il periodo di garanzia. Allo stesso modo, il fabbricante esclude una responsabilità per danni alle persone a causa di merci non correttamente conservate, che successivamente viene mangiata. -
Page 85: La Pulizia
Attenzione ► Se l’apparecchio non viene utilizzato per lungo tempo, rimuovere tutti i fondi d’appoggio di metallo, l’aggancio metallico e i ganci da macellaio e pulire a fondo l’apparecchio. ► Se il processo di maturazione è fallito, allora contattare il nostro Servizio clienti per concordare ulteriori procedure. - Page 86 ◆ Contenitore di raccolta per la condensa (K) Verificare regolarmente il contenitore di raccolta per la condensa. Questo si trova sul retro dell'apparecchio in basso a destra. Se necessario, rimuovere l'acqua di condensa con una spugna. ◆ Sbrinamento manuale: Lasciare sbrinare l'apparecchio per 24 ore dopo ogni operazione di maturazione. Spegnere l’apparecchio ma non staccare la spina.
-
Page 87: Cambio Della Lampada Uv
◆ Filtro a carbone attivo Sostituire il filtri a carbone attivo una volta all'anno. A tal proposito (se necessario), rimuovere la carne, svitare il filtro e sostituirlo. Filtri a carbone attivo di ricambio possono essere ordinati da noi, numero di articolo 692. -
Page 88: Muovere L'apparecchio
Eseguire il rimontaggio all’inverso. Muovere l’apparecchio 39.3.1 Quando volete installare l’apparecchio in un altro luogo: Spegnere l’apparecchio e. Svuotare il contenuto. Fissare tutte le parti interne con del nastro adesivo, per cautela. Fissare la porta con del nastro adesivo. Assicurarsi che L’apparecchio sia in posizione dritta durante il trasporto. 40 Eliminazione malfunzionamenti In questo capitolo riceverà... - Page 89 Vibrazioni & L’apparecchio Controllare che l’apparecchio sia in posizione piana. sembra emettere troppo Controllare la ventola. rumore & Lo sportello non Pezzi allentati, Apparecchio tocca la parete. Gli sportelli chiude in modo appropriato. erano al contrario e non potevano essere installati in modo appropriato.
-
Page 90: Smaltimento Dell'apparecchio Obsoleto
41 Smaltimento dell’apparecchio obsoleto Apparecchi elettrici ed elettronici obsoleti contengono spesso ancora materiali preziosi. Essi contengono però anche sostanze nocive, che erano necessarie per il loro funzionamento e la loro sicurezza. Questi possono nuocere alla salute umana o all’ambiente se vengono gettati tra i rifiuti non riciclabili o in caso di un trattamento errato. -
Page 91: Dati Tecnici
43 Dati tecnici Nome DryAged Master 380 Pro Nr. articolo Potenza 240 W Tensione 220 V - 240 V; 50 Hz Dimensioni esterne (L/H/P): 595 x 1865 x 750 mm Peso 118 kg Classe climatica Portata per griglia 20 kg... - Page 92 Manual del usuario DryAged Master 380 Pro (691)
-
Page 93: Manual Del Usuario
44 Manual del usuario 44.1 Generalidades Lea atentamente la información contenida en este manual para familiarizarse rápidamente con el aparato y poder utilizar sus funciones en toda su capacidad. Su DryAged Master 380 le servirá durante muchos años si lo trata y conserva adecuadamente. -
Page 94: Limitación De Responsabilidad
44.4 Limitación de responsabilidad La información técnica contenida, datos e indicaciones contenidos en el presente manual para la instalación, operación y conservación se corresponden con los últimos avances técnicos en el momento de la impresión y se publican teniendo en cuenta nuestra experiencia y conocimientos hasta ese momento. -
Page 95: Instrucciones Generales De Seguridad
45.2 Instrucciones generales de seguridad Nota Para una manipulación segura del aparato, observe las siguientes instrucciones generales de seguridad: Antes de utilizar el aparato debe revisarlo para detectar ► posibles daños. Si el aparato presenta daños, no lo ponga en marcha. -
Page 96: Fuentes De Peligro
Nota Este aparato no es apto para ahumar. ► El aparato regula activamente la humedad deseada. No se ► deben utilizar bloques de sal en el aparato con el fin de regular la humedad. El aparato podría resultar dañado. Si se usan bloques de sal, la garantía del aparato quedará... -
Page 97: Peligro De Electrocución
Peligro No almacene gasolina ni cualquier otro gas o fluido ► inflamable cerca de éste u otro aparato(s). Los vapores constituyen peligro de incendio o explosión. 45.3.2 Peligro de electrocución Peligro Peligro de muerte por electrocución El contacto con cables o componentes energizados implica peligro de muerte. -
Page 98: Ámbito De Suministro E Inspección De Transporte
46.2 Ámbito de suministro e inspección de transporte El DryAged Master 380 Pro incluye los siguientes componentes de fábrica • DryAged Master 380 Pro • 7 parrillas de acero inoxidable • 2 acumuladores H2O + 2 acumuladores de repuesto • soportes de acumulador con bandeja de goteo •... -
Page 99: Colocación
46.5 Colocación 46.5.1 Requisitos que debe reunir el lugar de montaje Para garantizar el funcionamiento seguro y correcto del aparato, el lugar de colocación debe cumplir los siguientes requisitos: • El aparato debe colocarse sobre una superficie sólida, plana, horizontal y resistente al calor, con suficiente capacidad portante para el aparato y los alimentos más pesados que podrían ser preparados en el aparato. -
Page 100: Fijación De Las Agarraderas
46.5.3 Fijación de las agarraderas Por favor, tenga en cuenta que las agarraderas que se entregan se deben atornillar a la puerta del aparato antes del primer uso. Para ello, aparte la goma de la parte trasera de la puerta de manera que queden a la vista los agujeros para las agarraderas. -
Page 101: Descripción General
47.1 Descripción general 1 Filtro de carbón activo (2 unidades) 2 Acumulador H2O (2 unidades) 3 Parrilla de acero inoxidable (7 unidades) 4 Bastidor para colgar 5 Panel táctil 6 Bisagra 7 Ganchos para carne (6 unidades) 8 Marco de puerta (con posibilidad de cierre) 9 Bandeja recogedora 10 Lámpara UV (detrás del bastidor para... -
Page 102: Extracción De La Parrilla De Acero Inoxidable
47.1.1 Extracción de la parrilla de acero inoxidable Para quitar una rejilla de acero inoxidable, primero saque la carne. Usar guantes que sean adecuados para el contacto con la comida. A continuación, levante la rejilla de acero inoxidable ligeramente y luego tire de ella. Nota ►... - Page 103 3. Luego, encienda la luz ultravioleta por lo menos 2 horas para desinfectar el interior. Para ello, pulse el botón 4. Acumulador H2O Rellenar 300 ml de agua del grifo (agua dulce) en cada acumulador H2O antes de introducir la carne en el aparato. Retire previamente el embalaje de plástico.
-
Page 104: Placa De Especificaciones
6. Ajuste de la luz LED y UV Presione una vez para encender la luz LED, que se apagará automáticamente después de 4 horas. Presione durante 5 segundos, la luz ultravioleta se enciende. Nota ► La puerta tiene un interruptor de seguridad. Al abrir la puerta del aparato, la luz ultravioleta se apaga automáticamente. -
Page 105: Descargo De Responsabilidad
49.2 Descargo de responsabilidad: El fabricante no se hace responsable de los daños que puedan sufrir los productos refrigerados, aunque el aparato esté defectuoso dentro del período de garantía. El fabricante también excluye la responsabilidad por los daños personales causados por los bienes almacenados incorrectamente que se consuman posteriormente. -
Page 106: Limpieza
Precaución ► Si el proceso de maduración ha fallado y la carne se ha estropeado o se ha formado moho silvestre, póngase en contacto con nuestro servicio de atención al cliente para acordar el procedimiento a seguir. 50.2 Limpieza 2a Acumulador H2O 2b Soporte del acumulador 2c Bandeja recogedora ◆... - Page 107 ◆ Recipiente colector de condensación (K) Revise la bandeja recogedora con regularidad para extraer la condensación acumulada. Esta se encuentra en la parte trasera del aparato, en su parte inferior derecha. Si fuera necesario, retire el agua de condensación con una bayeta o esponja de cocina.
-
Page 108: Sustitución De La Bombilla De La Lámpara De Luz Ultravioleta
50.3 Sustitución de la bombilla de la lámpara de luz ultravioleta Afloje los tornillos con cuidado. Retire la cubierta. Sostenga la bombilla de luz ultravioleta y gírela a un ángulo de 45°, luego extráigala y recámbiela. -
Page 109: Transporte Del Aparato
Para volver a colocarla, siga los pasos en orden inverso al desmontaje. 50.4 Transporte del aparato Cuando quiera cambiar de sitio el aparato: Desenchufe el aparato y desconecte el cable del punto de red. Saque el contenido. Para mayor seguridad, fije con cinta adhesiva todas las partes sueltas del interior de la nevera. - Page 110 Vibraciones & El aparato Compruebe que el aparato esté nivelado. es demasiado ruidoso & Compruebe el ventilador. Piezas sueltas. El aparato La puerta no cierra toca a la pared. La junta de la puerta está gastada. correctamente. Las puertas están colocadas al revés o no están bien. Las estanterías están desplazadas.
-
Page 111: Eliminación Del Aparato Usado
52 Eliminación del aparato usado Los productos eléctricos y electrónicos usados contienen materiales reutilizables. No obstante, también contienen materiales nocivos, necesarios para su funcionamiento y seguridad. En la basura doméstica, o ante la manipulación indebida, puede ponerse en peligro la salud humana y el medio ambiente. -
Page 112: Datos Técnicos
54 Datos técnicos Denominación DryAged Master 380 Pro Nº de art. Potencia 240 W Conexión 220 V - 240 V; 50 Hz Dimensiones exteriores (An/H/P) 595 x 1865 x 750 mm Peso neto 118 kg Clase climática Capacidad de carga por parrilla... - Page 113 Originele Gebruiksaanwijzing DryAged Master 380 Pro (691)
-
Page 114: Gebruiksaanwijzing
55.2 Informatie over deze gebruiksaanwijzing Deze gebruiksaanwijzing is onderdeel van de DryAged Master 380 Pro (vanaf hier ‘apparaat’ genoemd) en geeft u belangrijke aanwijzingen voor de ingebruikname, de veiligheid, het doelgerichte gebruik en het onderhoud van het apparaat. De gebruiksaanwijzing moet altijd bij het apparaat voorhanden zijn en voor iedereen te ... -
Page 115: Aansprakelijkheid
55.4 Aansprakelijkheid Alle in deze gebruiksaanwijzing aanwezige technische informatie, gegevens en instructies voor installatie, ingebruikname en onderhoud beantwoorden aan de laatste stand bij het in druk gaan en vinden plaats met inachtneming van onze tot nu toe opgedane ervaringen en kennis naar eer en geweten. Aan de informatie, afbeeldingen en beschrijvingen in deze gebruiksaanwijzingen kunnen geen rechten worden ontleend. -
Page 116: Algemene Veiligheidsinstructies
56.2 Algemene veiligheidsinstructies Houdt u zich voor een veilige omgang met het apparaat aan de volgende algemene veiligheidsinstructies: Controleer het apparaat voor de ingebruikname op aan de ► buitenkant zichtbare schaden. Neem een beschadigd apparaat niet in gebruik. Indien de aansluiting of de stekker beschadigd is, moet deze ►... -
Page 117: Bronnen Van Gevaar
Het apparaaat is geen koelkast. Beweer geen andere ► levensmiddelen in het apparaat dan onder „bedoeld gebruik“ vermeld. Het apparaat is niet geschikt voor roken. ► Het apparaat reguleert de gewenste luchtvochtigheid actief. In ► het apparaat mogen geen blokken zout voor regeling van de luchtvochtigheid worden gebruikt. -
Page 118: Gevaar Door Elektrische Stroom
GEVAAR Bewaar of gebruik geen benzine of andere vuurgevaarlijke ► gassen en vloeistoffen in de buurt van dit apparaat of andere apparaten. De gassen kunnen brandgevaar opleveren of ontploffen. Gebruik geen mechanische inrichtingen om het ontdooien te ► versnellen. Gebruik geen elektrische apparaten in het toestel. ►... -
Page 119: Veiligheidsvoorschriften
► Vanwege het hoge gewicht van het apparaat het transport als ook het uitpakken en plaatsen met twee personen uitvoeren. 57.2 Leveringsomvang en transportinspectie De DryAged Master 380 Pro wordt met de volgende onderdelen geleverd: • DryAged Master 380 Pro • 7 Roestvrijstalen roosters •... -
Page 120: Plaatsen
Het terugbrengen van de verpakking in de materiaalkringloop bespaart grondstoffen en verkleint de afvalhoop. Lever niet meer benodigd verpakkingsmateriaal in bij een afvalbrengstation, dat zorgdraagt voor de recycling. ► Bewaar indien mogelijk het originele verpakkingsmateriaal gedurende de garantieperiode, zodat u het apparaat indien nodig weer volgens de voorschriften kunt inpakken. -
Page 121: Handvat Bevestigen
57.5.1 Handvat bevestigen Let u er a.u.b. op dat u het meegeleverde roestvrijstalen handvat voor de eerste ingebruikname aan de deur van het apparaat vastschroeft. Schuif daarbij het dichtingsrubber aan de achterkant opzij, om zo de voorgeboorde gaten vrij te maken. -
Page 122: Opbouw En Functie
58 Opbouw en functie In dit hoofdstuk krijgt u belangrijke aanwijzingen m.b.t. de opbouw en het functioneren van het apparaat. 58.1 Algemeen overzicht 1 Actief koolfilter (2 stuks) 2 H2O-opslagtank (2 stuks) 3 Roestvrijstalen roosters (7 stuks) 4 Ophanging 5 Touch bedieningsveld 6 Scharnier 7 Vleeshaken (6 stuks) 8 Deurlijst (afsluitbaar) -
Page 123: Verwijderen Van Het Roestvrijstalen Rooster
58.1.1 Verwijderen van het roestvrijstalen rooster Om een roestvrijstalen rooster te verwijderen, haalt u eerst het vlees eruit. Gebruik handschoenen die geschikt zijn voor werken met voedsel. Til vervolgens het roestvrijstalen rooster een beetje op en trek het er dan uit. ►... - Page 124 3. Schakel vervolgens het UV-licht minstens 2 uur lang in, om de binnenruimte kiemvrij te maken. Daarvoor op de knop drukken. 4. H2O-opslagtank Voeg 300 ml drinkwater per H2O-opslagtank toe voordat u het vlees in de machine doet. Verwijder eest de plastic verpakking. ►...
-
Page 125: Typeplaatje
6. LED-Licht- en UV-Licht-instelling Druk 1x op , om het LED-licht in te schakelen, deze worden na 4 uur automatisch uitgeschakeld. Druk 5 seconden op en het UV-licht wordt ingeschakeld. ► De deur beschikt over een veiligheidsschakelaar. Wanneer u de deur van het apparaat opent, wordt het UV-licht automatisch uitgeschakeld. -
Page 126: Afwijzing Van Aansprakelijkheid
60.2 Afwijzing van aansprakelijkheid: De producent is niet aansprakelijk voor schade aan het gekoelde product, ook niet bij defecte van het apparaat binnen de garantieperiode. De fabrikant is ook niet aansprakelijk voor persoonlijk letsel, door incorrect bewaard voedsel dat wordt geconsumeerd. -
Page 127: Reiniging
VOORZICHTIG ► Wanneer u het apparaat niet langer gebruikt, moeten allen metalen bodems, de metalen ophanging en vleeshaken verwijderen en het apparaat grondig reinigen. ► Wanneer het rijpingsproces niet is gelukt, neemt u dan a.u.b. contact op met onze klantenservice, om te bespreken wat u verder kunt doen. ►... - Page 128 ◆ Opvangbak voor condensatievocht (K) Controleer regelmatig de opvangbak voor condensatiewater. Deze bevindt zich rechts aan de achterzijde van het apparaat. Verwijder indien nodig het condensatiewater met een spons. ◆ Handmatig ontdooien: Na ieder rijpingsproces het apparaaat 24 uur laten ontdooien. Schakel het apparaat uit, maar niet door middel van de stekker uit het stopcontact te halen Laat het apparaat vervolgens handmatig ontdooien.
-
Page 129: Vervanging Van De Uv-Lamp
61.1 Vervanging van de UV-lamp Schroeven voorzichtig losdraaien. Afdekking verwijderen. UV-lamp vasthouden en in een hoek van 45° draaien, vervolgens eruit trekken en vervangen. Inbouw in omgekeerde volgorde. -
Page 130: Bewegen Van Het Apparaat
61.2 Bewegen van het apparaat Wanneer u het apparaat op een andere plaats wilt neerzetten: Schakel het apparaat uit. Maak de binnenkant leeg. Plak voor de zekerheid alle losse elementen aan de binnenkant vast.Plak de deur vast. De koelkast dient rechtop getransporteerd te worden. -
Page 131: Afvoer Van Het Oude Apparaat
Compressor start niet De compressor start niet als de ruimtetemperatuur lager is dan de gewenste temperatuur. Condens op de oppervlakte Met name als het apparaat in een vochtige omgeving van de apparaat staat, ontstaat er condens op het glas aan de voorkant. Dit komt door de vochtige lucht die met de apparaat in contact komt. -
Page 132: Garantie
Stelt u zich voor het indienen van een garantieclaim en het terugsturen van uw apparaat via onderstaand adres (altijd met bewijs van koop!) met ons in verbinding. 65 Technische gegevens Apparaat DryAged Master 380 Pro Artikelnr. 240 W Vermogens 220 V - 240 V; 50 Hz... - Page 133 Инструкция по эксплуатации DryAged Master 380 Pro (691) Холодильник для сухого вызревания мяса...
-
Page 134: Инструкция По Эксплуатации
использовании прибора! 66.2 Информация о данной инструкции Эта инструкция по эксплуатации является составной частью холодильника для сухой выдержки DryAged Master 380 Pro (называемого далее прибор) и дает важные указания по введению в эксплуатацию, безопасности, надлежащему применению прибора и уходу за ним. Инструкция по эксплуатации должна быть всегда поблизости... -
Page 135: Ограничение Ответственности
ПРИМЕЧАНИЕ Указание означает дополнительную информацию, которая облегчает работу с прибором. 66.4 Ограничение ответственности Вся техническая информация, все данные и указания по установке, эксплуатации и уходу, содержащиеся в данной инструкции, соответствуют актуальному уровню по состоянию на день сдачи в набор и даются с учетом нашего прежнего опыта и знаний с... -
Page 136: Общие Указания По Безопасности
ПРЕДУПРЕЖДЕНИЕ Опасность из-за ненадлежащего применения! При ненадлежащем применении и\или использовании другого рода от прибора может исходить опасность. ► Прибор следует использоваться только в соответствии с назначением. ► Следует соблюдать порядок выполнения действий, описанный в данном руководстве по эксплуатации. Претензии любого вида, связанные с повреждениями вследствие ненадлежащего применения, исключены. - Page 137 ПРИМЕЧАНИЕ ► Прибор не является холодильником. Не храните в приборе никакие другие продукты питания, кроме тех, которые указаны в разделе "Применение по назначению". ► Прибор не предназначен для копчения мяса. ► Только квалифицированный перонал, прошедший обучение у изготовителя может выполнять ремонт прибора, в...
-
Page 138: Источники Опасности
Источники опасности 67.3 Риск возгорания / использование 67.3.1 легковоспламеняющихся материалов. Опасность ожога или взрыва ОПАСНОСТЬ При ненадлежащем применении прибора существует опасность возгорания или взрыва из-за воспламенения его содержимого. Соблюдайте следующие указания по технике безопасности, чтобы избежать опасности возгорания: Предупреждение: риск возгорания / использование легковоспламеняющихся... -
Page 139: Опасность, Связанная С Электрическим Током
ОПАСНОСТЬ ► Не храните или не используйте бензин или другие пожароопасные газы и жидкости поблизости от этого и других приборов. Газы могут представлять собой опасность возникновения пожара или взрыва. Опасность, связанная с электрическим током 67.3.2 Опасность для жизни от электрического тока! При... -
Page 140: Указания По Безопасности
следует выполнять вдвоем. 68.2 Объем поставки и осмотр после транспортировки Как правило, в комплект поставки прибора входят: • DryAged Master 380 Pro (холодильник для сухой выдержки) • 7 металлические полки 2 угольных фильтра • 2 резервуара для воды + 2 запасных резервуара... -
Page 141: Установка
Утилизируйте упаковочные материалы, которые больше не используются, в сборных пунктах для системы утилизации "Зеленая точка". ПРИМЕЧАНИЕ ► Если возможно, сохраняйте оригинальную упаковку в течение гарантийного периода прибора, чтобы в гарантийном случае снова можно было упаковать прибор надлежащим образом. Установка 68.5 68.5.1 Требования... -
Page 142: Установка Ручки
Установка ручки 68.5.3 Прибор поставляется с одной металлической ручкой из нержавеющей стали. Для установки просто прикрутите ее к двери прилагаемыми винтами. Для этого сдвиньте резиновую прокладку с обратной стороны дверцы в сторону, чтобы открыть просверленные отверстия. Используйте прилагаемые винты, чтобы установить ручку на дверь. 68.6 Электрическое... -
Page 143: Общий Обзор
Общий обзор 69.1 1 фильтр с активированным углем (2 штуки) 2 резервуар для воды (2 штуки) 3 металлические полки (7 штуки) 4 подвесная стойка 5 сенсорная панель управления 6 дверная петля 7 крючки для мяса (6 штуки) 8 рама двери (запираемая) 9 поддон... -
Page 144: Удаление Металлических Полок
69.1.1 Удаление металлических полок Чтобы вынуть металлические полки, сначала выньте мясо. Используйте перчатки, которые подходят для контакта с продуктами питания. Потом слегка приподнимите полку, а потом вытащите ее. ПРИМЕЧАНИЕ ► Внимательно следите за тем, чтобы металлические полки / и металлический подвес для... - Page 145 3. Включите ультрафиолетовую лампу минимум на 2 часа, чтобы стерилизовать внутреннюю часть. Для этого нажмите кнопку 4. Резурвуар для воды Перед помещением мяса в прибор налейте 300 мл питьевой воды в каждую емкость для воды. Заранее удалите пластиковую упаковку. ПРИМЕЧАНИЕ ►...
-
Page 146: Паспортная Табличка
6. Светодиодный свет и настройка УФ-излучения Нажмите один раз кнопку , чтобы включить подсветку, она автоматически выключится через 4 часа. Нажмите кнопку , чтобы включить УФ-лампусвет. ПРИМЕЧАНИЕ ► Дверь имеет предохранительный выключатель. Когда вы открываете дверцу прибора, УФ-лампа выключается автоматически. Когда вы закроете дверь, ультрафиолетовый... -
Page 147: Исключение Ответственности
71.2 Исключение ответственности: Изготовитель не берет на себя ответственность за повреждения охлаждаемого продукта, также при дефекте прибора в течение гарантийного периода. Также изготовитель исключает ответственность за нанесение ущерба людям из-за товара, который хранился ненадлежащим образом, который потом потребляется. 71.3 Информация по сухой выдержке Сухая... -
Page 148: Очистка
Осторожно ► Если процесс созревания не удался, и мясо испортилось или появилась дикая плесень, обратитесь в нашу службу поддержки клиентов, чтобы согласовать дальнейшие действия. Очистка 72.2 2a резервуар для воды 2b держатель резервуара 2c поддон для сбора капель резервуара ◆ Резкрвуар... - Page 149 ◆ Емкость для водяного конденсата (K) Регулярно проверяйте емкость для конденсата. Она расположена сзади справа на приборе. При необходимости удалите конденсат губкой. Ручное размораживание ◆ Разморозьте прибор после каждого процесса созревания. Выключите питание, но не вынимайте вилку из розетки. Затем дайте прибору разморозиться вручную. Обратите внимание на...
-
Page 150: Замена Уф Лампы
72.3 Замена УФ лампы Осторожно ослабьте винты Снимите крышку. Крепко держите УФ-лампу и поверните ее под углом 45 °, затем вытащите и замените. Соберите в обратном порядке. -
Page 151: Перемещение Прибора
Перемещение прибора 72.4 Сначала выключите прибор. Удалите все содержимое. Для безопасности приклейте все свободные предметы внутри вашего прибора. Закройте двери. Убедитесь, что прибор остается в вертикальном положении во время транспортировки. 73 Устранение неисправностей В этой главе содержатся важные указания по локализации и устранению неисправностей. -
Page 152: Утилизация Старого Прибора
Конденсат на Конденсат образуется на стеклянной передней панели, в поверхности прибора: частности, в том случае, если прибор стоит во влажной среде. Он образуется из влажности воздуха, которая соприкасается с прибором. Вытрите конденсат мягкой тряпкой. Булькающий звук, 1 Звук компрессора при запуске или прекращении работы который... -
Page 153: Гарантия
предназначен для дополнительного коммерческого использования. В случае обоснованных претензий мы по своему усмотрению отремонтируем неисправный прибор или заменим его исправным. 76 Технические характеристики Наименование DryAged Master 380 Pro Артикульный номер Мощность 240 Вт Параметры подключения 220 В - 240 В; 50 Гц...
Need help?
Do you have a question about the DryAged Master 380 Pro and is the answer not in the manual?
Questions and answers