Table of Contents
Advertisement
Quick Links
IMPORTANT! READ AND FOLLOW THESE INSTRUCTIONS
CAREFULLY AND KEE P FOR F UTURE REFERENCE
If you sell or give away this product, make sure you give this instruction to the new owner.
WARNING
WARNING - Incorrect installation can be dangerous.
WARNING - Do not use the safety barrier if any components are damaged or missing.
WARNING - The safety barrier must not be fitted across windows.
WARNING - Never use without wall cups.
Screws MUST always be used to install wall cups.
This safety barrier is for domestic use only.
This safety barrier is suitable for use with children up to 24 months of age.
Not every child is the same. If your child of less than 24 months is able to pass through, climb
over, crawl under or able to open or to dislodge the safety barrier, then the safety barrier can't
be used to provide the assumed protection.
Never use with a child able to climb or dislodge/open gate.
The surfaces that the gate is to be fixed to must be suitable for the purpose and must be
structurally sound.
If the barrier is to be used at the top of the stairs, it should not be positioned below top level.
If the safety barrier is used at the bottom of the stairs, it should be positioned at the front of
the lowest tread possible.
This gate has a manual close system.
This gate is intended for indoor use and is not to be exposed to outdoor elements.
Install this gate away from heaters and other sources of heat.
This product will not necessarily prevent all accidents. Never leave child unattended.
With any pressure mounted gate, a construction bar is required across the base. Note, this bar can be a tripping hazard. If you choose
to position a pressure mounted gate at the top of stairs, use extra caution to step over this bar to prevent trips and falls.
INSTRUCTIONS
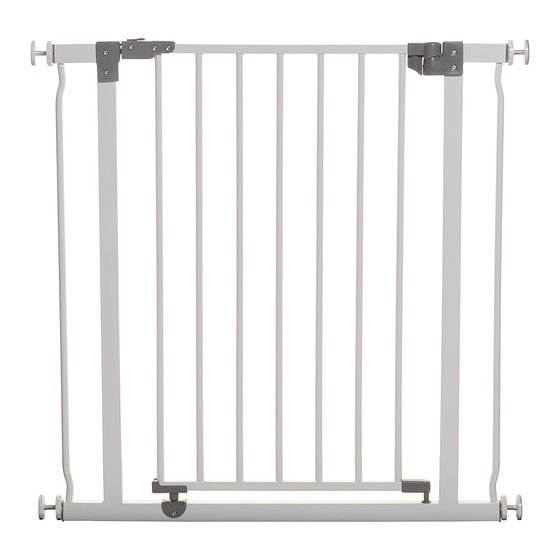
Liberty
Security Gate
Conforms to EN1930:2011
Can be used in conjunction with a Dreambaby
Gate Ramp (F837) to help avoid tripping.
Caution:
Watch-the-Step
®
1
F854
F920
F867
F1961
F919
F1962
Item numbers may also end in BB.
®
F1963
F1964
Advertisement
Table of Contents

Subscribe to Our Youtube Channel
Related Manuals for dreambaby F854


Summary of Contents for dreambaby F854
- Page 1 With any pressure mounted gate, a construction bar is required across the base. Note, this bar can be a tripping hazard. If you choose to position a pressure mounted gate at the top of stairs, use extra caution to step over this bar to prevent trips and falls. Can be used in conjunction with a Dreambaby Watch-the-Step ®...
- Page 2 PARTS LIST E x 4 F x 4 G x 4 H x 4 J x 4 Gate Panel Upper Locking Set Release Switch Gate Frame Tension Knobs Bolts with Rubber Pads Wood Screws Wall Cups Wood use only Double-sided Adhesive Tape Lower Locking Set B E F Wood Screws...
- Page 3 For plaster / gyprock surface, locate the timber beam or stud behind and mount in this location (mounting on plaster / gyprock alone is not strong enough and not safe). DO NOT MOUNT TO GLASS. F1961 / F1962 Xtra-Tall F854 / F919 75 - 81cm / 29.5 - 32in 75 - 81cm / 29.5 - 32in...
- Page 4 2. To use with Gate Extensions. Gate Extensions (sold separately) Gate Frame Extension Pin Xtra-Tall Tension Knobs Gate Extension *F901/F968 - 9cm (3.5in) F1965/F1966 - 9cm (3.5in) Bolts with Rubber Pads *F1989 - 2x9cm (3.5in) F1967/F1968 - 18cm (7in) F902/F969 - 18cm (7in) F1969/F1970 - 27cm (10.5in) F903/F970 - 27cm (10.5in) F1971/F1972 - 36cm (14in)
- Page 5 3. Insert the Bolts with Rubber Pads and Tension Knobs into the Gate Frame. 4. Place the gate in the opening so that the bottom of the Gate Frame is completely flat on the floor, and it is perpendicular to the opening and the floor. Top view of gate Side view of gate floor...
- Page 6 6. Tighten the Tension Knobs until the two Indicator Lines, located on the Upper Locking Set(B) align horizontally. When correctly tightened, the distances between Tension Knobs and Rubber Pads should be equal. Keep this gap about 1mm/0.04in 2.5in Distance should be equal Indicator Lines...
- Page 7 Screw Wall Cups (G) into place. Ensure the surface you are mount the gate is structurally sound such as solid timber, brick or masonry. For plaster / gyprock surface, locate the timber beam or stud behind and mount in this location (mounting on plaster / gyprock alone is not strong enough and not safe).
- Page 8 Regularly check Tension Knobs, Rubber Pads and Wall Cups to make sure the gate is securely in place and closes correctly. Adjust as required. • Only use Dreambaby spare parts. Any additional and replacement parts should be obtained from Tee-Zed Products. ®...
Need help?
Do you have a question about the F854 and is the answer not in the manual?
Questions and answers