Table of Contents
Advertisement
Quick Links
INSTALLATION HANDBOOK
PERMANENT LADDER SYSTEM
SafetyLink is an innovative
anchor company achieving
success and keeping you safe
whilst working at heights.
ROOF ANCHORS
HORIZONTAL LIFELINES
PERMANENT LADDERS
LADDER STABILISERS
TEMPORARY ANCHOR
Read entire handbook before installing
SafetyLink products. All products must be
installed in accordance with SafetyLink's
installation handbook, using only products
supplied by SafetyLink Pty Ltd. Failure to
follow all warnings and instructions may
result in serious injury or death.
SafetyLink Pty Ltd
AU: 1300 789 545
INT: +61 2 4964 1068
i nfo@saf etyl i nk.com
www.safetylink.com
Advertisement
Table of Contents

Summary of Contents for SafetyLink LADER002.LHD.90
- Page 1 Read entire handbook before installing SafetyLink products. All products must be installed in accordance with SafetyLink’s installation handbook, using only products supplied by SafetyLink Pty Ltd. Failure to follow all warnings and instructions may result in serious injury or death. SafetyLink Pty Ltd...
-
Page 2: Table Of Contents
VERTICAL LIFELINE SYSTEM ..................32 VERTICAL LIFELINE SYSTEM ..................33 EXPERT FALL PROTECTION PLANNING ................. 34 IN CASE OF ACCIDENT ....................36 Return to Table of Contents Ref: SafetyLink Pty Ltd Permanent Ladder System Page 2 of 36 Doc ID: MKT-471 Version: 19.0... -
Page 3: Warnings
YOUR LIFE DEPENDS UPON THE CONTINUED EFFICIENCY AND DURABILITY OF THE EQUIPMENT, SO, A PROPER INSPECTION IS REQUIRED TO AVOID MISHAPS. IN ADDITION TO SAFETYLINK’S EQUIPMENT, ALL ANCILLARY EQUIPMENT MUST BE INSPECTED IN ACCORDANCE WITH APPLICABLE REGULATORY REQUIREMENTS AND THE MANUFACTURER’S INSTRUCTIONS. -
Page 4: Warranties
Products are maintained in accordance with Australian Standard 1891.4 (section 9). you notify any claim under this warranty to SafetyLink in writing to the address below no later than 14 days after the event or occurrence concerning the produce giving rise to the claim and you pay all costs related to your claim. -
Page 5: Ladder Technical Specifications
The building or structure for the anchorage should be assessed by an Engineer, unless it is clear to a competent height safety installer that the structure is adequate. TESTING The SafetyLink ladder system has been tested and manufactured in accordance with Australia and New Zealand Standard AS/NZS 1891:2009 and Australian Standard AS 1657:2018. Return to Table of Contents... -
Page 6: Safetylink's Guidelines
SAFETYLINK’S GUIDELINES Prior to ladder assembly, refer below SafetyLink’s installation guidelines and considerations based on AS1657:2018. 1. Minimum clearances from ladders to permanent 2. The distance from the bottom landing to the top of objects must be: the first rung shall not be less than 90% (270mm) -200mm at the back. - Page 7 SAFETYLINK’S GUIDELINES Prior to ladder assembly, refer below SafetyLink’s installation guidelines and considerations based on AS1657:2018. 5. Ladders over 6 metres will require a ladder cage or 6. Ladder cages must have a clearance between fall arrest system. the ladder base/platform and the ladder cage of between 2000 to 2200mm.
- Page 8 SAFETYLINK’S GUIDELINES Prior to ladder assembly, refer below SafetyLink’s installation guidelines and considerations based on AS1657:2018. 9. Ladders over 6 metres must have midway rest platforms allowing the user to rest and change direction. When more than one platform is required it is recommended that intervals are no more than 4.5 metres.
-
Page 9: Safetylink Permanent Ladder Installed
SAFETYLINK PERMANENT LADDER INSTALLED SafetyLink ladder systems are designed in accordance with AS/NZS 1657:2018. 90/90 Degree Handrails 75/90 Degree Handrail Parapet Platform 75 Degree Ladder head Self-Closing Gate Parapet Platform 90 Degree Handrail Base Platform Vertical Lifeline Top Platform 90 Degree Ladder head... -
Page 10: Ladder Sections - 90 Degrees
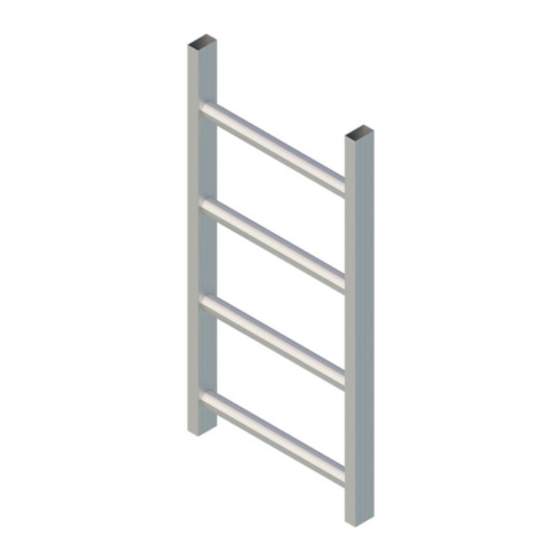
2400mm Ladder section 1200mm Ladder section Product Code: LADER002.LHD.90 Product Code: LADER002.SEC.8 Product Code: LADER002.SEC.4 90 Degree Ladder Rung Return to Table of Contents Ref: SafetyLink Pty Ltd Permanent Ladder System Page 10 of 36 Doc ID: MKT-471 Version: 19.0... -
Page 11: Ladder Sections - 75 Degrees
2400mm Ladder section 1200mm Ladder section Product Code: LADER002.LHD.75 Product Code: LADER002.SEC.8 Product Code: LADER002.SEC.4 75 Degree Ladder Rung Return to Table of Contents Ref: SafetyLink Pty Ltd Permanent Ladder System Page 11 of 36 Doc ID: MKT-471 Version: 19.0... -
Page 12: Ladder Installation Steps
Length (H)=Height (Y)x1.064 Return to Table of Contents Ref: SafetyLink Pty Ltd Permanent Ladder System Page 12 of 36 Doc ID: MKT-471 Version: 19.0... -
Page 13: Ladder Installation Steps
10. Bolt top platform to ladder head and level with adjustable leg kit or parapet platform kit. 11. Attach top handrail kit to ladder styles. 75 DEGREES 90 DEGREES Return to Table of Contents Ref: SafetyLink Pty Ltd Permanent Ladder System Page 13 of 36 Doc ID: MKT-471 Version: 19.0... -
Page 14: Ladder Installation Steps
LADDER INSTALLATION STEPS 12. If required, install the Cage/Lifeline onto the ladder. 13. If required, install the lockable door onto ladder. Return to Table of Contents Ref: SafetyLink Pty Ltd Permanent Ladder System Page 14 of 36 Doc ID: MKT-471 Version: 19.0... -
Page 15: Ladder Splice Joints
Roofing Sheets: Minimum two (2) x 12 gauge Roofing Screws or two (2) x 8mm Tri-fold Rivets. Concrete: 2 x M8 masonry bolts or equivalent. Return to Table of Contents Ref: SafetyLink Pty Ltd Permanent Ladder System Page 15 of 36 Doc ID: MKT-471 Version: 19.0... -
Page 16: Ladder Fixing Brackets
2 x Washer: M10 Spring 316SS 2 x Nut: M10 316SS 7 x Nyloc Nut: M10 316SS Product Code: LADER002.BRKADJ.900-1200 Return to Table of Contents Ref: SafetyLink Pty Ltd Permanent Ladder System Page 16 of 36 Doc ID: MKT-471 Version: 19.0... -
Page 17: Ladder Mounting Bracket Locations
2 x M10 masonry bolts or equivalent. Roof sheet: 3x 8mm Tri-fold rivets allowed only for Top bracket when it is installed with Top platform. Return to Table of Contents Ref: SafetyLink Pty Ltd Permanent Ladder System Page 17 of 36 Doc ID: MKT-471 Version: 19.0... -
Page 18: Safetylink Ladder Footing Platform
Additional steps will be required over 15 degrees. • Remark: U channel can be fixed onto roof sheet by using 2x8mm Tri-fold rivets Return to Table of Contents Ref: SafetyLink Pty Ltd Permanent Ladder System Page 18 of 36 Doc ID: MKT-471 Version: 19.0... -
Page 19: Ladder Base Platform
Suitable for roof pitches 0 to 15 degrees only. Remark: U channel can be fixed onto roof sheet by using 2x8mm Tri-fold rivets Return to Table of Contents Ref: SafetyLink Pty Ltd Permanent Ladder System Page 19 of 36 Doc ID: MKT-471... -
Page 20: Safetylink Ladder Top Platform
Suitable for roof pitches 0 to 15 degrees only. • Remark: U channel can be fixed onto roof sheet by using 2x8mm Tri-fold rivets Return to Table of Contents Ref: SafetyLink Pty Ltd Permanent Ladder System Page 20 of 36 Doc ID: MKT-471 Version: 19.0... -
Page 21: Safetylink Ladder Parapet Platform
Use the supplied M8x60mm set screws, washers and nyloc nuts to fix the bracket and platform. • The top platform will be level with top of ladder rung (within 3 degrees). Return to Table of Contents Ref: SafetyLink Pty Ltd Permanent Ladder System Page 21 of 36 Doc ID: MKT-471 Version: 19.0... -
Page 22: Ladder Handrails
Place the M8 bolt through the bottom handrail tab and through stile. Tighten with nyloc nut. 5. Repeat the same process to install other handrails. Return to Table of Contents Ref: SafetyLink Pty Ltd Permanent Ladder System Page 22 of 36 Doc ID: MKT-471... -
Page 23: Ladder Caps
1. Place ladder caps into open section at top of stiles. 2. Use a rubber mallet, gently tap it into stiles. Return to Table of Contents Ref: SafetyLink Pty Ltd Permanent Ladder System Page 23 of 36 Doc ID: MKT-471... -
Page 24: Ladder Midway Rest Platform
A and B by using using eight (8) 10Gx25 Tek Screws. twelve (12) M10x70mm bolts. Return to Table of Contents Ref: SafetyLink Pty Ltd Permanent Ladder System Page 24 of 36 Doc ID: MKT-471 Version: 19.0... - Page 25 Support structure integrity and fixing method to be assessed and confirmed by competent person or Engineer prior to installation. Return to Table of Contents Ref: SafetyLink Pty Ltd Permanent Ladder System Page 25 of 36 Doc ID: MKT-471 Version: 19.0...
-
Page 26: Ladder Cage
2. Bolt cage halves to one another. Ensure bars are fitted to the inside of hoops only, as pictured. Return to Table of Contents Ref: SafetyLink Pty Ltd Permanent Ladder System Page 26 of 36 Doc ID: MKT-471 Version: 19.0... - Page 27 5. If a second cage section is used to achieve desired cage length, ensure the spacing between cages does not exceed 150mm. 150mm Return to Table of Contents Ref: SafetyLink Pty Ltd Permanent Ladder System Page 27 of 36 Doc ID: MKT-471 Version: 19.0...
-
Page 28: Ladder Cage Gate
35mm bolts. 3. To lock ladder cage gate, place padlock through lock plate to secure (padlock is not provided). Return to Table of Contents Ref: SafetyLink Pty Ltd Permanent Ladder System Page 28 of 36 Doc ID: MKT-471 Version: 19.0... -
Page 29: Retractable Stiles
2. Ensure locking pin engages to secure stanchion. Remark: Regular lubrication with silicon spray is required for smooth action. RETRACTED EXTENDED Return to Table of Contents Ref: SafetyLink Pty Ltd Permanent Ladder System Page 29 of 36 Doc ID: MKT-471 Version: 19.0... -
Page 30: Lockable Door
6. To lock ladder door, place lock around rung and through door slot, padlock to secure (padlock is not provided). Return to Table of Contents Ref: SafetyLink Pty Ltd Permanent Ladder System Page 30 of 36 Doc ID: MKT-471 Version: 19.0... -
Page 31: Vertical Lifeline System Assembly
2 x Washer: M12 316SS 2 x Washer: M12 316SS Spring EZYTENSR004 SafetyLink's EZY-SPEC Swageless Tensioner with Indicator SafetyLink's EZY-SPEC Shuttle with Energy Absorber Pack EZYSHUT003 (3040-0 tear length 600mm) with 2x Karabiners Return to Table of Contents Ref: SafetyLink Pty Ltd Permanent Ladder System... -
Page 32: Vertical Lifeline System
Slot the cable into tension indicator. Assemble the tension indicator as shown below. Tension until indicator is located between correct tension markings. Return to Table of Contents Ref: SafetyLink Pty Ltd Permanent Ladder System Page 32 of 36 Doc ID: MKT-471... -
Page 33: Vertical Lifeline System
VERTICAL LIFELINE SYSTEM SHUTTLE FOR VERTICAL LIFELINE A FALL RESCUE PLAN SHOULD BE DEVELOPED PRIOR TO USING SAFETYLINK EQUIPMENT. Ladder should be only used for access. If it is intended to work from a ladder, the work should be light duty and short duration. -
Page 34: Expert Fall Protection Planning
EXPERT FALL PROTECTION PLANNING SafetyLink's design and planning team are here to help work out the positioning of your fall protection system, ensuring all areas of your roof are accessed safely. Things to consider when planning your roof layout: Are all areas of your roof protected, allowing complete access when working at heights? Are you protected from the ground up, allowing complete access to your roof? Detailed comprehensive documentation provided e.g. - Page 35 NOTES Return to Table of Contents Ref: SafetyLink Pty Ltd Permanent Ladder System Page 35 of 36 Doc ID: MKT-471 Version: 19.0...
-
Page 36: In Case Of Accident
PERSONS WORKING AT HEIGHTS SHOULD NOT WORK ALONE. It is critical that before using any SafetyLink Systems a fall rescue plan is in place for any persons suspended mid-air following a fall. Serious injury or death can occur in a matter of minutes, particularly if a person’s movement or breathing is restricted or loss of consciousness has occurred.
Need help?
Do you have a question about the LADER002.LHD.90 and is the answer not in the manual?
Questions and answers