Table of Contents
Advertisement
Quick Links
Advertisement
Table of Contents

Related Manuals for HIKVISION DS-AJ7824D

Summary of Contents for HIKVISION DS-AJ7824D
- Page 1 Storage Enclosure Quick Start Guide...
- Page 2 Any and all information, including, among others, wordings, pictures, graphs are the properties of Hangzhou Hikvision Digital Technology Co., Ltd. or its subsidiaries (hereinafter referred to be “Hikvision”). This user manual (hereinafter referred to be “the Manual”) cannot be reproduced, changed, translated, or distributed, partially or wholly, by any means, without the prior written permission of Hikvision.
- Page 3 Storage Enclosure Quick Start Guide Regulatory Information FCC Information Please take attention that changes or modification not expressly approved by the party responsible for compliance could void the user’s authority to operate the equipment. FCC compliance: This equipment has been tested and found to comply with the limits for a Class A digital device, pursuant to part 15 of the FCC Rules.
- Page 4 Storage Enclosure Quick Start Guide Applicable Models This manual is applicable to DS-AJ7824D and DS-AJ7824S.
-
Page 5: Table Of Contents
3.1.2 Rear Panel........................11 3.2 Install Accessories ....................... 13 3.2.1 Installation Requirement ....................13 3.2.2 Install HDD ........................14 Chapter 4 Device Wiring ....................... 17 4.1 DS-AJ7824D ......................... 17 4.2 DS-AJ7824S .......................... 19 Chapter 5 Preventive and Cautionary Tips................20... -
Page 6: Chapter 1 Security And Service
Storage Enclosure Quick Start Guide Chapter 1 Security and Service 1.1 Security Information and Disclaimer In order to ensure the security of user and device, please obey the precautions in the user manual and the symbol in the device during the installation, operation and maintenance. -
Page 7: Security Symbols
Storage Enclosure Quick Start Guide 1.2 Security Symbols Attention Symbol: it represents potential risks. Ignoring the attention may result in device damage, data loss, performance degradation or some unpredictable results. Alarm Symbol: it represents moderate or low grade potential risks. If you cannot avoid, it may result in mild or moderate personal injury. -
Page 8: Chapter 2 Working Environment And Installation
Storage Enclosure Quick Start Guide Chapter 2 Working Environment and Installation Devices described in this manual should be installed in the standard equipment room. 2.1 Environment of Equipment Room 2.1.1 Power Supply System The storage enclosure is sensitive to the change of a voltage, and an excessively high or low voltage, or a sudden change of the voltage may delete the data in the memory or even cause the damage of the components. -
Page 9: Installation And Initial Power-On
Storage Enclosure Quick Start Guide 2.7 m. The loading capability of the rack can be computed in 10 kg/U, e.g., for a 4U chassis, the required loading capability of the rack is 40 kg. Ensure adequate air ventilation of the rack. ... - Page 10 Storage Enclosure Quick Start Guide Step 2 Power on storage enclosure and then power on storage system. Step 3 Press the power switch on front panel. If the unit fails to start up, please check all connections. Step 4 Power off storage system and then power off storage enclosure. You can also reboot the system in the storage system.
-
Page 11: Chapter 3 Hardware Installation
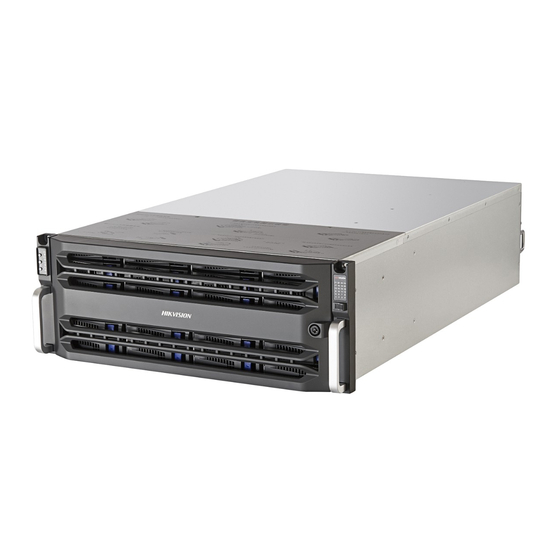
Storage Enclosure Quick Start Guide Chapter 3 Hardware Installation 3.1 Structure Appearance The hardware system adopts rack-mounted chassis which provides LED indicators for the status of power, network and HDD. 3.1.1 Front Panel Figure 3-1 Front Panel with Cover Figure 3-2 Front Panel without Cover Hard diskes of 3.5 inches are supported. -
Page 12: Rear Panel
15 seconds. The indicator shows green when the system is running. : Function button and blue light indicator for locating function. : Mute button and red light alarm indicator for clearing beep alarm sound and indicating system alarm. 3.1.2 Rear Panel Figure 3-4 DS-AJ7824D Rear Panel... - Page 13 Storage Enclosure Quick Start Guide Table 3-1 Panel Description Description Description Power module 1 SAS cable connection indicator Power module 2 Host (Up1) SAS cable connection indicator Host (Up2) Host (Up1) SAS cable connection indicator Host (Up2) SAS cable connection indicator SAS cable connection indicator Exp (Down) SAS cable connection indicator...
-
Page 14: Install Accessories
Storage Enclosure Quick Start Guide Table 3-2 Panel Description Description Description Power module 1 Exp (Down) Power module 2 Network management port SAS cable connection indicator Host (Up1) Fn button Host (Up2) Fn indicator SAS cable connection indicator Power switch SAS cable connection indicator ... -
Page 15: Install Hdd
Storage Enclosure Quick Start Guide Please check the following hardware connection Power cord connection: connect the power cord to 110V~220VAC power supply. Connect the SAS cable to storage system. The default interface is UP1. before installing device, please wear a wrist strap and ensure it is correctly grounded. 3.2.2 Install HDD Select HDD Model It is recommended to adopt the certificated professional HDD models so as to ensure... - Page 16 Storage Enclosure Quick Start Guide Figure 3-6 Split HDD Plate Figure 3-7 HDD Installation Diagram Precautions during HDD Installation When you plug or unplug the hard disks, please take the following precautions: After you have plugged the hard disk to its mounting bracket, please use the provided screws to fix the four edges of the mounting bracket.
- Page 17 Storage Enclosure Quick Start Guide Please avoid frequent plugging/unplugging of the hard disks during the system running so as to maintain long service life of the hard disks. Take regular check and examine of the working status of the hard disks every two months, or configure the system with auto check and examine task.
-
Page 18: Chapter 4 Device Wiring
EXP (Down): Connect EXP (Down) to Host (UP) interface of the lower-level storage enclosure. 4.1 DS-AJ7824D For storage system with STAT HDD, only one storage enclosure can be connected. Connect storage system and storage enclosure with SAS cable. - Page 19 Storage Enclosure Quick Start Guide Figure 4-2 Wiring for SAS Interface...
-
Page 20: Ds-Aj7824S
Storage Enclosure Quick Start Guide 4.2 DS-AJ7824S Figure 4-3 Wiring... -
Page 21: Chapter 5 Preventive And Cautionary Tips
Storage Enclosure Quick Start Guide Chapter 5 Preventive and Cautionary Tips Cut off storage enclosure power supply before plugging or unplugging power cord. When connecting storage system with enclosure, the more HDD the storage enclosure contains, the more time HDD detection takes. ...
Need help?
Do you have a question about the DS-AJ7824D and is the answer not in the manual?
Questions and answers