Advertisement
Quick Links
Operation Manual
Swimming Pool Reel System
61979
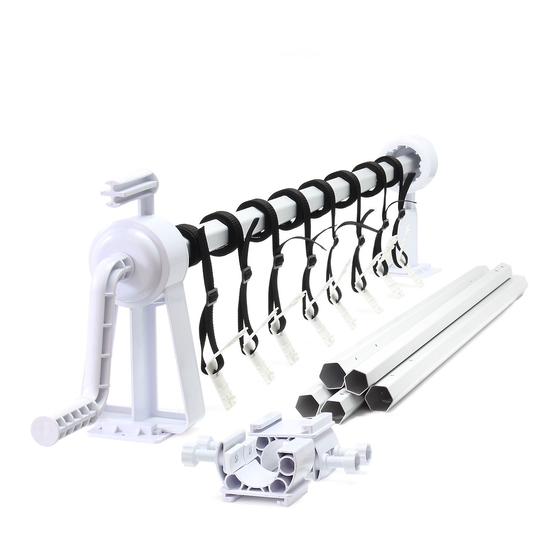
Illustration similar, may vary depending on model
Read and follow the operating instructions and safety information before using for the first time.
Technical changes reserved!
Due to further developments, illustrations, functioning steps and technical data can differ
insignificantly.
Updating the documentation
If you have suggestions for improvement or have found any irregularities, please contact us.
Advertisement

Related Manuals for WilTec 61979

Summary of Contents for WilTec 61979
- Page 1 Operation Manual Swimming Pool Reel System 61979 Illustration similar, may vary depending on model Read and follow the operating instructions and safety information before using for the first time. Technical changes reserved! Due to further developments, illustrations, functioning steps and technical data can differ insignificantly.
- Page 2 The information contained in this document is subject to change without prior notice. No part of this document can be copied or duplicated in another form without the prior written consent of WilTec Wildanger Technik GmbH. The WilTec Wildanger Technik GmbH assumes no liability for any errors in this user manual or the connection diagram.
- Page 3 Screw and nut (N) Cylinder screw (O) Adapter for hexagonal tube (T) Small hexagonal tube (P/ Q) Big hexagonal tube (R) © by WilTec Wildanger Technik GmbH Seite 3 http://www.WilTec.de http://www.aoyue.eu March 2020 Version http://www.teichtip.de...
- Page 4 To measure the length X for pools with an outer skirting, place both the base plates J on the skirting of the pool (without attaching these permanently). Then position A and B on J and measure the distance in between as previously mentioned. © by WilTec Wildanger Technik GmbH Seite 4 http://www.WilTec.de http://www.aoyue.eu...
- Page 5 A and B. To connect the connections between R and P/ Q, fasten three screws of O into the pre-drilled holes of R as shown. A minimum overlapping of 20 cm is required. © by WilTec Wildanger Technik GmbH Seite 5 http://www.WilTec.de http://www.aoyue.eu...
- Page 6 Ensure that the two pre-drilled holes on the tubes of P/ Q and the hole on the axis are facing each other parallelly. The tube then is connected via screw M to the axis of the plug system. © by WilTec Wildanger Technik GmbH Seite 6 http://www.WilTec.de...
- Page 7 If it is required to adjust the length of the tubes, loosen the 3 screws O of R. Then adjust the length and fasten the screw O again. © by WilTec Wildanger Technik GmbH Seite 7 http://www.WilTec.de http://www.aoyue.eu...
- Page 8 If it is required to adjust the length of the tubes, loosen the 3 screws O of R. Then adjust the length and fasten the screw O again. Mount E, G and H as shown in the picture. © by WilTec Wildanger Technik GmbH Seite 8 http://www.WilTec.de http://www.aoyue.eu...
- Page 9 Ensure that the length of the belts enable the cover to lay flat on top of the pool, hindering any wind to get underneath the covering. © by WilTec Wildanger Technik GmbH Seite 9 http://www.WilTec.de http://www.aoyue.eu...
- Page 10 Important notice: The reprint or reproduction, even of excerpts, and any commercial use, even in part of this instructions manual require the written permission of WilTec Wildanger Technik GmbH. © by WilTec Wildanger Technik GmbH Seite 10 http://www.WilTec.de...