Table of Contents
Advertisement
Quick Links
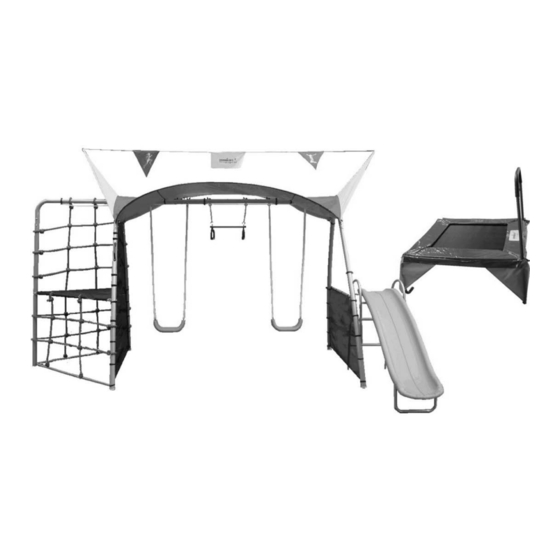
CAUTION: This unit is designed to be used safely by up to 6 children between the ages of 3
years to 8 years old with a maximum weight of 80 pounds (36.3kgs) each, simultaneously,
not to exceed a combined weight of 480 pounds (218kgs).
The specifications of this product may vary from this photo and are subject to change without notice.
IRONMAN, IRONMAN TRIATHLON and M-DOT are registered trademarks of World Triathlon
Corporation. This product is licensed by the IRONMAN TRIATHLON.
FITNESS PLAYGROUND
ITEM NO: 8201
OWNER'S MANUAL
Advertisement
Chapters
Table of Contents

Related Manuals for Ironkids FITNESSPLAYGROUND 8201


Summary of Contents for Ironkids FITNESSPLAYGROUND 8201
- Page 1 FITNESS PLAYGROUND ITEM NO: 8201 OWNER’S MANUAL CAUTION: This unit is designed to be used safely by up to 6 children between the ages of 3 years to 8 years old with a maximum weight of 80 pounds (36.3kgs) each, simultaneously, not to exceed a combined weight of 480 pounds (218kgs).
- Page 2 IMPORTANT: FOR NORTH AMERICA ONLY To request product service and order replacement parts, please call our customer service department at: 1-866-924-1688 Monday through Friday, 8:00 AM-5:00 PM Pacific Standard Time, service@paradigmhw.com or email us at: Please visit our website at www.paradigmhw.com. Please have the following information ready when requesting for service: Your name Phone number...
-
Page 3: Table Of Contents
TABLE OF CONTENTS Warranty -------------------------------------------------------------------------------------------- 3 Important Labels ---------------------------------------------------------------------------------- 4 Important Safety Precautions ------------------------------------------------------------------ 5 Tools Required for Assembly ------------------------------------------------------------------ 6 Included Hardware ------------------------------------------------------------------------------- 7 Parts Numbers and Illustrations -------------------------------------------------------------- 10 Overview Drawing -------------------------------------------------------------------------------- 22 Assembly Instructions --------------------------------------------------------------------------- 23 Ground Anchor Installation -------------------------------------------------------------------- 38 Parts Request Fax Form ----------------------------------------------------------------------- 40... -
Page 4: Warranty
MANUFACTURER’S LIMITED WARRANTY (IRONKIDS FITNESS PLAYGOUND) Paradigm Health & Wellness warrants to the original purchaser that this product is free from defects in material and workmanship when used for the purpose intended, under the conditions that it has be installed and operated in accordance with Paradigm’s Owner’s Manual. -
Page 5: Important Labels
IMPORTANT LABELS... -
Page 6: Important Safety Precautions
IMPORTANT SAFETY PRECAUTIONS Read all instructions carefully before assembling operating this product. Retain this owner’s manual and keep the original purchase receipt for future reference. Before you assemble the Fitness Playground, find level ground not less than 6 feet from any structure or obstruction to the Fitness Playground. -
Page 7: Tools Required For Assembly
CARE AND MAINTENANCE Check all nuts and bolts by monthly during the usage season for tightness and tighten as required. It is particularly important that all nuts and bolts are checked prior to the first use each season. TOOLS REQUIRED FOR ASSEMBLY Please prepare the following tools prior to assemble this equipment. -
Page 8: Included Hardware
INCLUDED HARDWARE Hardware used for main frame assembly (B1) Bolt 5/16”x63 (B4) Curve Washer Ø19 (B5) Nylon Nut 5/16” 6 PCS 6 PCS 8 PCS (B2) Bolt 5/16”x68 2 PCS (B3) Bolt 1/4”x15 (B6) Large Washer Ø19 (B7) Spring Washer Ø10 (B8) Plastic Cap 10 PCS 2 PCS... - Page 9 Hardware used for playground climbing net assembly (F1) Bolt 5/16”x63 (F5) Bolt M4x50mm 4 PCS 18 PCS (F2) Bolt 5/16”x72 4 PCS (F4) Plastic Cap (Flatted Surface) 2 PCS (F3) Bolt 5/16”x68 2 PCS (F8) Plastic Cap (F6) Curve Washer Ø19 (F7) Nylon Nut 5/16”...
- Page 10 Hardware used for trampoline assembly (T10) Bolt 5/16”x63 (T16) Bolt 1/4”x34 2 PCS 2 PCS (T11) Bolt 5/16”x40 (T12) Curve Washer Ø19 (T13) Nylon Nut 1/4” 2 PCS 4 PCS 2 PCS (T14) Nylon Nut 5/16” (T17) Screw 3/16x15 (T18) Spring Washer Ø10 (T19) Spring Washer Ø13 4 PCS 2 PCS...
-
Page 11: Parts Numbers And Illustrations
PARTS NUMBERS AND ILLUSTRATIONS Parts used for main frame assembly Top Bar I 1 PC Top Bar II 1 PC Leg with Foam 1 PC Leg with Foam 1 PC 1 PC Cross Bar 1 PC Protective Net 1 PC Protective Net 1 PC Ground Anchor... - Page 12 Plastic Stick Holder 2 PCS Plastic Stick Holder 2 PCS Plastic Stick Holder 2 PCS Plastic Handle 1 PC Hardware used for main frame assembly Bolt 5/16”x63 6 PCS Bolt 5/16”x68 2 PCS Bolt 1/4”x15 10 PCS Curve Washer Ø19 6 PCS Nylon Nut 5/16”...
- Page 13 Spring Washer Ø10 12 PCS Plastic Cap (Curved Surface) 8 PCS Bolt 1/4”x25 2 PCS Large Washer Ø16 2 PCS Parts used for trapeze assembly Eye Bolt with Attachment Bolt 2 PCS (Preassembled) Eye Bolt with Attachment Bolt 2 PCS (Preassembled) Swing Ring Chain 2 PCS...
- Page 14 Trapeze Ring Tube (Preassembled) 1 PC 2 PCS Plastic End Cap (Preassembled) Hardware used for trapeze assembly Nylon Nut 5/16” 2 PCS Plastic Cap (Curved Surface) 2 PCS Parts used for swings assembly PVC Covered Chain 4 PCS (Preassembled) Eye Bolt with Attachment Bolt 4 PCS (Preassembled) Swing Seat...
- Page 15 Hardware used for swings assembly Nylon Nut 5/16” 8 PCS Large Washer Ø19 4 PCS Plastic Cap (Curved Surface) 4 PCS Parts used for playground climbing net assembly L-Shaped Climbing Net Tube 1 PC Climbing Net Leg 1 PC Climbing Net Supporting Tube 2 PCS Cross Bar 1 PC...
- Page 16 Climbing Net 1 SET Rope 1 PC Rope 1 PC Rope 1 PC Rope 1 PC Rope 1 PC Rope 1 PC Rope 1 PC Rope 1 PC Rope 1 PC...
- Page 17 Hardware used for playground climbing net assembly Bolt 5/16”x63 4 PCS Bolt 5/16”x72 4 PCS Bolt 5/16”x68 2 PCS Plastic Cap (Flatted Surface) 2 PCS Bolt M4x50 32 PCS Curve Washer Ø19 4 PCS Nylon Nut 5/16” 10 PCS Plastic Cap (Curved Surface) 8 PCS Rope Connector 32 PCS...
- Page 18 Parts used for trampoline assembly Jump Mat 1 PC 1 PC Frame Pad 1 PC L-Shaped Tube (Left) L-Shaped Tube (Right) 1 PC Straight tube 1 PC Handlebar with Foam 1 PC 1 PC Handlebar Base Tube (Left) 1 PC Handlebar Base Tube (Right) 1 PC Elbow Tube...
- Page 19 Hardware used for trampoline assembly Bolt 5/16”x63 2 PCS Bolt 5/16”x40 2 PCS Curve Washer Ø19 4 PCS Nylon Nut 1/4” 2 PCS Nylon Nut 5/16” 4 PCS Bolt 1/4”x34 2 PCS Screw 3/16x15 2 PCS Spring Washer Ø10 4 PCS Spring Washer Ø13 4 PCS...
- Page 20 Parts used for slide assembly Slide Support (With Opening) 1 PC Slide Support 1 PC Slide Leg Tube 2 PCS Top Slide Support Bar 1 PC Front Slide Support 1 PC Slide Ladder 2 PCS Slide 1 PC Connecting Bar 1 PC...
- Page 21 Hardware used for slide assembly Plastic Bushing 2 PCS Bolt 1/4”x38 6 PCS Bolt 1/4”x45 2 PCS Bolt M6x40 2 PCS Spring Washer Ø13 4 PCS Nylon Nut 1/4” 4 PCS Cap Bolt 1/4”x14 4 PCS Spring Washer Ø10 20 PCS Bolt 1/4”x75 2 PCS Bolt M6x45...
- Page 22 Parts used for shade assembly Sunshade 1 PC Short Plastic Stick 2 PCS Long Plastic Stick 2 PCS Logo 1 PC...
-
Page 23: Overview Drawing
OVERVIEW DRAWING... -
Page 24: Assembly Instructions
ASSEMBLY INSTRUCTIONS Place the playground equipment on level ground, not less than 6 feet (1.8 meters) from any structure or obstruction such as a fence, garage, house, overhanging branches, laundry lines, or electrical wires. Do not install the playground equipment over concrete, asphalt, packed earth, or any other hard surface. - Page 25 Concave hole Round hole faces down faces up NOTE: Do not over-tight the nuts and bolts. Do not snap the plastic cap on until you have completed the rest of the assembly and have tightened the nuts and bolts. Step 1 ...
- Page 26 Step 2 Insert the small ends of A3 and A3A into the sockets at end of A1. Align the holes and secure using B1, B4, B8, and B5. Attach A5 onto the A3 and A3A with B2, B6, B8, and B5. ...
- Page 27 Step 4 Insert the small end of D2 into the socket at end of D1. Align the holes and secure using F1, F6, F8, and F7. Insert the small end of D1 into the socket at end of A2. ...
- Page 28 Step 6 Install F9 onto each end of ropes as shown in detailed drawing. Then attach each end of ropes onto D1, D2, D3, A4, A4A, and D5 with F5. Tighten F5 to secure the climbing net in place.
- Page 29 Step 7 Attach A7 onto A3, A3A, and A5 with Velcro straps. ․․ ․ ․ ․ ․ ․ ․ ․ ․ ․ ․ ․ ․ ․ ․ ․ ․ ․ ․ ․ ․ ․ ․ ․ ․ ․ ․ ․ ․ ․ ․ ․ ․ ․ ․ ․ ․ ․ ․ ․ ․ ․ ․ ․ ․ ․ ․ ․ ․ ․ ․ ․ Step 8 ...
- Page 30 Step 9 Insert J2 into holes on A1 and A2. Secure with four J6 and four J8. ․․ ․ ․ ․ ․ ․ ․ ․ ․ ․ ․ ․ ․ ․ ․ ․ ․ ․ ․ ․ ․ ․ ․ ․ ․ ․ ․ ․ ․ ․ ․ ․ ․ ․ ․ ․ ․ ․ ․ ․ ․ ․ ․ ․ ․ ․ ․ ․ ․ ․ ․ ․ Step 10 ...
- Page 31 Step 11 Attach E1 to A1. Secure using two S1 and S2. Install E3 to E1 if not pre-assembled. Install E3 to E2 if not pre-assembled. ․․ ․ ․ ․ ․ ․ ․ ․ ․ ․ ․ ․ ․ ․ ․ ․ ․ ․ ․ ․ ․ ․ ․ ․ ․ ․ ․ ․ ․ ․ ․ ․ ․ ․ ․ ․ ․ ․ ․ ․ ․ ․ ․ ․ ․ ․ ․ ․ ․ ․ ․ ․ Step 12 ...
- Page 32 Step 13 Put T7A to the outside of T4A, and put T7B to the outside of T4B, align the holes. Secure using T10, T12, T19, and T14 for the upper hole of T7A and T7B. Secure using T11, T12, T19, and T14 for the lower hole of T7A and T7B. Note: The T10’s are longer than the T11’s.
- Page 33 Step 15 Insert two corners of T3 which have yellow banners to the small end of T7A and T7B. Lay the Frame Pad (T3) over the trampoline, so that the springs and the steel frame are covered. Please ensure that the Frame Pad covers all metal parts well. ․․...
- Page 34 Step 17 Bring one end of the strap on T3 which is nearest to the jumping mat T2, then tie the strap to the triangle ring with a knot as shown in detailed drawing A. Repeat it for the other straps near the T2 in the same way.
- Page 35 Position for Playground 1. Do not place the trampoline in front or back of the swing set to avoid injuries from collisions. 2. Only place the trampoline at the side of swing set and keep at least 6 feet of distance between them.
- Page 36 Bolt hole faces up Step 18 Attach X5 to Y2. Secure using four Z9 and four Z7. Attach X4 to Y2. Secure using two Z3 and two Z7. Note: Make sure that the bolt holes face up. ․․...
- Page 37 Step 20 Attach X4 onto X1 and X2. Secure using two Z2, two Z7, two Z4, and two Z6. ․․ ․ ․ ․ ․ ․ ․ ․ ․ ․ ․ ․ ․ ․ ․ ․ ․ ․ ․ ․ ․ ․ ․ ․ ․ ․ ․ ․ ․ ․ ․ ․ ․ ․ ․ ․ ․ ․ ․ ․ ․ ․ ․ ․ ․ ․ ․ ․ ․ ․ ․ ․ Step 21 ...
- Page 38 Step 22 Insert H3 into the holes on H1. Insert H2 into the holes on H1. ․․ ․ ․ ․ ․ ․ ․ ․ ․ ․ ․ ․ ․ ․ ․ ․ ․ ․ ․ ․ ․ ․ ․ ․ ․ ․ ․ ․ ․ ․ ․ ․ ․ ․ ․ ․ ․ ․ ․ ․ ․ ․ ․ ․ ․ ․ ․ ․ ․ ․ ․ ․ Step 23 ...
-
Page 39: Ground Anchor Installation
GROUND ANCHOR INSTALLATION You may either anchor the feet of the frame in hard soil or if your soil is soft (sand, etc.), you may use the corkscrew (A8) anchor to secure the playground. If you wish to permanently secure your swing set, setting the legs in concrete secured by a brick or gravel bed is recommended. - Page 40 For Concrete Ground Installation: If the swing set is set up on grounds with sandy soil condition, it must be anchored with concrete footing (concrete not included). Dig holes around swing leg tube as shown below in drawing. As you dig down and create a cylindrical hole, you should use a shovel to carve out the lower part of the hole, to create a larger diameter hole at the bottom.
-
Page 41: Parts Request Fax Form
IRONKIDS PARTS REQUEST FAX FORM Please fax this form to (1-626-810-2166) OR YOU CAN EMAIL CUSTOMER SERVICE REQUESTS TO service@paradigmhw.com NAME: _____________________________________________________________________ ADDRESS: _________________________________________________________________ CITY ________________ STATE __________________ ZIP ________________ TELEPHONE: (Day) __________________________________________________________ (Night) _________________________________________________________ (Email Address) _________________________________________________ SERIAL#: ______________________________________________________... - Page 42 PLAYGROUND MIST ITEM NO: 8901 Mist hose can be used on IronKids playgrounds or other swing sets. OWNER’S MANUAL The specifications of this product may vary from this photo and are subject to change without notice. IRONMAN, IRONMAN TRIATHLON and M-DOT are registered trademarks of World Triathlon...
- Page 43 IMPORTANT: FOR NORTH AMERICA ONLY To request product service and order replacement parts, please call our customer service department at: 1-866-924-1688 Monday through Friday, 8:00 AM-5:00 PM Pacific Standard Time, service@paradigmhw.com or email us at: Please visit our website at www.paradigmhw.com. Please have the following information ready when requesting for service: Your name Phone number...
- Page 44 TABLE OF CONTENTS Warranty -------------------------------------------------------------------------------------------- 3 Important Safety Precautions ------------------------------------------------------------------ 4 Tool Required for Assembly -------------------------------------------------------------------- 4 Package Contents -------------------------------------------------------------------------------- 5 Assembly Instructions --------------------------------------------------------------------------- 6 Parts Request Fax Form ------------------------------------------------------------------------ 7...
-
Page 45: Warranty
MANUFACTURER’S LIMITED WARRANTY (IRONKIDS FITNESS PLAYGOUND) Paradigm Health & Wellness warrants to the original purchaser that this product is free from defects in material and workmanship when used for the purpose intended, under the conditions that it has be installed and operated in accordance with Paradigm’s Owner’s Manual. -
Page 46: Important Safety Precautions
IMPORTANT SAFETY PRECAUTIONS Read all instructions carefully before assembling operating this product. Retain this owner’s manual and keep the original purchase receipt for future reference. To prevent serious injury, do not allow children to play the Playground Mist Hose until it is completely installed. -
Page 47: Package Contents
PACKAGE CONTENTS Mist Hose 1 PC Mist Hose Nozzle with On/Off 1 PC Switch Mist Holder 4 PCS Bolt 4 PCS Velcro Strap 3 PCS... -
Page 48: Assembly Instructions
ASSEMBLY INSTRUCTIONS Route the Mist Hose (A) as illustrated. 1. Install one Mist Holder (C) onto the left end of the mist spout on the Mist Hose (A). Then attach the Mist Holder (C) with Mist Hose (A) onto the top bar of the climbing net with one Bolt (D) as showed in detailed drawing. -
Page 49: Parts Request Fax Form
IRONKIDS PARTS REQUEST FAX FORM Please fax this form to (1-626-810-2166) OR YOU CAN EMAIL CUSTOMER SERVICE REQUESTS TO service@paradigmhw.com NAME: _____________________________________________________________________ ADDRESS: _________________________________________________________________ CITY ________________ STATE __________________ ZIP ________________ TELEPHONE: (Day) __________________________________________________________ (Night) _________________________________________________________ (Email Address) _________________________________________________ SERIAL#: ______________________________________________________...
Need help?
Do you have a question about the FITNESSPLAYGROUND 8201 and is the answer not in the manual?
Questions and answers