Table of Contents
Advertisement
Quick Links
Advertisement
Table of Contents

Related Manuals for Steren SmartBot K-720


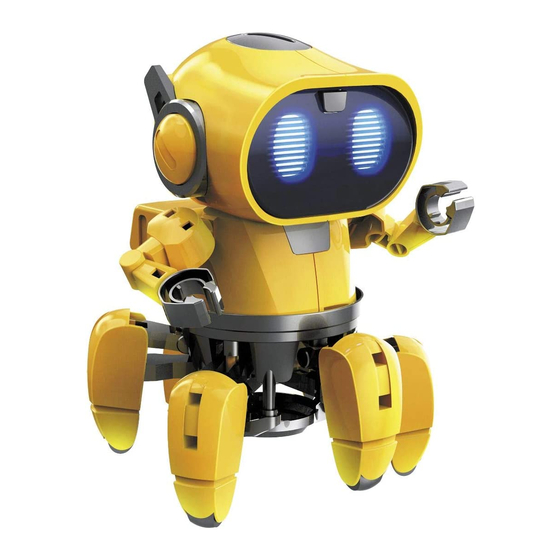
Summary of Contents for Steren SmartBot K-720
- Page 1 Manual de instrucciones V0.1/0418v...
- Page 2 La información presentada sirve únicamente como referencia sobre el producto. Consulte nuestra página web www.steren.com para obtener la versión más reciente de este manual. PRECAUCIONES • Se recomienda el uso de este producto para niños mayores de 10 años, bajo la supervisión de un adulto.
- Page 3 Engrane 40/10T (rosa) Engrane 10T (naranja) Tornillos de rosca Cant.) Cant.) Cant.) Tornillos de rosca Eje (corto) Eje (largo) Cant.) Cant. Cant. (1:1) (1:1) Monitor con conector Monitor con conector Cant.) Cant.) Azul Rojo Negro) Negro) Compartimento para baterías Circuito electrónico Cant.) Cant.) 6 V - - - CD...
- Page 4 PARTES PLÁSTICAS Corte las piezas cuando las vaya a utilizar, no las corte previamente. 15 16 17 19 Corte de manera uniforme y retire todas las rebabas antes de ensamblar. Rebaba Rebaba Rebaba...
- Page 5 ENSAMBLAJE DEL CUERPO P11x3 Azul Negro (corto) (naranja) (blanco) (naranja) Azul Negro (rosa)
- Page 6 P9x3...
- Page 7 Ajuste los tornillos P10 hasta el fondo REMUEVA Importante: sólo retire la pieza A15 cuando haya concluido estos pasos...
- Page 8 Rojo Negro (largo) (blanco) (verde) VISTA LATERAL (largo) (gris) (azul) (naranja) P5 (blanco) P2 (gris) P4 (verde) P3 (azul) P8 (naranja)
- Page 9 P9x3...
- Page 10 Importante: sólo retire la pieza A15 cuando haya concluido estos pasos P9x4...
- Page 11 ENSAMBLAJE DE LA CABEZA CUERPO D2&D3 D2&D3 ¡Importante! Está en la hoja de calcomanías Pegue la calcomanía P17 desde la esquina de A10...
- Page 12 P9x2 Atornille P9 como se muestra en la imagen Corte todas las rebabas antes de ensamblar Rebaba Rebaba...
- Page 13 Negro Azul Negro Rojo Presione hacia abajo los cables...
- Page 14 AAA(x4)
- Page 16 VISTA LATERAL...
- Page 17 Vista derecha Vista izquierda...
- Page 18 A18x2 Asegúrese de escuchar un clic cuando ensamble las piezas A18 Click Click Vista superior...
- Page 19 No mezcle A1 con Presione Vista superior Vista superior...
- Page 20 Presione Presione...
- Page 21 Vista superior Vista superior...
- Page 22 Asegúrese de colocar la pieza A19 en la dirección correcta Asegúrese de colocar la pieza A17 en la dirección correcta...
- Page 23 No mezcle A1 con A2 A1+B1 A2+B15 A2+B15 A1+B1 A1+B1 A2+B15...
- Page 24 P9x2 P9x2 P9x2...
- Page 25 ENSAMBLAJE DE EXTREMIDADES...
- Page 26 Brazo derecho Rebaba Corte todas las rebabas antes de ensamblar Brazo derecho Brazo izquierdo Brazo izquierdo Rebaba Corte todas las rebabas antes de ensamblar...
- Page 27 ¡Listo! CÓMO REEMPLAZAR LAS BATERÍAS Retire Retire REMOVE Baterías “AAA” x 4...
- Page 28 MODO DE USO Encienda el robot Mantenga pulsado el botón durante 2 segundos. Los ojos del robot se iluminarán y emitirá efectos de sonido. El robot entrará en modo de espera. Seleccione el modo de juego Presione una sola vez el botón. El LED izquierdo encenderá ►Modo de juego 1 Presione otra vez el botón.
- Page 29 MODO Sígueme MODO Explorador...
- Page 30 Apague el robot Mantenga presionado el botón durante 3 segundos. Los ojos del robot se iluminarán y emitirá efectos de sonido, después se apagará. ¡Precaución! No manipule el robot con fuerza excesiva; podría causar daños a los circuitos internos o desprendi- miento de partes.
- Page 31 PROBLEMAS Y SOLUCIONES 1. Asegúrese de que as baterías están bien colocadas y con la polaridad correcta. 2. Si al presionar el botón de encendido/apagado las luces LED no destellan y el robot no hace nada, asegúrese de que los tornillos estén atornillados hasta el fondo (página 12). 3.
- Page 32 ESPECIFICACIONES Entrada: 6 V - - - (4 x AAA)
- Page 34 User Manual V0.1/0418v...
- Page 35 Before to use the product, please read carefully this manual to avoid any malfunction. The info in this manual is shown as reference. Consult our website www.steren.com to obtain the current version of this manual. CAUTIONS • It’s recommendable the use of this product to kids older than 10 years, under the adult super- vision.
- Page 36 Gear 40/10T (Pink) Gear 10T (Orange) Tapping Screw QTY) QTY) QTY) Tapping Screw Shaft ( Short ) Shaft ( Long ) QTY) (1:1) (1:1) Motor With Connector Motor With Connector QTY) QTY) Blue Black) Black) Battery Holder With Connector PC Board QTY) QTY) DC 6V - - -...
- Page 37 PLASTIC PARTS Cut the plastic parts when they are required. Do not cut them in advance. 15 16 17 19 Cut off the burrs before assembly Burr Burr Burr...
- Page 38 BODY ASSEMBLY P11x3 Blue Black (short) (orange) (white) (orange) Blue Black (pink)
- Page 39 P9x3...
- Page 40 Fasten P10 to the bottom. REMOVE Important:Only remove A15 after above steps are finished.
- Page 41 Black (long) (white) (green) SIDE VIEW (long) (gray) (blue) (orange) P5 (white) P2 (gray) P4 (green) P3 (blue) P8 (orange)
- Page 42 P9x3...
- Page 43 Important:Only remove A15 after above steps are finished. P9x4...
- Page 44 HEAD ASSEMBLY BODY D2&D3 D2&D3 ¡Important! Is on a white sticker plate Paste the P17 sticker from the corner of A10...
- Page 45 P9x2 Fasten P9 as shown in the image Cut off the burrs before assembly. Burr Burr...
- Page 46 Black Blue Black Push down the wires...
- Page 47 AAA(x4)
- Page 49 SIDE VIEW...
- Page 50 Right View Left View...
- Page 51 A18x2 Ensure that listen a click when assembly Click Click Top view...
- Page 52 Don’t mix A1 with Push Push Top view Top view...
- Page 53 Push Push...
- Page 54 Top view Top view...
- Page 55 Ensure to place the A19 in the right position Ensure to place the A17 in the right position...
- Page 56 Don’t A1 with A2 A1+B1 A2+B15 A2+B15 A1+B1 A1+B1 A2+B15...
- Page 57 P9x2 P9x2 P9x2...
- Page 58 FEET AND ARMS ASSEMBLY...
- Page 59 Right arm Burr Cut off the burrs before assembly Right arm Left arm Left arm Burr Cut off the burrs before assembly...
- Page 60 Ready! HOW TO REPLACE BATTERIES Remove Remove REMOVE “AAA” batteries x 4...
- Page 61 HOW TO PLAY Turn on the robot Press and hold the button for 2 seconds. The robot’s eyes will flashing and will emit sound effects. The robot will enter to stand by mode. Select a play mode Press once the button. The left LED will light ►Play mode 1 Press again the button.
- Page 62 MODE Follow me MODE Explorer...
- Page 63 Turn off the robot Press and hold the button for 3 seconds. The robot’s eyes will flashing and will emit sound effects. Then, the robot will turn off. Caution! Don’t manipulate with excessive force, may cause damage in the internal circuits or detachment of parts.
- Page 64 TROUBLESHOOTING 1. Ensure batteries are placed in correct polarity. 2. If when you press the 0n/off button the LED lights do not flashing and the robot is not work, ensure that the screws are fastened until bottom (refer to p.45). 3.
- Page 65 SPECIFICATIONS Input: 6 V - - - (4 x AAA)
Need help?
Do you have a question about the SmartBot K-720 and is the answer not in the manual?
Questions and answers