MADRIX STELLA Quick Start Manual & Technical Manual
Usb 2.0 dmx512 interface
Hide thumbs
Also See for STELLA:
- User manual (115 pages) ,
- Quick start manual & technical manual (29 pages) ,
- Technical manual & quick start manual (29 pages)
Table of Contents
Advertisement
Quick Links
Advertisement
Table of Contents

Subscribe to Our Youtube Channel
Related Manuals for MADRIX STELLA


Summary of Contents for MADRIX STELLA
- Page 1 STELLA Art-Net Node / USB 2.0 DMX512 Interface...
- Page 2 Please read this guide carefully and thoroughly before using MADRIX ® STELLA. Make sure that you fully understand all information. This MADRIX STELLA Quick Start Guide is written in English and German. ® Developed and made in Germany. Imprint inoage GmbH Wiener Straße 56...
-
Page 3: Trademark Credits
2x Wall-mount brackets 1x Quick start guide and USB drivers (software license not included) 1x CD-ROM incl. MADRIX ® Please note: Check the package contents and the condition of the interface after unpacking! Contact your supplier if something is missing or damaged. Do... - Page 4 Safety Instructions And Limited Warranty Two years of limited manufacturer’s warranty are granted to the purchaser of this product. Warranty applies to constructional fault, material defect, or incorrect assembly the manufacturer has caused or is to be held responsible for. Warranty will be void if the interface is opened, modified, damaged through inappropriate handling and wrong usage, damaged through electric current (electricity), or damaged through any other cause.
-
Page 5: Technical Specifications
End-Of-Life This electrical device and its accessories need to be disposed of properly. Do not throw the device into normal trash or household waste. Please recycle packaging material whenever possible. Usage In general, this device is designed to be operated as a hardware control interface to be connected towards various types of controllable lights / lighting controllers via DMX512 (USB to DMX) or Art-Net (DMX over Ethernet). -
Page 6: Supported Operating Systems
(See page 11 to reset the device to the default IP address if needed.) Using Any 3rd-Party Controller Via Art-Net MADRIX STELLA is a standard Art-Net node. Because of this, you can use the ® device with any application, console, or controller that supports Art-Net. - Page 7 ‘Browse...’ to choose a location and then click ‘Install’. The installation process may take a few minutes. Sixth, when the ‘Installation Complete’ window appears, click ‘Next >’. Seventh, uncheck ‘Run MADRIX’ and then click ‘Finish’ to complete the installation process.
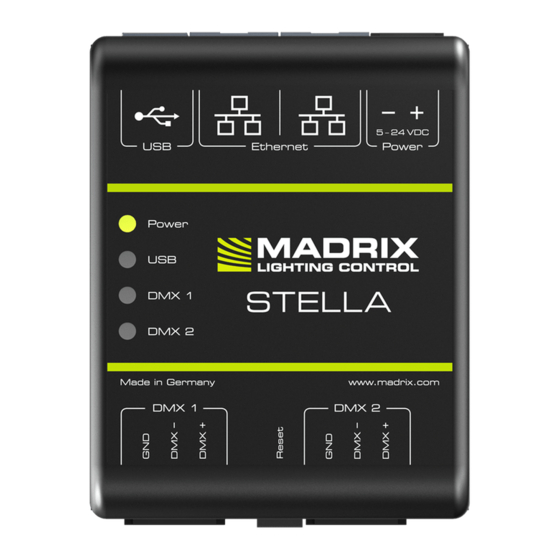
- Page 8 Connectivity 1) Power 2) RJ45 Ethernet port, incl. 2 status LEDs 3) USB port 4) Status LED for Power 5) Status LED for USB 6) Status LED for DMX 1 7) Status LED for DMX 2 8) DMX 1 9) Reset button 10) DIN-rail unlocking clip 11) DMX 2 Please note:...
- Page 9 Or connect the provided USB power supply. Step 4) Connect to USB or to Ethernet network for data as required. Step 5) Do not switch on your supply of power until all required power cables and DMX fixtures are connected to MADRIX STELLA. ®...
- Page 10 Connection Diagram Variations Variation A Variation B Variation C Variation D...
-
Page 11: Device Configuration
Step 2) Assign correct network settings in the Windows operating system. (Recommended default settings: IP address 10.0.0.1 and Subnet mask 255.0.0.0) Step 3) Open your web browser and enter the IP address of MADRIX STELLA. ® (You can find the default IP address on the side of the device.) Step 4) The web configuration interface will be launched. -
Page 12: Reset To Factory Default Settings
Description Of Status LED Codes STATUS POWER Powered off Power not connected. The device has no power. Permanently green Connected to power. The power is on. Blinking green Bootloader activated. Reset the device (see below). STATUS Powered off USB not connected. Communicating over USB. - Page 13 STELLA into operation by connecting the DMX fixtures ® and supplying power; as described above. Step 2) Connect MADRIX STELLA to a free USB 2.0 port of your computer ® using the provided USB cable. Step 3) Start MADRIX and configure your virtual LED matrix using ®...
-
Page 14: How To Update The Firmware
STELLA into operation by connecting the LEDs and ® supplying power; as described above. Step 2) Connect STELLA to your computer using Ethernet network cabling. Step 3) Assign correct network settings in the Windows operating system. (Recommended default settings: IP address 10.0.0.1 and Subnet mask 255.0.0.0) -
Page 15: Fcc Declaration Of Conformity
STELLA is ® provided in the MADRIX Help And Manual. You can access this user manual ® by pressing ‘F1’ on your keyboard while using the MADRIX software, by ® navigating to the menu ‘Help’ ‘User Manual…’, or online at help.madrix.com...
Need help?
Do you have a question about the STELLA and is the answer not in the manual?
Questions and answers