Table of Contents
Advertisement
Quick Links
RF TopGun user manual
1.TopGun packaging list
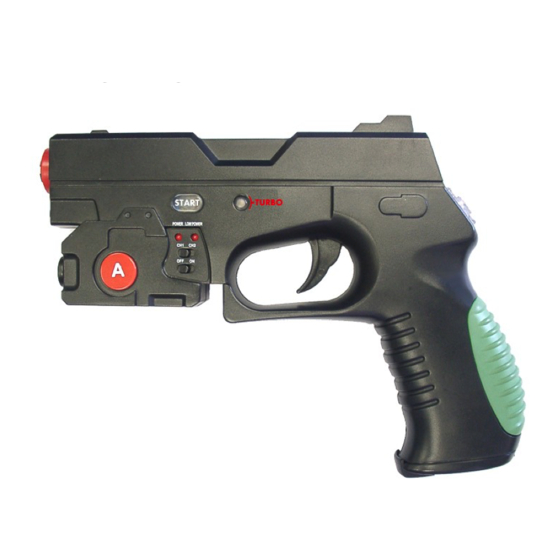
1.1 RF TopGun
1.3 LED stand A
(with infrared LEDs on
top and at bottom)
LED stand B
(with infrared LEDs on
top and in the middle)
1.4 LED stand hooks
1.6 Double sided tape
2.TopGun buttons list
1. A (B at the back)
2. C
3. D
4. START
(SELECT at the back)
5. TURBO
(AUTO RELOAD at the back)
6. D-pad
7. CH1 / CH2
8. Power switch (ON/OFF)
1.2 PC driver CD
1.5 USB power cable
1.7 RF receiver
Advertisement
Table of Contents

Summary of Contents for EMS RF TopGun
- Page 1 RF TopGun user manual 1.TopGun packaging list 1.1 RF TopGun 1.2 PC driver CD 1.3 LED stand A (with infrared LEDs on top and at bottom) LED stand B (with infrared LEDs on top and in the middle) 1.4 LED stand hooks 1.5 USB power cable...
- Page 2 3.Mount the LED stands 3.1 Mount the two LED stand hooks onto the LED stand A and B. Please refer to the guide below for details: 3.1.1 Mount the hooks on top of the LED stands 3.1.2 Finished diagram Either mount the LED stands beside the screen as shown in figure 1, refer to 3.2.1, or mount the LED stands above and below the screen as shown in figure 2, refer to 3.2.2.
- Page 3 4.TopGun & RF receiver Installation 4.1 Set the channel of the RF receiver to either 1 or 2 (refer to the picture below), and set the TopGun to the corresponding channel. 4.2 For PS2™/PS3™, please turn ON the console and load a "GunCon2™ compatible" game first. When the game demo screen appear, plug in RF receiver.
- Page 4 5.2.3 Plug the RF receiver to PC and then turn ON the switch (ON/OFF) of the TopGun. 5.2.4 It would find the "HID mini driver for EMS TopGun", hardware installation wizard would pop up. Please let it search for the most suitable driver automatically from the directory where the file is decompressed.
- Page 5 6.2 TopGun Calibration procedures 6.2.1 Make sure the blue LED in the D-Pad lights when you aim at all corners of the screen. If the blue LED flashes, there should be some interruption sources beside/behind where you are aiming at. If it doesn't light, the gun may be too close to the screen.
- Page 6 To solve this problem, a cloth could be placed on those smooth surfaces to prevent reflection. 8.3 For PS2™/PS3™, only GunCon2™ compatible games are supported. 8.4 TopGun supports those PS2™ compatible PS3™ consoles. For any questions, please contact us. Email : sales@hkems.com EMS Production Ltd. www.hkems.com...
Need help?
Do you have a question about the RF TopGun and is the answer not in the manual?
Questions and answers