
Subscribe to Our Youtube Channel
Related Manuals for Wexxar BEL 290


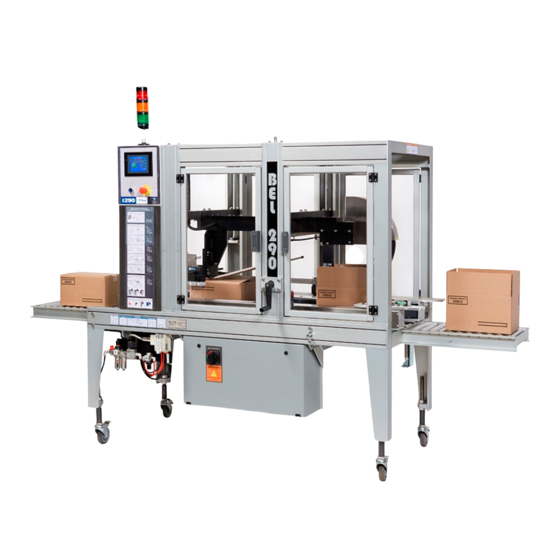
Summary of Contents for Wexxar BEL 290
- Page 1 & S PERATION ERVICE ANUAL 65-35-1 Effective February 26, 2010 BEL 290 ULLY UTOMATIC OP AND OTTOM EALER Wexxar Packaging Inc. Phone (604) 930-9300 • Fax (604) 930-9368 E-mail: sales@wexxar.com Rev 1.1...
- Page 2 B E L 2 9 0 F U L L Y U T O M A T I C A S E A P E E A L E R SAFETY CAUTION Ensure that the machine is disconnected from air and power supplies before undertaking any maintenance or service procedures.
-
Page 3: Table Of Contents
U L L Y U T O M A T I C A S E A P E E A L E R ABLE OF ONTENTS INSTALLING THE BEL 290 .............................4 ............................4 EVELING THE ACHINE ..........................5 NSTALLING THE EADS .............................5... -
Page 4: Installing The Bel 290
Case Width Crank (not shown here) BEL 290 fully automatic top and bottom taper Installing the BEL 290 1. Remove the through-bolts that secure the machine to the shipping base. 2. If possible, use a forklift to move machine off its base, with wooden blocks between the forks and the frame. -
Page 5: Installing The Tape Heads
Compressed Air The BEL 290 requires an air supply, which must be clean and dry, with a PSI between 80 and 120 and an optimal pressure of 90 PSI. The kicker regulator must always be set at 70 PSI. The volume of air required for the BEL 290 is rated at 0.1 C.F./cycle at 90 PSI. -
Page 6: Machine Adjustments
Safety: Disconnect machine electrics and compressed air before making any machine adjustments. There are only two main, quick adjustments required in setting up the BEL 290 to run a particular case size: Case width adjustment ‘D’- Use the hand crank on the side of the bottom frame to move side-belt conveyors in and out to fit the width of the case. -
Page 7: Case Height Adjustment
B E L 2 9 0 F U L L Y U T O M A T I C A S E A P E E A L E R EIGHT DJUSTMENT Case Dimension ‘H’ Adjustment Use the case height crank and scale on the side of the arch to adjust the case height to Dimension ‘H’. -
Page 8: Case Width Adjustment
B E L 2 9 0 F U L L Y U T O M A T I C A S E A P E E A L E R IDTH DJUSTMENT Case Dimension ‘D1’ (Conveyor Adjustment) Use the case width crank and the scale at the front of the conveyor to set Dimension ‘D1’. The case width crank can be connected to the case width leadscrew on either side of the machine frame. -
Page 9: Case Dimension 'D2' (Major Flap-Folding Rods)
B E L 2 9 0 F U L L Y U T O M A T I C A S E A P E E A L E R Case Dimension ‘D2’ (Major Flap-folding Rods) If necessary, loosen the bolts that lock the top major flap folding rods in position and adjust their position so that they capture the top case flaps and fold them down ahead of the top tape head as the case passes under them. -
Page 10: Case Dimension 'D3' (Case Side Compression)
B E L 2 9 0 F U L L Y U T O M A T I C A S E A P E E A L E R Case Dimension ‘D3’ (Case Side Compression) Adjust the side-compression rollers to control the tendency of the upper sides of the case to expand due to incorrect top flap folding and perhaps case overfilling. -
Page 11: Top Ski Flap Width Adjustment 'G
B E L 2 9 0 F U L L Y U T O M A T I C A S E A P E E A L E R ‘G’ IDTH DJUSTMENT The top ski, used to fold down the front minor flap, is mounted on a slotted bracket that permits the ski to be adjusted towards or away from the machine infeed. -
Page 12: Starting The Machine
B E L 2 9 0 F U L L Y U T O M A T I C A S E A P E E A L E R Starting the Machine OMPRESSED There is a manual air ‘ON/OFF’ valve located where the air supply is connected to the machine at the filter-regulator unit and it must be in the ON position to supply air to the machine circuit. -
Page 13: Electrical Switching
To carry out service or repair work safely on the machine, the manual air ‘ON/OFF’ valve is located on all WEXXAR machines upstream of the filter-regulator unit. Padlock this valve in the OFF position for absolute safety during service work. -
Page 14: Controls
‘pushbuttons’ displayed on the screen. It also provides instructions related to machine operation. This section lists the standard controls on a BEL 290. Actual control functions may vary depending on options installed on your machine. Pay special attention to the location of the ‘EMERGENCY STOP’... - Page 15 B E L 2 9 0 F U L L Y U T O M A T I C A S E A P E E A L E R 28) ‘PLC INPUTS’ Button In the center-left side of the ‘Troubleshooting’ screen is the ‘PLC INPUTS’...
- Page 16 B E L 2 9 0 F U L L Y U T O M A T I C A S E A P E E A L E R 30) ‘PLC OUTPUTS’ Button In the center-right side of the ‘Troubleshooting’ screen is the ‘PLC OUTPUTS’...
-
Page 17: Feeding Cases Into The Machine
FPM or less is recommended. TOP GATE PTION Stop gate shown in the up or closed position The BEL 290 can be equipped with an optional timed stop gate that separates the cases as they enter into the machine. 65-35-1 02/26/10... -
Page 18: Service And Maintenance Procedures
QUIPMENT AFETY The BEL 290 has safety features to prevent you from injury while maintenance is in progress. Sliding and bi-folding guard doors, equipped with interlock switches, are in place to prevent you from entering the work cell while the case forming is in progress; the machine will not run if these doors are open. -
Page 19: Preventive Maintenance
B E L 2 9 0 F U L L Y U T O M A T I C A S E A P E E A L E R REVENTIVE AINTENANCE A regular program of preventative maintenance will help to avoid unnecessary downtime due to premature component failures. - Page 20 B E L 2 9 0 F U L L Y U T O M A T I C A S E A P E E A L E R Daily Inspection Inspect all pneumatic motions for smooth action and belt wear. As the machine processes a case, listen for air leakage or other abnormal noises.
-
Page 21: Weekly Inspection
B E L 2 9 0 F U L L Y U T O M A T I C A S E A P E E A L E R Maintenance and Cleaning Cleaning Remove any corrugated fragment deposits that have accumulated. Check the pneumatic filter bowl filter for debris. -
Page 22: Side - Belt Conveyor System
B E L 2 9 0 F U L L Y U T O M A T I C A S E A P E E A L E R BELT ONVEYOR YSTEM The side-belt conveyor is designed to keep the case square during sealing, which results in a technically stronger seal and a better-finished appearance. -
Page 23: Chain Drive Tension
B E L 2 9 0 F U L L Y U T O M A T I C A S E A P E E A L E R Chain Drive Tension Chain tension is preset at the factory, but if adjustment is needed, tighten the idler sprocket, as shown in the preceding illustration. -
Page 24: Side-Belt Replacement
B E L 2 9 0 F U L L Y U T O M A T I C A S E A P E E A L E R Side-belt Replacement The belts are replaced by removing the top cover assemblies from each side unit. recommend replacing both belts at the same time. - Page 25 B E L 2 9 0 F U L L Y U T O M A T I C A S E A P E E A L E R 4. Remove the stainless steel cover guard. 5. Remove the belt and replace it with a new one. Finger-splice belts can move in either direction.
- Page 26 B E L 2 9 0 F U L L Y U T O M A T I C A S E A P E E A L E R Adjust belt tension & tracking with top and bottom adjusting screws.
-
Page 27: Troubleshooting Guide
B E L 2 9 0 F U L L Y U T O M A T I C A S E A P E E A L E R Troubleshooting Guide 1 - C & S ECTION ORRUGATED UALITY PECIFICATIONS Corrugated case quality is a major factor in smooth running and quality sealing. -
Page 28: Section 2 - Conveyor Belt System
B E L 2 9 0 F U L L Y U T O M A T I C A S E A P E E A L E R 2 - C ECTION ONVEYOR YSTEM The side-belt conveyor system is designed to keep the case square during sealing, resulting in a technically stronger seal and a better finished appearance. - Page 29 B E L 2 9 0 F U L L Y U T O M A T I C A S E A P E E A L E R • Belt tracking. Ensure that the idler pulley has its camber set so that the belt does not try to ride up or down on the pulleys.
-
Page 30: Section 3 - General Taping Conditions
B E L 2 9 0 F U L L Y U T O M A T I C A S E A P E E A L E R 3 - G ECTION ENERAL APING ONDITIONS Problem: Tape Does Not Stick To Case Surface. The tape is not bonding to the corrugated board of the flaps or ends of the case to provide a secure seal. -
Page 31: Section 4 - Case Infeed
B E L 2 9 0 F U L L Y U T O M A T I C A S E A P E E A L E R Problem: Tape is off-center. The line of tape is not centered over the gap between flaps on the top or bottom of the case. Look for the following conditions: •... -
Page 32: Machine Controls
ACHINE ONTROLS For controls troubleshooting, see the ‘TROUBLESHOOTING’ button and the ‘Troubleshooting’ screen in the Controls section of the manual. For additional assistance, contact us at: Wexxar Packaging Inc. Phone (604) 930-9300, Fax 604-930-9368 E-mail: sales@wexxar.com 65-35-1 02/26/10...
Need help?
Do you have a question about the BEL 290 and is the answer not in the manual?
Questions and answers