GUTMANN NIVEL 8000 ML Series Installation Instructions Manual
Hide thumbs
Also See for NIVEL 8000 ML Series:
- Operating instructions manual (112 pages) ,
- Installation instructions manual (80 pages)
Table of Contents
Advertisement
Available languages
Available languages
Quick Links
Advertisement
Chapters
Table of Contents

Related Manuals for GUTMANN NIVEL 8000 ML Series


Summary of Contents for GUTMANN NIVEL 8000 ML Series
- Page 1 NIVEL TYP 8000 ML Montageanleitung 002-025 Installation instructions 026-049 Instructions de montage 050-073 Istruzioni per il montaggio 084-097 Instrucciones de montaje 098-121 Montagehandleiding 122-145...
- Page 2 Prüfungen. Es ist natürlich zu beachten, dass unsere Produkte einem natürlichen Verschleiß- und Alterungsprozess unterliegen. Alle Rechte liegen bei der GUTMANN GmbH, auch für den Fall von Schutzrechtsanmeldungen. Jede Verfügungsbefugnis, wie Kopie- und Weitergaberecht, liegt bei uns. Auf der Titelseite ist eine Beispielkonfiguration abgebildet. Das ausgelieferte Produkt kann daher von der Abbildung abweichen.
-
Page 3: Table Of Contents
INHALTSVERZEICHNIS SEITE WARNHINWEISE UND SYMBOLE : VORBEMERKUNGEN : SICHERHEITSHINWEISE : 5 - 6 ALLGEMEINE BESCHREIBUNG : 7 - 13 TECHNISCHE DATEN, ANSCHLUSSWERTE : PRODUKTBESCHREIBUNG : 8 - 9 LIEFERUMFANG MONTAGEZUBEHÖR : ABMESSUNGEN TECHNISCHE ZEICHNUNGEN : 11 - 13 VORBEREITUNGEN : MONTAGEVORBEREITUNG : MONTAGEVORAUSSETZUNG KÜCHENMÖBEL + ARBEITSPLATTE :... -
Page 4: Warnhinweise Und Symbole
WARNHINWEISE UND SYMBOLE In dieser Anleitung stehen Warnhinweise vor einer Handlungsanweisung, bei der die Gefahr von Personen- oder Sachschäden besteht. Maßnahmen zur Gefahrenabwehr müssen eingehalten werden. WARN- BEDEUTUNG ZEICHEN Warnung vor einer Gefahrenstelle ! Bezeichnet mögliche gefährliche Situationen. Das Nichtbeachten der Warnhinweise kann zu Personen- und / oder Sachschäden führen. -
Page 5: Vorbemerkungen
VORBEMERKUNGEN 1. SICHERHEITSHINWEISE Montage, Anschluss, Inbetriebnahme und Reparatur dürfen nur von einer Fachkraft durchgeführt werden. Diese Fachkraft kann die geeignete Befestigung und Abluftfüh- rung der Dunstabzugshaube bestimmen. Die Befestigung muss für das Gewicht der Dunstabzugshaube und die Belastung des Untergrunds geeignet sein. Bei anderen unsicheren Untergründen ist für die sichere Montage der Dunstabzugshaube ein Fachmann für Bauangelegenheiten, z.B. - Page 6 VORBEMERKUNGEN Beim Einschalten des Kochfeldes kann es sonst durch Spannungsspitzen zu einer Sicherheitsausschaltung kommen. Die Elektronik kann beschädigt werden. Die elektri- sche Sicherheit des Kochfeldes ist nur dann gewährleistet, wenn es an ein vorschrifts- mäßig installiertes Schutzleitersystem angeschlossen wird. Diese grundlegende Si- cherheitsvoraussetzung muss vorhanden sein.
-
Page 7: Allgemeine Beschreibung
ALLGEMEINE BESCHREIBUNG 2. TECHNISCHE DATEN UND ANSCHLUSSWERTE Bezeichnung : NIVEL Typ: 8000 ML Abmessung : - 930 x 520 x 152 - 200 mm Lüftung: Spannung : - 220-240 V / 50 Hz Integrierter Motor : - Luftleistung : ca. 1200 m³/h freiblasend - Leistung : 350 Watt max. -
Page 8: Produktbeschreibung
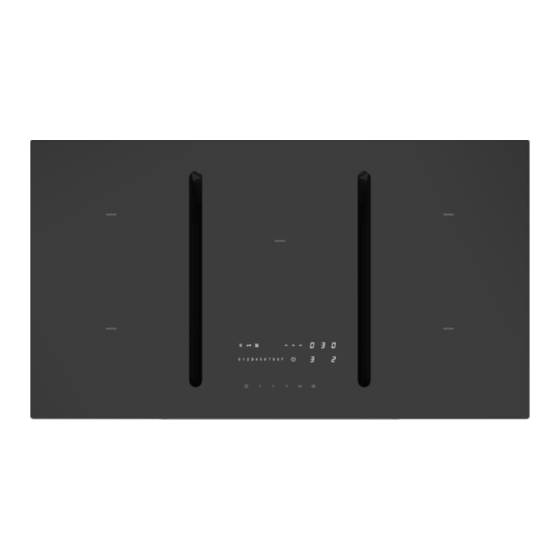
3. PRODUKTBESCHREIBUNG C - VERSION 1 Kochfeld mit Muldenlüftung NIVEL 9 Motor-Zuleitung ( 9a Signalleitung ) 2 Bedienfeld Touch-Sensor 10 elektrischer Anschluss Steuerung 3 Technik-Schublade mit LED - 11 elektrischer Anschluss Kochfeld Beleuchtung und Lichtsensor 12 Steuerleitung Bedienfeld 4 Kondensationsfilter 13 Anschluss-Schubladenbeleuchtung 5 Naber-Kanal 14 Auffangwanne... - Page 9 3. PRODUKTBESCHREIBUNG C - VERSION Filtersystem Entnahme gemäß Abbildung - Technikschublade bis zum Anschlag herausziehen. - Kondensationsfilter (4) abheben. - Auffangwanne (14) entnehmen - Filterbehälter (16) ca. 5cm nach vorne ziehen und entnehmen. - Deckel des Filterbehälters (16) öffnen. - Fett- und Aktivkohlefilter (17+18) entnehmen.
-
Page 10: Lieferumfang Montagezubehör
4. LIEFERUMFANG - MONTAGEZUBEHÖR - NIVEL Kochfeld mit Dunstabzugs- unterbau 10 Torx-Schrauben Lüftermotoreinheit Ausblasschalldämpfer Art.Nr.: 41986500 Fettfilter Aktivkohlefilter ( Einwegfilter ) Kondensationsfilter Art.Nr.: 4617 Art.Nr.: 4618 Naber-Kanal Klebeband PU-Schaumband 3x10mm / 5m Art.Nr.: TZ 8001 40-50mm Art.Nr.: 2806... -
Page 11: Abmessungen Technische Zeichnungen
5. ABMESSUNGEN Vorderansicht Draufsicht... - Page 12 5. ABMESSUNGEN - LÜFTEREINHEIT...
- Page 13 5. ABMESSUNGEN - EINBAU Seitenansicht Einbau - Beispiel Führungskante Schrankkorpus - Rückwand Kanallänge = X - 30 Steuereinheit frei positionierbar Führungskante Schrankkorpus - Lüfterfront Führungskante Schrankkorpus - Lüfterrückseite...
-
Page 14: Vorbereitungen
VORBEREITUNGEN 6. MONTAGEVORBEREITUNG: Transport, Auspacken, Aufstellen Wenn das Gerät aus kalter Umgebung in den Betriebsraum gebracht wird, kann Be- tauung auftreten. Bitte warten Sie bis das Gerät temperaturangeglichen und absolut trocken ist, bevor Sie es in Betrieb nehmen. Die Akklimatisationszeit ist abhängig von Temperaturdifferenz und Gerät sowie dessen Aufbau. -
Page 15: Montagevoraussetzung - Küchenmöbel + Arbeitsplatte
VORBEREITUNGEN 7. MONTAGEVORAUSETZUNG - KÜCHENMÖBEL U. ARBEITSPLATTE Sicherheitshinweise für den Küchenmöbelmonteur der Lüfter seine Geschwindigkeit und • Furniere, Kleber bzw. Kunststoffbeläge schaltet wieder automatisch ab. der angrenzenden Möbel müssen • Der Abstand zwischen Induktionskoch- temperaturbeständig sein (min. 75°C). feld und Küchenmöbel bzw. Einbau- Sind die Furniere und Beläge nicht geräten muss so gewählt werden, genügend temperaturbeständig, kön-... - Page 16 VORBEREITUNGEN 7. MONTAGEVORAUSETZUNG - KÜCHENMÖBEL U. ARBEITSPLATTE Einbau, wichtige Hinweise! • Es muss verhindert werden, dass Flüs- sigkeiten zwischen Kochfeldrand und • Übermäßige Hitzeentwicklung von Arbeitsplatte oder zwischen Arbeits- unten z.B. von einem Backofen ohne platte und Wand in evtl. darunter ein- Querstromlüfter ist zu vermeiden.
- Page 17 VORBEREITUNGEN 7. MONTAGEVORAUSETZUNG - ARBEITSPLATTE - KOCHFELD PU-Dichtungsband 3x10mm an der Auflageflächen umlaufend anbringen. Bei Flä- chenbündiger Montage auch in der Versenkung möglich. Höhe der Glasplatte berück- sichtigen. Bei Bedarf Niveauausgleich.
- Page 18 8. BEARBEITUNG - ARBEITSPLATTE...
-
Page 19: Bearbeitung - Arbeitsplatte - Unterschrank
8. BEARBEITUNG - ARBEITSPLATTE - UNTERSCHRANK 1. Front oder Schubladen entfernen. 2. Positionen für den Ausschnitt an der Küchenarbeitsplatte festlegen und anzeich- nen. Bitte hierbei auf Mindestabstände und Mindest-Stegbreite achten ! Diese können je nach Material und Materialeigenschaften unterschiedlich sein ! ( Unter Umständen Hilfs-Traverse „Armierung“... -
Page 20: Montagevoraussetzung Elektrischer Anschluss
9. MONTAGEVORAUSETZUNG ELEKTRISCHER ANSCHLUSS: Anschlusswerte: WARNUNG VOR ELEKTRISCHER SPANNUNG ! Kochfeld Netzspannung: ES BESTEHT LEBENSGEFAHR ! 380-415V 3N~, 50/60Hz In der Nähe dieses Symbols sind span- Dunstabzug Netzspannung: nungsführende Teile angebracht. Abde- 220-240V 50Hz ( siehe hierzu auch Anleitung Kochfeld ) ckungen, die damit gekennzeichnet sind, dürfen nur von einer autorisierten Anschlussleitung werkseitig vorhanden... -
Page 21: Montageanleitung
10. MONTAGEANLEITUNG - KOCHFELD: 1. Möbel-Schubladen herausnehmen bzw. Front des Küchenblocks abmontieren. 2. Sockelausschnitt auf Maße und Ebenheit überprüfen und ggf. ausgleichen. 3. Griff und Auslassstutzen der NIVEL abschrauben. 4. NIVEL-Kochfeld-Abzug einsetzen. Dabei auf korrekten Sitz der Dichtung achten. Höhenunterschiede beachten und ausgleichen. Hierbei ist höchste Vorsicht geboten - Bruchgefahr ! 5. -
Page 22: Montageanleitung Dunstabzug
11. MONTAGEANLEITUNG - DUNSTABZUG: 6. Lüftermotor und Abluftschalldämpfer montieren ( 10 x Torx 4,2x9,5 ). Naber-Kanal kürzen - Distanz X - 30mm. -
Page 23: Montageanleitung Dunstabzug - Einbau
12. MONTAGEANLEITUNG - DUNSTABZUG - EINBAU: 7. Lüftermotor inkl. Schalldämpfer in die Rückseite des Schrankes einbauen. 8. Griff der Schublade und Auslassstutzen anschrauben. 9. Naber-Kanal ablängen und montieren. Mit Klebeband abdichten. 10. Elektrischen Anschluss durch Fach - personal erstellen ! - Sicherungsautomaten im Hausver- teilerkasten abschalten ! - Kochfeld anschließen (A) -
Page 24: Inbetriebnahme
13. INBETRIEBNAHME Sicherungsautomaten im Hausverteilerkasten einschalten ! Funktionstest anhand der Bedienungsanleitung durchführen ! Nach dem Anlegen der Versorgungsspannung (Netzanschluss) erfolgt zuerst ein Selbst-Test der Steuerung und es wird eine Serviceinformation für den Kundendienst angezeigt. Wichtig: Zum Netzanschluss dürfen keine Gegenstände auf den Touch-Control Sen- sortasten und den Kochfeldern sein ! 14. -
Page 25: Allgemeine Themen
Gesetz als Elektroschrott bezeichnet. Bitte informieren Sie sich über die Abnahme bei Ihrem zuständigen Recycling-Hof. 16. UMWELTHINWEISE Alle Modelle aus dem Hause GUTMANN sind entsprechend der europäischen Richtli- nie 2002/96/EG über Elektro- und Elektronikgeräte (waste electrical and electronic equipment – WEEE) gekennzeichnet. Diese Richtlinie gibt die Rahmenbedingungen für eine EU-weit gültige Rücknahme und Verwertung von Altgeräten vor. - Page 26 GUTMANN cooker hood Please carefully read the following information and explanations on the proper use of your new GUTMANN hood before using the appliance for the first time. Please also read our operating and installation instructions as well as the cleaning recommenda- tions to ensure that you enjoy many years of service from your appliance.
- Page 27 TABLE OF CONTENTS PAGE WARNINGS AND SYMBOLS : PRELIMINARY REMARKS : 1 SAFETY INSTRUCTIONS : 29 - 30 GENERAL DESCRIPTION : 31 - 37 2 TECHNICAL DATA, CONNECTION VALUES : 3 PRODUCT DESCRIPTION : 32 - 33 4 SCOPE OF DELIVERY MOUNTING ACCESSORIES : 5 DIMENSIONS TECHNICAL DRAWINGS : 35 - 37 PREPARATIONS :...
-
Page 28: Warnings And Symbols
WARNING NOTICE AND SYMBOLS Warnings in these operating instructions are placed in front of an instruction that may result in personal injury or property damage. Measures to avert a hazard must be observed. WARNING MEANING SIGNS Warning of a danger spot ! Indicates potentially dangerous situations. -
Page 29: Preliminary Remarks
PRELIMINARY NOTES 1. SAFETY INSTRUCTIONS Assembly, connection, commissioning and repair may only be carried out by a specia- list. This specialist can determine the suitable mounting and exhaust air routing of the cooker hood. The fastening must be suitable for the weight of the cooker hood and the load on the substrate. - Page 30 PRELIMINARY NOTES Otherwise, when the hob is switched on, voltage spikes may cause a safety cut-out. The electronics can be damaged. The electrical safety of the cooktop is only guaran- teed if it is connected to a properly installed protective conductor system. This basic safety requirement must be in place.
-
Page 31: General Description
GENERAL DESCRIPTION 2. TECHNICAL DATA AND CONNECTION VALUES Designation : NIVEL Typ: 8000 ML Dimension : - 930 x 520 x 152 mm Ventilation : Voltage : - 220 - 240 V / 50 Hz Integrated motor : - air output / blowing open : ca. -
Page 32: Product Description
3. PRODUCT DESCRIPTION C - VERSION 1 Cooktop with ventilation NIVEL 9 Motor supply cable 2 Control panel Touch sensor 10 electrical connection control 3 Technology drawer with LED - 11 Electrical connection hob lighting and light sensor 12 Control line Control panel 4 condensation filters 13 Connection drawer lighting 5 Naber channel... - Page 33 3. PRODUCT DESCRIPTION C - VERSION Filtration system Withdrawal according to illustration - Pull out the technical drawer to stop bar. - Lift off the condensation filter (4). - Remove the drip tray (14). - Pull the filter container (16) approx. 5 cm forward and remove it. - Open the cover of the filter container (16).
-
Page 34: Scope Of Delivery Mounting Accessories
4. SCOPE OF DELIVERY - MOUNTING ACCESSORIES - NIVEL Cooktop with cooker hood substructure 10 x Sheet metal screws Fan motor unit Blow out silencer Item No.: 41986500 Grease filter Activated carbon filter Condensation filter Item No.: 4617 ( disposable ) Item No.: 4618 Adhesive tape PU foam tape 3x10mm / 5m Naber canal... -
Page 35: Dimensions Technical Drawings
5. DIMENSIONS front view top view... - Page 36 5. DIMENSIONS - FAN UNIT...
- Page 37 5. DIMENSIONS - INTEGRATION sideview Installation - example guide edge cabinet body - rear panel duct - length = X - 30 control unit freely positionable guide edge cabinet body - fan front guide edge cabinet body - fan rear side...
-
Page 38: Preparations
PREPARATIONS 6. MOUNTING PREPARATION Transport, unpacking, setting up If the device is brought from a cold environment into the operating room, condensation may occur. Please wait until the device has reached the correct temperature and is absolutely dry before putting it into operation. The acclimatization time depends on the temperature difference and the device as well as its construction. -
Page 39: Preconditions For Inst. - Kitchen Furniture + Worktop
PREPARATIONS 7. MOUNTING REQUIREMENTS - KITCHEN FURNITURE AND WORKTOP Safety instructions for the kitchen furniture fitter • Veneers, adhesives plastic the fan reduces its speed and swit- coverings of adjacent furniture must ches off again automatically. be temperature-resistant (min. 75°C). •... - Page 40 PREPARATIONS 7. MOUNTING REQUIREMENTS - KITCHEN FURNITURE AND WORKTOP Installation, important notes! hob and the worktop or between the worktop and the wall into any electri- • Avoid excessive heat generation from cal appliances installed underneath. below, e.g. from a baking oven wit- •...
- Page 41 PREPARATIONS 7. MOUNTING REQUIREMENTS - WORKTOP - HOB PU sealing tape 3x10mm at the mount bearing surfaces all around. Flush mounting also possible in the countersink. Consider the height of the glass plate. Level adjust- ment if required.
- Page 42 8. MACHINING - WORKTOP Section A - A Attachment mounting Reinforcement required for thin walls Section B - B Flush mounting Reinforcement required for thin walls...
-
Page 43: Machining - Worktop - Base Cabinet
8. MACHINING - WORKTOP - BASE CABINET 1. Remove the front or drawers. 2. Define and mark the positions for the cut-out on the kitchen worktop. Please pay attention to minimum distances and minimum web width! These may vary depending on the material and material properties! (Under certain circumstances use auxiliary crossbar "Reinforcement"). -
Page 44: Installation Requirements For Electrical Connection
9. MOUNTING REQUIREMENT - ELECTRICAL CONNECTION WARNING AGAINST ELECTRICAL Connected loads: TENSION! Cooker hob Mains voltage: THERE IS DANGER TO LIFE ! 380-415V 3N~, 50/60Hz There are energised parts near this Extractor hood Mains voltage: symbol. Covers marked with this symbol 220-240V 50Hz may only be removed by an authorised ( see also instructions cooktop ) -
Page 45: Assembly Instructions
10. ASSEMBLY INSTRUCTIONS - HOB: 1. Remove the furniture drawers or remove the front of the kitchen unit. 2 Check base cut-out for dimensions and flatness and adjust if necessary. 3. Unscrew the handle and outlet nozzle of the NIVEL. 4. -
Page 46: Installation Instructions For Extractor Hood
11. INSTALLATION INSTRUCTIONS - EXTRACTOR HOOD: 6. Assembly of fan motor and exhaust air silencer (10 x Torx 4,2x9,5 ). Motor Housing Outlet silencer Shorten Naber channel - distance X - 30mm. -
Page 47: Installation Instructions Ext. Hood - Fan Integration
12. INSTALLATION INSTRUCTIONS EXTRACTOR HOOD - FAN INTEGRATION : 7. Install the fan motor incl. silencer in the rear of the cabinet. 8. screw on the handle of the drawer and the outlet connection piece. 9. Cut the Naber duct to length and mount it. Seal with adhesive tape. -
Page 48: Commissioning
13. COMISSIONING - INITIAL START-UP Switch on the circuit breakers in the house distribution box ! Carry out a function test according to the operating instructions ! After applying the supply voltage (mains connection), a self-test of the control unit is carried out first and service information for customer service is displayed. -
Page 49: General Topics
Please inform yourself about the acceptance at your responsible recycling yard. 16. ENVIRONMENTAL INFORMATION All models manufactured by GUTMANN are identified in accordance with European Directive 2002/96/EC on waste electrical and electronic equipment (WEEE). This direc- tive specifies the framework for the EU-wide return and disposal of used appliances. - Page 50 Il est à noter que nos produits sont soumis à un processus naturel d'usure et de vieillissement. Tous les droits sont réservés par GUTMANN GmbH, y compris pour les demandes de droits de propriété industrielle. Nous avons tous les pouvoirs de disposition, tels que le droit de copier et de transmettre.
- Page 51 SOMMAIRE PAGE AVERTISSEMENTS ET SYMBOLES : REMARQUES PRÉLIMINAIRES : 1 CONSIGNES DE SÉCURITÉ : 53 - 54 DESCRIPTION GÉNÉRALE : 2 CARACTÉRISTIQUES TECHNIQUES, VALEURS DE RACCORDEMENT : 3 DESCRIPTION DU PRODUIT : 56 - 57 4 ACCESSOIRES DE MONTAGE INCLUS DANS LA LIVRAISON : 5 5.
-
Page 52: Avertissements Et Symboles
MISES EN GARDE ET SYMBOLES Ce manuel contient des mises en garde devant des instructions qui peuvent entraîner des blessures corporelles ou des dommages matériels. Les mesures de prévention des dangers doivent être respectées. SIGNAL DE SIGNIFICATION AVERTIS- SEMENT Mise en garde contre un endroit dangereux ! Désigne des situations potentiellement dangereuses. -
Page 53: Remarques Préliminaires
REMARQUES PRÉLIMINAIRES 1. CONSIGNES DE SÉCURITÉ Le montage, le raccordement, la mise en service et la réparation ne doivent être effectués que par un spécialiste. Ce spécialiste peut déterminer le montage et l'évacuation d'air appropriés de la hotte de la cuisinière. La fixation doit être adaptée au poids de la hotte et à... - Page 54 REMARQUES PRÉLIMINAIRES Installation Le raccordement de l'appareil ne doit être effectué que par des spécialistes agréés et en conformité avec toutes les réglementations en vigueur dans les entreprises d'ali- mentation électrique ainsi qu'avec les réglementations de construction des Länder. Respectez les instructions correspondantes lors de l'installation ! Les dommages à l'appareil doivent être signalés immédiatement après la livraison.
-
Page 55: Description Générale
DESCRIPTION GÉNÉRALE 2. CARACTÉRISTIQUES TECHNIQUES , VALEURS DE RACCORDEMENT : Désignation : NIVEL Typ: 8000 ML Dimension : - 930 x 520 x 152 mm Ventilation : Tension : - 220 - 240 V / 50 Hz ca. 1200 m³/h Moteur intégré... -
Page 56: Description Du Produit
DESCRIPTION DU PRODUIT : C - VERSION 1 Table de cuisson - ventilation NIVEL 9 Câble d'alimentation du moteur 2 Capteur tactile du panneau de commande 10 Raccordement électrique du contrôle 3 Tiroir technique avec éclairage 11 Raccordement électrique de la plaque de cuisson LED et capteur de lumière 12 Ligne de contrôle Panneau de contrôle 4 Filtre à... - Page 57 DESCRIPTION DU PRODUIT : C - VERSION Système de filtration Retrait selon l’illustration - Tirer le tiroir technique jusqu’en butée. - Retirer le filtre à condensation (4). - Retirer la cuve de réception (14). - Tirer le corps de filtre (16) d’env. 5 cm vers l’avant et le retirer. - Ouvrir le couvercle du corps de filtre (16).
-
Page 58: Accessoires De Montage Inclus Dans La Livraison
4. CONTENU DE LIVRAISON - NIVEL ACCESSOIRES DE MONTAGE Table de cuisson avec sous- structure de hotte aspirante 10 vis à tôle Moteur de ventilateur Silencieux sortie Réf. : 41986500 Filtre à graisse Filtre à charbon actif Filtre à condensation Réf. -
Page 59: 5. Dessins Techniques En Dimensions
5. DESSINS TECHNIQUES EN DIMENSIONS : Vue de face Vue du dessus... - Page 60 5. DIMENSIONS - UNITÉ DE VENTILATION :...
- Page 61 5. DESSINS TECHNIQUES EN DIMENSIONS : Vue latérale Montage - exemple Bord de guidage corps du Longueur du cabinet - panneau arrière canal = X - 30 Unité de contrôle librement positionnable bord de guidage corps du cabi- net - façade du ventilateur bord de guidage corps du cabi- net - arrière du ventilateur...
-
Page 62: Préparations
PRÉPARATIONS 6. PRÉPARATION DU MONTAGE Transport, déballage, mise en place Si l'appareil est amené d'un environnement froid dans la salle d'opération, de la con- densation peut se produire. Veuillez attendre que l'appareil ait atteint la bonne température et soit absolument sec avant de le mettre en service. Le temps d'acclima- tation dépend de la différence de température et de l'appareil ainsi que de sa construc- tion. -
Page 63: Condition De Montage - Mobilier De Cuisine + Plan De Travail
PRÉPARATIONS 7. CONDITION DE MONTAGE: MOBILIER DE CUISINE + PLAN DE TRAVAIL : Consignes de sécurité pour l'in- stallateur de meubles de cuisine Ventilation - Les placages, adhésifs ou revêtements - La plaque de cuisson à induction est en plastique des meubles adjacents équipée d'un ventilateur qui s'allume doivent être résistants à... - Page 64 PRÉPARATIONS 7. CONDITION DE MONTAGE - MEUBLES DE CUISINE ET PLAQUE DE TRAVAIL Installation, remarques importantes ! - Il faut éviter que des liquides ne pénètrent entre le bord de la plaque - Eviter les échauffements excessifs par de cuisson et le plan de travail ou le bas, par ex.
- Page 65 PRÉPARATIONS 7. CONDITION DE MONTAGE- PLAN DE TRAVAIL - PLAQUE DE CUISSON Bande d'étanchéité en PU 3x10mm à appliquer tout autour des surfaces d'appui, avec montage affleurant également possible dans la fraise. Pensez à la hauteur de la plaque de verre. Réglage du niveau si nécessaire.
-
Page 66: Usinage - Plan De Travail - Meuble Bas
8. PRÉPARATION - PLAN DE TRAVAIL : Section A - A Montage de l'accessoire Renforcement nécessaire pour les parois minces Section B - B Montage encastré Renforcement nécessaire pour les parois minces... - Page 67 8. PRÉPARATION - PLAN DE TRAVAIL - MEUBLE DE SOUBASSEMENT 1. Retirer la face avant ou les tiroirs. 2. Définir et marquer les positions pour la découpe sur le plan de travail de cuisine. Ce faisant, respecter les distances minimales et la largeur minimale de traverse ! Elles peuvent différer selon le matériau ou ses propriétés ! (Le cas échéant, utiliser la traverse auxiliaire «...
-
Page 68: Exigences De Montage - Raccordement Électrique
9. EXIGENCES DE MONTAGE - RACCORDEMENT ÉLECTRIQUE : Charges raccordées: MISE EN GARDE CONTRE LES RIS- QUES D'ÉLECTROCUTION ÉNERGIE ! Tension d’alimentation de la table IL Y A DANGER POUR LA VIE ! de cuisson : Il y a des parties sous tension près de ce 380-415 V 3 N~, 50/60 Hz symbole. -
Page 69: Instructions De Montage Pour La Table De Cuisson
10. INSTRUCTIONS DE MONTAGE - PLAQUE DE CUISSON : 1. Retirer les tiroirs du meuble et/ou démonter la face avant du bloc de cuisine. 2. Vérifier les dimensions et la planéité de la découpe de socle et ajuster si néces- saire. -
Page 70: Instructions De Montage De La Hotte Aspirante
11. INSTRUCTIONS DE MONTAGE - HOTTE ASPIRANTE : 6. Montage du Moteur du ventilateur et silencieux de l'air d'échappe ment ( 10 x Torx 4,2x9,5 ). Logement moteur Silencieux d'échappement Raccourcir la chaîne Naber - distance X - 30mm. -
Page 71: Instructions De Montage
12. INSTRUCTIONS DE MONTAGE - VENTILATEUR - INSTALLATION 7. Monter le moteur de ventilateur, y compris l e silencieux, dans le panneau arrière du placard. 8. Visser la poignée du tiroir et les manchons de sortie. 9. Couper le canal Naber en longueur et le monter. Étanchéifier avec du ruban adhésif. -
Page 72: Mise En Service
13. MISE EN SERVICE : Mettre les disjoncteurs en marche dans le tableau électrique ! Effectuer un test de fonctionnement à l’aide du mode d’emploi ! Après application de la tension d’alimentation (raccordement au secteur), un auto-test de la commande est d’abord effectué et des informations d’entretien pour le service après-vente sont affichées. -
Page 73: Sujets Généraux
16. INDICATIONS ENVIRONNEMENTALES Tous les modèles GUTMANN sont identifiés suivant la directive européenne 2002/96/ CE sur les appareils électriques et électroniques (Déchets d'équipements électriques et électroniques - DEE). Cette directive fournit un cadre pour une reprise et une valori- sation des anciens appareils au niveau européen. - Page 74 Tutti i diritti sono riservati a GUTMANN GmbH, anche nel caso di richieste di diritti di proprietà industriale. Abbiamo tutti i poteri di smaltimento, come il diritto di copiare e trasmettere.
- Page 75 INDICE PAGINA AVVERTENZE E SIMBOLI : OSSERVAZIONI PRELIMINARI : 1 ISTRUZIONI DI SICUREZZA : 77 - 78 DESCRIZIONE GENERALE: 79 - 85 2 DATI TECNICI, VALORI DI COLLEGAMENTO : 3 DESCRIZIONE DEL PRODOTTO : 80 - 81 4 ACCESSORI DI MONTAGGIO COMPRESI NELLA FORNITURA : 5 DIMENSIONI DISEGNI TECNICI : 83 - 85 PREPARAZIONI :...
-
Page 76: Avvertenze E Simboli
AVVERTENZE E SIMBOLI Il presente manuale riporta avvertenze relative alle procedure operative in cui sussiste il rischio di lesioni personali o danni materiali. Le misure per proteggersi dal pericolo devono essere rispettate. SEGNALE SIGNIFICATO PERICOLO Avviso di pericolo - punto pericoloso ! Indica una possibile situazione di pericolo. -
Page 77: Osservazioni Preliminari
OSSERVAZIONI PRELIMINARI 1. ISTRUZIONI DI SICUREZZA Il montaggio, il collegamento, la messa in funzione e la riparazione devono essere eseguiti esclusivamente da personale specializzato. Questo specialista è in grado di determinare il montaggio e il percorso dell'aria di scarico della cappa. Il fissaggio deve essere adeguato al peso della cappa e al carico sul supporto. - Page 78 OSSERVAZIONI PRELIMINARI: Installazione L'apparecchio può essere collegato solo da personale specializzato autorizzato, nel rispetto di tutte le disposizioni pertinenti delle aziende elettriche e delle disposizioni edilizie dei Länder federali. Osservare le relative istruzioni durante il montaggio! I danni all'apparecchio devono essere segnalati immediatamente alla consegna. Possono essere installati dispositivi danneggiati.
-
Page 79: Descrizione Generale
DESCRIZIONE GENERALE 2. DATI TECNICI E VALORI DI COLLEGAMENTO Designazione : NIVEL Typ: 8000 ML Dimensione : - 930 x 520 x 152 mm Ventilazione : Tensione : - 220 - 240 V / 50 Hz Motore integrato : - Uscita aria / che si apre : ca. -
Page 80: Descrizione Del Prodotto
3. DESCRIZIONE DEL PRODOTTO C - VERSIONE 1 Piano cottura con ventilazione NIVEL 9 Cavo di alimentazione del motore 2 Pannello di comando con sensore a 10 collegamento elettrico del sistema di con- sfioramento trollo 3 Cassetto tecnico con illuminazione 11 Collegamento elettrico del piano cottura a LED e sensore luc 12 Linea di controllo Pannello di controllo... - Page 81 3. DESCRIZIONE DEL PRODOTTO C - VERSIONE Sistema di filtrazione Estrarre il filtro come da figura - Estrarre il cassetto tecnico fino all’arresto. - Sollevare il filtro anticondensa (4). - Rimuovere la vaschetta di raccolta (14) - Tirare verso di sé il recipiente del filtro (16) di ca. 5 cm e rimuoverlo. - Aprire il coperchio del recipiente del filtro (16).
-
Page 82: Accessori Di Montaggio Compresi Nella Fornitura
4. VOLUME DELLA FORNITURA NIVEL: - ACCESSORI PER IL MONTAGGIO - Piano cottura con cappa aspirante incassata 10 viti per lamiera Motore ventola Silenziatore scarico Cod. art.: 41986500 Filtro antigrasso Filtro a carbone attivo (monouso) Filtri a condensazione Cod. art.: 4617 Cod. -
Page 83: Dimensioni Disegni Tecnici
5. DIMENSIONI DISEGNI TECNICI : Vista frontale Vista dall’alto... - Page 84 5. DIMENSIONI - UNITÀ VENTILATORE :...
- Page 85 5. DIMENSIONI DISEGNI TECNICI : vista laterale Esempio di montaggio bordo guida corpo del mobile - Lunghezza del canale pannello posteriore = X - 30 Unità di controllo liberamente posizionabile bordo guida corpo del mobile - Parte anteriore del ventilatore bordo guida corpo del mobile - lato posteriore del ventilatore...
-
Page 86: Preparazioni
PREPARAZIONI 6. PREPARAZIONE AL MONTAGGIO Trasporto, disimballaggio, messa in servizio Se l'apparecchio viene portato da un ambiente freddo in sala operatoria, può formarsi della condensa. Attendere che l'apparecchio abbia raggiunto la temperatura corretta e sia assolutamente asciutto prima di metterlo in funzione. Il tempo di acclimatazione dipende dalla differenza di temperatura, dal dispositivo e dalla sua costruzione. - Page 87 PREPARAZIONI 7. PREREQUISITO PER IL MONTAGGIO - PIANO DI LAVORO Istruzioni di sicurezza per l'in- Aerazione stallatore di mobili da cucina - Il piano a induzione è dotato di una - Le impiallacciature, gli adesivi o i rives- ventola che si accende e spegne timenti plastici di mobili adiacenti automaticamente.
- Page 88 PREPARAZIONI 7. PREREQUISITO PER IL MONTAGGIO - PIANO DI LAVORO Installazione, note importanti! - Si deve evitare che liquidi possano penetrare tra il bordo del piano di - Evitare l'eccessivo sviluppo di calore cottura e il piano di lavoro o tra il pia- dal basso, ad es.
- Page 89 PREPARAZIONI 7. PREREQUISITO DI MONTAGGIO - PIANO DI LAVORO - PIANO COTTURA Nastro sigillante in PU 3x10mm da applicare su tutte le superfici di supporto, con pos- sibilità di montaggio a filo anche nella svasatura. Considerare l'altezza della lastra di vetro.
-
Page 90: Lavorazioni Meccaniche - Piano Di Lavoro - Mobile Base
8. LAVORAZIONE - PIANO DI LAVORO Sezione A - A Montaggio dell'accessorio Rinforzo necessario per pareti sottili Sezione B - B Montaggio ad incasso Rinforzo necessario per pareti sottili... - Page 91 8. LAVORAZIONE - PIANO DI LAVORO - CASSETTONE 1. Rimuovere il pannello frontale o i cassetti. 2. Stabilire e indicare le posizioni dove ritagliare il piano di lavoro della cucina rispet tando le distanze minime e le larghezze minime dei filetti! Queste possono variare in funzione del materiale e delle rispettive caratteristiche! (Se necessario ricorrere all’uso di traverse di supporto/di rinforzo).
-
Page 92: Collegamento Elettrico Necessario Per L'installazione
9. PREREQUISITO PER IL MONTAGGIO - COLLEGAMENTO ELETTRICO AVVERTIMENTO CONTRO L'IMP- Carichi collegati: IANTO ELETTRICOENERGIA! Tensione di rete del piano cottura: C'È PERICOLO DI VITA! 380-415V 3N~, 50/60Hz Ci sono parti in tensione vicino a questo Tensione di rete della cappa aspirante: simbolo. -
Page 93: Istruzioni Di Montaggio Del Piano Cottura
10. ISTRUZIONI DI MONTAGGIO - PIANO COTTURA: 1. Estrarre i cassetti del mobile o smontare il pannello frontale del blocco del piano cottura. 2. Controllare dimensioni e planarità del ritaglio dello zoccolo e se necessario livellarlo. 3. Svitare la maniglia e i bocchettoni di scarico di NIVEL. 4. -
Page 94: Istruzioni Di Montaggio
11. ISTRUZIONI DI MONTAGGIO - CAPPA ASPIRANTE: : 6. Montare il motore del ventilatore e il silenziatore dell'aria di scari- co ( 10 x Torx 4,2x9,5). Alloggia- mento del motore Silenziatore di scarico Canale per mozzo tagliato su misura - distanza X-30 mm. - Page 95 12. ISTRUZIONI DI MONTAGGIO - CAPPA ASPIRANTE - MONTAGGIO: 7. Montare il motore della ventola completo di silenziatore nel lato posteriore dell’armadio. 8. Avvitare la maniglia del cassetto e i bocchettoni di scarico. 9. Tagliare su misura il canale per mozzo e montarlo. Sigillare con del nastro adesivo.
-
Page 96: Messa In Servizio
13. MESSA IN SERVIZIO Inserire i disgiuntori nella cassetta di distribuzione principale! Eseguire un test di funzionamento osservando le istruzioni per l’uso! Dopo aver collegato la tensione di alimentazione (collegamento alla rete) avviene dapprima un autotest dell’unità di comando, quindi vengono visualizzate delle infor- mazioni di servizio per il Servizio clienti. -
Page 97: Topici Generali
16. NOTA AMBIENTALE Tutti i modelli di produzione GUTMANN sono contrassegnati in base alla Direttiva euro- pea 2002/96/CE sulle apparecchiature elettriche ed elettroniche (waste electrical and electronic equipment – WEEE), la quale sancisce i criteri base per il ritiro e il ricupero di apparecchiature usate, validi su tutto il territorio UE. - Page 98 Por supuesto, hay que tener en cuenta que nuestros productos están sujetos a un proceso natural de desgaste y envejecimiento. GUTMANN GmbH se reserva todos los derechos, también en el caso de solicitudes de derechos de propiedad industrial. Tenemos todo el poder de disposición, como el derecho a copiar y trans- mitir.
- Page 99 ÍNDICE PÁGINA ADVERTENCIAS Y SÍMBOLOS : OBSERVACIONES PRELIMINARES : 1 INSTRUCCIONES DE SEGURIDAD : 101 - 102 DESCRIPCIÓN GENERAL : 103 - 109 2 DATOS TÉCNICOS, VALORES DE CONEXIÓN : 3 DESCRIPCIÓN DEL PRODUCTO : 104 - 105 ACCESORIOS DE MONTAJE INCLUIDOS EN EL VOLUMEN DE SUMINISTRO : 5 PLANOS TÉCNICOS DE DIMENSIONES : 107 - 109...
-
Page 100: Advertencias Y Símbolos
INDICACIONES DE ADVERTENCIA Y SÍMBOLOS En estas instrucciones hay indicaciones de advertencia antes de las instrucciones operativas con las que exista riesgo de daños personales o materiales. Hay que cumplir las medidas para evitar riesgos. SEÑALES SIGNIFICADO ADVERT- ENCIA Advertencia de un punto peligroso ! Marca posibles situaciones peligrosas. -
Page 101: Observaciones Preliminares
NOTAS PRELIMINARES 1. INDICACIONES DE SEGURIDAD El montaje, la conexión, la puesta en marcha y la reparación sólo pueden ser realiza- dos por un especialista. Este especialista puede determinar el montaje adecuado y el recorrido del aire de escape de la campana extractora. La fijación debe ser adecuada para el peso de la campana extractora y la carga sobre el soporte. - Page 102 NOTAS PRELIMINARES Instalación La conexión del aparato sólo puede ser realizada por personal especializado autoriza- do y de acuerdo con todas las normas pertinentes de las empresas de suministro de energía eléctrica, así como con las normas de construcción de los estados federados. Tenga en cuenta las instrucciones correspondientes durante el montaje! Los daños en el aparato deben ser comunicados inmediatamente después de su entrega.
-
Page 103: Descripción General
DESCRIPCIÓN GENERAL 2. DATOS TÉCNICOS Y VALORES DE CONEXIÓN Designación : NIVEL Typ: 8000 ML Dimensión : - 930 x 520 x 152 mm Ventilación : Voltaje : - 220 - 240 V / 50 Hz Motor integrado : - Salida de aire / soplando abierto : ca. -
Page 104: Descripción Del Producto
3. DESCRIPCIÓN DEL PRODUCTO C - VERSIÓN 1 Placa de cocina / ventilación NIVEL 9 Cable de alimentación del motor 2 Panel de control de sensor táctil 10 control de la conexión eléctrica 3 Cajón técnico con iluminación 11 conexión eléctrica del sistema de control LED y sensor de luz 12 Conexión eléctrica de la placa de cocción 4 Filtro de condensación... - Page 105 3. DESCRIPCIÓN DEL PRODUCTO C - VERSIÓN Sistema de filtros Extracción según ilustración - Sacar el cajón técnico hasta el tope. - Levantar los filtros de condensación (4). - Sacar bandeja colectora (14) - Tirar hacia delante del depósito de filtrado (16) aprox. 5 cm y extraerlo. - Abrir tapa del depósito de filtrado (16).
-
Page 106: Suministro
4. ALCANCE DE SUMINISTRO - ACCESORIOS DE MONTAJE - NIVEL B/C Placa de cocina con extracción de humos integrada 10 x tornillos para chapa Motor del ventilador Silenciador del soplado nº art.: 41986500 Filtros de grasa Filtros de carbón activo Filtro de condensación nº... -
Page 107: Planos Técnicos De Dimensiones
5. DIMENSIONES Vista frontal Vista en planta... - Page 108 5. DIMENSIONES - UNIDAD DE VENTILADOR...
- Page 109 5. DIMENSIONES vista lateral Ejemplo de instalación borde de la guía - cuerpo del gabinete - panel trasero La longitud del canal = X - 30 Unidad de control libremente posicionable borde de la guía - cuerpo del gabinete - frente del ventilador borde de la guía cuerpo del gabi- nete - parte trasera del ventilador...
-
Page 110: Preparaciones
PREPARACIONES 6. PREPARACIÓN DE MONTAJE Transporte, desembalaje, montaje Si el dispositivo se introduce en el quirófano desde un entorno frío, puede producirse condensación. Por favor, espere hasta que el dispositivo haya alcanzado la temperatu- ra correcta y esté completamente seco antes de ponerlo en funcionamiento. El tiempo de aclimatación depende de la diferencia de temperatura y del dispositivo, así... - Page 111 PREPARACIONES 7. REQUISITOS DE MONTAJE - MUEBLES DE COCINA Y ENCIMERAS Indicaciones de seguridad para el montador de muebles de cocina Aireación - La placa de inducción tiene un ventila- - Las chapas, los adhesivos o los revesti- dor que se enciende y se apaga au- mientos de plástico de los muebles tomáticamente.
- Page 112 PREPARACIONES 7. REQUISITOS DE MONTAJE - MUEBLES DE COCINA Y ENCIMERAS Instalación, notas importantes! - Evite la generación excesiva de calor - Debe evitarse que puedan penetrar desde abajo, por ejemplo, desde un líquidos entre el borde de la encimera horno sin ventilador de flujo cruzado.
- Page 113 PREPARACIONES 7. REQUISITO DE MONTAJE - ENCIMERA - PLACA DE COCCIÓN Cinta de sellado de PU de 3x10mm para aplicar alrededor de las superficies de apoyo, con posibilidad de montaje enrasado en el avellanador. Considere la altura de la placa de vidrio.
-
Page 114: Encimera
8. MECANIZADO - ENCIMERA Sección A - A Montaje del accesorio Refuerzo necesario para paredes delgadas Sección B - B Montaje empotrado Refuerzo necesario para paredes delgadas... -
Page 115: Mecanizado - Encimera - Armario Bajo
8. MECANIZADO - ENCIMERA - ARMARIO BAJO 1. Retirar frontal o cajones. 2. Determinar y marcar las posiciones de corte en la encimera de cocina. ¡Por favor, al hacerlo tener en cuenta las distancias mínimas y la anchura mínima entre seg mentos! Estas pueden ser diferentes en función del material y de las característi cas del material ! (En determinadas circunstancias, usar travesaño auxiliar de "refuerzo"). -
Page 116: Conexión Eléctrica Necesaria Para La Instalación
9. REQUISITO DE MONTAJE - CONEXIÓN ELÉCTRICA ADVERTENCIA CONTRA LA Cargas conectadas: ENERGÍA! Tensión de red de placa de cocina: HAY PELIGRO DE MUERTE! 380-415V 3N~, 50/60Hz Hay partes activas cerca de este símbo- Tensión de red de extracción de humos: lo. -
Page 117: Instrucciones De Montaje Para La Placa De Cocción
10. INSTRUCCIONES DE MONTAJE - DE PLACA DE COCINA 1. Extraer los cajones del mueble o desmontar el frontal del bloque de la cocina. 2. Comprobar y, dado el caso, compensar las medidas y la planitud del recorte del zócalo. 3. -
Page 118: Instrucciones De Montaje
11. INSTRUCCIONES DE MONTAJE DE EXTRACCIÓN DE HUMOS: 6. Montar el motor del ventilador y el silenciador del aire de es cape . Carcasa ( 10 x Torx 4,2x9,5 ) del motor Silenciador de escape Cortar a medida el canal Naber, distancia X-30 mm. -
Page 119: Ción
12. INSTRUCCIONES DE MONTAJE DE EXTRACCIÓN DE HUMOS - INSTALACIÓN: 7. Montar el motor del ventilador y los silenciadores en la parte trasera del armario. 8. Atornillar el mango del cajón y la tubuladura de escape. 9. Cortar a medida el canal Naber y montarlo. Sellar con cinta adhesiva. -
Page 120: Puesta En Marcha
13. PUESTA EN SERVICIO Conectar los interruptores automáticos de la caja de distribución de la casa! Realizar una prueba de funcionamiento siguiendo las instrucciones de uso! Tras poner la tensión de alimentación (conexión de red) se realiza primero una au- tocomprobación del control y se da información para el servicio de asistencia al clien- Importante: Para la conexión de red no puede haber ningún objeto en las teclas con sensor del control táctil ni en las placas de cocción! -
Page 121: Temas Generales
Por favor, infórmese sobre la aceptación en su patio de reciclaje responsable. 16. INDICACIONES MEDIOAMBIENTALES Todos los modelos de la empresa GUTMANN están identificados conforme a la direc- tiva europea 2002/96/CE de equipos eléctricos y electrónicos (waste electrical and electronic equipment - WEEE). Dicha directiva preestablece las condiciones marco para una recogida y reutilización de aparatos usados en el ámbito de la UE. - Page 122 Er moet natuurlijk worden opgemerkt dat onze producten onderhevig zijn aan een natuurlijk slijtage- en verouderingsproces. Alle rechten zijn voorbehouden aan GUTMANN GmbH, ook bij aanvragen voor industriële eigen- domsrechten. Wij hebben alle beschikkingsbevoegdheid, zoals het recht om te kopiëren en door te geven.
- Page 123 INHOUD PAGINA WAARSCHUWINGEN EN SYMBOLEN : INLEIDENDE OPMERKINGEN : 1 VEILIGHEIDSINSTRUCTIES : 125 - 126 ALGEMENE OMSCHRIJVING : 127 - 133 2 TECHNISCHE GEGEVENS, AANSLUITWAARDEN : 3 PRODUCTBESCHRIJVING : 148 - 129 4 STUKS MEEGELEVERD BEVESTIGINGSMATERIAAL : 5 AFMETINGEN TECHNISCHE TEKENINGEN : 131 - 133 VOORBEREIDINGEN : 6 MONTAGEVOORBEREIDING :...
-
Page 124: Waarschuwingen En Symbolen
WAARSCHUWINGEN EN SYMBOLEN In deze handleiding staan waarschuwingen voor instructies waarbij gevaar voor persoonlijk letsel of schade aan voorwerpen bestaat. Houd u aan de maatregelen om het gevaar te voorkomen. WAAR- SCHU- STEKEN BETEKENIS WING Waarschuwing voor een gevaarlijke plek ! Geeft een mogelijk gevaarlijke situatie aan. -
Page 125: Inleidende Opmerkingen
VOORLOPIGE OPMERKINGEN 1. VEILIGHEIDSVOORSCHRIFTEN, GEVAAR Montage, aansluiting, inbedrijfstelling en reparatie mogen alleen door een vakman wor- den uitgevoerd. Deze specialist kan de geschikte montage en afvoerluchtrouting van de afzuigkap bepalen. Bij andere onveilige ondergronden moet een bouwkundige, bijv. een bouwkundig ingenieur of architect, worden geraadpleegd om een veilige installatie Gevaar voor letsel ! Tijdens de productie kunnen er scherpe randen in de kap... - Page 126 VOORLOPIGE OPMERKINGEN Inbouw De aansluiting van het apparaat mag alleen door geautoriseerde vakmensen worden uitgevoerd in overeenstemming met alle relevante voorschriften van de energie- bedrijven en de bouwvoorschriften van de deelstaten. Let bij de installatie op de bi- jbehorende instructies! Schade aan het apparaat moet onmiddellijk bij levering worden gemeld.
-
Page 127: Algemene Omschrijving
ALGEMENE BESCHRIJVING 2. TECHNISCHE GEGEVENS EN AANSLUITINGSWAARDEN Aanwijzing : NIVEL Typ: 8000 ML Afmeting : - 930 x 520 x 152 x 152 mm Ventilatie : Spanning : - 220 - 240 V / 50 Hz Geïntegreerde motor : - Luchtuitgang / openblazen : ca. -
Page 128: Productbeschrijving
3. PRODUCTBESCHRIJVING C - VERSIE 1 Kookplaat met bakventilator NIVEL 9 Motorvoedingskabel 2 Bedieningspaneel met aanraaksensor 10 elektrische aansluiting van het be- sturingssysteem 3 Technologielade met LED-verlichting 11 Elektrische aansluiting van de kookplaat en lichtsensor 12 Controlelijn Bedieningspaneel 4 Condensatiefilter 13 Aansluiting ladeverlichting 5 Naber-kanaal 14 Verzamelbak... - Page 129 3. PRODUCTBESCHRIJVING C - VERSIE Filtersysteem Verwijdering zoals op de afbeelding is aangegeven. - Trek de lade waarin de techniek is ondergebracht tot de aanslag uit. - Til het condensatiefilter (4) op. - Haal het opvangreservoir (14) eruit. - Trek het filterreservoir (16) circa 5 cm naar voren en haal het eruit. - Open het deksel van het filterreservoir (16).
-
Page 130: Stuks Meegeleverd Bevestigingsmateriaal
4. BIJ DE LEVERING INBEGREPEN NIVEL – MONTAGETOEBEHOREN – Kookplaat met geïntegreer- de afzuiging 10x zelftappende schroef Ventilatormotor Uitblaasgeluiddemper art.nr.: 41986500 Vetfilter Actievekoolfilter (wegwerpfilter) Condensatiefilter art.nr.: 4617 art.nr.: 4618 Naber-kanaal Tape PU-schuimband 3 × 10 mm / 5 m art.nr.: TZ 8001 40-50 mm art.nr. -
Page 131: Afmetingen Technische Tekeningen
5. AFMETINGEN Vooraanzicht Bovenaanzicht... - Page 132 5. AFMETINGEN - VENTILATOREENHEID...
- Page 133 5. AFMETINGEN zijaanzicht Inbouw – voorbeeld Geleidingsrand Kastbak - achterwand kanaallengte = X - 30 besturingseenheid vrij positioneerbaar Geleidingsrand Kastbak - Ventilatorfront Geleidingsrand Kastbody - ventilator achteraan...
-
Page 134: Voorbereidingen
VOORBEREIDINGEN 6. MONTAGEVOORBEREIDING Transport, uitpakken, uitpakken, opstellen Als het apparaat vanuit een koude omgeving in de operatiekamer wordt gebracht, kan condensatie optreden. Wacht tot het apparaat de juiste temperatuur heeft bereikt en absoluut droog is voordat u het in gebruik neemt. De acclimatisatietijd is afhankelijk van het temperatuurverschil en het apparaat en de constructie. -
Page 135: Voorwaarden Voor De Installatie - Keukenmeubilair + Werkblad
VOORBEREIDINGEN 7. VERPLICHTING - WERKBLAD Veiligheidsinstructies voor de installateur van het Luchtverversing keukenmeubilair - De inductiekookplaat heeft een ventila- - Fineer, kleefstoffen of kunststof bekle- tor die automatisch in- en uitschakelt. dingen van aangrenzende meubels Als de temperatuurwaarden van de moeten temperatuurbestendig zijn... - Page 136 VOORBEREIDINGEN 7. MONTAGE-EISEN - KEUKENMEUBILAIR EN WERKBLAD Installatie, belangrijke opmerkingen! - Voorkomen moet worden dat vloeistof- - Vermijd overmatige warmteontwikke- fen tussen de rand van de kookplaat ling van onderen, bijv. uit een en het werkblad of tussen het werk- bakoven zonder kruisstroomventila- blad en de muur doordringen in de tor.
- Page 137 VOORBEREIDINGEN 7. MONTAGEVOORWAARDE - WERKBLAD - KOOKPLAAT - KOOKPLAAT PU-afdichtingstape 3x10 mm voor het aanbrengen van afdichtingsband rondom de lageroppervlakken. Met verzonken montage ook mogelijk in de verzinkbodem. Houd rekening met de hoogte van de glasplaat. Niveau-aanpassing indien nodig.
-
Page 138: Bewerking - Werkblad - Onderkast
8. UIT TE VOEREN STAPPEN – WERKBLAD Sectie A - A Bevestiging van de bevestiging Versterking nodig voor dunne muren Sectie B - B Inbouwmontage Versterking nodig voor dunne muren... - Page 139 8. UIT TE VOEREN STAPPEN – WERKBLAD – ONDERKAST 1. Verwijder het front of de laden. 2. Bepaal waar de uitsparingen in het werkblad moeten komen en teken ze af. Let hierbij op de minimale afstanden en de minimale dikte van het schroefblad. Deze kunnen afhankelijk van het materiaal en de materiaaleigenschappen verschillend zijn.
-
Page 140: Elektrische Aansluiting Nodig Voor De Installatie
9. FITTING REQUIREMENT - ELEKTRISCHE AANSLUITING WAARSCHUWING TEGEN Aangesloten belastingen: ELEKTRISCHEENERGIE!ER IS Netspanning kookplaat: GEVAAR VOOR HET LEVEN! 380-415 V, 3 N~, 50/60 Hz Er zijn levende delen in de buurt van dit Netspanning afzuiging: symbool. Afdekkingen met dit symbool 220-240 V, 50 Hz mogen alleen door een gekwalificeerde elektricien worden verwijderd. -
Page 141: Montage-Instructies
10. MONTAGE-INSTRUCTIES - KOOKPLAAT: 1. Haal de laden eruit of demonteer het front van het keukenblok. 2. Controleer of de afmetingen van de sokkeluitsparingen kloppen en de uitsparingen gelijkmatig zijn. Corrigeer dit eventueel. 3. Schroef de handgreep en de uitlaatverbindingen van de NIVEL los. 4. -
Page 142: Montage-Instructies Voor De Afzuigkap
11. MONTAGEHANDLEIDING – AFZUIGING: 6. Monteer de ventilatormotor en de uitlaatluchtge luiddemper ( 10 x Torx 4,2x9,5 ). Motorbe- huizing Uitlaat- demper Kort het Naber-kanaal af op een afstand van X-30 mm. -
Page 143: Montagehandleiding Voor De Afzuigventilator - Instal- Latie
12. MONTAGEHANDLEIDING – AFZUIGING – INBOUW: 7. Bouw de ventilatormotor inclusief geluiddemper in de achterkant van de kast in. 8. Schroef de handgreep van de lade en de uitlaatverbindingen vast. 9. Kort het Naber-kanaal af en monteer het. Dicht het af met tape. 10. -
Page 144: Inbedrijfstelling
13. INBEDRIJFSTELLING Schakel de zekeringautomaat in de verdeelkast in. Voer aan de hand van de gebruikershandleiding een functietest uit. Als de voedingsspanning is ingeschakeld (netaansluiting), voert de besturing eerst een zelftest uit en wordt een servicebericht voor de klantenservice weergegeven. Belangrijk: Er mogen tijdens de netaansluiting geen voorwerpen op de sensortoets- en van de aanraakgevoelige bediening en de kookplaten liggen ! 14. -
Page 145: Algemene Topics
Informeer u a.u.b. over de acceptatie bij uw verantwoordelijke recyclingbedrijf. 16. MILIEU-INSTRUCTIES Alle modellen van de firma GUTMANN zijn volgens de Europese richtlijn over elektri- sche en elektronische toestellen (waste electrical and electronic equipment – WEEE) gekenmerkt. De richtlijn beschrijft het kader voor een EU-wijde geldige terugname en recyclage van oude toestellen. - Page 146 Le etichette energetiche e le schede tecniche dei prodotti possono essere consultate su Internet all'indirizzo www.gutmann - exklusiv.eu La riproduzione, la modifica, l'utilizzo o la diffusione delle informazioni qui pubblicate senza l'autorizzazione scritta di Exklusiv-Hauben GUTMANN GmbH è...
- Page 147 à la technologie d'impression. Les étiquettes énergétiques et les fiches techniques des produits peuvent être consultées sur Internet à l'adresse www.gutmann- exklusiv.eu La reproduction, la modification, l'utilisation ou la diffusion des informations publiées ici sont interdites sans l'autorisa- tion écrite de Exklusiv-Hauben GUTMANN GmbH.
- Page 148 Energy label data and product datasheets can be viewed on our website at www.gutmann-exklusiv.eu. The reproduction, modifi- cation, utilisation and/or dissemination of the information published herein without prior, written authorisation having been provid-...
Need help?
Do you have a question about the NIVEL 8000 ML Series and is the answer not in the manual?
Questions and answers