Table of Contents
Advertisement
Advertisement
Table of Contents

Subscribe to Our Youtube Channel
Related Manuals for Allflex AWR300


Summary of Contents for Allflex AWR300
- Page 1 AWR300 Allflex AWR300 User Manual User Guide Firmware v1.11 and higher...
- Page 2 ©Copyright Agrident GmbH 2020 This manual is copyrighted. All rights are reserved, and no part of this publication may be reproduced or transmitted in any form or by any means without prior written consent. Disclaimer The information in this manual was accurate and reliable at the time of its release. However, we reserve the right to change the specifications of the product described in this manual without notice at any time.
-
Page 3: Table Of Contents
Introduction ......................1 1.1 Before You Start ......................1 Hardware Specifications ................... 2 2.1 AWR300 Parts ....................... 2 2.2 Accessories ........................2 2.3 Connecting the USB Cable .................... 3 2.4 Exchanging the Battery Pack ..................4 Controlling the AWR300 ................... 4 3.1 AWR300 Display ...................... - Page 4 Appendix B: Safety and Care ..................47 Appendix D: International Approvals ................48 CE Marking ........................... 48 FCC and IC digital device limitations ..................48...
-
Page 5: Introduction
(2) of the Y-Cable. The plug-in power supply (3) should be fitted with the correct mains adapter. Then you can plug in the power supply into a mains outlet and the AWR300 should start charging the battery. See Chapters 3.1.2.1 for details about the battery status. -
Page 6: Hardware Specifications
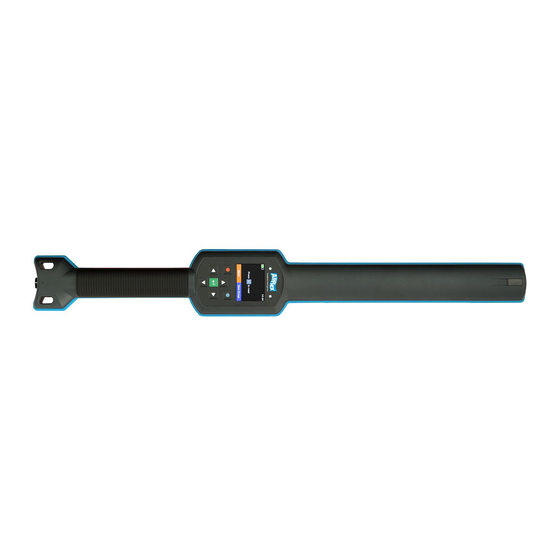
Allflex AWR300 User Guide 2 Hardware Specifications This section describes the AWR300 hardware including all accessories. 2.1 AWR300 Parts • 65 centimeters long • 750 grams • Provides an excellent reading performance • Large 2.4 inch color TFT display • Multicolor LED indicator at the tip •... -
Page 7: Connecting The Usb Cable
2.3 Connecting the USB Cable The AWR300 uses a bayonet connector system that is IP67 without an additional cap: 1. Attach the connector of the serial cable to the socket at the bottom of the reader. Pay attention on the correct orientation (see marking). -
Page 8: Exchanging The Battery Pack
3 Controlling the AWR300 The AWR300 has a large color display and seven keys used for controlling the device. • The Reader is activated by pressing the key in the middle of the directional pad. 3.1 AWR300 Display... -
Page 9: Symbols At The Top Of The Display
Allflex AWR300 User Guide • In the example shown here, the only active connection is USB (symbol on the right side). The reader would also indicate an active RS232 connection or the status of Bluetooth or WLAN (optional). • The soft keys have different meanings depending on the current operation. - Page 10 Status Meaning Slave Mode – AWR300 can be connected from other devices Master Mode – AWR300 is trying to connect to remote device Connected (in either Bluetooth Mode) Bluetooth init: Communication to Bluetooth module failed or booting in progress 13/11/19...
-
Page 11: Status Leds
Solid Battery is fully charged The multicolor LEDs are only used when the AWR300 is turned off. When switched on, the battery symbol in the display indicates the charging status. The blue LED on the right side is only used when the display is turned off. Then it indicates the... -
Page 12: Multicolored Leds
Tag has been read repeatedly (duplicate) 3.4 Using the Keyboard The AWR300 has 7 keys to allow easy operation of the reader. The directional pad has an ENTER key in the middle and two additional soft-keys below the display whose functionality is dependent on the current action. - Page 13 Allflex AWR300 User Guide Switches off the AWR300 on a long press (>2 seconds) * No function in home screen * No function in home screen * *The directional keys are also used to navigate within menus (up, down, left and right), for scrolling through selection lists and for selecting characters in numeric or text input fields.
-
Page 14: Operating States
If the AWR300 is connected to USB while it is switched off, the SD-card mode is activated. In this case, the reader is attached to the computer as a mass storage device and file transfer is possible. -
Page 15: Reading Transponders
Allflex AWR300 User Guide Reading Transponders Flux Lines 13/11/19 Page 11... - Page 16 Allflex AWR300 User Guide When a tag is read, the following information displays: VID – Visual ID EID – Electronic ID Name of the current group, here: ‘group 9’ Number of records in the current group, here: ‘20’ Return to home screen...
- Page 17 Allflex AWR300 User Guide If an alert is present for the transponder just read, the alert text is displayed continuously, with the color inverting and an alert sounding. The alert can be disarmed (not shown again after next reading of this tag) or it can be skipped.
-
Page 18: Menu Items
6.1 Menu Structure The following table shows the menu structure for the AWR300, including submenus and options. Options or actions are shown in italic and the default values for options are marked with ‘... - Page 19 Allflex AWR300 User Guide Main Menu sub menu submenu submenu submenu New Group Start new group Data Show Data Select Group To Show Clear Data Clear Groups Clear Last Group Select Group Clear All Groups Memory Info Print Print Last Group...
- Page 20 Allflex AWR300 User Guide 20 min 10 min 5 min 3 min 2 min 90 sec 60 sec * 30 sec 20 sec 10 sec 5 sec Set Display Colors Black * White Set language [depends on uploaded languages] Interface Setup...
-
Page 21: New Group
Allflex AWR300 User Guide 6.2 New Group Records in the AWR300 memory are organized in groups. One group can contain up to 10,000 records. A new record is created for every transponder that is read. If you do not wish to create new records for duplicate reads, enable the ‘Animal Counter’... -
Page 22: Data
Allflex AWR300 User Guide 6.3 Data Screen Details The ‘Data’ menu contains items for showing and deleting data. Show Data The device displays a list of all current groups. Each entry shows the group name and the number of records within the group in brackets. - Page 23 Allflex AWR300 User Guide Screen Details … One record down … One record up … Scroll down 50 records … Scroll up 50 records … Select record … Switch between EID and VID view This example shows the same list but instead of the EID, the VID is shown.
- Page 24 Allflex AWR300 User Guide You can also edit fields by selecting them and pressing , if they are allowed to be editable in the Database definition. Non-editable fields are not selectable at all. … Switch next page … Select next / previous (editable) Database field …...
-
Page 25: Clear Data
Allflex AWR300 User Guide Clear Data You can delete data from the AWR300. There are various ways to delete data, depending on how that data was collected. The standard records are saved in groups. These are the records that have been saved after the transponder reading starts from the home screen... -
Page 26: Memory Info
Allflex AWR300 User Guide Memory Info Screen Details This menu item shows information about the amount of collected data (number of records in number of groups), the number of entries in the uploaded Link list. Search Database using VID It is possible to search entries in the uploaded database by entering the VID. This is useful if the transponder is lost or defective. -
Page 27: Search Database Using Eid
This menu item searches the Database for a matching entry on the basis of the electronic ID. As soon as the transponder is read, the AWR300 starts looking up this number in the database. Note that this menu item is only visible if a database has been uploaded. - Page 28 Allflex AWR300 User Guide If the timeout has elapsed without a successful detection of a tag, ‘No Tag’ is displayed. • Use the key to start a new scan. • Use to abort the EID search. If the transponder was read but there is no match in the Database, ‘Not in database’...
-
Page 29: Print
Bluetooth printer. After exiting the Print menu, the connection to the printer is lost and the AWR300 tries to re- connect to the configured primary Bluetooth partner again (if in Master Mode). This means that the user does not need to select a different Bluetooth device just for printing. -
Page 30: Select Group
It is also possible to print the barcode of a particular EID. This is useful if you want to label blood samples, for example. To be able to print the EID as a barcode, the AWR300 has to read the transponder first. When you select ‘Print Barcode’, the device activates the RFID engine. -
Page 31: Printer Setup
AWR-PC-Demo can be used for configuring all possible printer options. 6.4.5.1 Set Printer Type The AWR300 Firmware supports various printer types, such as the Able Systems ‘AP1300’, the Datamax-O’Neil ‘Apex’ series (former Extech Apex), the Zebra QL-series and QLn-series and the Martel ‘MCP 1880/7880’. - Page 32 Baud rates from 300bps to 115200bps are possible in particular steps. 6.4.5.4 Search BT Printer Before you can start printing via Bluetooth, the AWR300 must be paired with a printer. The reader scans for available Bluetooth devices first. The scan starts when this menu item is selected.
-
Page 33: Setup
Since this address is unique, it can quickly help to identify the correct device. Choose a device from the list and select it by pressing . The AWR300 stores this device as the Bluetooth printer and attempts to connect to it for all scheduled print jobs until a different device is selected. - Page 34 6.5.1.2 Set Read Mode By default, the AWR300 is configured to ‘Single Read’. This means that RFID is activated until a transponder has been detected or the ‘Single Read Time’ (default = 10 seconds) has elapsed. key has to be pressed to scan for tags again.
- Page 35 12-digit national ID (no space in between), terminated with <CR><LF>. This format is quite common and accepted by most weighing indicators on the market. A detailed explanation of the AWR300 output formats can be found in the separate document ‘AWR300_Output-Formats_...’.
- Page 36 Wireless Synchronization and fixed timings, which allow for the best possible performance for wirelessly synchronized mobile readers. 6.5.1.5 Volume and Vibrator The AWR300 provides a speaker and a vibrating handle for alerts, in addition to the LEDs and the display. These can be configured in this menu: Screen Details After selecting ‘Volume &...
-
Page 37: Display
Details The ‘Switch Off Time’ determines after which period (of no action) the AWR300 enters suspend mode. Any action, like a key press, will reset this timer. See Chapter 4 for further details. The maximum possible time is 60 minutes, but keep in mind that this reduces the operating time. -
Page 38: Interface Setup
Allflex AWR300 User Guide 6.5.2.3 Set Display Colors Screen Details Depending on the light conditions, it may be necessary to invert the background color. It can also be a question of user preference. That can be done within this menu item. - Page 39 … Set the new value 6.5.3.2 Setup Scale The AWR300 is able to receive the weight from indicators that can send it via Bluetooth. There are different scale types supported, including some major brands on the market. This function can only be used for Task-Mode, where the ‘Weight-from-Scale’ field is available.
- Page 40 Allflex AWR300 User Guide If the baud rate of the scale differs from the configured scale baud rate on the AWR300, this might cause communication issues when using Bluetooth as the scale interface. For an RS232 connection, the communication will not work if the baud rates do not match. They must be configured to the same values on both devices.
- Page 41 Since this address is unique, it can help to identify the correct device quickly. Choose a device from the list and select it by pressing . The AWR300 stores this device as the Bluetooth partner and attempts to connect to it automatically and permanently, if the reader is configured to Master Mode.
- Page 42 This removes the need to develop a serial interface for the reader. The AWR300 is connected to the host as a ‘virtual keyboard’. When the cursor is in a text field in the app running on the host, the EID is entered in this field after a transponder has been read.
- Page 43 • Status: Connection Status, here: tries to connect to remote device. In this case, the AWR300 is connected to the remote device. If the connection is lost, the reader attempts to reconnect to the configured Bluetooth partner until it successful. This is done automatically.
- Page 44 Allflex AWR300 User Guide 6.5.3.5 WLAN The WLAN menu is only visible if the AWR300 contains a Wi-Fi module. In the standard item, WLAN is not shown. Screen Details The WLAN settings available on the device itself are only basic ones. Showing all possible settings would make the menu too complex, so the advanced settings are only software configurable –...
- Page 45 Allflex AWR300 User Guide When the AWR300 joins an Access Point, or another device connects to the AWR300, a UDP or TCP connection must still be opened to enable communication and before data can be exchanged! Depending on the application, a UDP or TCP connection must be established, and an appropriate port must be opened.
-
Page 46: Configuration
Allflex AWR300 User Guide In this screen, the AWR300 has joined the configured Access Point (WLAN symbol turned into blue) and the Status has changed ‘waiting connect’. Device shows the IP address (192.168.1.3) of the AWR300 plus configured port (2010). -
Page 47: Device Info
Allflex AWR300 User Guide Device Info Screen Details The Device Info menu includes information about the current battery status, the AWR300 firmware and some information on the hardware. 6.5.5.1 Show Battery Info Screen Details When fully charged, the battery info shows ‘100%’. - Page 48 Allflex AWR300 User Guide 6.5.5.3 Show Hardware Info Screen Details This screen shows the reader’s serial number and revisions of printed circuit board that is built into the device. You should have this information available when contacting support. 13/11/19 Page 44...
-
Page 49: Appendix A: Battery Precautions
Allflex AWR300 User Guide Appendix A: Battery Precautions There are important things to consider concerning the rechargeable battery pack: • Permitted charge temperature is between 0°C to +45°C (32°F to 113°F). • Discharging is allowed within the range of -20°C to +60°C (-4°F to 140°F) – this is the allowed operating temperature for the battery. -
Page 50: Charging The Battery
When charging the battery, only use chargers supplied by Allflex. o Do not attach the batteries to a power supply plug or directly to a car's cigarette lighter. - Page 51 Agrident GmbH (“Allflex”) accepts no liability for damage resulting from improper use or use not consistent with that described in these operating instructions. • The AWR300 Reader contains no parts that can be repaired by the user. For this reason, the Reader Electronic may only be repaired by authorized customer service personnel.
- Page 52 Appendix D: International Approvals CE Marking Hereby, Allflex declares that the AWR300, if used according to the instructions, is in compliance with the essential requirements and other relevant provisions of the Radio Equipment Directive (RED) 2014/53/EU. For use in all countries of the EU.
- Page 53 Allflex AWR300 User Guide Le présent appareil est conforme aux CNR d'Industrie Canada applicables aux appareils radio exempts de licence. L'exploitation est autorisée aux deux conditions suivantes : (1) l'appareil ne doit pas produire de brouillage, et (2) l'utilisateur de l'appareil doit accepter tout brouillage radioélectrique subi, même si le brouillage est susceptible d'en compromettre le...
Need help?
Do you have a question about the AWR300 and is the answer not in the manual?
Questions and answers