
Related Manuals for FSN MSV 2

Summary of Contents for FSN MSV 2
- Page 1 4K Multi Scaler Viewer MSV 2 User’s Guide Before connecting, operating or adjusting this product, please read this instruction booklet carefully and completely. FSN2016 – 9/2019...
-
Page 2: Table Of Contents
Table of Contents 1. Introduction ..........................3 2. Description..........................8 3. Quick Start ..........................8 4. Starting Guide and Basic Functions ..................9 5. MSV2 Function ........................13 6. MSV2 Web Controller ......................17 7. MSV2 OSD .......................... 65 8. API............................79 FSN2016 –... -
Page 3: Introduction
Introduction The MSV2 (Multi Scaler Viewer2) is 4K Multi Scaler Viewer which is an advanced video processor for multimedia presentations. It is an ideal solution for applications where up to four different or same video signals must be displayed on a single display. MSV2 allows you to manipulate output images, wherever positions and whatever size you want for display and also allows you to control brightness, overlay, etc. - Page 4 1.1 Specification 1.1.1 Power specification Items Values / Description AC/DC adaptor 12V DC, 3.33A Total power consumption 25.2W (12V DC, 2.1A) (on 4 inputs operation) 1.1.2 Video input specification Items Values / Description HDMI x 2 Port type HDMI / DisplayPort x 2 (selectable) Resolutions 4096 x 2160p @60Hz (maximum) Signal formats...
- Page 5 1.1.4 Input/output port pin assignment HDMI Connector Signal Assignment Signal Assignment Signal Assignment TMDS DATA2+ TMDS DATA0- TMDS DATA2 SHIELD TMDS CLOKE+ TMDS DATA2- TMDS CLOKE SHIELD TMDS DATA1+ TMDS CLOKE- TMDS DATA1 SHIELD TMDS DATA1- HEAC TMDS DATA0+ TMDS DATA0 SHIELD Display Connector Signal Assignment Signal Assignment...
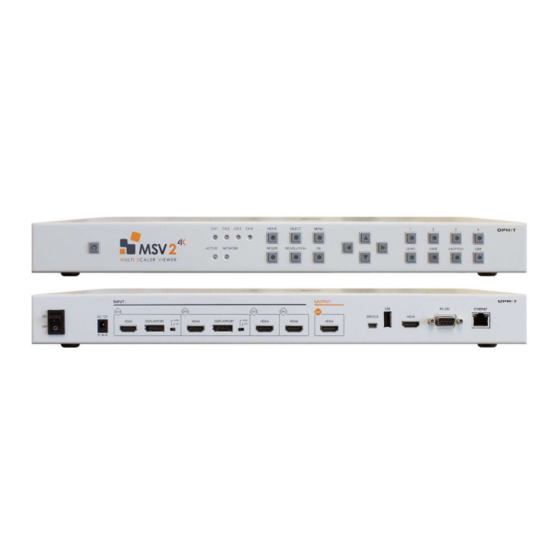
- Page 6 1.1.5 Mechanical Specification MSV2 case construction features Button: Power, Menu, Move, Resize, Resolution, Left/Right/Up/Down, OK, 8 display type buttons. Input video: 2 HDMI Connecters + 2 HDMI/DisplayPort Connectors (Selectable). Output video: 1 HDMI Connector. Size : 436(W) x 44(D) X 213(H) mm Color : Black, Ivory FSN2016 –...
- Page 7 FSN2016 – 9/2019...
-
Page 8: Description
2. Description Hardware Software HDMI input port 2ea MSV2 controller(Web) HDMI/DisplayPort input port 2ea(selectable) Front panel User console [Table 1] MSV2 Hardware & Software Hardware - MSV2 can receive two HDMI inputs and two HDMI/DisplayPort inputs (optional). - Front panel allows you to change layout presets, move, resize functions, and OSD operation. Software - MSV2 operation is possible by utilizing MSV2 Web controller, On Screen Display (OSD), and User console. -
Page 9: Starting Guide And Basic Functions
[Figure 1] MSV2 System Application Operate in quad mode unless there is a separate operation using MSV2 Web Controller, OSD, User Console, etc. You can operate MSV2 by Quick Start Flow as below. MSV2 Quick Start Flow 1. Connect source device/devices to MSV input port (HDMI /DisplayPort) 2. - Page 10 4.1 MSV2 Front Panel Description Power: Power On/Off button. LEDs CH 1~4 LED: Input signal is detected, for each channel led is illuminated ACTIVE LED: If MSV2 is operating normally, this LED will flash. NETWORK LED: If the network connection is normal, the LED will illuminate. If this LED is not lit, you will not be able to access the Web Controller.
- Page 11 4.2 Basic Function 4.2.1 Power On/Off 1. The front MSV2 power button LED will illuminate red when the rear power switch is switched on. 2. When the power button is pressed, the blue LED flashes and starts booting 3. The power button LED will turn blue after boot. 4.
- Page 12 4.2.5 Resolution MSV2 supports output resolution of 4K(4096x2160p@60), 1080P.720P and more. (See Chapter 5 for detailed output resolution of MSV2 Function) When the Resolution button is pressed, the currently set output resolution is displayed on the screen banner, and you can change the output resolution by pressing the resolution button again before the banner disappears (Timeout: 5sec).
-
Page 13: Msv2 Function
5. MSV2 Function MSV 2 is a multiprocessor that accepts 4 inputs and arranges all inputs into 1 layout. Windows of different inputs can overlap due to resizing and moving function. In this case you will see the window with higher priority on the top of lower priority window. You can set Transparency level of overlapped areas of windows and also set border and label details. - Page 14 [Table 3] Screen layout 5.4 Output resolution Output resolutions can be selected. Supporting output resolution is shown on [Table 4] Output resolution. (Control tool Front panel, Web controller) (Only SINK-supported resolutions in the below table are displayed.) Output resolution 4096 x 2160p (24/30/60Hz) 3840 x 2160p (25/30/50/60Hz) 1920 x 1080p (50/60Hz) 1280 x 720p (50/60Hz)
- Page 15 5.5 Input resolution MSV2 supports various input resolutions from the source. Information on supported resolutions can be found in the specification 5.6 Audio setting User can set the audio output channel when it is not in CH 1-4 only mode. MSV2 allows you to have 4 audio inputs and 1 output.
- Page 16 5.8 Window priority The Input priority setting affects the output screen and the Web controller window display. If a window overlaps, display a window with a high priority at the top of the output screen and the Web controller preview screen. A high number has a high priority.
-
Page 17: Msv2 Web Controller
6. MSV2 Web Controller Front panel, user console, and OSD control do not support all functions, but MSV2 Web controller supports all the functions of MSV2... The MSV2 Web controller is available only when Ethernet is connected to MSV2 and the IP initial value is 169.254.0.193 Function Control... - Page 18 6.2 MSV2 Web Controller Connection To connect to the MSV2 Web controller, launch an Internet browser then connect to “ http://169.254.0.193” (Caution) We recommend using the Google Chrome, Google Chromium, Google ChromiumPortable, Internet Explorer, Microsoft Edge, and Opera Software Opera browsers to ensure seamless use of the MSV2 Web Controller.
- Page 19 Home Menu – Device name, menu button, user rights information, message information, logout Preview & Screen control window – Preview, Banner, Front Lock, Resolution, Audio, Swap Layout control – Use saved Preset and Channel Enabled buttons Menu Name of device, Preview On/Off, Banner On/Off, Screen Settings, Front Button Lock On/Off, current layout, and audio settings are available in the Menu 6.4.1 MSV2 Logo 6.4.2 Device name...
- Page 20 Menu button[ ] 6.4.3 Menu button of MSV2 6.4.4 Message information[ ] Provide message information 6.4.5 Go home button [ ] Return to home 6.4.6 User permission information[ ] Indicates the permissions of the user you are currently connected to. 6.4.7 Logout[ Log out Preview &...
- Page 21 6.5.1 Preview The current video is shown in the Web Controller via real-time streaming. 6.5.2 Front Lock If Front Lock selected, it will prevent to use control button on the front of MSV2 6.5.3 Resolution, Audio[ ] Displays the resolution currently output from MSV2 and the channel of the audio used. User can change it by clicking the mouse.
- Page 22 User can change Layout or select options for Layout, and select and set channels. FSN2016 – 9/2019...
- Page 23 6.7 Preset & Channel You can enter when Preset & channel is selected in the Menu. 1) Preview & Screen control window – Preview, Banner, Front Lock, HDCP settings, resolution changes and audio changes 2) Preset & channel options – preset settings and channel settings 3) Screen Information –...
- Page 24 6.8.1 Preview[ ] The current video is shown in the Web Controller via real-time streaming. 6.8.2 Preview Mode, Banner, Front Lock [ ] Streaming can be turned on or off through Preview Mode. Banners can be enabled or turned off via the Banner function.
- Page 25 6.9 Preset & Channel Option By Preset, you can save the settings you want, and you can also set up the channels. You can adjust the number of layout buttons. FSN2016 – 9/2019...
- Page 26 6.9.1 Select Preset & Channel Press the select button on Preset & Channel to select the presets and channels as follows: Select to view and change the settings for the corresponding preset or channel. FSN2016 – 9/2019...
- Page 27 6.9.2 Preset & Channel Setup Select preset to : 1. Preset Name – You can rename the current preset. 2. Audio Output – You can select AIDIO in current preset. 3. OSD Border – You can select Enable OSD Border when you select the current preset. FSN2016 –...
- Page 28 4. OSD Label - You can select Enable OSD Label when you select the current preset. 5. Window Scale – You can select whether the scale is based on channel settings or individually set.. 6. Window Crop – You can choose whether to set the Crop according to channel settings or individually.
- Page 29 4) OSD Label You can select the OSD Label option you want by pressing the OSD Label Select button. 5) Window Scale You can select the desired Window Scale Mode by pressing the Window Scale Select button. Window Crop You can select the desired Window Crop Mode by pressing the Window Crop Select button. 7) Select Input You can change the Input value by window.
- Page 30 Before Input change After Input change FSN2016 – 9/2019...
- Page 31 Before Layer change After Layer change FSN2016 – 9/2019...
- Page 32 With Preset selected, press the Tab A, B, C, and D buttons to view information about that window. If the window is OFF, the window tab remains disabled. FSN2016 – 9/2019...
- Page 33 1) Input Name – Displays the channel name that is output from the current window.. 2) Keep Aspect – When it enabled, the image remains at the original ratio. 3) Output Window Coordinates – Show the output coordinates. MAIN Tab – The Keep Aspect setting is possible when Window Scale is set to Individual. FSN2016 –...
- Page 34 Keep Aspect (Disable) Keep Aspect (Enable) FSN2016 – 9/2019...
- Page 35 There are buttons at the bottom related to the Crop setting. 1) Input Cropping – Select whether or not to activate crop 2) Input Window Coordinates – When Crop is enabled, you can insert the value and enter the coordinates you want to Crop. 3) Apply –...
- Page 36 Before Top Window Crop (Size 3840x2160) After Top Window Crop (X1 : 1000, Y1 : 1000, X2 : 3840, Y2 : 2160 applied) FSN2016 – 9/2019...
- Page 37 When you select a channel in Preset & Channel Select, you will see the below channel information 1. Input Name – You can change the name of the current channel when it appears.. 2. Input Port – Indicates the physical port of the current channel. 3.
- Page 38 6. Brightness – You can adjust the Brightness value of the current channel 7. Contrast – You can adjust the Contrast value of the current channel 8. Input Cropping – You can adjust the Crop value of the current channel 1) Input Name You can also see that the Select button changes when you change Input Name.
- Page 39 4) Audio Output You can turn audio off or on for the current channel. 5) Keep Aspect You can set the scale mode for the current channel. 6) Brightness & Contrast You can adjust the Brightness and Contrast of the current channel . In case of increased Brightness and Contrast FSN2016 –...
- Page 40 In case of reduced Brightness and Contrast There are buttons at the bottom related to the Crop setting. 1. Input Cropping – Select whether to enable Crop. 2. Input Window Coordinates – When Crop is enabled, you can insert the value and enter the coordinates you want to Crop.
- Page 41 6.9.3 Preset List The Preset List is activated when you click a button with a blue line drawn. You can remove unnecessary Preset buttons in the Preset list. When the Block Unlisted Preset keys are enabled, the button that does not exist in the preset list is prevented from being pressed on the MSV2 Front. When Block channel keys are enabled, the function prevents the channel button from being pressed on the front.
- Page 42 1. Preset List In case of all Preset Lists are checked In case of some of the Preset lists checked 2. Block unlisted preset keys When activating Block unregistered presets, it prevents the front button from selecting the presets that are in the Preset list.. FSN2016 –...
- Page 43 3. Block channel keys When activating Block channel keys, the channel selection is disabled through the front button. 6.9.4 Input Information, Coordinate Information Shows the information and output coordinates of the source that MSV2 recognizes. 1. Input Information FSN2016 – 9/2019...
- Page 44 1) CH – Displays the current channel number. 2) Type – Indicates the physical port number that the current channel is connecting. 3) Signal – Displays if there is an input on that channel at this time. If you have an input, it will be green, and if it is not, it will be greyed out.
- Page 45 6.10 Design Design mode allows layout editing and allows you to save the layout of your choice. Preview & Screen control window – Screen Layout, Preview, Banner, Grid setting, win1~win4 select function Design Option – Provide functionality for editing layouts Display information –...
- Page 46 6.11 Preview & Screen Control Window The horizontal and vertical positions of each window can be modified. To adjust the position, position the mouse cursor in the middle of the window and hold the left mouse button while dragging the window to the desired position.
- Page 47 Grid Function View The shape of Window B using by window selector FSN2016 – 9/2019...
- Page 48 Changing window position via drag FSN2016 – 9/2019...
- Page 49 Changing window size via drag FSN2016 – 9/2019...
- Page 50 6.12 Design Option - EDIT Design options help users edit layouts more quickly and in more detail. User0~User4, 5 Presets are selected and provide Window On/Off functions, Input Select, Layer, Coordinate settings, and New Layout functions. FSN2016 – 9/2019...
- Page 51 1. Preset Select Allows users to select a Preset so that they can save it to the desired Preset. 2. Preset Save The button to save the edited layout. If you move to a different menu without pressing Save, you will be returned to the previously saved layout.
- Page 52 4. Design Select Input Please refer to the Select Input function 6.9.2 Preset & Channel Setup – Select Input. Window On/Off is provided in the Design Select Input. Click the name of the leftmost window to turn it on or off. When off, the corresponding window button line changes to grey.
- Page 53 Shape of Window C, D OFF Shape of Window C, D ON FSN2016 – 9/2019...
- Page 54 5. Send Coordinate Information Send Coordinate Information is a feature that is provided for precise movement of coordinates. Insert the desired start coordinates, height, and width, then press the Apply button to apply. The total coordinate size is the output resolution size. (Caution) Because the 3840x2160 is multiples of 4 and the 1920x1080 is multiples of 2, the coordinate values, such as multiples of 2 are shifted by resolution, even if you add them, a slight error value can be...
- Page 55 6.13 Design Option – NEW LAYOUT NEW LAYOUT is a feature that allows you to edit layouts quickly through layout provided in MSV2. Click the desired Layout shape, set Input, and press the Save button to save the Layout. FSN2016 – 9/2019...
- Page 56 Vertical 2 PIP 1 FSN2016 – 9/2019...
- Page 57 Horizontal 3 PIP Side 3 FSN2016 – 9/2019...
- Page 58 6.14 Input Information, Coordinate Information Please refer 6.9.4 Input Information, Coordinate Information. 6.15 System User can check the version of MSV2 and various settings in the system. The name of the device, MSV2 serial number, hardware / software version, Mac address, system clock, and an upload button for firmware upgrade exists 6.15.1 Device Name Shows input information for MSV2.
- Page 59 If user wants to adjust the time manually, press System Clock to display the following Time Setup window. Time Setup allows user to set the time user wants. When the time setting is complete, press OK to apply. 6.15.3 Firmware Firmware upgrade is possible through MSV2 Web Manager.
- Page 60 User can view network information such as IP, Gateway, Subnet, DNS, and so on on, and change the network settings. DHCP features are available. Check MSV2 OSD for the changed IP and connect to the web. Creates the desired network setting value and is saved by pressing the Save button.
- Page 61 6.18 Schedule MSV2 schedule functionality is available. user can set the power on, off time to automatically turn MSV2 on or off when necessary FSN2016 – 9/2019...
- Page 62 Active is enabled, Time is on or off, and WEEKLY is the day of the week when the schedule function will operate. The green part is the active part. Set the schedule user wants and click the Save button to take effect.
- Page 63 6.19 Account User can change the account information for MSV2 account. After logging in again, you can set the ID, password, and device name of your account FSN2016 – 9/2019...
- Page 64 After connecting, the following window will appear: Selects user is the list of users to change (MSV2 provides Admin, guest1, guest2 total 3 accounts), and Device name is the name to enter the Device name column (see Manual 6.4.2). Username, password means ID and password when logging in. Once you have completed all of the values, user can save it by click the shape of arrow.
-
Page 65: Msv2 Osd
6.20 Shut down The MSV2 web controller provides Shutdown and Restart functions. It is available when powering off or restarting MSV2. 7 MSV2 OSD MSV2 supports the On Screen Display (OSD) feature. The OSD can be controlled by the front panel.. 7.1 OSD Introduction When press the Menu button, display the OSD in the center of the screen. - Page 66 OSD Menu operating button Menu button : Display or exit OSD menu Right button : User can go down a step in the menu hierarchy or increase and select of the Item value.. Left button : User can go up a step in the menu hierarchy or decrease the Item value. Up /Down button : Move up/down the menu list or increase or decrease the Item value by 10..
- Page 67 Channel1 Channel2 Channel3 Audio Channel4 Timeout Border Timeout Label Channel1 Channel2 Input Port Channel3 Channel4 Layer1 Layer2 Priority Layer3 Window A Layer4 Windows Fit window Scale mode Same aspect X pos Y pos Width Height Window B Same as window A Window C Same as window A Window D...
- Page 68 Output menu 7.2.1 Ouput Format User can select the output resolution. The Resolution list shows only the resolutions supported by the Display device in the MSV2's supported resolution. (Interlace resolution is not currently supported.) 7.2.2 Encryption User can set HDCP on/off FSN2016 –...
- Page 69 7.2.3 Preset User can show the currently selected Layout and select a different Layout 7.2.4 WinScale Options for whether you want the scale mode of the current image to follow the channel or individual settings. FSN2016 – 9/2019...
- Page 70 7.2.5 WinCrop Options for whether you want the crop mode of the current image to follow the channel or individual settings. 7.2.6 Audio Shows the channel where the current audio is output, and allows you to select audio for the other channel.
- Page 71 7.2.7 Border User can draw a Border on the MSV2 window. User can select 3type of Time out, On, and Off. Image of Border applied FSN2016 – 9/2019...
- Page 72 7.2.8 Label It can be shown the input name of outputed in each window through the OSD. user can select 3type of Time out, On, and Off * When using the output menu in Channel only mode, the value of Border, label on/off/timeout is shared by all four channels FSN2016 –...
- Page 73 Windows menu In the Window menu, user can change the Input port, Priority, and Scale mode for each window and view the coordinate information for that window. 7.3.1 Input Port User can change the input in the window FSN2016 – 9/2019...
- Page 74 7.3.2 Priority Available to change the order of layers on window. Layer4 is the front and Layer1 is the rearmost. 7.3.3 Scale Mode When Scale mode is Same Aspect, maintain the same ratio as Input size and when scale mode is Fit window, output is displayed the adjusted of image size and ratio according to the area occupied by Window.
- Page 75 7.3.4 Coordinate Information User can view the x, y coordinates, width, and height of the selected window. * If Layout is a channel, if you enter Windows menu, the following picture and window will be changed to a channel and only scale mode can be changed FSN2016 –...
- Page 76 7.4 Input menu In the Input menu, you can set information about each channel, Brightness, and Contrast, and range from 0 to 100. The Left/Right button decreases/increases the value by 1 and the Up/Down button decreases /increases the value by 10. User can select EDID Mode. FSN2016 –...
- Page 77 Brightness (Default) Brightness (Raise up) FSN2016 – 9/2019...
- Page 78 Contrast (Raise up) EDID Mode FSN2016 – 9/2019...
-
Page 79: Api
System menu User can view information about the S/W version, IP information, Mac, RS-232 and TCP Port on MSV2. 8 API(Command Set) On UART Controlling or TCP you can control MSV using text commands via RS-232 port on MSV. UART Control, TCP supports some of the functions of MSV, please control via MSV manager if you need full control. - Page 80 Warranty We hereby warrant the final purchase of our product as follows. In the case of troubles on our products, please contact the seller purchased. One (1) year limited warranty Our customers have right to be served with free charge when there is trouble in this product during one(1) year from the day purchased.
- Page 81 Thank you for choosing our product. Service Please contact our customer service if you need any information or help with our products. Warranty One year, parts and labor. EC Representative FORESEESON GmbH Industriestrasse 38a, 63150 Heusenstamm, Germany Tel. +49(0)6104-643980 FORESEESON UK Ltd. Unit 71, Barwell Business Park Leatherhead Road, Chessington, Surrey KT9 2NY, UK...
Need help?
Do you have a question about the MSV 2 and is the answer not in the manual?
Questions and answers