Table of Contents
Advertisement
Advertisement
Table of Contents

Related Manuals for Askey Verizon ASK-RTL108


Summary of Contents for Askey Verizon ASK-RTL108
- Page 1 User Guide LTE Home Router...
-
Page 2: Table Of Contents
1. Inside the box 2. Your LTE WiFi Gateway 3. Installation Positioning your gateway ............................... 6 Setup requirements ................................6 4. Login to Your LTE Gateway Connect by Smartphone ................................ 7 Connect by computer ................................9 5. Basic Settings Dashboard ................................... 12 Network .................................... - Page 3 WAN ......................................42 LTE ....................................... 44 LAN ....................................... 45 WiFi ....................................... 47 Client List ...................................... 50 Device Settings ................................... 51 Administration ....................................52 Date & Time ....................................53 Backup / Restore ..................................54 Firmware ....................................... 56 System Log ....................................57 Parental Control ..................................
- Page 4 Can’t access the Web User Interface to configure settings......................75 8. Tips & tricks Taking care of your SIM card ................................ 76 Get the best WiFi signal ................................76 Surf the Internet faster .................................. 76 Network security ................................... 76 9.
-
Page 5: Inside The Box
Inside the box Contact Verizon if any item is missing or damaged. 1) Gateway 2) Power Adapter **PLACEHOLDER ARTWORK: TO BE REVISED AFTER TECHNICAL REVIEW**... -
Page 6: Your Lte Wifi Gateway
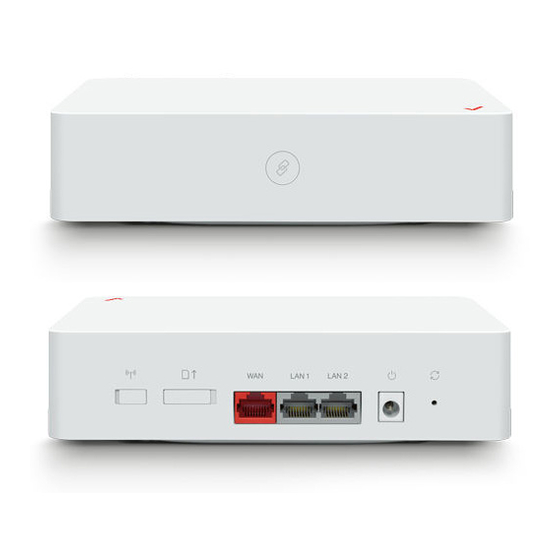
Your LTE WiFi Gateway Front: Status LED, WPS LED, WPS/LTE? Button Back: Power Port, 2 x LAN Ethernet Ports, 1 x WAN Ethernet Port, SIM Card Slot, Reset Button Bottom: Micro USB **PLACEHOLDER ARTWORK: TO BE REVISED AFTER TECHNICAL REVIEW**... - Page 7 LEDs The LEDs indicate the system and connection status, and WPS activity. **PLACEHOLDER: TO BE REVISED AFTER TECHNICAL REVIEW**...
- Page 8 WPS/LTE Button Press the WPS button on the front of the gateway to activate WPS. Refer to XY for more information about WPS. **PLACEHOLDER: TO BE REVISED AFTER TECHNICAL REVIEW**...
-
Page 9: Installation
Installation Disconnect any existing router or from your network before installation. 1. Plug the gateway into a power outlet with the included power adapter. **INSTALLATION ARTWORK #1** 2. Wait for a couple of minutes for the gateway to power up, and then head to 4. -
Page 10: Positioning Your Gateway
Positioning your gateway For the best wireless signal transmission from the gateway to your network devices: Place the gateway in a central area. Keep the gateway away from metal obstructions and away from direct sunlight. Keep the gateway away from 802.11g or 20MHz only WiFi devices, 2.4GHz computer peripherals, Bluetooth devices, cordless phones, transformers, heavy-duty motors, fluorescent lights, microwave ovens, refrigerators, and other industrial equipment to prevent signal interference or loss. -
Page 11: Login To Your Lte Gateway
Login to Your LTE Gateway You can configure your gateway’s network settings using the Web User Interface (Web UI) by computer or mobile app. First connect to your gateway, then access the Web UI, as shown below. Your gateway is pre-set with the WPA2 security, but you should immediately change the default WiFi password, as well as the Web UI login password. - Page 12 Login to the Web User Interface Open the Verizon Gateway App. Log in using the default username: admin and password: admin Go to to change your WiFi password and to change your Basic > Network > WiFi Expert > Device Settings > Administration Web UI login password, and remember to save your settings.
-
Page 13: Connect By Computer
Connect by computer On your computer, scan available WiFi networks. Select either of the networks named: WiFi-2.4G WiFi-5G Enter the unique password found on your gateway’s box. If preferred, you can use an Ethernet cable to connect your computer to the gateway’s LAN port for configuration (instead of WiFi). - Page 14 Login to the Web User Interface Open a web browser and enter the gateway’s default address http://192.168.1.1 in the address bar. Log in to the Web UI using the default username: admin and password: admin Go to to change your WiFi password and to change your Basic >...
-
Page 15: Basic Settings
Basic Settings Your gateway’s Web User Interface (Web UI) allows you to easily setup its Basic & Expert features. Menu Save Select the Basic tab in the menu: Remember to save your settings with the save button after making changes. The icon takes you back to the Dashboard. -
Page 16: Dashboard
Dashboard Basic > Dashboard The Dashboard shows a snapshot of your network status with quick links to key features of your gateway. Select any icon on the dashboard: Network Status, Parental Control to access more information and settings. Network Status takes you to Basic > Network > Status Parental Control takes you to Basic >... -
Page 17: Network
Network Basic > Network The Network menu provides quick links to the basic networking functions of your gateway. When you select the Network menu, the Network Map page is displayed as below. -
Page 18: Network Map
Network Map Basic > Network > Network Map The network map provides a visual overview and status information of the network and devices on the network, with quick links to wireless security settings and client lists. It’s important to check and configure security settings. - Page 19 Select icons on the dashboard for more information and settings, as displayed below: Displays the gateway’s Wide Area Network (WAN) IP Address and Connection Type (LTE). Displays the gateway’s Local Area Network (LAN) IP Address and Subnet Mask. Click LAN Settings to modify the settings.
- Page 20 LAN > LAN Settings This page allows you to configure your gateway on your Local Area Network (LAN). You can specify a static IP address for your gateway, and configure your gateway as a DHCP server to assign IP addresses to other devices on your LAN. Basic MAC Address Displays the MAC address of your gateway.
- Page 21 IP Address Specify the IP address here. This IP address will be assigned to your gateway and will replace the default IP address. Subnet Mask Specify a subnet mask. The default value is 255.255.255.0 Advanced DHCP is active/inactive Toggle the switch to enable or disable DHCP server. IP Address Pool Enter the start and end IP address of the IP address range which your gateway’s DHCP server will assign to...
- Page 22 WiFi Displays your gateway’s 2.4GHz & 5GHz network name (SSID) with switches to quickly enable or disable either WiFi network. Click WiFi Settings to go to Network > WiFi Settings.
- Page 23 Connected Devices Displays all devices (clients) connected to your gateway, by Ethernet (LAN) or WiFi (wireless) e.g. laptops, smartphones. The device name, MAC address and IP address is listed for each device.
-
Page 24: Status
Status Basic > Network > Status Network Status displays the status of the network across six categories: Internet v4, Internet v6, LTE, LAN, Wireless & System Information. Information is listed in Network Status for reference as described below: Internet v4 Displays IPv4 Wide Area Network WAN information about your gateway’s LTE connection. -
Page 26: Traffic Query
Traffic Query Basic > Network > Network Map Traffic Query displays your network data usage, with upload, download and total traffic displayed in MB. Ensure that your gateway’s date and time settings are correct in Expert > Device Settings > Date & Time for accurate Monthly usage information. -
Page 27: Wan
Basic > Network > WAN The Internet Connection screen allows you to configure the settings of various WAN connection types. 1. From the navigation panel, go to Basic Settings > Network > WAN. 2. Configure the following settings below. When done, click Save. WAN Connection Type: Choose your Internet Service Provider type: Dynamic IP or Static IP –... - Page 28 Connect to DNS Server: Allows this router to get the DNS IP address from the ISP automatically. A DNS is a host on the Internet that translates Internet names to numeric IP addresses.
-
Page 29: Lte
Basic > Network > LTE LTE settings are pre-configured by default. You can disconnect the LTE connection using the Disconnect button if needed, and the connection and SIM status are displayed accordingly. Data Roaming, APN, PDN and SIM Management PIN settings can be altered using the switch buttons and drop-down menu. -
Page 30: Wifi
WiFi Basic > Network > WiFi The WiFi screen displays the basic settings for your gateway’s WiFi. Your gateway is dual-band and uses two Wi-Fi frequencies (2.4GHz & 5GHz) for better wireless performance on your devices. You can edit basic settings for 2.4GHz or 5GHz frequency bands by selecting the respective tab. - Page 31 2.4 / 5 GHz WiFi Settings WiFi is Enable or disable this WiFi frequency. active/inactive Wireless Name This is the name of your Wi-Fi network for identification, (SSID) also sometimes referred to as “SSID”. The SSID can consist of any combination of up to 32 alphanumerical characters.
-
Page 32: Parental Control
Parental Control Basic > Parental Control The Parental Control feature allows you to restrict Internet access to selected devices on your network at specified times e.g. disabling Internet access for a child’s smartphone. - Page 33 1. Set the slider to active to enable parental control. 2. Click ADD NEW to add and setup a new device for parental controls. 3. Select a device from the Client menu or enter the MAC address manually. 4. Specify a Device Name and Description for the device easy reference. 5.
-
Page 35: Expert Settings
Expert Settings Your gateway’s Web User Interface (Web UI) allows you to easily setup its Basic & Expert features. Menu Save Select the Expert tab in the menu: Remember to save your settings with the save button after making changes. The icon takes you back to the Dashboard. -
Page 36: Dashboard
Dashboard Expert > Dashboard The Dashboard shows a snapshot of your network status with quick links to key features of your gateway. Select any icon on the dashboard: Network Status, Parental Control, Device Settings, LAN, & Security to access more information and settings. -
Page 37: Network
Network Status should display All OK to indicate a functioning LTE network. If you don’t see this, check the gateway’s LEDs and refer to Troubleshooting to diagnose the problem. Network Expert > Network The Network menu provides quick links to the basic networking functions of your gateway. When you select the Network menu, the Network Map page is displayed as below. -
Page 38: Network Map
Network Map Expert > Network > Network Map The network map provides a visual overview and status information of the network and devices on the network, with quick links to wireless security settings and client lists. It’s important to check and configure security settings. - Page 39 Select icons on the dashboard for more information and settings, as displayed below: Displays the gateway’s Wide Area Network (WAN) IP Address and Connection Type (LTE). Displays the gateway’s Local Area Network (LAN) IP Address and Subnet Mask. Click LAN Settings to modify the settings.
- Page 40 LAN > LAN Settings This page allows you to configure your gateway on your Local Area Network (LAN). You can specify a static IP address for your gateway and configure your gateway as a DHCP server to assign IP addresses to other devices on your LAN. Basic MAC Address Displays the MAC address of your gateway.
- Page 41 Advanced DHCP is active/inactive Toggle the switch to enable or disable DHCP server. IP Address Pool Enter the start and end IP address of the IP address range which your gateway’s DHCP server will assign to devices on the network. Address Lease Time Enter an address lease time in hours.
- Page 42 WiFi Displays your gateway’s 2.4GHz & 5GHz network name (SSID) with switches to quickly enable or disable either WiFi network. Click WiFi Settings to go to Network > WiFi Settings. Connected Devices Displays all devices (clients) connected to your gateway, by Ethernet (LAN) or WiFi (wireless) e.g.
-
Page 43: Status
Status Expert > Network > Status Network Status displays the status of the network across six categories: Internet v4, Internet v6, LTE, LAN, Wireless & System Information. Information is listed in Network Status for reference as described below: Internet v4 Displays IPv4 Wide Area Network WAN information about your gateway’s LTE connection. -
Page 45: Traffic Query
Traffic Query Expert > Network > Network Map Traffic Query displays your network data usage, with upload, download and total traffic displayed in MB. Ensure that your gateway’s date and time settings are correct in Expert > Device Settings > Date & Time for accurate Monthly usage information. -
Page 46: Wan
Expert > Network > WAN The Internet Connection screen allows you to configure the settings of various WAN connection types. 1. From the navigation panel, go to Basic Settings > Network > WAN. 2. Configure the following settings below. When done, click Save. WAN Connection Type: Choose your Internet Service Provider type: Dynamic IP or Static IP –... - Page 47 Connect to DNS Server: Allows this router to get the DNS IP address from the ISP automatically. A DNS is a host on the Internet that translates Internet names to numeric IP addresses.
-
Page 48: Lte
Expert > Network > LTE LTE settings are pre-configured by default. You can disconnect the LTE connection using the Disconnect button if needed, and the connection and SIM status are displayed accordingly. Data Roaming, APN, PDN and SIM Management PIN settings can be altered using the switch buttons and drop-down menu. -
Page 49: Lan
Expert > Network > LAN The LAN page allows you to configure your gateway on your Local Area Network (LAN). You can specify a static IP address for your gateway, and configure your gateway as a DHCP server to assign IP addresses to other devices on your LAN. Basic MAC Address Displays the MAC address of your gateway. - Page 50 network. IP Address Specify the IP address here. This IP address will be assigned to your gateway and will replace the default IP address. Subnet Mask Specify a subnet mask. The default value is 255.255.255.0 Advanced DHCP is active/inactive Toggle the switch to enable or disable DHCP server. IP Address Pool Enter the start and end IP address of the IP address range which your gateway’s DHCP server will assign to...
-
Page 51: Wifi
WiFi Expert > Network > WiFi The WiFi screen displays advanced settings for your gateway’s WiFi as well as WPS settings. Your gateway is dual-band and uses two Wi-Fi frequencies (2.4GHz & 5GHz) for better wireless performance on your devices. You can edit advanced settings for 2.4GHz or 5GHz frequency bands by selecting the respective tab. - Page 52 consist of any combination of up to 32 alphanumerical characters. Hide SSID Check the box to hide your SSID. When hidden, the SSID will not be visible as an available Wi-Fi network to clients – clients must manually enter the SSID in order to connect.
- Page 53 but less interference), 40MHz (better performance but likely more interference), or Auto (automatically select based on interference level). Displays the gateway’s WPS Settings. (How can it be Enrollee?)
-
Page 54: Client List
Client List Expert > Network > Client List Displays all devices (clients) connected to your gateway, by Ethernet (LAN) or WiFi (wireless) e.g. laptops, smartphones. The device name, MAC address and IP address is listed for each device. -
Page 55: Device Settings
Device Settings Expert > Device Settings Various administrative functions of your gateway can be configured from the Device Settings menu, including the Web UI login password, gateway date & time settings, backup, gateway firmware and system logs. -
Page 56: Administration
Administration Expert > Device Settings > Administration The administration function allows you to change the login password for the gateway’s Web UI. It’s essential to change this password for the security of your gateway. Use hard-to-guess password which include combinations of numbers, letters and symbols, and change your password regularly. -
Page 57: Date & Time
Date & Time Expert > Device Settings > Date & Time Set the date and time for your gateway. You can use a Simple Network Time Protocol (SNTP) which synchronizes the date and time with public time servers, or the gateway can get the date and time automatically based on your selected time zone. Select SNTP from the Version options. -
Page 58: Backup / Restore
Backup / Restore Expert > Device Settings > Backup & Restore The Backup & Restore page enables you to save/backup the gateway’s current settings as a file to your local computer, or restore your gateway to previously saved settings by loading a backed up file. You can also reset the gateway back to factory default settings. - Page 59 file to your gateway. Factory Default Restore Revert all the settings to Select Factory Restore to revert your gateway to it’s their default values. original factory default state. This resets all settings.
-
Page 60: Firmware
Firmware Expert > Device Settings > Firmware The Firmware page displays your gateway’s firmware version and hardware version information. You can enter a server path to manually check for a new version or upload a firmware file from your local drive. Contact your ISP or check their website for correct Server Path or to download files manually. -
Page 61: System Log
System Log Expert > Device Settings > System Log System Log is useful information for network administrators or for potentially troubleshooting gateway/network issues. The page displays a detailed information log of network activities under different categories. You can select a category using the drop-down menu or view all categories, as well as clear log entries using the DELETE ALL icon. -
Page 62: Parental Control
Parental Control Expert > Parental Control The Parental Control feature allows you to restrict Internet access to selected devices on your network at specified times e.g. disabling Internet access for a child’s smartphone. 1. Set the slider to active to enable parental control. 2. - Page 63 7. Click and drag to fill in the red blocks on the schedule by day and hour. The red blocks indicate the time blocks during which Internet access is not allowed. 8. Click SAVE SCHEDULE to save the schedule and the device’s Internet access will now be restricted according to the schedule.
-
Page 65: Diagnostic
Diagnostic Expert > Diagnostic You can run Ping & Traceroute diagnostic tests with the gateway. Enter the IP address to use for the test and click Start, results are displayed in the box. -
Page 66: Security
Security Expert > Security Use the Security menu to configure various security functions if needed, including Firewall, IP/MAC Binding and Access Control. -
Page 67: Firewall
Firewall Expert > Security > Firewall The gateway features a built-in firewall that provides protection to your network from unauthorized intrusions from the Internet. The firewall features four modules which can be enabled or disabled using the switches. SPI Firewall Stateful Packet Inspection (SPI) firewall protection means only packets matching a known active connection will be allowed by the firewall, and others will be rejected. -
Page 68: Ip / Mac Binding
IP / MAC Binding Expert > Security > IP / MAC Binding IP/MAC Binding allows you to reserve a static IP address for a device on the network, rather than being assigned a new (dynamic) IP address by the gateway’s DHCP Server every time the device connects to the gateway. Static IP addresses can be useful for using various services on the local network. -
Page 70: Access Control
Access Control Expert > Security > Access Control Access Control is a security feature that can help to prevent unauthorized users from connecting to your gateway. You can define a list of network devices permitted (whitelist) or denied (blacklist) to connect to the gateway. Devices are each identified by their unique MAC address or IP address. -
Page 72: Nat Forwarding
NAT Forwarding Expert > NAT Forwarding Functions in the Network Address Translation (NAT) Forwarding menu can improve network performance and security. -
Page 73: Dmz
Expert > NAT Forwarding > DMZ A Demilitarized Zone (DMZ) is an isolated area in your local network where a computer runs outside the firewall and receives/intercepts all incoming Internet traffic. This can provide an extra layer of security to the rest of the network, or can be useful if a network client PC cannot run an application properly from behind an NAT firewall. -
Page 74: Upnp
UPnP Expert > NAT Forwarding > UPnP Universal plug-and-play (UPnP) is a set of networking protocols which enables network devices to communicate and automatically establish working configurations with each other, such as computers, printers, mobile devices etc. It’s typically used for data sharing, communications and entertainment purposes, although sometimes not preferred due to security concerns. -
Page 75: Alg
Expert > NAT Forwarding > ALG Application Level Gateway (ALG) settings are advanced functions that can resolve issues where services are disrupted by the firewall. Each ALG module is a security component that augments the firewall. Services such as VPNs or Virtual Servers may require ALG modules enabled. - Page 76 or as part of the delivery of services by ISPs. IPSec Passthrough Internet Protocol Security (IPsec) is a protocol suite for securing Internet Protocol (IP) communications by authenticating and encrypting each IP packet of a communication session. FTP ALG File Transfer Protocol is a widely and commonly used method of exchanging files over IP networks.
-
Page 77: Virtual Servers
Virtual Servers Expert > NAT Forwarding > Virtual Servers This function allows you to set up an internet service on a local computer, without exposing the local computer to the internet. Internet traffic is directed to a specific port or range of ports on a device or devices on your local network. You can also build various sets of port redirection, to provide various internet services on different local computers via a single Internet IP address. - Page 78 Service Type Specify the service type e.g. HTTP, FTP etc. External Port Start Specify the external/public port to access the computer on your local network. External Port End Select the type of Internet Protocol. Internal IP Enter the IP address of the computer on your local network.
-
Page 79: Troubleshooting
Troubleshooting If you are having problems with your gateway, try these basic steps in this section before looking for further solutions. Phone or computer is disconnected from the gateway. Your phone or computer might have lost the connection to the gateway due to interference, system updates, or any number of reasons. - Page 80 Tips & tricks Taking care of your SIM card You should not remove your SIM card from the gateway unless asked to do so by customer service. Keep your SIM card dry and clean Avoid extreme temperatures and magnetic fields Do not bend, cut, trim or modify the SIM card in any way.
- Page 81 Technical Specification General Technical Standard 3GPP L TE , L TE Category 12 Frequency band L TE FDD: B2, B4, B5, B13, B48, B66 W i-Fi Standard 802.11 a/b/g/n/ac Dimensions (L x W x H) 170mm x 124mm x 43.4mm Operating temperature range -20 –...
- Page 82 Federal Communication Commission Interference Statement This device complies with Part 15 of the FCC Rules. Operation is subject to the following two conditions: (1) This device may not cause harmful interference, and (2) this device must accept any interference received, including interference that may cause undesired operation.
Need help?
Do you have a question about the Verizon ASK-RTL108 and is the answer not in the manual?
Questions and answers