Advertisement
Available languages
Available languages
Quick Links
NL
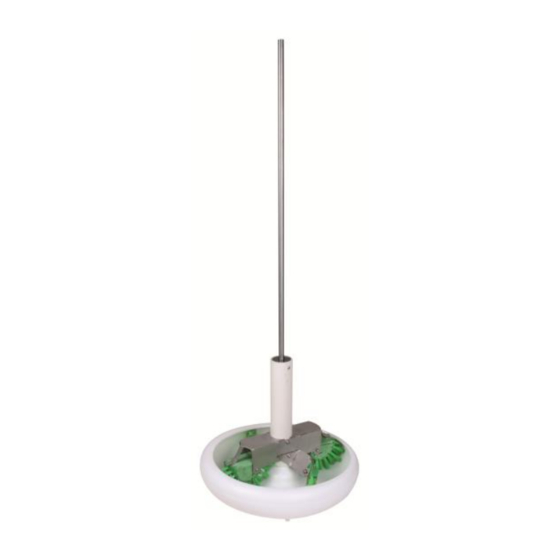
MS Cleanfeeder
Gebruiksaanwijzing ............................................................................................................ 2
EN
MS Cleanfeeder
Manual .................................................................................................................................... 5
DE
MS Cleanfeeder
Gebrauchsanweisung ........................................................................................................ 8
FR
MS Cleanfeeder
Mode d'emploi.................................................................................................................. 11
ES
MS Cleanfeeder
Instrucciones para el uso ............................................................................................... 14
IT
MS Cleanfeeder
Manuale di istruzioni ...................................................................................................... 17
MS Cleanfeeder
1505575 - 1505576
1
1505575/09-10-2014/F
Advertisement

Related Manuals for MS Schippers MS Cleanfeeder

Summary of Contents for MS Schippers MS Cleanfeeder
- Page 1 MS Cleanfeeder 1505575 - 1505576 MS Cleanfeeder Gebruiksaanwijzing ......................2 MS Cleanfeeder Manual ............................ 5 MS Cleanfeeder Gebrauchsanweisung ......................8 MS Cleanfeeder Mode d’emploi........................11 MS Cleanfeeder Instrucciones para el uso ....................14 MS Cleanfeeder Manuale di istruzioni ...................... 17...
-
Page 2: Montage-Instructies
MS Cleanfeeder borstelhouder - borstelset Montage-instructies: Benodigd gereedschap: Inbussleutel 2,5 mm en steek- of ringsleutel 6 1. MS Cleanfeeder borstelhouder 2. Monteer de twee hoofdcomponenten mbv de meegeleverde korte inbusbouthes zoals op de foto. 3. Borstelset... - Page 3 5. Monteer de groene borstels zoals op de foto. Let op de juiste positie van de het zwarte blokje. De moer moet tegen de schuine kant zitten! 6. Schuif nu de borstelhouder met de gemonteerde borstels over de MS Cleanfeeder.
- Page 4 7. Gebruik een schroefmachine om de borstels aan te drijven. Tegen de klok in = schrobben Met de klok mee = dweilen...
-
Page 5: Mounting Instructions
MS Cleanfeeder Mounting instructions: Required tools: 2.5 mm Allen key and wrench 6 1. MS Cleanfeeder brush holder 2. Assemble the 2 components with included short Allen screws as in the picture. 3. Set brushes... - Page 6 Bevelled side 5. Assemble the green brushes as in the picture. Take note of the position of the black part. The nut should be fixed against the bevel! 6. Slide the brush holder with the assembles brushes over the MS Cleanfeeder.
- Page 7 7. Use an electric screwdriver to twirl the brushes. Clockwise = scrubbing Counter clockwise = mopping...
- Page 8 MS Cleanfeeder Montageanleitung: Benötigtes Werkzeug: Inbusschlüssel 2,5 mm, Steck- oder Ringschlüssel 6 1. MS Cleanfeeder Bürste 2. Montieren Sie die zwei Hauptkomponenten wie im Bild dargestellt. (mit Hilfe des mitgelieferten kurzen Inmusbolzen) 3. Bürstenset...
- Page 9 – nach innen gerichtet) Schräge Seite 5. Montieren Sie die grünen Bürsten wie im Bild dargestellt. Achten Sie darauf, dass Sie das schwarze Blöckchen richtig positionieren. 6. Schieben Sie jetzt die Röhre mit den montierten Bürsten über den MS Cleanfeeder.
- Page 10 7. Benutzen Sie eine Bohrmaschine um die Bürsten anzutreiben. Gegen den Uhrzeigersinn = scheuern Im Uhrzeigersinn = rauswischen...
- Page 11 Instructions de montage : Outillage nécessaire : Clef Allen 2,5 mm et clef plate de 6 ouverte ou fermée 1. Porte-brosses MS Cleanfeeder 2. Monter les deux composants principaux au moyen des petites vis creuses livrées avec l’appareil, comme sur la photo.
- Page 12 Côté oblique 5. Monter les brosses vertes comme sur la photo. Attention à bien positionner le petit bloc noir. L’écrou doit être positionné contre le côté oblique ! 6. Emboîter le porte-brosses, avec les brosses en place, sur le MS Cleanfeeder...
- Page 13 7. Utiliser une visseuse pour faire tourner les brosses Sens inverse des aiguilles d’une montre : brossage Sens des aiguilles d’une montre : évacuation des déchets...
-
Page 14: Instrucciones De Montaje
MS Cleanfeeder Instrucciones de montaje: Herramientas: 2,5 mm Allen y llave tubo 6 1. MS Cleanfeeder soporte cepillos 2. Montar los dos componentes con los allen cortos como muestra la foto. 3. Set cepillos... - Page 15 Bevelled side 5. Montar los cepillos verdes como muestra la foto. Ten en cuenta la posición del cepillo y la parte negra. (la tuerca va al lado fresado) 6. Deslizar el soporte con los cepillos montados encima del MS Cleanfeeder...
- Page 16 7. Usa un taladro para girar los cepillos. En sentido del reloj: Limpieza, fregar En sentido contrarreloj: Vaciar, quitar liquido...
-
Page 17: Istruzioni Per Il Montaggio
MS Cleanfeeder Istruzioni per il montaggio: Attrezzatura: Chiave a brugola 2,5 mm e Chiave Inglese 6 1. MS Cleanfeeder porta-spazzola 2. Assemblare i 2 componenti come nella figura. 3. Posizionare le spazzole. - Page 18 (lato corto, iniziare dalla vite, verso l’interno) Lato smussato 5. Assemblare le spazzole versi come nella figura. Attenzione alla posizione della parte nera. Il dado dovrebbe essere fissato contro la parte smussata! 6. Far scorrere il porta-spazzola con le spazzole assemblate sull’MS Cleanfeeder...
- Page 19 7. Usare un trapano elettrico per far girare le spazzole. In senso orario = lavaggio energico In senso antiorario = pulizia...
Need help?
Do you have a question about the MS Cleanfeeder and is the answer not in the manual?
Questions and answers