Table of Contents
Advertisement
Available languages
Available languages
http://waterheatertimer.org/Intermatic-ET-series-timers-and-manuals.html
7777 Winn Road
Spring Grove, Illinois 60081
www.intermatic.com
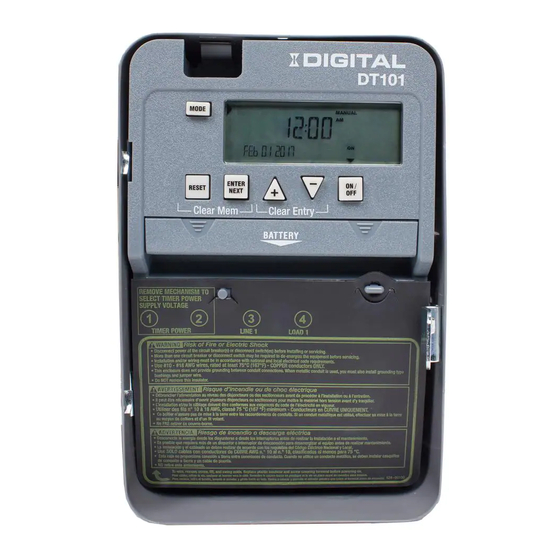
IDIGITAL — 24-Hour Digital Time Switch
MODEL DT101
SAFETY SECTION
Risk of Fire or Electrical Shock
• Disconnect power at the circuit breaker(s) or disconnect switch(es) before installing or servicing.
• Installation and/or wiring must be in accordance with national and local electrical code requirements.
• This enclosure does not provide grounding between conduit connections. When metallic conduit is used, you must also install grounding type bushings and jumper wire.
• Use #14-#12 AWG wires, rated at least 75°C (167°F)-COPPER conductors ONLY.
• If the power disconnect point is out of sight, lock it in the OFF position and tag it to prevent unexpected application power.
• Make sure there is no wire insulation under the terminal plate on the time switch connector. Firmly tighten terminal screws.
• Do not remove insulator that is covering terminals.
• KEEP DOOR CLOSED AT ALL TIMES when not servicing.
• Do NOT touch circuit board components. Contact can create a static discharge, which can damage the microprocessor.
PRODUCT DESCRIPTION
The Intermatic DT101 Digital 24-Hour Time Switch automatically switches loads to a preset daily schedule with to-the-minute
accuracy. Use the DT101 as an ON/OFF timer in applications requiring 24-hour load control such as lighting, air conditioning
systems, pumps, etc. Each load output of the Time Switch can support up to 14 timed ON and 14 timed OFF events per day.
The program can be overridden by pushing the ON/OFF load override button(s). The DT101 Time Switch is designed to directly
switch tungsten or ballast loads up to its rating, and inductive or resistive loads up to 20 A at 120, 208, 240 or 277 VAC.
Specifications
Time Switch
• Input Voltage: 120–277 VAC, 60 Hz
• Power Consumption: 6.0 W Max.
• Contact Configuration: SPST
Switch Ratings
• 20 A Inductive/Resistive, 120/240 VAC, 60 Hz
• 20 A Magnetic Ballast, 120-277 VAC, 60 Hz
• 1 A Electronic Ballast, 120-277 VAC, 60 Hz
• 20 A Resistive, 28 VDC
• 5 A Tungsten: 120/240 VAC, 60 Hz
• 1 HP, 120 VAC, 60 Hz
• 2 HP, 240 VAC, 60 Hz
Set Points (Events)
• The load output of the Time Switch can support up to
14 timed ON and 14 timed OFF events per day.
WARNING
NOTICE
Battery-Powered Clock Operation
• 3 year minimum (uses two AAA industrial-grade
alkaline nonrechargeable 1.5 V batteries, supplied)
Minimum ON or OFF time
• 1 minute
Maximum ON or OFF time
• 23 hours, 59 minutes
Shipping Weight
• 2.5 lb. (1.1 kg)
Enclosures
• TYPE 1 indoor metal enclosure
Knockouts
• Combination 1/2-3/4" size (one on back, one on each
side, two on bottom)
Wire Size
• #14-#12 AWG
Advertisement
Table of Contents

Related Manuals for Intermatic DT101


Summary of Contents for Intermatic DT101
- Page 1 Each load output of the Time Switch can support up to 14 timed ON and 14 timed OFF events per day. The program can be overridden by pushing the ON/OFF load override button(s). The DT101 Time Switch is designed to directly switch tungsten or ballast loads up to its rating, and inductive or resistive loads up to 20 A at 120, 208, 240 or 277 VAC.
-
Page 2: Installation
INSTALLATION Preparing the Time Switch Catch 1. Remove the mechanism from the case by depressing the catch at the top of the case and pulling out, as shown in FIG. 1. 2. Set the voltage selector for the desired input voltage. The time switch is shipped with voltage set for 277 VAC. -
Page 3: Initial Setup
Powering the Time Switch 1. Remove the battery case by sliding it down as shown by the arrows, then install two AAA alkaline batteries. Make sure the batteries are pointing in the direction MODE shown in FIG. 6. Battery Cover –... -
Page 4: Operation
This warranty service is available by either (a) returning the product to the dealer from whom the unit was purchased or (b) completing a warranty claim online at www.intermatic.com. This warranty is made by: Intermatic Incorporated, Customer Service 7777 Winn Rd., Spring Grove, Illinois 60081-9698. -
Page 5: Description Du Produit
Le programme peut être outrepassé en appuyant sur le(s) bouton(s) ON/OFF (ACTIVER/DÉSACTIVER) de neutralisation de la charge. La minuterie DT101 est conçue pour commuter directement les charges tungstène ou les charges de ballast jusqu’à leur capacité et les charges inductives ou résistives jusqu’à 20 A à 120, 208, 240 ou 277 V CA. - Page 6 INSTALLATION Préparation de la minuterie Verrouillage 1. Retirez le mécanisme du boîtier en enfonçant le verrouillage en haut du boîtier et en le retirant, tel qu’illustré dans la FIG. 1. 2. Réglez le sélecteur de tension sur la tension d’entrée désirée. La minuterie est fournie avec une tension réglée sur 277 V CA.
-
Page 7: Configuration Initiale
Alimentation de la minuterie 1. Retirez le boîtier de piles en le coulissant vers le bas, vers le sens des flèches, puis placez les deux piles alcalines de type AAA. Assurez-vous que les piles sont orientées dans le sens indiqué sur la FIG. 6. MODE Remarque : Remplacez les piles tous les deux à... -
Page 8: Garantie Limitée D'un An
Ce service de garantie est disponible (a) en retournant le produit au vendeur auprès duquel l’unité a été achetée ou (b) en remplissant un formulaire en ligne de réclamation de garantie sur www.intermatic.com. La présente garantie est offerte par : Intermatic Incorporated, Customer Service 7777 Winn Rd., Spring Grove, Illinois 60081-9698. -
Page 9: Descripción Del Producto
El interruptor temporizador digital de 24 horas DT101 de Intermatic puede conmutar automáticamente cargas predefinidas en un programa diario con precisión de minutos. Use el DT101 como un temporizador de encendido/apagado en aplicaciones que necesitan 24 horas de control sobre la carga, como por ejemplo, iluminación, sistemas de aire acondicionado, bombas, entre otros. -
Page 10: Instalación
INSTALACIÓN Preparar el interruptor temporizador Cierre 1. Extraiga el mecanismo de la caja accionando el cierre de la parte superior de la caja y luego extráigalo como se muestra en la FIG. 1. 2. Ajuste el selector de voltaje en el voltaje de entrada deseado. -
Page 11: Ajuste Inicial
Energizar el interruptor temporizador 1. Extraiga la caja de la pila deslizándola hacia abajo como lo muestran las flechas, luego instale dos pilas alcalinas AAA. Debe comprobar que las pilas apunten en la MODE dirección que se muestra en la FIG. 6. Tapa de las pilas –... -
Page 12: Garantía Limitada De Un Año
Este servicio de garantía está disponible mediante (a) la devolución del producto al proveedor al que se le compró la unidad; o (b) el llenado de una reclamación de garantía en línea en www.intermatic.com. Esta garantía la otorga: Intermatic Incorporated, Atención al cliente 7777 Winn Rd., Spring Grove, Illinois 60081-9698.
Need help?
Do you have a question about the DT101 and is the answer not in the manual?
Questions and answers
Do you a 240v wiring diagram