Table of Contents
Advertisement
Advertisement
Table of Contents

Related Manuals for Pakedge PowerPak 9

Summary of Contents for Pakedge PowerPak 9
- Page 1 PowerPak Power Distribution Unit User Guide...
-
Page 2: Table Of Contents
PowerPak Power Distribution Unit Contents Introduction ..........................4 Overview ........................... 5 PowerPak 9 ................................... 5 Front panel ................................5 Back panel ................................5 PowerPak 8I ................................. 6 Front panel ................................6 Back panel ................................6 Display .................................... 7 PowerPak Installation ......................8 Warnings ................................... - Page 3 PowerPak Power Distribution Unit Maintenance ................................. 20 Back up the configuration ..............................20 Restore the configuration ..............................21 Manually reboot the PowerPak ............................21 Firmware ................................22 Diagnostics ................................22 Display ..................................23 Add the PowerPak to a BakPak account ..............23 Troubleshooting ........................
-
Page 4: Introduction
Configurable alerts: Define visual, audible, and email alarms with full logging. • Surge protection: Provides up to 6kV surge protection to your devices. • BakPak Lite built in: Manageable by Pakedge’s BakPak and BakPak Lite network management • agents from any location. -
Page 5: Overview
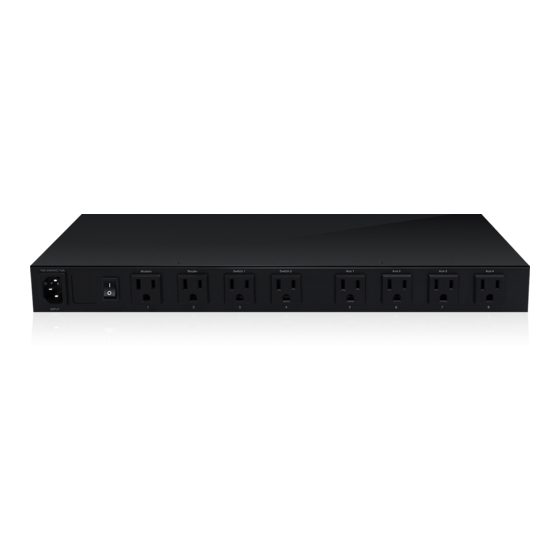
PowerPak Power Distribution Unit Overview PowerPak 9 The PowerPak 9 power distribution unit comes with nine NEMA 5-15 outlets. Input: 100-120VAC, 50~60 Hz • Output: 100-120VAC, 12A, 50~60 Hz, 1440W (total) • Front panel A. Power switch B. Surge protection indicator light C. -
Page 6: Powerpak 8I
PowerPak Power Distribution Unit PowerPak 8I The PowerPak 8I power distribution unit comes with eight IEC C14-type outlets. Input: 100-240VAC, 50~60 Hz • Output: 100-240VAC, 10A, 50~60 Hz, 2400W (total) • Front panel A. Power switch B. Surge protection indicator light C. -
Page 7: Display
PowerPak Power Distribution Unit Display The front panel of the PDU has an OLED display, which helps you quickly review information and control outlets while working at the rack without needing to log in to the web interface. From the home screen, rotate the scroll wheel and press the center button to select from the menu options: Local Reboot: Press and hold the center button for two seconds to power cycle the outlets that •... -
Page 8: Powerpak Installation
PowerPak Power Distribution Unit PowerPak Installation Tools required: Phillips screwdriver (if using rack-mount brackets). • Computer with an Ethernet interface and a web browser (an integrated DB-9 port or USB-to-Serial • adapter may be necessary if you would like to use the console interface). Ethernet cable. -
Page 9: Warnings
PowerPak Power Distribution Unit Warnings Elevated Operating Ambient—If installed in a closed or multi-unit rack assembly, the operating ambient temperature of the rack environment may be greater than room ambient. Therefore, consideration should be given to installing the equipment in an environment compatible with the maximum ambient temperature (Tma) specified by the manufacturer. -
Page 10: Powerpak Startup
PowerPak Power Distribution Unit PowerPak startup To log in to the PowerPak, you must first configure the TCP/IP settings of your computer. To configure TCP/IP settings: 1. Under Control Panel, double-click Network Connections and double-click the connection of your Network Interface Card (NIC). The Local Area Connection Properties dialog appears: 2. - Page 11 Default settings: The IP address will be automatically assigned by a router if a DHCP server is detected. Otherwise, the default IP address will be automatically set to 192.168.1.210. To log in: 1. For Username, type pakedge. For Password, type pakedgep, then click Log in.
- Page 12 PowerPak Power Distribution Unit The Quick Setup page opens. Use this page to quickly set up your PDU’s basic configuration. You can set: Username • Password • Outlet names • Whether to register the PDU in the cloud • 2. Click Apply to apply your changes to the PDU. The Quick Setup page closes, and you are brought to the Dashboard.
-
Page 13: Menu Options
PowerPak Power Distribution Unit The PowerPak’s Dashboard (main menu) appears. The Dashboard displays the status of PowerPak and general information such as IP address, MAC addresses, voltage, and frequency. The outlet section displays the current, power consumption, power on delay, etc. Menu options Status This section contains system-level menus like LAN and Display settings... -
Page 14: Dashboard
PowerPak Power Distribution Unit Dashboard The Dashboard is the default landing page of the PDU. You can also access this page by hovering over the Status icon and clicking Dashboard, or by clicking the PowerPak circle in the upper-left corner. This page displays the MAC and IP addresses, current voltage/frequency/current, outlet status, and temperature/humidity with the temperature sensor. -
Page 15: Network
PowerPak Power Distribution Unit Network This section contains settings for the PowerPak’s network settings. IP network setting configures the IP network setting of your PowerPak (DHCP or static IP). The default setting is DHCP. Outlet This section contains outlet configuration and management menus, including schedules and alerts. -
Page 16: Configuration
PowerPak Power Distribution Unit Configuration Configure the name, local reboot, auto ping reboot, power on/off delay for each individual outlet. Outlet name: Specify an outlet name. For example, if you connect a 24-Port switch to Outlet1, you • can rename Outlet1 to “24-Port-Switch”. Local reboot: Enable/disable local reboot. -
Page 17: Scheduling
PowerPak Power Distribution Unit Email notification: Select to automatically send an email whenever the outlet is power cycled as a • result of failed auto-pings. Edit: If auto-ping is enabled for the outlet, click Edit to define host settings for the outlet. •... -
Page 18: Graph View
PowerPak Power Distribution Unit Graph view Outlet: Select the outlet (or All) to display data for. • Time: Select the time range (Now, Day, or Week) to display data for. • Measurement: Select the measurement unit (Current or Power). • Apply: After changing any of the above settings, click Apply to recompute the graph. -
Page 19: Outlet Alerts
PowerPak Power Distribution Unit Outlet alerts You can also set up alerts for each individual outlet, using the same selection of parameters above. Alert/Notification settings Notification method: Select method of alert to use. • Recipient’s email: Enter the recipient’s email address. •... -
Page 20: Username/Password
PowerPak Power Distribution Unit Username/Password Username: Enter a username up to 15 characters. • Current password: Enter the current password. • New password: Enter the new password. • Verify password: Enter the new password again. • Time zone Time zone: Select the time zone to use for system reporting and logging. •... -
Page 21: Restore The Configuration
PowerPak Power Distribution Unit Restore the configuration Restore from backup: Click Choose File to select the appropriate configuration to restore. • Restore: Click to restore the PowerPak configuration using the selected file. • Factory default: Click to restore the PowerPak’s default factory settings. All changes made to the •... -
Page 22: Firmware
PowerPak Power Distribution Unit Firmware Allows you to update the PDU firmware. Keep settings: Select to preserve your current configurations after the firmware update. Note: • If this is not selected, the personalized settings will be lost. Local image: Click Choose File to select the firmware update file. •... -
Page 23: Display
PowerPak Power Distribution Unit Target IP / Domain name: Enter the IP or domain name to use for the ping test. • Start: Click to start the text. • Display OLED display: Select to enable the OLED display . • OLED contrast: Set the OLED contrast to 25, 50, 75, or 100. - Page 24 PowerPak Power Distribution Unit The BakPak cloud login page opens. 2. If you already have a BakPak account, enter your credentials here, then click the arrow to log in. If you do not have a BakPak account, click Create Admin Account and follow the on-screen instructions to set up your account.
- Page 25 PowerPak Power Distribution Unit Manage the PowerPak from a BakPak account After you log in to your BakPak account, you can manage your PowerPak remotely. To manage your PowerPak through BakPak: 1. Log in to BakPak and select the site that contains the PowerPak. 2.
-
Page 26: Troubleshooting
PowerPak Power Distribution Unit Troubleshooting Symptom Possible causes Solution Press power button on front of the PowerPak. PowerPak is not turned on. If the PowerPak is connected to wall outlet PowerPak has no controlled by a light switch, make sure the power. -
Page 27: Specifications
PowerPak specifications PowerPak 9: Input: 100-120VAC, 50~60Hz, 12A Input voltage/current PowerPak 8I: Input: 100-240VAC, 50~60Hz, 10A PowerPak 9: Output: 100-120VAC, 12A total and per outlet, 50~60Hz, 1440W (total) Output voltage/current PowerPak 8I: Output: 100-240VAC, 10A total and per outlet, 50~60Hz, 2400W (total) - Page 28 Visit Us At: www.pakedge.com Copyright ©2018, Control4 Corporation. All rights reserved. Control4, Pakedge, Triad, and their logos are registered trademarks or trademarks of Control4 Corporation in the United States and/or other countries. 4Store, 4Sight, Control4 My Home, Mockupancy, and BakPak are also registered trademarks or trademarks of Control4 Corporation.
Need help?
Do you have a question about the PowerPak 9 and is the answer not in the manual?
Questions and answers