Table of Contents
Advertisement
Quick Links
.%3:' ,QVWDOODWLRQ DQG 2SHUDWLRQ 0DQXDO
5HY $
6XSSOHPHQWDO ,QIRUPDWLRQ
WARNING! Disconnect main power when making connections to the drive.
The following information and instructions are to be used as a supplement to the
KBPW-240D Installation and Operation Manual Rev. A (Part No. A40360). The manual
must be read and understood before attempting to operate this control.
The PC board has been upgraded to include provision for normally open or normally
closed stop contacts and to connect an Enable switch. The General Performance
Specifications have not changed.
Jumper J6 (Stop Switch type "NO" or "NC" Selection) and Jumper J7 (Enable
Selection) have been added. Enable terminals have been added to Terminal Block
TB3. Also, Figures 7A and 10A have been added.
&KDQJHV WR 7DEOH RI &RQWHQWV RQ 3DJH LL
Figure
7A
Remote 3-Wire Start/Stop Switch with Normally Closed Stop Contact ..................8
10A Enable Switch Connection .....................................................................................9
KB Electronics, Inc.
G. Remote Start/Stop Switch Connections
The control is supplied with a prewired Start/Stop Switch with a normally open "NO"
stop contact. Jumper J6 is factory set to the "NO" position.
For remote 3-wire Start/Stop Switch with a normally closed "NC" stop contact, connect
the switch as shown in Figure 7A, below. Set Jumper J6 to the "NC" position.
Page
K. Enable Connection
Wire the Enable contact to Terminals "EN1" and "EN2" of Terminal Block TB3 as
shown in Figure 10A, below.
The Enable is used to electronically start and stop the control. When the Enable
contact is closed, the control will accelerate to the Main Speed Potentiometer setting.
When the Enable contact is opened, the control will coast to stop.
Note: The contact must be isolated from the AC line and Jumper J7 must be removed.
Page 1 of 2
&KDQJHV WR :LULQJ 6HFWLRQ ,,,* RQ 3DJH
Figure 7A
Remote 3-Wire Start/Stop Switch
with Normally Closed Stop Contact
START
STOP
&KDQJHV WR :LULQJ 6HFWLRQ ,,,. RQ 3DJH
Figure 10A
Enable Switch Connection
ENABLE SWITCH
(A42140) - Rev. A00 - 3/22/2005 - Z3570A00
Page 2 of 2
Advertisement
Table of Contents

Related Manuals for KB Electronics KBPW-240D


Summary of Contents for KB Electronics KBPW-240D
- Page 1 The following information and instructions are to be used as a supplement to the Remote 3-Wire Start/Stop Switch KBPW-240D Installation and Operation Manual Rev. A (Part No. A40360). The manual with Normally Closed Stop Contact must be read and understood before attempting to operate this control.
- Page 2 The information contained in this manual is intended to be accurate. However, the manufacturer retains the right to make changes in design which may not be included herein. ™ A COMPLETE LINE OF MOTOR DRIVES © 2000 KB Electronics, Inc.
-
Page 3: Table Of Contents
TABLE OF CONTENTS Section Page Safety Warning ............1 Introduction . -
Page 4: Safety Warning
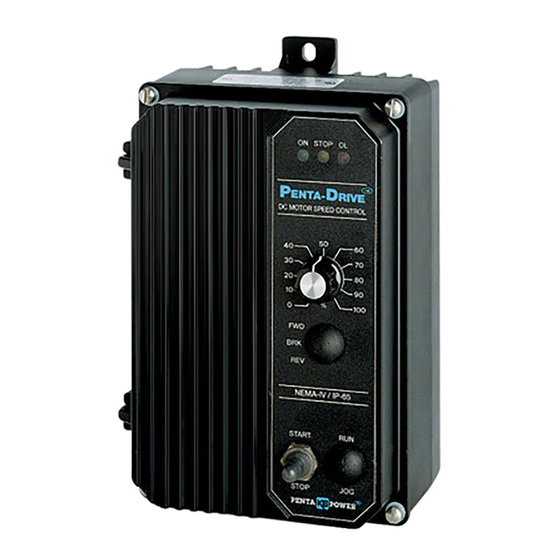
The KBPW-240D is manufactured with surface mount components incorporating advanced circuitry and technology. The KBPW-240D is a Pulse Width Modulated (PWM) control in a NEMA-4X / IP-65 watertight and washdown enclosure designed to operate PWM and SCR rated Permanent Magnet and Shunt Wound motors ranging from 0.2 Amps DC to 7.5 Amps DC. -
Page 5: Simplified Operating Instructions
Optional accessories include On/Off AC Line Switch, FWD-BRK-REV Switch, Run-Stop-Jog Switch, Signal Isolator, and Anti-Plug Reversing Module. Quick-connect terminals are pro- vided for easy installation of all optional accessories. The control is available in black finish (P/N 8401) and FDA approved white finish (P/N 8402). STANDARD FEATURES •... -
Page 6: Electrical Ratings
D. Motor Current – Jumper J2 is factory set for 7.5 Amp motors. For lower current motors, set jumper J2 to the corresponding motor current as described in Section IVB, on page 9. Note: The factory setting for Current Limit is 150% of the nominal current setting (exam- ple: if jumper J2 is set to “5A”... -
Page 7: Control Layout
FIGURE 1 – CONTROL LAYOUT (Illustrates Factory Setting of Jumpers and Approximate Trimpot Settings) ACCEL DECEL KBPW 240D START/STOP SWITCH A57440 CON1 TCL NTCL INH1 STOP INH2 WHITE START BLACK LED BOARD STOP VIOLET NC NO ORANGE WHITE MAIN SPEED POTENTIOMETER 180V AMPS... -
Page 8: Mechanical Specifications
FIGURE 2 – MECHANICAL SPECIFICATIONS (INCHES / [mm]) -
Page 9: Iii. Wiring Instructions
III. WIRING INSTRUCTIONS Warning! Read Safety Warning, FIGURE 3 – POWER CONNECTION on page 1, before using this control. Disconnect the AC line before wiring. Note: To avoid erratic operation, do not bundle AC line and motor wires with wires from signal following, start/stop switch, inhibit, or any other signal wires. -
Page 10: Field Connection (Shunt Wound Motors Only)
operation (230 Volt AC line input with 90 FIGURE 4 – FULL VOLTAGE FIELD Volt DC SCR rated motor or 130 Volt DC PWM rated motor) set jumper J1 to “90V” position. However, in step-down operation the motor may have reduced brush life - consult motor manufacturer. -
Page 11: Remote Start/Stop Switch
G. Remote Start/Stop Switch Connections – The control is supplied with a prewired Start/Stop switch mounted on the front cover. To operate the control from a remote Start/Stop switch (type: (ON)-OFF-ON, SPDT), remove the white, black, and red wires from START, COM, and STOP terminals, FIGURE 7 –... -
Page 12: Iv. Setting Selectable Jumpers
DC TACH-GENERATOR IR trimpot should be set fully counter- clockwise. IV. SETTING SELECTABLE JUMPERS The KBPW-240D has customer selectable jumpers which must be set before the con- trol can be used. See Figure 1, on page 4 for location of jumpers. -
Page 13: Setting Motor Current (Scr & Pwm Motor Horsepower Ratings)
For motors of lower amper- FIGURE 14 – REMOVING RESISTOR R35 age, set jumper J2 to the cor- TO REMOVE RESISTOR R35 responding position for the CUT THE LEADS HERE motor being used. Figure 13 on page 9 and BLU BLU WHT WHT Table 5. -
Page 14: Mounting Instructions
J5 to “NC” posi- tion. See Figure 18, on page 12. MOUNTING INSTRUCTIONS Warning! The KBPW-240D is not designed to be used in an explosion-proof application. DC TACH-GENERATOR It is recommended that the control be mounted verti- cally on a flat surface with adequate ventilation. -
Page 15: Operation
VIII. TRIMPOT ADJUSTMENTS The KBPW-240D contains trimpots, which are factory set for most applications. Figure 1, on page 4, illustrates the location of the trimpots and their approximate calibrated positions. Some applications may require readjustment of the trimpots in order to tailor the control for a specific requirement. -
Page 16: Diagnostic Leds
IX. DIAGNOSTIC LEDs The KBPW-240D is designed with LEDs mounted on the front cover to display the control’s operational status. A. Power On (ON) – The ON LED will illuminate green when the AC line is applied to the control. -
Page 17: Optional Accessories
(jumper J3 set to “TCL” position). The control can be reset by either setting the start/stop switch to “START” position or by disconnecting and reconnecting the AC line. If the over- load condition still exists when the control is restarted or AC line reapplied, the OL LED will illuminate again. -
Page 18: Xi. Limited Warranty
XI. LIMITED WARRANTY For a period of 18 months from the date of original purchase, KB Electronics, Inc. will repair or replace, without charge, devices which our examination proves to be defective in material or workmanship. This warranty is valid if the unit has not been tampered with by unauthorized persons, misused, abused, or improperly installed and has been used in accordance with the instructions and/or ratings supplied.
Need help?
Do you have a question about the KBPW-240D and is the answer not in the manual?
Questions and answers