Advertisement
Quick Links
Cover
FLEXCO ELEVATE™ Belt Cleaner i3
Installation, Operation and Maintenance Manual
https://flexcoonline.sharepoint.com/:f:/s/IoT1.0/EvdUR8HtYw5KtxR_u0mMS0gBypU8I4soIGR2P
MBNg63cqw?e=FkZW5d
For product models 91600, 91601, 91602
Product Registration
Device Number:
Purchase Date:
Purchased From:
Installation Date:
Installation Location, Conveyor #:
The device name is found in the mobile application when Bluetooth® wireless communication
connected to the device.
This information will be helpful for any future inquiries or questions about device replacement
parts, specifications or troubleshooting.
Table of Contents
image source location for MarCom:
3 separate IOMs for each region
Unique country item code
Unique certifications
Australian & global version
English spellings and syntax
Advertisement

Related Manuals for Flexco ELEVATE i3

Summary of Contents for Flexco ELEVATE i3
-
Page 1: Table Of Contents
3 separate IOMs for each region Unique country item code Unique certifications Cover Australian & global version FLEXCO ELEVATE™ Belt Cleaner i3 English spellings and syntax Installation, Operation and Maintenance Manual image source location for MarCom: https://flexcoonline.sharepoint.com/:f:/s/IoT1.0/EvdUR8HtYw5KtxR_u0mMS0gBypU8I4soIGR2P MBNg63cqw?e=FkZW5d ... -
Page 2: Important Information
Section 1 – Important Information 1.1 General Introduction We at Flexco are very pleased that you have selected a FLEXCO ELEVATE™ Belt Cleaner i3 device for your conveyor system. This manual will help you to understand the installation, operation and maintenance of this product and assist you in making it work up to its maximum efficiency over its lifetime of service. -
Page 3: User Benefits
Customer Service: USA & Canada 1-800-541-8028, UK 44-1274-600-942, Australia 61-2-8818- 2000 Visit www.flexco.com for other Flexco locations and products. Please read this manual thoroughly and pass it on to any others who will be directly responsible for installation, operation and maintenance of this device and its tools. While we have tried to... -
Page 4: Safety Consideration And Precautions
2.2 Equipment Shipping Shipping of devices and spare batteries must be performed by an authorized shipper. Flexco and its manufacturing partners are authorized to ship devices and batteries. To become an authorized shipper, please reference your region’s compliance requirements to pursue appropriate training. - Page 5 Please consult with your country’s environmental or recycling services governing body for more information and recycling locations. Any used batteries may be returned to a Flexco facility. The following regions may wish to consider these sources to identify a recycling location: o US and Canadian customers: Retriev Technologies https://www.retrievtech.com...
- Page 6 3.3 Mobile Application Setup The mobile application setup process will be initiated and managed by Flexco. Flexco will request email addresses for authorized application users, and each mobile application user will receive a unique download link with setup instructions.
- Page 7 The extender may require assembly. Customers that have applications using Wi-Fi® must contact their service partner or Flexco customer service for setup procedures. Section 4 – Installation Instructions – BRAND NAME...
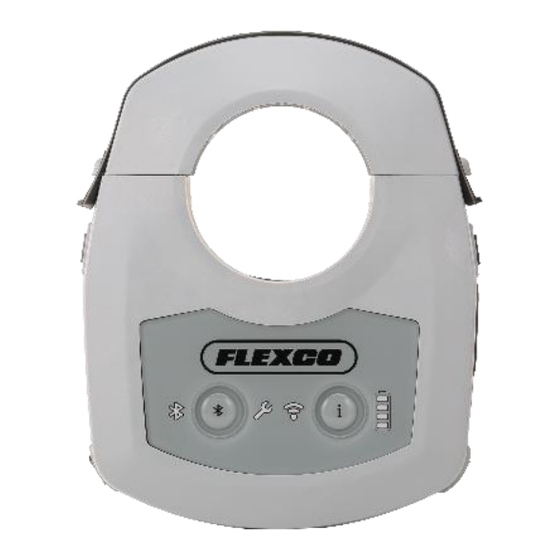
- Page 8 image source location for MarCom: https://flexcoonline.sharepoint.com/:f:/s/IoT1.0/EvdUR8HtYw5KtxR_u0mMS0gBypU8I4soIGR2PMBNg6 3cqw?e=FkZW5d 1. Rubber boot on top cap protects screws 2. Rubber covers on the back panel protects screws and power switch 3. Back panel: Power switch 4. Back panel: regulatory information label 5. Keypad: Bluetooth® wireless communication connectivity button 6.
- Page 9 Belt speed reader Conveyor Site Preparation: o Identify where the device will be installed The device requires 3-1/2” (90mm) of clearance on the pole Placement outside OR inside the tensioner on the pole is acceptable, but it is advised to add a pole extender to the pole before placing the device inside a tensioner ...
- Page 10 Caption: Device mounted facing forward on the pole Caption: Device mounted facing forward inside the tensioner b. If using a pole adapter (replacement part 91597) or pole extender (replacement part 91595 or 91596), then affix the device so the body clamps only to the adapter or extender. The device body cannot sit half on a pole extender and half on the cleaner pole.
- Page 11 d. Maintain an equal gap between the device body and the top on each side of the pole. Caption: equal space between device body and top cap on either side of the pole e. Place the rubber boot over the screw heads when finished. Replace the rubber pole end cap.
- Page 12 e. All available devices within range (approximately 10 meters) will appear on the screen. Connect to the appropriate device. i. The application will automatically find the device as long as the LED light on the device is blinking blue. ii. The device name is predefined by the manufacturer. This name is only used to identify the device for Bluetooth®...
- Page 13 g. Tap the “Return to Home” button, and the mobile application will now give you the option to enter cleaner profile information or disconnect from the device. 4. Enter conveyor and cleaner information. a. In the mobile application, tap the “Conveyor Information” button. b.
- Page 14 1601-1800 fpm 1801-2000 fpm >2000 fpm Material Conveyed Coal Sand & Gravel Iron Ore Limestone Cement Clinker Copper Silver Nickel Platinum Asphalt Granite Wood Sugar Metal/Recycling Glass Tonnage 0 tons/hour 0-100 tons/hour 101-200 tons/hour 201-300 tons/hour 301-400 tons/hour 401-500 tons/hour 501-600 tons/hour 601-700 tons/hour 701-800 tons/hour...
- Page 15 Material Path -2 in 0 in 4 in 6 in 8 in 10 in 12 in 14 in Cleaner Position Precleaner 1 Precleaner 2 Secondary 1 Secondary 2 Secondary 3 Secondary 4 Basic Cleaner Type* EZP1 *cleaner type determined by EZS2 the cushions used H-type...
- Page 16 ATEX/FRAS Urethane (Blue) Drywipe Urethane (Black) C-tip V-tip V-tip Protected Carbide Belt Width 12 in / 300 mm 16 in / 400 mm 18 in / 450 mm 20 in / 500 mm 24 in / 600 mm 26 in / 650 mm 30 in / 750 mm 32 in / 800 mm 36 in / 900 mm...
- Page 17 Section 5 – Dashboard Setup The dashboard account creation process will be initiated and managed by Flexco. Flexco will request email addresses for authorized dashboard users, and each user will receive a unique invitation email with account setup instructions.
- Page 18 Use the dashboard to remotely monitor the status of the device and the cleaner. 6.2 Battery Replacement Batteries must be routinely replaced to power the device. Battery life is highly dependent on the temperature and can range between 3 months to 12 months with Flexco recommended configuration.
- Page 19 Leave the replacement battery in its original packaging until ready to use. Please reference the battery storage guidelines (section 2.3). Only use replacement batteries supplied by Flexco. Keep batteries in original packaging until ready to replace. Remove the device. Completely remove the device from the cleaner to change the battery. DO NOT attempt to open the back panel of the device while the device is attached to the cleaner.
- Page 20 Replace the battery. Unpackage the spare battery. Clip the lead into the appropriate terminal. Wait. Once the battery is plugged in, wait at least 30 seconds before powering on the device. Failure to wait may result in a false, low-battery warning. ...
- Page 21 6.4 Remote Device Software Updates On occasion, Flexco will push software updates to the device for bug fixes, security enhancements or feature upgrades. No action is necessary by the customer, nor will the updates interrupt the feed of insights to the online dashboard.
- Page 22 2. Full product serial number found inside the device cavity and under the battery pack. 3. Unique product look-up number on a sticker at the bottom of the device and below the barcode. 7.1 Device LED Alerts LIGHT / ALERT LIGHT COLOR &...
- Page 23 Green Green battery LED indicates approximate remaining battery life. The LED will display 2, 3 or 4 green bars. Battery LED Critical battery state. At this stage, the device will only have enough power to light the LED and establish a Bluetooth® wireless communication connection.
- Page 24 7.2 Device Troubleshooting As a possible solution, replacing parts or entire devices may be the outcome. Contact your service partner or local Flexco representative for warranty information. PROBLEM POSSIBLE CAUSE POSSIBLE SOLUTION...
- Page 25 Device will not power on Missing or dead battery Replace battery (replacement part 91605) Malfunctioning LEDs Press the Bluetooth® wireless communication button (left button) on the device and attempt to connect to the device with the mobile application. If the connection is successful, then the LEDs may be malfunctioning, but the functionality of the device is not...
- Page 26 Make sure your Bluetooth® wireless communication is enabled. Try connecting the smartphone to another Bluetooth® wireless communication enable device (headphones, car, etc.). Try connecting to a different device. If issues persist, then call Flexco customer service.
- Page 27 If issues persist, then call Flexco customer service. Cannot save conveyor and All required fields not Fill in all required fields cleaner information completed...
- Page 28 https://www.att.com/outages/. Telstra: https://outages.telstra.com.au/. Cannot access the dashboard No permission Contact the authorized representative from your company to approve you for access to the dashboard Incompatible browser While any browser can be used, the online dashboard is optimized for Google Chrome. Due to the rapid updates and expansion of available browsers across the globe, the online...
- Page 29 Regulatory: FCC (item #91600 US); RCM (device #91602 Australia); CE, ISED (item #91601 global) Certifications, Standards: IP66, RoHS (all device models) Explosive Environments: MSHA coming spring 2020 (item #91600 US); IECEx (device #91602 Australia); ATEX coming winter 2019 (item #91601 global) 8.2 Digital Tools Specifications ...
- Page 30 91607 DVCR-CLR-TC3 Cleaner device top cap screw pack (4 screws, 4 washers) Cleaner device top cap kit* (incl. top cap & 1 ea. Items 4, 5) 91608 DVCR-CLR-TC1 Cleaner device 2-3/8", 60mm pole adapter (1 ea.) 91597 DVCR-CLR-ADT 91595 DVCR-CLR-EXT Cleaner device 73mm pole extender* (1 ea.) 91596 DVCR-CLR-EXT6...
- Page 31 Flexco will upon its discretion, use commercially reasonable efforts to remedy the issue as requested and described by the client. The Warranty does NOT apply to damages due to improper use or normal wear. Flexco makes no representation of any kind that the software or system will be provided error-free, virus-free, or uninterrupted.
- Page 32 Connect the equipment into an outlet on a circuit different from that to which the receiver is connected. Consult the dealer or an experienced radio/TV technician for help. 11.2 Europe and Canada (device #91601) EU Regulatory Statements Hereby, Flexible Lacing Company declares that the radio equipment type [TBD] is in compliance with Directive 2014/53/EU.
- Page 33 Section 12 – Other Flexco Cleaner Replacement Parts Flexco provides many conveyor products and replacement parts that help your conveyors to run more efficiently and safely. Here is a quick overview of replacement cleaner blades and tips that your BRAND NAME device may be monitoring: ...
- Page 34 Carbide replacement tips for EZS2, P-Type, R-Type, FMS and MHS secondary cleaners o Impact resistant tungsten carbide tips for mechanically fastened belts Other applications o Flexco provides replacement blades, tips and cartridges for all cleaners o Accommodate tight spaces, high temperatures, reversing belts, food grade applications, non-Flexco cleaners and more...
Need help?
Do you have a question about the ELEVATE i3 and is the answer not in the manual?
Questions and answers