Table of Contents
Advertisement
Quick Links
Advertisement
Table of Contents

Related Manuals for TESTO 550i


Summary of Contents for TESTO 550i
- Page 1 550i - digital manifold Instruction manual...
-
Page 3: Table Of Contents
Contents Contents About this document ................5 Safety and disposal ................5 Product-specific approvals ..............5 Product-specific information............... 6 Use ......................6 Product description ................7 First steps ..................... 8 Inserting (rechargeable) batteries ............... 8 Switching the instrument on and off ..............8 Switching the instrument on .................. - Page 4 Help and Information ..................34 Instrument information ..................... 34 8.9.1 Tutorial ........................34 8.9.2 Exclusion of liability ....................34 8.9.3 testo DataControl archiving software ..............35 8.10 System requirements ....................35 8.10.1 Operating system ........................35 8.10.1.1 PC ............................35 8.10.1.2...
-
Page 5: About This Document
Control keys of the instrument or buttons of the program interface. 2 Safety and disposal Take the testo information document into account (accompanies the product). 3 Product-specific approvals Please find the current country approvals in the attached Approval and Certification document. -
Page 6: Product-Specific Information
5 Use testo 550i is a fully digital, highly reliable app-based manifold for digitally adept AC/R technicians. Equipped with a 2-way valve block, the testo 550i helps AC/R technicians to save time with quick and easy measurements, results and digital documentation. -
Page 7: Product Description
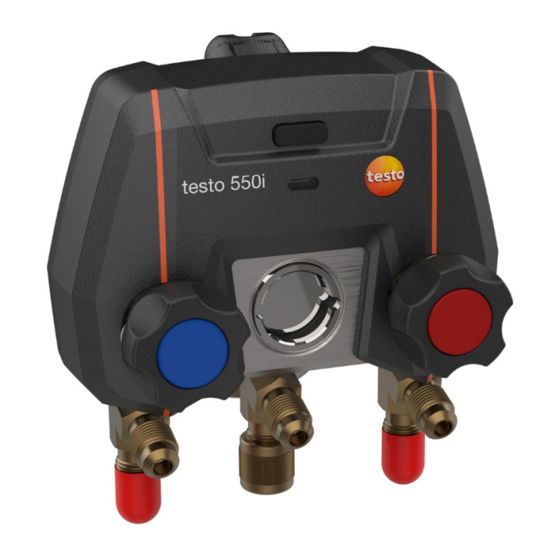
6 Product description 6 Product description 1 Hinged suspension hook (on rear) 2 Battery compartment and mini USB connection in battery compartment (on rear) 3 Sight glass for refrigerant flow 4 On/off button 5 LED display 6 2 x valve positioner 7 3 x hose bracket for refrigerant 8 3 x connections 7/16"... -
Page 8: First Steps
7 First steps 7 First steps Inserting (rechargeable) batteries Unfold the suspension hook and open the battery compartment (clip lock). Insert the batteries (in scope of delivery) or rechargeable batteries (3 x AAA/micro/R03) in the battery compartment. Observe the polarity! Close the battery compartment. -
Page 9: Bluetooth
7 First steps Bluetooth ® The testo 550i features the option of connecting to the testo Smart App. The App enables connection of other Bluetooth probes needed for the ® measurement. Compatible probes 7.4.1 Order no. Designation 0560 2115 02... - Page 10 7 First steps Open the App. The LED indicator flashes green as soon as the testo 550i is connected to the tablet or smartphone via Bluetooth ®...
-
Page 11: Using The Product
8 Using the product 8 Using the product Preparing for measurement Operating the valve positioners 8.1.1 WARNING Risk of injury caused by refrigerant that is at high pressure, hot, cold, or poisonous! > Wear protective goggles and safety gloves. > Before applying pressure to the measuring instrument: Always fasten the measuring instrument on the suspension hook to prevent it from falling down (danger of breakage) >... -
Page 12: Measuring Mode
Measuring mode 8.1.2 testo 550i automatically detects the pressure difference between the low- pressure and high-pressure sides. If the measured pressure on the low pressure side is 1 bar higher than on the high pressure side, a dialogue appears and the display can be changed accordingly. - Page 13 8 Using the product...
-
Page 14: Main Menu
8 Using the product Further symbols on the user interface (without numbering) One level back Exit view Share report Search Favorite Delete Further information Display report Multiple selection Main menu Main menu can be accessed via the icon at top left. To exit the main menu, select a menu or right-click on the guided menus. -
Page 15: Measurement Programs
Share measurement data/reports Display report Search Edit Favorite Measurement programs The testo 550i has permanently installed measurement programs. These enable the user to carry out convenient configuration and implementation of specific measuring tasks. The testo 550i offers the following Measurement programs: Basic view Volume flow –... -
Page 16: Graphic View
8 Using the product In all application menus, apart from the volume flow measurement, there are three different screens for the measurement - Live (or also Basic view), Graphic and Table. Graphic view 8.4.1.1 In the Graphic view, the values for a maximum 4 channels can be displayed simultaneously in a chronological trend graph. -
Page 17: Refrigeration
• Condensation pressure: Subcooling Δtcu/SC • The testo 115i clamp thermometer is used for the measurement. An NTC temperature sensor (accessory) must be connected for measuring the pipe temperature and for automatic calculation of superheating and subcooling. Testo Smart Probes (e.g. testo 115i) can... - Page 18 > For your own safety, return the measuring instrument to the Testo Customer Service for technical inspection. > Therefore, always replace the refrigerant hoses with new ones after the measuring instrument is dropped or after any comparable mechanical stress.
- Page 19 8 Using the product Make the required settings. Click on Apply Configuration. Set refrigerant.
- Page 20 8 Using the product You have the option of setting up favorite refrigerants in the App. These then appear at the beginning of the refrigerant list. To do this, click on the asterisk next to the refrigerant in the refrigerant list (App).
-
Page 21: Target Superheat
Target superheat 8.4.3 This feature allows the testo 550i manifold to calculate the target superheat in conjunction with the App and additional testo 605i Smart Probes. This application can only be used for split air conditioning systems/heat pumps with a fixed expansion valve. - Page 22 8 Using the product Make the required settings. Click on Apply Configuration. Set refrigerant.
-
Page 23: Pressure Leak Testing
They must be positioned as far as possible to measure the air temperature. The 550i, 550s or 557s manifold is used to perform the measurement. Click on Measure. Click on Pressure leak test. - Page 24 8 Using the product Make the required settings. Click on Apply Configuration. Start the measurement once pressure has been achieved. Once pressure has been reached, press start to enable the Pressure leak test. This will begin the test and the clock. Click on Start.
-
Page 25: Evacuation
Click on Evacuation. The Evacuation measurement menu opens. Click on Configuration menu opens. To have an accurate reading in microns, the testo 552i Smart Probe is recommended for this measurement. Please connect the smart probe to the app. - Page 26 8 Using the product Make the required settings. Click on Apply Configuration by setting the maximum decay target and evacuation target. Click on Start. The measurement starts. The graph will not begin until the refrigeration circuit reaches 1500 microns. The timer will run once start is pressed. Begin timing once evacuation target is reached.
-
Page 27: Customer
8 Using the product Values currently being measured are displayed. Measured values can be saved or a new measurement can be started. Customer In the Customer menu, all customer and measuring site information can be created, edited and deleted. Fields marked with * are mandatory. Without any information in this field, no customers or measuring sites can be stored. -
Page 28: Creating And Editing Measuring Sites
8 Using the product It is recommended to create customers before measurements. Customers can be added later within the memory of the testo Smart App (section 8.6) Store all relevant customer data. Click on Save. The new customer was saved. -
Page 29: Memory
In the menu, you can call up all the measurements stored with the testo 550i, analyze them in detail and also create and save csv data and PDF reports. When clicking on a measurement, an overview of the measurement results is displayed. -
Page 30: Searching For And Deleting Measurement Results
8 Using the product Searching for and deleting measurement 8.6.1 results Memory In the menu, all stored measurements are sorted by date and time. Memory menu is open. Click on Search field with measurements opens. Enter the customer name or measuring site or date/time in the search field. -
Page 31: Information
8 Using the product Information 8.7.1 Information is stored for each probe. The App is connected to testo 550i. Click on Main menu opens. Click on Sensors. The Sensors menu opens. Click on one of the displayed probes. -
Page 32: Settings
8 Using the product Click on Main menu opens. Click on Sensors. The Sensors menu opens. Click on one of the displayed probes. Click on the Settings tab. Click on one of the displayed probes. Settings appear that can be changed if necessary. Settings Language 8.8.1... -
Page 33: Company Details
8 Using the product Click on the required settings and change if necessary. The required measurement settings are set. Exit Measurement settings. Company details 8.8.3 Click on Settings. The Settings menu opens. Click on Company details. A window with company details opens. Click on the required data and enter if necessary. -
Page 34: Help And Information
8 Using the product Help and Information Under Help and Information, you will find information about the testo 550i, and the tutorial can be called up and implemented. This also where legal information can be found. Instrument information 8.9.1 Help and Information. -
Page 35: Testo Datacontrol Archiving Software
Screen with a resolution of at least 800 x 600 pixels • 8.10.2 Procedure To transfer the data from the App to testo DataControl, both instruments must be in the same network. For example: A notebook with installed testo DataControl and a smartphone with installed testo Smart App are connected to the same WLAN. - Page 36 8 Using the product Open the testo DataControl archiving software on the PC. Select instrument. Click on An overview with available instruments opens. Select instrument. A safety notice is displayed.
- Page 37 8 Using the product Click on Transfer data to DataControl and delete from instrument. Data has been successfully transferred.
-
Page 38: Maintenance
9 Maintenance 9 Maintenance Calibration testo 550i is supplied with a factory calibration certificate as standard. Recalibration once every 12 months is recommended in many applications. This can be carried out by Testo Industrial Services (TIS) or other certified service providers. -
Page 39: Cleaning The Vacuum Probe
9 Maintenance Fold out the suspension hook, release the clip and remove the battery compartment lid. Remove the (rechargeable) batteries and insert new ones into the battery compartment (3 x type AAA / Micro / R03). Observe the polarity! Attach and close the battery compartment lid (the clip must click into place). -
Page 40: Technical Data
Auto off 10 minutes if activated, Bluetooth ® Bluetooth range Up to 490 ft (150 m) Directives, standards and EU Directive: 2014/30/EU tests You can find the EU declaration of conformity under the product-specific downloads on the Testo website: www.testo.com. - Page 41 R401C R422A R1270 R406A R426A R13B1 R407B R508A R407D R508B R142B R600 R152a R411A RIS89 R161 R412A SP22 R170 R413A Refrigerants will be updated as they are released. Check with the testo Smart App for the most up-to-date refrigerants available.
- Page 42 Testo SE & Co. KGaA Celsiusstraße 2 79822 Titisee-Neustadt Germany Telefon: +49 7653 681-0 E-Mail: info@testo.de Internet: www.testo.com 0970 5505 en-US 01...
Need help?
Do you have a question about the 550i and is the answer not in the manual?
Questions and answers