Table of Contents
Advertisement
Quick Links
Advertisement
Table of Contents

Subscribe to Our Youtube Channel
Related Manuals for VTech 5-in-1 Stroll & Grow Trike

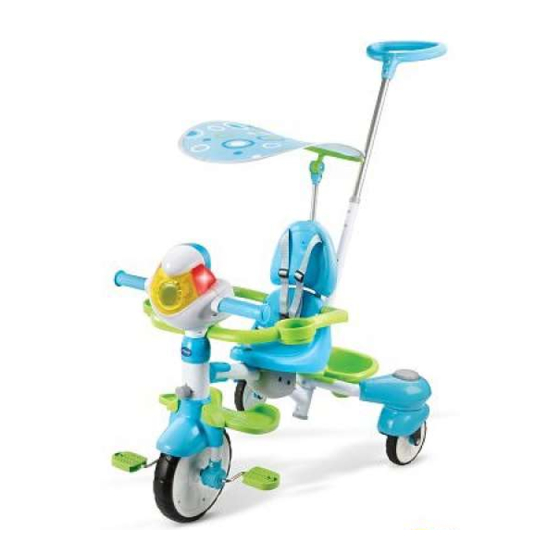
Summary of Contents for VTech 5-in-1 Stroll & Grow Trike
- Page 1 Parent’s Guide -1 Stroll & Grow Trike Months Years 91-003399-008...
- Page 3 INTRODUCTION Thank you for purchasing the VTech 5-in-1 Stroll & Grow Trike. ® Through interactive riding, your child can role-play and enjoy cheerful melodies and sing-along songs. With the interactive panel and four trike stage settings, your child will enjoy endless riding fun!
-
Page 4: Safety Warnings
SAFETY WARNINGS WARNING: All packing materials, such as tape, plastic sheets, packaging locks, removable tags, cable ties and packaging screws are not part of this toy, and should be discarded for your child’s safety. NOTE: Please keep this parent’s guide as it contains important information. All tape and cardboard are not part of this toy, and should be discarded for your child’s safety. -
Page 5: Getting Started
GETTING STARTED BATTERY INSTALLATION 1. Make sure the unit is turned OFF. 2. Use a screwdriver to loosen the screw and open the battery cover. 3. Install 2 new AA size (LR6/AM-3) batteries following the diagram inside the battery box. (The use of new alkaline batteries is recommended for maximum performance). -
Page 6: Included In This Package
INCLUDED IN THIS PACKAGE • One VTech 5-in-1 Stroll & Grow Trike ® • One parent’s guide P4 (x5) P3 (x2) P2 (x2) M x 2... -
Page 7: Assembly And Setup
ASSEMBLY AND SETUP For additional assistance, watch our assembly video at: www.vtech.co.uk/tutorials/5in1trike. INCLUDED HARDWARE REQUIRED TOOLS FOR ASSEMBLY T2 (x2) for D T3 (x3) for B,C T4 (x2) for J T1 (x1) (for G & C) T7 (x12) for F,N,K,T8 T8 (x2) (for I & A) T9 (X2) for B... - Page 8 T7 (x2) 5. Push the storage bin (F) into the 6. Next, screw them together, using 2 T7 screws. Then, set it aside. frame (C) until it’s secure. T2 (x2) STAGE 2,3 STAGE 4 STAGE 5 7. Align the opening of (D) with frame 8.
- Page 9 T7 (x4) 11. Then, screw them together using 12. Align the opening of frame (B) 4 T7 screws. with frame (A). T3 (x2) 13. Then, attach T9 to frame (B) with 14. Push the frame (C) into the frame 2 T3 screws and nuts. (B).
- Page 10 P2 (x1) P2 (x1) 17. Install the seat belts (P2) into the seat. P3 (x1) P3 (x1) 18. Install the seat belts (P3) into the removable seat back. T4 (x2) Push Bead 3 holes 19. Use a screwdriver to push the grey 20.
- Page 11 21. Push the push handle (G) down 22. Attach the push handle (G) and into the hole of frame (C). frame (C) together by inserting (T1). 23. To add the footrest to the trike, 24. Then, put the footrest (K) on top of first, make sure the front steering the trike frame.
- Page 12 27. Insert the wraparound safety bar 28. Please ON/OFF press (O) by snapping it to the front of BUTTON and turn the handlebars the trike under the interactive towards the right, then the 5-in-1 panel and into the grooves on the Stroll &...
- Page 13 STAGE 2 - STROLL 9+ Months Note: This is a rear wheel steering control stroller, always adjust the moving direction before pushing forward. STAGE 2,3 STAGE 4 STAGE 5 1. Turn the pedal lock 2. Move the seat to the 3.
- Page 14 STAGE 3 - TRAIN 12+ Months STAGE 2,3 STAGE 4 STAGE 5 1. Remove the wraparound safety bar. 2. Remove the footrest. 3. Make sure the front steering 4. Move the seat to the lock is in the lock position. stage 3 position by removing the screws, adjusting the position and then screwing...
- Page 15 STAGE 4 - RIDE 2-4 Years STAGE 2,3 STAGE 4 STAGE 5 1. Remove the height-adjustable push handle. Press Press 2. Remove the canopy and 3. Turn the pedal lock 4. Move the seat to the anticlockwise to lock the pedals. stage 4 position by removing the removable seat back.
- Page 16 STAGE 5 - DRIFT 4-6 Years STAGE 2,3 1. Move the seat to the stage 5 position by removing the screws, adjusting the STAGE 4 position and then screwing STAGE 5 the seat into position. 2. Make sure the pedal 3.
- Page 17 PRODUCT FEATURES 1. ON/OFF BUTTON 6. FOUR ROLE-PLAY BUTTONS To turn the unit ON, press Press the ROLE-PLAY the ON/OFF BUTTON. BUTTONS to hear Press the ON/OFF different phrases from BUTTON again to turn the each character. unit OFF. 7. LOCATION BUTTONS 2. MODE SELECTOR Press the LOCATION Slide the MODE BUTTONS to hear...
-
Page 18: Care And Maintenance
Keep your hands on the handlebars Make sure that your shoes are tied Safety first while you ride! TROUBLESHOOTING IMPORTANT NOTE: Creating and developing VTech products is ® If for some reason the program/activity stops accompanied by a responsibility that we take working or malfunctions, please follow these steps: very seriously. - Page 19 YEAR...
- Page 20 Visit our website for more information about our products, downloads, resources and more. www.vtech.co.uk TM & © 2017 VTech Holdings Limited. All rights reserved. Printed in China. 91-003399-008...
Need help?
Do you have a question about the 5-in-1 Stroll & Grow Trike and is the answer not in the manual?
Questions and answers