Advertisement
Available languages
Available languages
Quick Links
Advertisement

Related Manuals for Akiyama A3M


Summary of Contents for Akiyama A3M
- Page 1 WITH USB PLAYBACK/RECORD MANUAL DE USUARIO USER MANUAL...
- Page 2 ATENCIÓN PARA EVITAR RIESGO DE ELECTROCUCIÓN ASEGÚRESE DE QUE EN CASO DE NO USAR UNA CONEXIÓN AC CON TOMA DE TIERRA LOS CONECTORES DE TOMA DE TIERRA DEL ENCHUFE DEL MEZCLADOR NO QUEDEN EXPUESTOS. CAUTION Esta señal indica la presencia de lugares donde Esta señal indica la presencia de componentes ATENCIÓN: para reducir el riesgo de electrocución, no habiendo un elevado voltaje no presentan...
- Page 3 Nivel mínimo audible que los LED de saturación “CLIP” solo se iluminen ocasionalmente. Las etapas Akiyama AMP tienen un nivel de entrada nominal de 4 dBu (es un nivel de señal de 1,23 V RMS que corresponde al estándar de nivel de línea para uso profesional).
- Page 4 DRAWINGS / DIBUJOS Desenroscando los apoyos traseros podrá inclinar el mezclador.
-
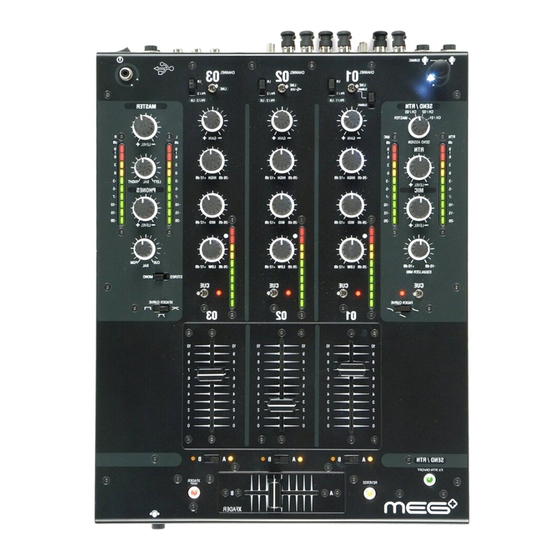
Page 5: Controles Y Funciones
Para mayor operatividad y agilidad del equipo, el componente SECCIÓN VCA CONTROLES Y FUNCIONES mecánico donde se localiza la función de Crossfader y de Fader de canal es reemplazable. Para reemplazar el Crossfader y/o el fader SECCIÓN CANALES Selector de curva de faders de canal: Mediante este de canal, desaloje los tornillos exteriores y retire la pieza;... -
Page 6: Panel De Conexiones
SECCIÓN MAIN MIC -MICRÓFONO PRINCIPAL- selección en el control Se dispone de una salida mediante conectores RCAestéreo. Conexión de grabación -REC- : Determina el nivel de la señal del micrófono Control de nivel de Micrófono principal: El nivel de dicha salida es fijado de modo que es algo inferior al nivel de salida estándar del mezclador. principal. - Page 7 ENVIO/RETORNO DE EFECTOS disponemos del control (24) y de la barra de LEDs (25) que nos ECUALIZACI N Ó permiten adaptar en nivel de entrada conforme a las En primer lugar vamos a analizar los conectores SEND y instrucciones dadas para optimizar el nivel de una señal RETURN de nuestro mezclador: Se dispone de un potente ecualizador por canal tipo Sallen utilizando el control de nivel y la barra de LEDs.
- Page 8 El control de ecualización por canal etiquetado MID modifica faders de canal respecto del desplazamiento del fader. En el realiza una súbita conmutación de un canal a otro. la señal de canal potenciando o decreciendo el nivel de la señal dibujo contiguo se representan dichas curvas donde podemos alrededor a un valor de frecuencia fija de ver como cambia la forma en que el fa...
- Page 9 Primero, utilizando el control (23), escogemos uno de los Canales o Master para ser enviado al módulo de efectos. A3M permite enviar Ch1, Ch2, Ch3 y Master. A4M permite enviar Ch1, Ch2, Ch3, Ch4 y Master. La señal escogida es enviada al módulo de efectos a través del conector Send. El módulo de efectos “colorea”...
- Page 10 ” B - Utilización del USB: 3. Seleccione “ SOUNDS &AUDIO DEVICES ” La conexión USB de los mezcladores A3M y A4M es compatible con 4. Seleccione “ AUDIO TAB ” cualquier programa de reproducción de audio & media “player”.
- Page 11 WARNING TO PREVENT FIRE OR SHOCK HAZARD. DO NOT USE THIS PLUG WITH AN EXTENSION CORD, RECEPTACLE OR OTHER OUTLET UNLESS THE BLADES CAN BE FULLY INSERTED TO PRESENT BLADE TO PREVENT FIRE OR SHOCK HAZARD. DO NOT EXPOSE THISAPPLIANCE TO RAIN OR MOISTURE. TO PRVENT ELECTRICAL SHOCK, MATCH WIDE BLADE PLUG TO WIDE SLOT FULLY INSERT. CAUTION The lightning flash with arrowhead symbol within the The exclamation point within the equilateral triangle is...
- Page 12 (saturation at mixer), it will be amplified. Naturally, that is bad. 15 min, Read me! Power amplifiers and loudspeakers: Current professional power amplifiers are quite reasonably Before unwrapping and starting the mixer there are a few thinks you should know… protected against signal deterioration and excessive levels and shortcuts.
- Page 13 DRAWINGS Unscrewing the feet you will be able to tilt forward the mixer.
-
Page 14: Controls And Functions
means of the Crossfader assign control. To be in-field replaceable, VCA SECTION CONTROLS AND FUNCTIONS this part is front-detachable. For replacement, switch off the unit and unscrew the outer screws of the plate and remove the part; CHANNELS SECTION Channel Faders curve selector: Sliding this 3 position detach the connector and replace the part. -
Page 15: Connections Panel
MAIN MIC SECTION POWER SUPPLY SECTION Microphone level: Sets the microphone level. POWER switch: Plug the AC adapter to the mixer and then to the Mains net. Press the ON The Microphone equalizer is especifically designed for human voice Microphone equalizer: switch and a some LEDs will light, another press and the mixer will be OFF as well as the LEDs. - Page 16 SEND/RETURN To set a proper entry level for Return signal we use control (24) HIGH for level setting and through monitoring LED (25) we adjust th correct level as see at introductory page. First we will have a look at the differnt connectors for Send and Return functions.
- Page 17 We can modify the level in a range from +12dB to -26dB. Bass equalizing control increases and decreases low level frequency signals. Range is from +12dB to -26dB . Typical low frequency signals are drums, sintetizers, bass and sometimes A3M case. vocals. Maximum FADER POSITION FADER POSITION FADER POSITION...
- Page 18 First, using control 2 , we choose a channel or Master to be Send to the external effects processor. ( 3) A3M allows for Ch1, Ch2, Ch3, Master andA4M allows for Ch1, Ch2, Ch3, Ch4, Master. Once a channel is selected is routed to the effects unit at once, providing some audio source is on playback at such channel.
- Page 19 USB TUTORIAL INTRODUCTION SYSTEM FOR PC CONNECTION AM mixers feature USB PORT ( ) to connect the mixer to 1. Turn on your computer & yourAM Mixer. PC/MAC with PLAYBACK & REC SOFTWARE 2. Connect the USB PORT 43 ( ) on your mixer to the port on your any Mac or PC USB (1.0 or greater) ports allowing the DJ to either computer via...
- Page 20 HOOK UP DIAGRAMS / GRAFICO DE CONEXIONES Jack connector for Mic Conector jack para Micrófono Earth connection for turntables Conexión a tierra para giradiscos DJ-1200 Professional Turntable Power Amplifier with RCA To recording unit Input connectors A unidad de grabación Amplificador de potencia con entradas RCA To secondary amplifier...
- Page 21 BLOCK DIAGRAM/DIAGRAMA DE BLOQUES A4M USB...
- Page 22 SPECIFICATIONS / ESPECIFICACIONES 1. POWER SOURCE / ALIMENTACIÓN: AC 12V, 2.0A 10. T.H.D (1KHz 0dB OUTPUT) / DISTORSIÓN HARMÓNICA (1KHz 0dB SALIDA) Master output Less than 0.05% (LOAD= 47K OHMS, 20-20KHz BPF) Salida Master Menos de 0.05% (CARGA= 47K OHMS, 20-20KHz BPF) 2.
- Page 23 C/ Praga nº11 . Pol. Ind. Cova Solera 08191 Rubí . Barcelona (SPAIN) www.akiyamadj.com info@akiyamadj.com...
Need help?
Do you have a question about the A3M and is the answer not in the manual?
Questions and answers